


9.0
79
Periodic Inspection
www.liko.com
Instructions for the check points
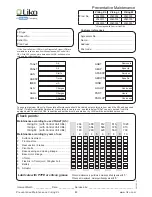
1 Product decal
- Verify presence of mast decal with model type and serial number.
9LVLEOHGDPDJHWRWKHOLIWVXUIDFH¿QLVK
- Check for scratches, dents, deformities or unusual surface wear.
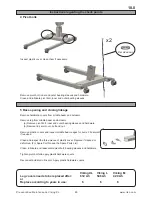
3 Castor wheels, forks and fork covers
5ROOWKHOLIWXQORDGHGDQGZLWKORDGDORQJWKHÀRRU&KHFNWRHQVXUHWKDWDOOFDVWRUVUROODQGWXUQIUHHO\
- Verify that the castor fasteners are tight. There should not be any play between the fork and the castor nut.
- Remove the front fork cover and inspect safety casing and bolt channel for cracks or fractures.
4 Castor brakes
- Lock the brakes. Make sure the wheels do not turn and the castor housing does not swivel when the lift is pushed.
5 Base covers
- Verify that the protective plastic covers are secure.
6 Base opening and closing linkage
- Inspect the linkage between legs and base motor. Make sure there is no cracks or deformations at the legs.
- Inspect the plastic protective cover shell for cracks, deformation or gaps.
- Open and close the base to maximum and minimum dimensions.
- Listen for particular noises and vibrations.
7 Base frame castor play and levelling
- Manually open and close legs at the front castors to measure wheel play. Base width wheel play should not
exceed 35mm / 1,38 Inch total.
8 Locking handles
- Loosen & re tighten locking handles. Verify that threads are not damaged or binding.
9 Lift arm hardware and covers
- With the lift in it’s lowest position, manually raise the lift arm. Verify that the shaft lowers and raises freely.
If the arm is binding, the mounting screw is to tight.
- Inspect the plastic protective cover shells for cracks, deformation or gaps.
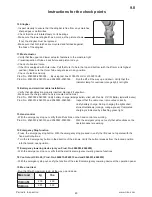
- Make sure the holes in the mast are not deformed on:
Product
Product No.
Up to S/N:
Viking XL
2040003
801 999
Viking L
2040004
7 200 795
Viking M
2040005
7 106 200
Verify that the diameter of the holes in the mast (where the arm
and mast is connected) is not bigger than 12 mm/0,47 inch,
It can be done by measuring the distance from cover hat, to top of
the“ear”. The length should be the same on each side (X¹=X²)±1 mm.
10 Flexlink to arm hardware and covers
:LWKWKHVOLQJEDUKDQJLQJLQLW¶VORZHVWSRVLWLRQPDQXDOO\UDLVHWKHVOLQJEDUDQGÀH[OLQNDUP
9HULI\WKDWWKHÀH[OLQNDUPORZHUVDQGUDLVHVIUHHO\,IWKHÀH[OLQNLVELQGLQJWKHVFUHZLVWRRWLJKW
- Inspect the plastic protective cover shells for cracks, deformation or gaps.
11 Flexlink to slingbar hardware and covers
:LWKWKHVOLQJEDUKDQJLQJLQLW¶VORZHVWSRVLWLRQPDQXDOO\SLYRWWKHVOLQJEDUVLGHWRVLGH9HULI\WKDWWKHÀH[OLQN
DUPORZHUVDQGUDLVHVIUHHO\,IWKHÀH[OLQNLVELQGLQJWKHPRXQWLQJVFUHZLVWRRWLJKW
- Verify that hardware covering plastic caps are secure.
,IQRDFFHVVRULHVLVDWWDFKHGYHULI\WKDWWKHVOLQJEDULVDVVHPEOHGGLUHFWO\WRWKHÀH[OLQN
X¹
X²
Summary of Contents for Viking XL 2040003
Page 12: ...12 www liko com...
Page 82: ...82 www liko com...
Page 90: ...90 www liko com...
Page 93: ...93 www liko com...
Page 94: ...Manufacturer Liko AB SE 975 92 Lule 6ZHGHQ LQIR OLNR VH www liko com...


