background image

LightmaXX 

LED DROP System 

Effect Backdrop Curtain 


____________


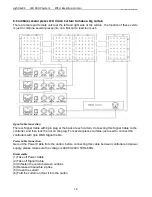
7. Kombination von mehreren LED DROP Vorhängen 


Bringen Sie die LED DROP Vorhänge fachgerecht an die gewünschten Positionen. 
 
Benutzen Sie schwer entflammbare Bänder oder Spannfix  
um die LED DROP Systeme an den Ringösen zu verbinden. 
 
Durch handelsübliche DMX 5 pol. Verlängerungskabel 
erreichen Sie eine größere Distanzen zwischen Controller und LED DROP Vorhang . 

Verkabeln Sie das System nach dem Schema wie auf dem Bild unten 


Demontage und Transportgerechte Verpackung 

(1) Schalten Sie den LED DROP Controller aus und Trennen hn vom Stromnetz 

(2) Lösen Sie alle Signalverbindungen wie DMX und NC Vorhangverbindung 

(3) Lösen sie Ihre Montagevorrichtungen und nehmen den Vorhang ab. 

(4) Reinigen Sie den Vorhang gegebenenfalls 

(5) Falten Sie den Vorhang vorsichtig und legte sie in den Karton 

(6) Falten Sie den Vorhang immer so dass sich keine LED Platinen im Knick befinden  


Summary of Contents for LIG0010719-000 LED DROP I RGB 1x2m

Page 1: ...LED DROP III RGB 3x6m incl Controller Bag Sehr geehrter Kunde vielen Dank dass Sie sich für ein Produkt von LightmaXX entschieden haben In der folgenden Anleitung erhalten Sie wichtige Informationen über dieses Produkt sowie deren Eigenschaften und Funktionen Dear Customer Thank you for purchasing our product from LightmaXX To fully enjoy the benefits of this product Please read and understand the...

Page 2: ...tromnetz Verpackungsinhalt Zubehör Typen Seite 4 4 Montage und Befestigungsmöglichkeiten Seite 5 5 LED DROP Controller Anschlüsse Seite 6 6 Tastenbelegung Menü Optionen Führung Seite 7 7 Kombination von LED DROP Verpackung Transport Seite 8 8 Programmliste für Auto und Sound Modus Seite 9 9 DMX Kanalbelegung Seite 10 10 Wartung und LED Austausch __________ Seite 11 1 ...

Page 3: ...und darf ohne Einschränkungen auf öffentlichen Veranstaltungen eingesetzt werden Produktmerkmale DMX Kanäle 7 DMX Kanäle nach internationalem DMX512 Standard Lichtquelle SMD LED 3 in 1 RGB Longlife bis zu 100 000 Std LED Anzahl 30 Stk je m LED Pitch 180mm Abstrahlwinkel 120 Steuerung LED Controller mit Display und Menüführung Steuerungsmöglichkeiten DMX Auto Run Sound to Light SD Karten Playback A...

Page 4: ...D DROP Controller blockiert sind 9 Bitte tretten Sie niemals oder reißen am Stoff der LED DROP achten Sie immer auf die interne Kabelverbindung 10 Der elektrische Anschluss darf nur von qualifiziertem Fachpersonal durchgeführt werden 11 Stellen Sie sicher dass die Spannung und Frequenz der Stromversorgung entsprechen den Energiebedarf des Gerätes entspricht 12 Betreiben Sie den LED DROP ausschließ...

Page 5: ...al EU Kable UK Kable US Kable Belegung L Baun Rot Gelb Braun Phase N Blau Schwarz Grau Neutralleiter Gelb Grün Grün Grün Schutzleiter Hinweis Stellen Sie sicher dass der Schutzleiter richtig angeschlossen ist Verpackungsinhalt Zubehör 1x LED DROP Vorhang 1x LED DROP Controller 1x SD Karte inkl 30 Programmen 1x IEC Schuko Kaltgeräte Netzkabel 1x Bedienungsanleitung 3 5x Ersatz LEDs je nach Größe de...

Page 6: ...läche zu erhalten Verwenden Sie zur Montage die dafür vorgesehenen Ringösen um den LED DROP aufzuhängen oder mit weiteren zu verbinden Bitte beachten Sie das die beiliegenden Mehrweg Kabelbinder nicht in allen Regionen als zulässiges Montagematerial gelten Erkundigen Sie sich welche Montage in Ihrere Region zulässig ist Benutzen Sie im Zweifelsfall handelsübliche Spannfix für Molton Produktübersic...

Page 7: ...LightmaXX LED DROP System Effect Backdrop Curtain ____________ 5 LED DROP Controller LED DROP Controller Anschlüsse 6 ...

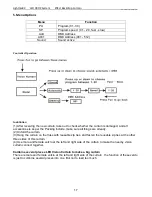
Page 8: ...und speichern UP Aufwärts durch die Funktionen scrollen DOWN Abwärts durch die Funktionen scrollen Controller Menü Optionen Menu Function Program Programme 01 30 Speed Programm Tempo 01 20 Schnell Langsam DMX512 DMX Modus EIN AUS A001 DMX Addresse 001 512 Sound Sound to Light EIN AUS Automatic Automatik Modus EIn AUS Version Aktuelle Firmware Version Controller Menü Führung 7 ...

Page 9: ...e größere Distanzen zwischen Controller und LED DROP Vorhang Verkabeln Sie das System nach dem Schema wie auf dem Bild unten Demontage und Transportgerechte Verpackung 1 Schalten Sie den LED DROP Controller aus und Trennen hn vom Stromnetz 2 Lösen Sie alle Signalverbindungen wie DMX und NC Vorhangverbindung 3 Lösen sie Ihre Montagevorrichtungen und nehmen den Vorhang ab 4 Reinigen Sie den Vorhang ...

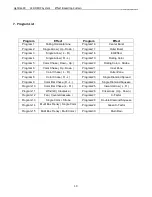
Page 10: ...olling Color Strobe Program 6 Color Chase Up Down Program21 Inner Zone Program 7 Color Chase L R Program22 Outer Zone Program 8 Color Chase R L Program23 Single Diamond Spread Program 9 Color Bar Chase R L Program24 Single Diamond Squeeze Program 10 Color Bar Chase L R Program25 Inward Arrow L R Program 11 Windmill Clockwise Program26 Crisscross Up Down Program 12 Fan Counterclockwise Program27 X ...

Page 11: ... 255 CH 6 Autoprogramme 1 15 0 15 OFF 1 16 31 6 96 111 11 176 191 2 32 47 7 112 127 12 192 207 3 48 63 8 128 143 13 208 223 4 64 79 9 144 159 14 224 239 5 80 95 10 160 175 15 240 255 CH 7 Autoprogramme 16 30 0 15 OFF 16 16 31 21 96 111 26 176 191 17 32 47 22 112 127 27 192 207 18 48 63 23 128 143 28 208 223 19 64 79 24 144 159 29 224 239 20 80 95 25 160 175 30 240 255 CH 8 Geschwindigkeit 0 255 10...

Page 12: ...er LED Platine ab 5 Entfernen Sie den runden LED Halterahmen aus dem Vorhang 6 Entfernen Sie nun die defekte LED Platine 7 Schließen Sie die Ersatz LED Platine an Bitte beachten Sie die kleinen Markierungen und auf der Platine 8 Setzen Sie den runden LED Halterahmen in das Loch auf dem Vorhang 9 Schließen Sie das Netzkabel und das Signalkabel dann den Controller und testen Sie die Funktion der soe...

Page 13: ...ges Technical Parameters Page 14 3 Packing Content Installation Page 15 4 Controller Overview Page 16 5 Menu Options Controller Operation Page 17 6 Combination Installation several LED DROP Systems Page 18 7 Program List Page 19 8 DMX Channel Charts Page 20 9 Maintenance Replacement of LEDs Page 21 12 ...

Page 14: ...by qualified person 8 Make sure no ventilation slots are blocked 9 Prohibit trample and tear the curtain keep the internal cable connection in order 10 Electrical connection must be carried out by qualified person 11 Make sure the voltage and frequency of power supply match the power require of this device 12 Always connect this product to a grounded circuit to avoid the risk of electrocution 13 D...

Page 15: ...Ds 3 in 1 RGB and fire retardant velvet cloth 30 exciting patterns and support for 7 channels of DMX the curtain also comes equipped with a sound activation mode and the ability to choose and run your favorite program with a simple press of a button without a DMX 512 console 2 layers of smooth velvet sewn with wool Many grommets fitted on our industrial machines around the cloths Fitted with a sta...

Page 16: ...e The curtain is connected to the controller directly Size Color Leds Weight Packing Size H 1M X W 2M RGB 7 Colors 66pcs 3 6kgs 26X14X16cm H 2M X W 3M RGB 7 Colors 176pcs 7 5kgs 51X23X28cm H 3M X W 6M RGB 7 Colors 512pcs 17kgs 51X76X29cm Installation Curtains can be used by single or through combination to make a large led curtain Product Overview 1 LED Vision Curtain 15 ...

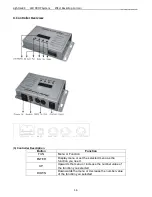
Page 17: ...ontroller Description Button Function FUN Menu or Function ENTER Display menu or set the selected menu as the function you need UP Upwards the menu or increase the number value of the function you selected DOWN Downwards the menu or decrease the number value of the function you selected 16 ...

Page 18: ...cking Include make sure all things are already 2 Unfold the curtain 3 Hang the curtain on the truss with reusable zip ties and fasten the reusable zip ties at the other three sides of this curtain 4 Use male and female velcro at the left and right side of the curtain to make the nearby vision curtain connect together Combine several pieces LED Vision Curtain to make a big curtain There are male an...

Page 19: ...ack of each curtain Connecting this Signal Cable to the controller and then lock the nut on the plug For several pieces curtains just need to connect the controllers with 3pin DMX Signal Cable Power Cable Connection Get out the Power Cable from the carton before connecting this cable between controller and power supply please make sure the voltage is AC90V 240V 50Hz 60Hz Disassembly 1 Take off Pow...

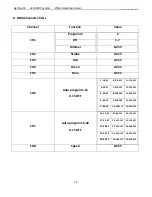
Page 20: ...rogram 6 Color Chase Up Down Program21 Inner Zone Program 7 Color Chase L R Program22 Outer Zone Program 8 Color Chase R L Program23 Single Diamond Spread Program 9 Color Bar Chase R L Program24 Single Diamond Squeeze Program 10 Color Bar Chase L R Program25 Inward Arrow L R Program 11 Windmill Clockwise Program26 Crisscross Up Down Program 12 Fan Counterclockwise Program27 X Factor Program 13 Sin...

Page 21: ... 5 Blue 0 255 CH 6 Auto program 1 15 0 15 OFF 1 16 31 6 96 111 11 176 191 2 32 47 7 112 127 12 192 207 3 48 63 8 128 143 13 208 223 4 64 79 9 144 159 14 224 239 5 80 95 10 160 175 15 240 255 CH 7 Auto program 16 30 0 15 OFF 16 16 31 21 96 111 26 176 191 17 32 47 22 112 127 27 192 207 18 48 63 23 128 143 28 208 223 19 64 79 24 144 159 29 224 239 20 80 95 25 160 175 30 240 255 CH 8 Speed 0 255 20 ...

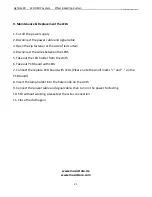
Page 22: ...ires between the LEDS 5 Take out the LED holder from the cloth 6 Take out PCB board with LEDs 7 Connect the replace PCB board with LEDs Please note the small marks and on the PCB board 8 Insert the lamp holder into the hole made on the cloth 9 Connect the power cable and signal cable then turn on the power for testing 10 Still without working please test the wires connection 11 Close the cloth aga...

Reviews: