background image


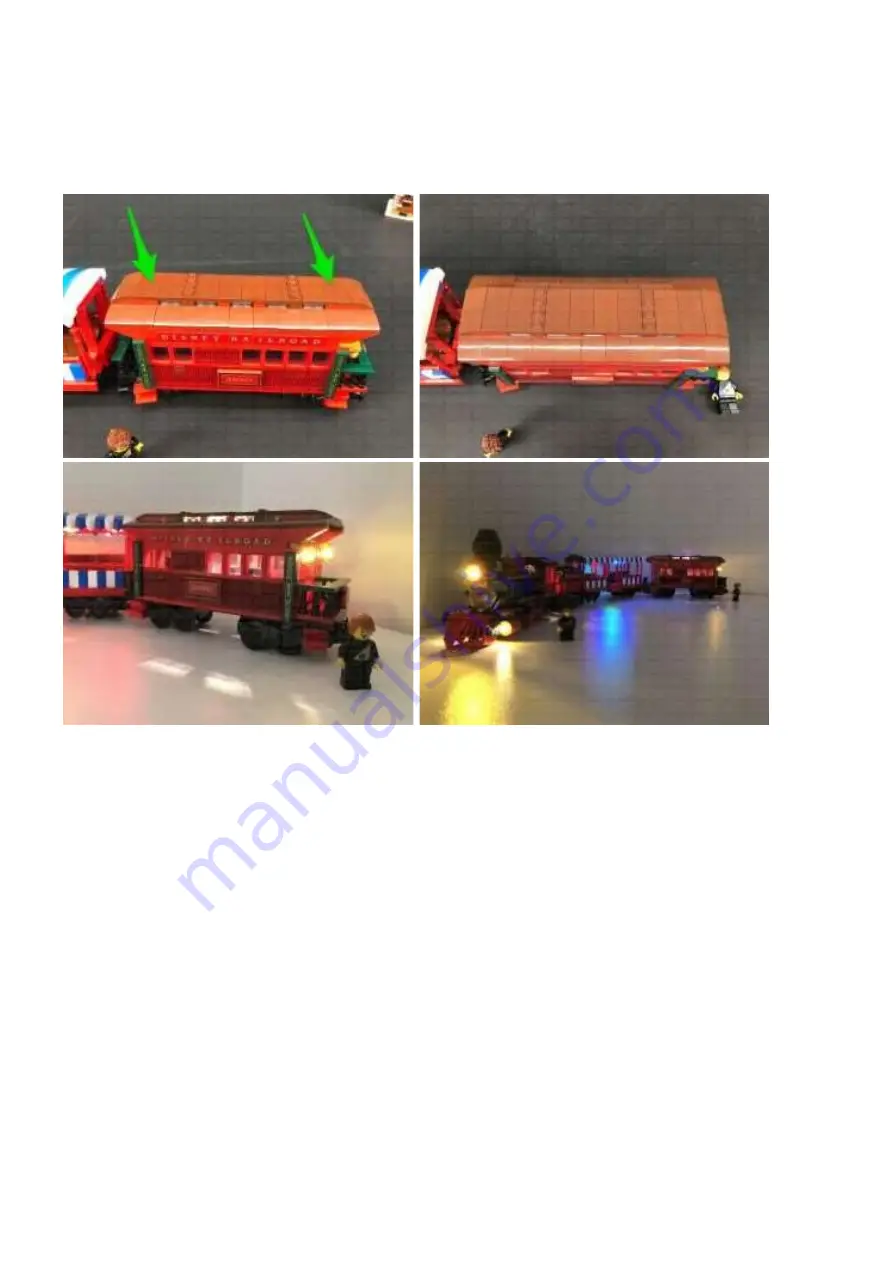
Securely reconnect the roof, then use your controller or remote app to press ‘accelerate’ to 

test the internal light is working OK. 


This finally completes installation of the Light My Bricks Disney Train Station Light Kit. 

We thank you for purchasing this product and hope you ENJOY! 

For all questions or issues please follow the troubleshooting guide. 


Summary of Contents for LEGO Disney Train Station 71044

Page 1: ......

Page 2: ...Please note This page lists instructions for the LED light kit only CAUTION Forcing LEGO to connect over a cable can result in damaging the cable and light...

Page 3: ...plug won t fit easily into a port connector do not force it Incorrectly inserting the connector can can result in bent pins inside the port or possible overheating of the expansion board when connecte...

Page 4: ...expansion board facing up ensure the side of the connector with the wires exposed is facing down If a plug won t fit easily into a port connector do not force it Use your fingernail to push the plast...

Page 5: ...OK Let s Begin Installing lights to the Disney Train 1 Disconnect the train carriages then take the first carriage and disconnectsections from the top and front of the vehicle...

Page 6: ......

Page 7: ...Place the train onto it s right side and disconnect the front wheel section then disconnect the gold round plate from each side...

Page 8: ...of a White 15cm Bit Light through the front of it Thread it all the way through then carefully bend the Bit Light so that it sits flat against the edge of the plate Secure the LED in place by connecti...

Page 9: ...another provided Trans Clear Round Plate 1 1 3 Reconnect each plate to the front wheel section ensuring the cables arefacing toward the inside then cross both cables over each other and secure them un...

Page 10: ......

Page 11: ...woplates Take a Warm White 30cm Large Bit Light and with the cable facing down place it in the following position on the front section Secure the Bit Light in place by reconnecting the trans yellow 2...

Page 12: ...wn in between studs Reconnect the two outer sections as shown below 5 Place the train onto it s right side then bend the large bit light cable into ahook shape Thread the cable over the following tech...

Page 13: ...Reconnect the front wheel section to the train then connect the two bit light cables from the front to the 6 Port Expansion Board...

Page 14: ...second carriage and disconnect the motor cable from the LEGOpowered up battery box Remove the battery box from the carriage then take out the Light My Bricks Powered Up Cable and connect it to the ba...

Page 15: ...6 Port Expansion Board Turn ON the battery box and ensure that it is paired to your remote control or smartphone app Press the button on the controller on the A side or on the Smartphone App to test...

Page 16: ......

Page 17: ......

Page 18: ...e with a component please try a different port on the expansion board to verify where the fault lies with the light or expansion board To correct any issues with expansion board ports please view the...

Page 19: ...e train Turn the train over onto it s right side and pull the cable all the way out from the bottom Bend the cable into a hook shape and thread it down the space of the black brick with handle Pull th...

Page 20: ...Thread the cable through the following technic brick hole and pull it all the way out from the middle Connect the Bit Light cable to the 6 Port Expansion Board...

Page 21: ...isconnect the large black dish from theinside Lay the cable down in between studs then reconnect the large dish over the top Close the roof then use your controller or remote app to accelerate to test...

Page 22: ...9 Eliminate excess cable from the large bit light by twisting and folding it intoa neat bunch Tuck the bunched up cables inside the space underneath the train...

Page 23: ...sion Board then disconnect the following grey 2 4 plate at the back of the carriage Lay both connecting cable and powered up cable in the middle facing the back then reconnect the grey 2 4 plate over...

Page 24: ...ort Expansion Board then mount the board underneath the train inside in the following position Tuck all the cables into the space underneath the train 10 Return the train to it s upright position then...

Page 25: ...urn the lights on if the train is stationary Option 2 If you re using the smartphone app to control the train motor pull out the train motor cable and connect it to the spare socket on the Light My Br...

Page 26: ...Option 2...

Page 27: ...ver behind the second carriage then tuck in the motor cable and as much of the powered up cable as possible inside the second carriage Neatly place the socket of the powered up cable on the front of t...

Page 28: ...third carriage First seperate this carriage and turn it onto it s right side so we can access underneath Take out a new 6 Port Expansion Board and connect a 50cm Connecting Cable to it s far right po...

Page 29: ...Using 2x Adhesive Squares mount the expansion board underneath the carriage toward the front as shown below...

Page 30: ...12 Disconnect the rear wheel section then disconnect the red plate on topand lay the 50cm cable down in between studs Secure the cable by reconnecting the red plate over the top...

Page 31: ...r the front and rear wheels to turn Secure the cable underneath the carriage using a provided LEGO Plate 1 2 Test each wheel section by turning it left and right to ensure there is enough cable slack...

Page 32: ...ight String and connect it to the 6 Port Expansion Board Flip the carriage back over and turn it to the front Disconnect the red 2 4 tile and lay the Multi Colour Light String Cable up in between stud...

Page 33: ...Bend the tip of the light string into a hook and thread it through the side of the carriage as shown below Pull the light string all the way out from the centre then pull it up the top left corner...

Page 34: ...de Lift up the left roofsection and disconnect the blue arched plates from the left side Bring the cable up and lay it over the top of the window toward the middle of the carriage Ensuring the cable i...

Page 35: ...e middle section and disconnect the 1 2 plate with ridge on the left Lay the rubber part of the light string toward the back of the left roof then ensure the light string is laid in between studs unde...

Page 36: ......

Page 37: ...the light string around the studs on top of the middle section Ensurethat the two light string LEDs are positioned as shown below then secure the light string underneath the 1 2 plate with ridge on th...

Page 38: ...t the red 1 2 plate with ridge on the right side Position the light string as shown below ensuring there are 3 LEDs positioned in this back section then loop the light string around the bottom red stu...

Page 39: ...sconnectthe white 1 1 plate from the top of the post Wind the light string around the top of the pole as shown below Ensuring the light string is looped around the top side of the stud secure it down...

Page 40: ......

Page 41: ...Ensure the top of the light string is positioned as shown below and slightly bent up so that it isn t seen from the sides of the carriages Close down the front roof panel...

Page 42: ...o the second carriage then turn it onto it s rightside so we can access underneath Locate the other end of the 30cm Connecting Cable brought over from the front of the train and connect it to the 6 po...

Page 43: ...pright then turn the entire train around to the right side and secure the 30cm cable underneath the Disney Railroad sign Use your controller or remote app to press accelerate to test the multi coloure...

Page 44: ...now light up the last carriage Remove this section from the back then disconnect the entire roof section as shown below Remove the following bricks and tiles from the top and sides then disconnect the...

Page 45: ......

Page 46: ...nnector side of the cable through the top of one of the gold plates Thread the cable all the way through then carefully bend the LED so that it sits flat against the top of the gold plate Secure the B...

Page 47: ...Bring the bit light cable up and then thread it down the hole of the gold handle Pull the cable all the way out from the bottom...

Page 48: ...Reconnect the lamp to the left side of the carriage ensuring the cable is facing the inside then bring the cable up and reconnect the angled brick we removed earlier over the top...

Page 49: ...20 Repeat previous step to install another White 15cm Bit Light to the other lamp then reconnect it to the other side of the carriage Secure it down by reconnecting the other red angled brick...

Page 50: ...Reconnect the green tile to each side of the carriage...

Page 51: ...hird carriage then disconnectthe red 2 6 plate from the front of the last carriage Take the 50cm cable from the front over and lay it over toward the inside of the last carriage Ensuring the cable is...

Page 52: ...corner of the last carriage as shown below 22 Bring the cable toward the back of the carriage and secure it down underneath the following brown angled tiles on the top Ensure you carefully lay the ca...

Page 53: ......

Page 54: ...e lights not working and suspect an issue with a component please try a different port on the expansion board to verify where the fault lies with the light or expansion board To correct any issues wit...

Page 55: ...Take a Warm White Strip Light and connect a 5cm Connecting Cable to the right port Using it s adhesive backing stick it directly to the middle of the roof in the following position...

Page 56: ...24 Take the 6 port expansion board and neaten up the excess cable from the bit lights and connecting cable by twisting and folding them around each other into a neat bunch...

Page 57: ...er the carriage with the bottom still facing up Connect the other end of the 5cm cable from the strip light to a spare port on the 6 port expansion board then tuck the expansion board underneath the r...

Page 58: ...ss accelerate to test the internal light is working OK This finally completes installation of the Light My Bricks Disney Train Station Light Kit We thank you for purchasing this product and hope you E...

Page 59: ......

Reviews: