background image


Important Safety Information 


Please keep this manual in a safe place for easy reference. 


1.  It is important to read this entire manual before assembling and using the equipment. 
      Safe and effective use can only be achieved if the equipment is assembled, maintained and used 

properly. It is your responsibility to ensure that all users of the equipment are informed of all warnings 

and precautions. 

 
2.   Before  starting  any  exercise  program  you  should consult  your  doctor  to  determine if  you  have  any 

medical or physical conditions that could put your health and safety at risk or prevent you from using 
the  equipment  properly.    Your  doctor's  advice  is  essential if  you  are  taking medication  that  affects 
your heart rate, blood pressure or cholesterol level. 

 
3.   Always  be  aware  of  your  body's  signals.  Incorrect  or excessive  exercise  can  damage  your  health. 

Stop  exercising  if  you  experience  any  of  the  following  symptoms:  pain,  tightness  in  your  chest, 
irregular  heartbeat,  and  extreme  shortness  of  breath,  lightheadedness,  dizziness  or  feelings  of 
nausea.  If  you  do  experience  any  of  these  conditions  you  should  consult  your  doctor  before 
continuing with your exercise program. 

 
4.  Keep children and pets away from the equipment. The equipment is designed for adult use only. 

 
5.   Use  the  equipment  on  a  solid, flat level  surface  with  a  protective cover for  your floor  or carpet.  To 

ensure safety, the equipment should have at least 1.65 feet of free space around it. 

 
6.    Before using the equipment, check that the nuts and bolts are securely tightened. 
 
7.   The  safety  of the  equipment  can  only  be maintained if it  is  regularly  examined for  damage  and/or 

wear and tear. 

 
8.   Always  use  the  equipment  as indicated. If  you find  any  defective  components  while  assembling  or 

checking the equipment, or if you hear any unusual noises coming from the equipment during use, 
stop immediately. Do not use the equipment until the problem has been rectified. 

 
9.   Wear suitable clothing while using the equipment. Avoid wearing loose clothing that may get caught 

in the equipment or that may restrict or prevent movement. 


10.    The equipment has been tested and certified to EN957 under class H.C. Suitable for home 

use only. Maximum weight of user: 220lbs.    Braking ability is independent of speed. 


11.     The equipment is not suitable for therapeutic use. 

12.    Care must be taken when lifting or moving the equipment so as not to injure your back. Always use 

proper lifting techniques and/or seek assistance if necessary. 


Summary of Contents for RC 80

Page 1: ...RC 80 Owner s Manual ...

Page 2: ...ntinuing with your exercise program 4 Keep children and pets away from the equipment The equipment is designed for adult use only 5 Use the equipment on a solid flat level surface with a protective cover for your floor or carpet To ensure safety the equipment should have at least 1 65 feet of free space around it 6 Before using the equipment check that the nuts and bolts are securely tightened 7 T...

Page 3: ......

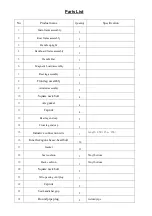
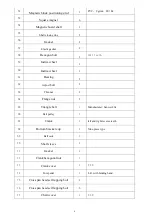
Page 4: ...nt leg assembly 1 9 Armrest assembly 1 10 Square neck bolt 4 11 Arc gasket 4 12 Cap nut 4 13 Rear leg end cap 2 14 Front leg end cap 2 15 Inductive connection wire 2 Length 850 15a 15b 16 Inner hexagon cheese head bolt 16 17 Gasket 11 18 Seat cushion 1 Vinyl bottom 19 Back cushion 1 Vinyl bottom 20 Square neck bolt 2 21 Wire passing vent plug 1 22 Cap nut 2 23 Seat handlebar grip 2 24 Round pipe p...

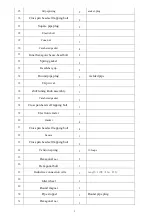
Page 5: ...lded pipe 35 Clip cover 1 36 shift tuning knob assembly 1 37 Cambered gasket 1 38 Cross pan head self tapping bolt 1 39 Electronic meter 1 40 Gasket 4 41 Cross pan head self tapping bolt 4 42 Sensor 1 43 Cross pan head self tapping bolt 2 44 Tension spring 1 16 loops 45 Hexagonal nut 2 46 Hexagonal bolt 1 47 Inductive connection wire 2 Length 1100 47a 47b 48 Idler wheel 1 49 Round magnet 1 50 Pipe...

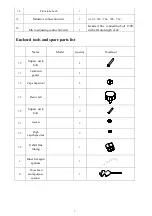
Page 6: ...61 Bearing 2 62 Adjust bolt 2 63 Thin nut 2 64 Flange nut 2 65 Triangle belt 1 Manufacturer Sanwei 864 66 Belt pulley 1 67 Crank 1 left and right reverse teeth 68 Bottom bracket cup 2 Nine piece type 69 Ball rack 2 70 Shaft sleeve 2 71 Gasket 2 72 Crank hexagonal nut 1 73 Crank cover 1 7 2D 74 Foot pedal 1 L R with binding band 75 Cross pan head self tapping bolt 4 76 Cross pan head self tapping b...

Page 7: ...cting bolt 1300 with a thrum length of 42 Enclosed tools and spare parts list Name Model Quantity Thumbnail 10 Square neck bolt 4 11 Cambered gasket 4 12 Cap shaped nut 4 28 Elastic bolt 1 20 Square neck bolt 2 21 Gasket 2 22 High cap shaped nut 2 36 8 shift fine tuning 1 A Inner hexagon spanner 1 B Cross head multipurpose spanner 1 ...

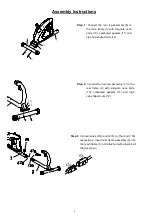
Page 8: ...bered gaskets 11 and high cap shaped nuts 12 Step 3 Connect wires 47a and 47b to 15a and 15b respectively Insert rear frame assembly 2 into the main frame 1 and attached with elastic bolt 28 as shown Step 1 Connect the rear leg assembly 8 to the main frame 1 with 2 square neck bolts 10 cambered gaskets 11 and high cap shaped nuts 12 ...

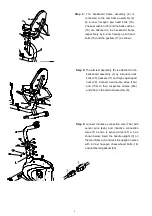
Page 9: ...e backboard frame assembly 4 is connected to the rear frame assembly 2 by 4 inner hexagon pan head bolts 16 The seat cushion 18 and the back cushion 19 are attached to the backboard frame respectively by 4 inner hexagon pan head bolts 16 and the gaskets 17 as shown Step 5 The armrest assembly 9 is attached to the backboard assembly 4 by 2 square neck bolts 20 gaskets 17 and high cap shaped nuts 22...

Page 10: ... the sub figure 1 2 and 3 Lock the shift tuning knob assembly 36 on the handle upright 3 with cross pan head self tapping bolt 38 and cambered gasket 37 Attach wires a b and c of the electronic meter 39 to the respective inductive connection wires 79 a b and c then fix and lock the electronic meter on the handle upright 3 by cross pan head self tapping bolt 40 and a gasket 41 Lock the left and rig...

Reviews: