different formatting, capacities, and controller
boards.
The same number drive may even have a different
number of heads or cylinders. So, to my know-
ledge, there is no way to change a RLL drive
into an MFM drive by just swapping boards
attached to the drive.
ESDI drives also have similar cable connections
and cannot be used, but these drives are rare.
While new MFM hard drives are very rare now,
some remanufactured or repaired hard drives can
still be purchased from drive repair shops.
Also, look for older computers at garage sales,
shops, swap meets, etc.
Caution:
You cannot just slap an MFM drive from
another computer into your Z-100 and expect it
to work, without completely reformatting the
drive. It will require low level formatting
using the
PREP
command, partitioning using the
PART
command, and a high level formatting of
each partition using the
FORMAT
command. These
commands are unique to the Heath/Zenith CP/M and
MS-DOS operating systems.
There are numerous manufacturers of MFM drives,
each with different sets of programming plugs,
jumpers, and terminating resistors. If you have
a specific brand that you can not figure out,
try calling me at the "
Z-100 LifeLine
".
PROGRAMMING PLUGS:
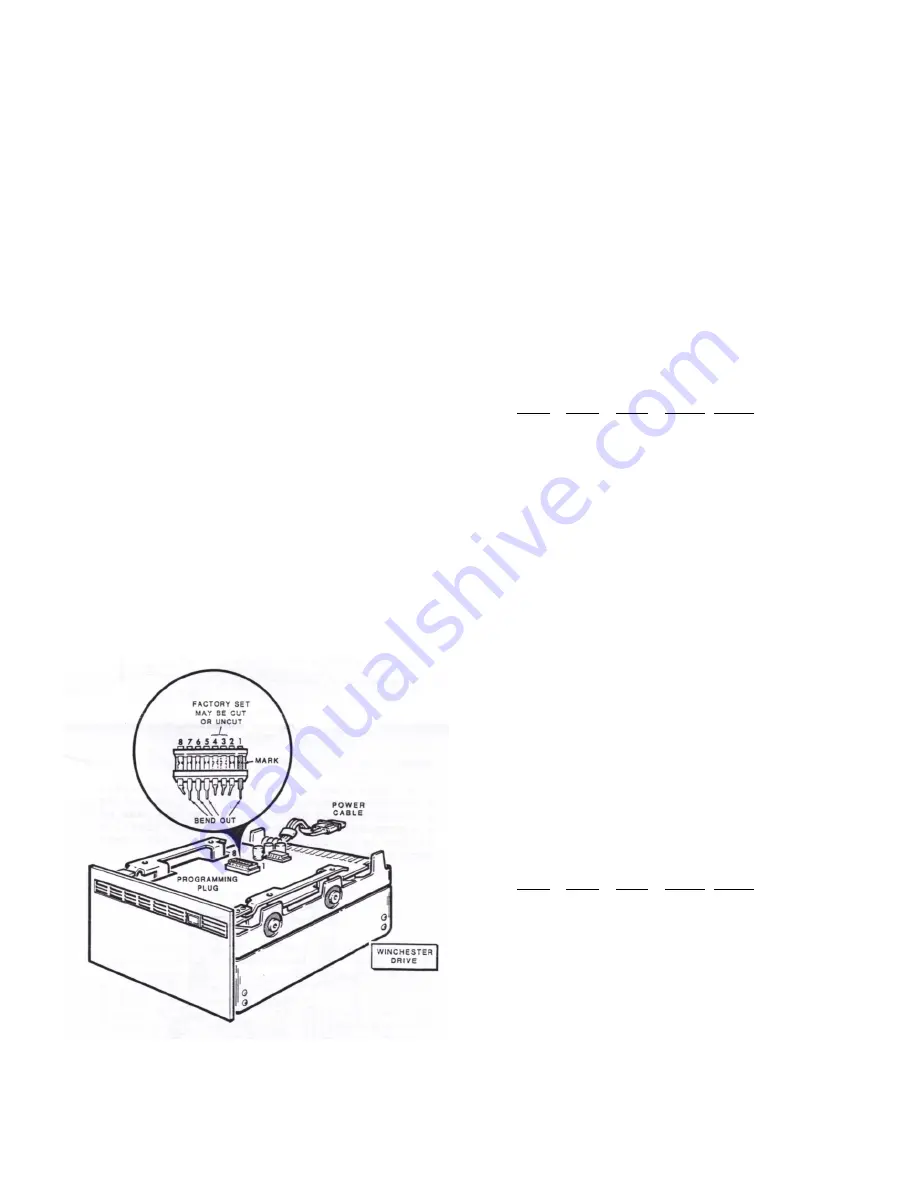
The most popular drive in the Z-100 seems to be
the 10 megabyte Miniscribe model 2012 pictured
here:
Figure 2.
Programming Plug on the Miniscribe 2012.
Other popular drives were the 10 meg Seagate
model ST-412 and the 10 meg Computer Memories,
Inc. model CM 5412. These were all full height,
5-1/4" drives. Later drives were available as
half-height and/or 3.5" wide and had higher
capacities.
[ ] Locate and check the setting of any
programming plugs or pins on the hard drive.
Programming plugs may take many forms on floppy
and hard drives. On the Miniscribe 2012 and the
Seagate ST-412, it takes the form of that shown
in the picture - a flat pack of 8 shorted pairs
of pins. Although meant to simply break the
connection between pairs with a sharp pointed
object, a less permanent method is to simply
bend out one of the pins to open that pair, as
shown.
On the Miniscribe 2012, the drive configuration
is:
Pin
Sect
Hardware Unit
Pair
Nbr:
Note
1 2
1-16 1
Open
Open
2-15 2
Short Short
3-14 3
Factory Set
4-13 4
Factory Set
5-12 5
DS4
Open
Open
6-11 6
DS3
Open
Open
7-10 7
DS2
Open
Short
8- 9 8
DS1
Short Open
Note
: Pin pairs 3-14 and 4-13 (section 3 and 4)
are set at the factory; the programming plug is
properly configured for the drive it is instal-
led in. If you change or move programming plugs,
you should check the following table and set
these two sections according to the phase code
of the disk drive. The phase code is printed on
a label on the disk drive case.
Pin Pair:
3-14
4-13
Section Number:
3
4
----------------------------------------
Phase Code C
Open
Open
Phase Code D
Open
Short
Phase Code E
Short
Open
Phase Code F
Short
Short
----------------------------------------
On the Seagate, the programming information is
slightly different:
Pin
Sect
Hardware Unit
Pair
Nbr:
Note
1 2
1-16 1
R
Short Short
2-15 2
NC
Open
Open
3-14 3
NC
Open
Open
4-13 4
NC
Open
Open
5-12 5
DS4
Open
Open
6-11 6
DS3
Open
Open
7-10 7
DS2
Open
Closed
8- 9 8
DS1
Closed Open
Where: DS1, DS2, DS3, DS4 = Drive Select
#
R = Radial Operation
6


