background image

23

Filters

Open front service door to access the filters located in 

both  supply  and  exhaust  air  streams.  It  may  be 

easier  to  first  remove  the  core  before  removing  the 

filters.
The  filters  are  designed  to  stop  large  particles  from 

entering in  the  core.  The  filters  are  fastened  in  place 

by  a  metal spring  rod.  To  remove  filters  from  core(s) 

simply  pull  the rod  from  one  end,  outward  until  free 

from  core  lip,  and remove.
Use  warm  water  with  a  mild  detergent  to  wash  the 

filters. Do not use harsh chemicals.
The  time  between  filter  service  will  depend 

on  the  application  the  HRV  has  been  installed 

in.  It can  be  as  often  as  one  -  two  months  or  at 

the  very least, cleaned every six months.

Condensate


Drains

The  condensate  drains  consist  of  two  drain  pans 

which  may  collect  water  after  the  HRV  initiates  a 

defrost  cycle,  and  a  drain  line  to  remove  the 

condensate.
Maintenance  on  this  portion  of  the  system  should  be 

done  as  often  as  possible  and  should  not  exceed  six 

months. Note bacterial  growth  in  standing  water  is  a 

major  concern  to  healthy  indoor  air  quality,  and 

should be avoided whenever possible.
To  clean  these  components,  open  the  front  service 

door and flush  the  pans  with  water.  Ensure  that  the 

pans  drain completely and in a reasonable amount of 

time.  Note  if  the  water  does  not  drain  right  away, 

check  for  blockage  in  the  drain  line,  also  check  that 

the  drain  line  has  a  good  slope  to it. (1/8 - 1/4” per 

foot)
The  drain  line  itself  should  have  a  “P”  trap  in  it 

below  the  HRV  which  is  to  be  filled  with  water  to 

prevent  odors  or  gases  from  entering  back  into  the 

unit.

Duct


Work

It  is  a  good  idea  to  inspect  ducting,  outside  weather 

hoods  (wall  caps),  and  grilles  for  blockage  and  dirt 

buildup,  at least every six months.
Outside weather hoods should be protected by a bird 

screen  which  can  plug  up  with  debris.  Also,  it  is  a 

good  idea  to  visually  confirm  that  the  fresh  air 

supply  is  free  from  any  sources  of  contamination, 

such  as  other  vented  combustion  equipment  added 

after the fact.

Damper


Motor

The  damper  motor,  (if  applicable)  is  a  self  contained 

motor and does not require service. The damper door 

attached  to  the  motor  could  use  a  little  lithium 

grease  on  the  shaft  opposite  the  motor,  where  it 

enters  its  holder,  once  every two - three years.

General


Maintenance

As  a  final  step  in  a  routine  maintenance  schedule,  it 

is  a  good  idea  to  confirm  operation  of  the  system, 

checking speed  control  functions  and  remote  control 

operation,  if applicable.
Wipe the inside of the cabinet to remove dust and cob 

webs as needed.
It  is  a  good  idea  to  keep  a  service/maintenance  log 

of  the unit.

Maintenance


and


Service


Continued

Summary of Contents for 1200 POOL

Page 1: ...POOL 1200POOL Operation and Installation Manual Lifebreath Pool Room HRVs provide fresh clean air without sacrificing the savings of your energy conserving home The aluminum cores of the HRV provide effective and efficient heat recovery and air exchange Models 700POOL 1200POOL ...

Page 2: ...erse Installation of the HRV 24 25 Never install an HRV in a situation where its normal operation lack of operation or partial failure may result in the backdrafting or improper functioning of vented combustion equipment It is always important to assess how the operation of any HRV may interact with vented combustion equipment ie Gas Furnaces Oil Furnaces Wood Stoves etc Do not apply electrical po...

Page 3: ...er the system Outside air is prevented from entering the HRV during recirculation by the supply damper closing off The exhaust fan to the outside is shut off during this recirculation mode Outside air does not enter the system again until the pool room humidity exceeds the setpoint of the dehumidistat HRV Aluminum Core A Heat Recovery Ventilator HRV is designed to provide fresh air into a building...

Page 4: ...eed Fan setting Low Medium High 4 wire connection 20 gauge wire minimum CORES Modular 2 section patented aluminum heat recovery cores arranged for efficient counter flow ventilation MOTORS Two PSC 3 speed single shafted 120 VAC 4 5 Amps each 9 total on high speed HP 1 4 1450 RPM Watts total on high speed 1032 MCA 11 3 MOP 15 FILTERS Washable air filters in exhaust and supply air streams BLOWERS Sl...

Page 5: ...mm H MOUNTING Unit to be set on support brackets hung by threaded rod type apparatus brackets and rods not provided CASE Unit has front and back access doors and electrical panel can be switched to either side giving installer flexibility in duct direction 20 gauge prepainted galvanized steel G60 for superior corrosion resistance Insulated with elastomeric insulation where required to prevent exte...

Page 6: ...ng flow Rate factor depending on the indoor air temperature outdoor temperature and room relative humidity Flow Rate Factor 21 70 Evaporation rate X Flow Rate CFM square foot of water surface area 0 052 X 21 70 1 12 4 Multiply the value in step 3 by the area of the pool X Value for step 3 CFM Area of pool 512 X 1 12 573 Calculating the Ventilation Rate for the Pool Room Spas Hot Tubs must be consi...

Page 7: ... 0 053 0 082 0 073 0 064 0 094 0 085 0 076 0 107 0 098 0 089 0 121 0 112 0 103 78 0 059 0 049 0 039 0 069 0 059 0 049 0 080 0 070 0 060 0 091 0 082 0 072 0 104 0 095 0 085 0 118 0 109 0 099 80 0 056 0 046 0 035 0 066 0 056 0 045 0 077 0 067 0 056 0 089 0 079 0 068 0 102 0 091 0 081 0 116 0 105 0 095 82 0 053 0 042 0 031 0 063 0 052 0 041 0 074 0 063 0 052 0 086 0 075 0 064 0 099 0 088 0 077 0 113 ...

Page 8: ... 39 40 29 80 24 00 34 70 26 40 21 30 30 70 23 50 19 00 27 30 21 00 17 00 15 56 20 41 00 32 20 48 50 35 80 28 30 42 10 31 40 25 00 36 80 27 60 22 10 32 40 24 50 19 60 28 60 21 70 17 50 20 63 40 44 70 34 50 53 70 38 50 30 00 46 00 33 50 26 30 39 70 29 30 23 10 34 60 25 70 20 40 30 30 22 70 19 10 25 74 90 50 10 37 60 61 70 42 50 32 40 51 80 36 40 28 10 44 00 31 50 24 50 37 80 27 40 21 50 32 70 24 10 ...

Page 9: ...be mounted on an equipment platform providing the drain hoses are clear and there is sufficient space to open the doors for servicing Install the drain pans in the bottom of the HRV so the drain connections protrude through the holes provided Use drain hoses with hose clamps to connect the drain pan outlets to a floor drain or standpipe Make sure the drain line slopes down to the outlet If this is...

Page 10: ...es of contaminants such as automobile exhaust fumes gas meters garbage cans containers etc not exposed to prevailing winds The outside perimeter of the weatherhood must be caulked to prevent leakage into the building The design and size of the weatherhoods or louvers chosen by the installer must allow for adequate free area Water and snow penetration of the system is minimized when the airflow doe...

Page 11: ...e of room EXPOSED WALL Min 10 0 HRV Typical Duct Layout Sketch 1 Sample Duct Layout 1 System Installation It is necessary to design and size the duct distribution system for both the supply and the exhaust air streams Proper duct design will Minimize air flow requirements Ensure a comfortable environment by using reheat if required Optimize humidity control including eliminating condensation on wi...

Page 12: ...le air from opposite side of room Typical Duct Layout Sketch 2 Sample Duct Layout 2 System Installation It is necessary to design and size the duct distribution system for both the supply and the exhaust air streams Proper duct design will Minimize air flow requirements Ensure a comfortable environment by using reheat if required Optimize humidity control including eliminating condensation on wind...

Page 13: ...ated when outside temperatures drop below 27 F 3 C A motor driven damper door mechanism opens the pool and defrost air port and closes off the supply air from outside port This defrost cycle operates for about 3 minutes and then the damper reverts to its previous run time position 2 RECIRCULATION MODE TO POOL ROOM EXHAUST TO OUTSIDE FROM POOL ROOM FROM POOL ROOM Ø FRESH AIR FROM OUTSIDE DAMPER CLO...

Page 14: ...d develops in one of the devices Stale Air Return System Fresh Air Supply System Adjustable Grilles The stale air return system is used to draw air from the points in the building where the highest humidity levels exist Balancing dampers and or adjustable grilles are recommended on all return air lines which are used during installation to help balance the draw from different areas of the pool roo...

Page 15: ...rcuit board Switch T37 and T39 on the Aircom circuit board Switch T37 red wire and T39 yellow wire on the Aircom circuit board if you wish to reverse the Supply Air From Outside and Pool and Defrost Air ports This illustration shows the factory configuration T31 T32 T33 T34 T35 T36 T37 T38 T39 T40 T41 T42 Contact 1 N 0 COM N C N 0 COM N C N 0 COM N C N 0 COM Contact 2 Contact 3 Contact 4 N C RED Y...

Page 16: ...T HIGH OFF OFF OFF MED LOW Optional 3 Speed Control Part 99 500 Connect to R W Y and G on Thermostat O G Y W R C Thermostat 24V Jumper Wire HIGH MED LOW Jumper Wire Placement on Micro Processor Board SPEED High R W Medium R Y Low R G JUMPER T18 T5 T13 C4 T17 T19 T1 T2 T3 T4 T6 T14 T15 T16 C3 C2 C1 RELAY Fan Hi Fan Med Fan Low FEED Line Ligne Neutral Neutre T20 CHASSIS T11 T12 T44 N O N O N O N O C...

Page 17: ...ss and release the Dehumidistat button until the Dehumidistat Light is at the desired setting After 5 seconds the Dehumidistat light will either flash or be on continuous A flashing light indicates the humidity level is higher than the setting and the unit is operating on high speed ventilation A continuous light indicates the humidity level is lower than the setting Refer to the unit s Operation ...

Page 18: ...n the Back Plate Figure C 8 Attach the Back Plate to the wall using the 2 supplied screws and anchors 9 Attach the Face Plate to the Back Plate Figure B Note Be careful to correctly align the Face Plate to avoid damaging the Face Plate Contact Pins 10 Insert the Operating Instructions Card into the control Figure A 11 Connect the 3 wire 20 gauge min 100 ft length max to the digital controls termin...

Page 19: ...der to prevent electric shock when cleaning or servicing the HRV it is extremely important to confirm the polarity of the power line that is switched by the safety disconnect switch whose control arm is located on the outside of the electrical control box area The hot line black is the proper line to be switched To confirm the proper polarity use a voltmeter or test lamp to make sure there is no p...

Page 20: ...nit Drill a small hole in the duct about 3 16 three feet downstream of any elbows or bends and one foot upstream of any elbows or bends These are recommended distances but the actual installation may limit the amount of straight duct The Pitot tube should be connected to a manometer capable of reading 3 digits of resolution The tube coming out of the top of the pitot is connected to the high press...

Page 21: ...e any of the other DIP switch settings Only available when unit is operating in ventilation mode Factory Setting DIP Switch 8 OFF The HRV enters defrost mode when outdoor temperatures drop below 27 F 3 C The factory defrost cycle is 4 minutes defrost with a 30 minute run time Increased Defrost Time DIP Switch 8 ON Cooler climates may require a more aggressive defrost cycle Positioning DIP switch 8...

Page 22: ...temporarily preventing its removal In most cases all the core requires is a wash in a mild detergent and warm water to completely clean it Do not use harsh chemicals as their use may cause corrosion in the HRV The time required between each core service depends on the application in which the HRV is installed Service may be required as often as one month two months or at the very least cleaned eve...

Page 23: ...drain completely and in a reasonable amount of time Note if the water does not drain right away check for blockage in the drain line also check that the drain line has a good slope to it 1 8 1 4 per foot The drain line itself should have a P trap in it below the HRV which is to be filled with water to prevent odors or gases from entering back into the unit Duct Work It is a good idea to inspect du...

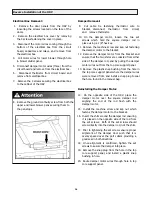
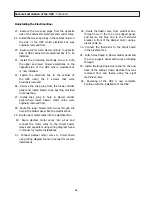
Page 24: ...rt the shim around the damper rod ensuring it is placed on the opposite side of the rod from the set screws Both of the set screws should screw directly into the damper rod not the shim 17 Prior to tightening the set screws ensure proper alignment of the damper door such that it is evenly spaced over the port collars providing a good seal in both directions 18 Once alignment is confirmed tighten t...

Page 25: ...the lower blower motor wires through the hole in the divider panel into the electrical box 29 Route upper motor wires into the electrical box 30 Route damper motor wires into e box and connect the motor wires to the circuit board relays and capacitors using wiring diagram found in manual for reverse installations 31 Connect damper motor wires to circuit board using wiring diagram found in manual f...

Page 26: ...ior hoods or vents remove and clean filter remove and clean core check and open grilles open and adjust dampers have electrician check supply voltage at house check duct installation increase the speed of the HRV have contractor balance HRV locate the grilles high on the walls or under the baseboards install ceiling mounted diffuser or grilles so as not to directly spill the supply air on the occu...

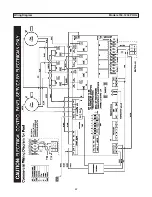
Page 27: ...27 Wiring Diagram Models 700 1200 POOL ...

Page 28: ...ects please contact AIRIA BRANDS INC 511 McCormick Blvd London Ontario N5W 4C8 519 457 1904 or fax 519 457 1676 to find the name of your nearest dealer in order to repair the product The labor required to install any replacement part s shall be dealt with at the option of the customer in either of the following ways a the customer may supply labor at their own expense or b if the product was purch...

Page 29: ...29 ...

Page 30: ...30 ...

Page 31: ...31 ...

Page 32: ...info lifebreath com T 1 855 247 4200 F 1 800 494 4185 69 POOL 100516 ...

Reviews: