background image

32

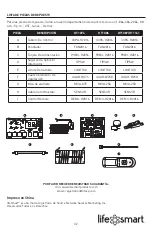
LISTA DE PIEZAS DE REPUESTO

Para las piezas de repuesto, llame a nuestro departamento de soporte técnico en 1-866-484-2066 , 08 

a .m .-5 p .m . , CST, Lunes - Viernes

PIEZA

DESCRIPCIÓN

HT1074

HT1086

HT1087/HT1141

A

Tablero De Control

COPA-H2016

COPA-H2016

COPA-H2016

B

Ventilador

FAN2016

FAN2016

FAN2016

C

Tarjeta De Alimentación

POBO-H2016

POBO-H2016

POBO-H2016

D

Sugerencia Sobre El 

Interruptor

TIPSW

TIPSW

TIPSW

E

Límite De Cambio

LIMIT130

LIMIT130

LIMIT130

F

Cuarzo Elemento De 

Calefacción

QUAR-R375

QUAR-W250

QUAR-R250

G

Mica de alambre

MICA-375

MICA-250

MICA-250

H

Cable de termostato

SENSOR

SENSOR

SENSOR

I

Control Remoto

REMO-H2016

REMO-H2016

REMO-H2016

B

A

C

D

E

H

I

G

F

Impreso en China

lifesmart

®

 es una marca registrada  de Source Network Sales & Marketing Inc ., 

Reservados Todos Los Derechos .

POR FAVOR RECUERDE REGISTRAR SU GARANTÍA:

sitio: www .lifesmartproducts .com

email: registration@lifesp .com

Summary of Contents for XXHT1074US

Page 1: ...products com Please have your model and serial number ready 1 ATTACH YOUR RECEIPT HERE Purchase Date ____________Serial Number located on back of unit __________________ lifesmart is a registered trademark of Source Network Sales Marketing Inc All Rights Reserved REV1 030117 INFRARED QUARTZ HEATER Customer number XXHT1141US XXHT1074US XXHT1086US XXHT1087US ...

Page 2: ...y Information 4 Frequently Asked Questions 6 Preparation 8 Troubleshooting 8 Control Panel 9 Remote Control 10 Operating Instructions 11 Care and Maintenance 13 Wall Mounting Instructions 14 One Year Limited Warranty 15 Replacement Parts List 16 ...

Page 3: ... 1 B Remote Control 1 C Control Panel preassembled to Infrared Heater A 1 D Filter Cover 1 E Easy grab handle 1 F Heater mounting brackets preassembled to Infrared Heater A 2 G Unit Feet preassembled to Infrared Heater A 2 H Wall mounting bracket 1 I Wall screw and drywall anchor 6 ...

Page 4: ...cturer for resolution options Do not use outdoors Exposure to outdoor elements such as rain snow sun wind or extreme temperatures may cause the heater to become a safety hazard This heater is not intended for use in bathrooms laundry areas and similar indoor locations nor any locations that use GFCI outlets Never place the heater where it may fall into a bathtub or other water receptacles Do not r...

Page 5: ...g or possible fire the heater will automatically shut off If the unit has been overheated you will need to unplug the unit from the wall and replug it in to use the heater again WARNING This heater has a voltage rating of 120 volts The cord has a three blade grounding type plug An adapter is available for connecting three blade grounding type plugs to two slot receptacles The grounding lug extendi...

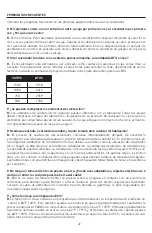
Page 6: ...n it on how long will it take to heat my room A The heating process in the heater begins immediately upon powering on and setting the desired temperature above the ambient temperature A noticeable change in the ambient temperature of the room will vary due to variables such as the location of the heater in the home floor plan and size of the room how well the room is insulated how many doors windo...

Page 7: ... or the power is turned off A This is normal The heater s fan will continue to run even after the heater automatically cycles down The fan continues to run so that every last bit of heat is blown out of the heat chamber while allowing the unit to continue filtering your air Once the internal box components cool completely the fan should then shut off on its own In this case allow a few minutes aft...

Page 8: ...ned in porches RV s garages unheated basements etc TROUBLESHOOTING PROBLEM POSSIBLE CAUSE CORRECTIVE ACTION The heater does not turn on 1 The power cord is not plugged in 2 The electricity at the main fuse box is not working 3 The battery in the remote control is dead 4 The thermostat on the heater is set lower than the room temperature 1 Plug the power cord into an electrical outlet 2 Check the e...

Page 9: ...r Indicator Light Indicates when the unit is receiving power from the wall outlet 7 Power Switch Button Powers the heater ON or OFF 8 Ambient Temp Button Indicates ambient temp hold to toggle between C F 9 Temp Down Button Decreases the set temperature 10 Temp Up Button Increases the set temperature 11 Timer Button Engages the on off timer function 12 Heater Mode Button Toggles between Hi Low Eco ...

Page 10: ... Mode Button Toggles between the three heat modes available 3 Temp Down Button Decreases the set temperature value 4 Power Button Powers the heater on or off 5 Ambient Lock Button Short press Shows Ambient temperature Long press for 3 seconds to activate lock function 6 Timer Button Engages the on off timer ...

Page 11: ...t will only illuminate when the ECO function is active and the ambient room temperature falls below 68ºF 20ºC 2 HIGH LOW ECO C B 3 Set the temperature by pressing the arrows on the control panel C or the remote control B You can set the temperature on the heater anywhere between 50 F and 90 F or between 10 C and 36 C Once you have chosen the desired temperature the heater will remain on until the ...

Page 12: ...wered off then press the timer button on the control panel C Note The timer power on function can only be set when the heater is in power off mode The digital display on the control panel C will indicate time value for the timer Press the Timer button repeatedly to change the number value between a range of 0 to 12 hours in 1 hour intervals The Timer light turns on when the timer is set 5 C B TIME...

Page 13: ... the heater in water 4 Wait until the unit is completely dry before use 5 If you will not be using the heater for a while take the batteries out of the remote control and store for future use 6 Store the heater in a cool dry location when not in use To prevent dust and dirt build up use the original packaging to repack the unit CLEANING THE AIR FILTER 1 Clean the air filter 2 after three months or...

Page 14: ...ound to the bot tom of the unit Max hanging height is 36 from the ground to the bottom of the unit If mounting the bracket to dry wall use the outside screw slots See Diagram A along with the provided drywall anchors If mounting the bracket to a wooden stud use the Top Middle and Bottom Middle Screw slots Diagram B If you choose this option you will need to use a screw with min 2 length not provid...

Page 15: ...er s warranty department The purchaser is responsible for insuring any parts shipped or returned if desired The purchaser is responsible to prepay any shipping charges both ways including but not limited to taxes and duties All exchanged parts and products replaced under this warranty will become the property of manufacturer The manufacturer reserves the right to change manufacturers of replacemen...

Page 16: ...tment at 1 866 484 2066 8 a m 5 p m CST Monday Friday PART DESCRIPTION HT1074 HT1086 HT1087 HT1141 A Control panel COPA H2016 COPA H2016 COPA H2016 B Fan FAN2016 FAN2016 FAN2016 C Power board POBO H2016 POBO H2016 POBO H2016 D Tip over switch TIPSW TIPSW TIPSW E Limit switch LIMIT130 LIMIT130 LIMIT130 F Infrared tube QUAR R375 QUAR W250 QUAR R250 G Wire mica MICA 375 MICA 250 MICA 250 H Thermostat...

Page 17: ...os los derechos reservados Preguntas problemas piezas faltantes Llame a nuestro Departamento de Servicio al Cliente al 1 866 484 2066 de lunes a viernes de 8 a m a 5 p m hora estándar del Centro y www lifesmartproducts com Tenga preparado el número de serie y modelo ADJUNTE SU RECIBO AQUÍ Fecha de compra ____________Número de serie ubicado en la parte trasera de la unidad __________________ 17 ...

Page 18: ...ión de seguridad 20 Preguntas frecuentes 22 Preparación 24 Solución de problemas 24 Panel de control 25 Control remoto 26 Instrucciones de funcionamiento 27 Cuidado y mantenimiento 13 Un año de garantía limitada 14 Lista de piezas de repuesto 15 ...

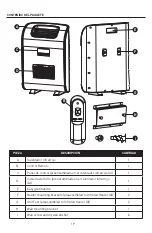
Page 19: ...nel de control preensamblado en el calentador infrarrojo A 1 D Cubierta del filtro preensamblado en el calentador infrarrojo A 1 E Easy grab handle 1 F Heater mounting brackets preassembled to Infrared Heater A 2 G Unit Feet preassembled to Infrared Heater A 2 H Wall mounting bracket 1 I Wall screw and drywall anchor 6 ...

Page 20: ...icante para conocer las opciones de resolución No lo use en exteriores La exposición a los elementos exteriores como la lluvia la nieve el sol el viento o las temperaturas extremas podría causar que el calentador se convierta en un riesgo de seguridad Este calentador no está diseñado para usarse en baños cuartos de lavado ni en espacios interiores similares ni en ningún área donde se utilicen toma...

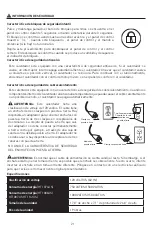
Page 21: ... posible incendio el calentador se apaga automáticamente ADVERTENCIA Este calentador tiene una clasificación de voltaje de 120 voltios El cable tiene un enchufe de tres clavijas con puesta a tierra Hay disponible un adaptador para conectar enchufes con puesta a tierra de tres clavijas en receptáculos de dos ranuras La orejeta de puesta a tierra que sale del adaptador se debe conectar permanentemen...

Page 22: ...or comienza inmediatamente después de encenderlo y configurar una temperatura deseada por sobre la temperatura de la habitación El cambio notorio en la temperatura ambiente de la habitación fluctúa debido a variables como la ubicación del calentador en el hogar la distribución y el tamaño de la habitación la calidad del aislamiento de la habitación la cantidad de puertas ventanas la cantidad de co...

Page 23: ...incluso después de que el calentador termine el ciclo automáticamente El ventilador continúa funcionando a fin de expulsar todo el calor de la cámara de calor al mismo tiempo que permite que la unidad siga filtrando el aire Una vez que las cajas componentes internos se enfríen por completo el ventilador debería apagarse automáticamente En este caso espere unos minutos después de que finalice el ci...

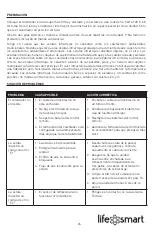
Page 24: ...uncionarán bien en espacios no aislados y sin calefacción como porches con mallas contra insectos caravanas garajes sótanos sin calefacción etc SOLUCIÓN DE PROBLEMAS PROBLEMA CAUSA POSIBLE ACCIÓN CORRECTIVA El calentador no enciende 1 El cable de alimentación no está enchufado 2 No hay electricidad en la caja de fusibles principal 3 Se agotó la batería del control remoto 4 El termostato del calent...

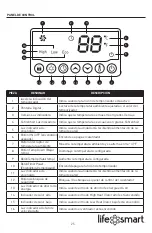
Page 25: ... de temperatura ambiente Muestra la temperatura ambiente y se alterna entre C F 8 Botón Temp Down Bajar temp Disminuye la temperatura configurada 9 BotónTempUp Subirtemp Aumenta la temperatura configurada 10 BotónTimerPower Encendidodeltemporizador Enciende apaga la función de temporizador 11 Luz indicadora de encendido Indica cuando la unidad está recibiendo alimentación de la toma de pared 12 Bo...

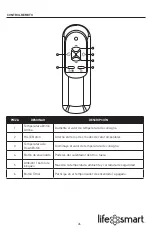
Page 26: ... Botón Alterna entre los tres modos de calor disponibles 3 Temperatura de Down Botón Disminuye el valor de temperatura de consigna 4 Botón de encendido Poderes del calentador dentro o fuera 5 Ambient botón de bloqueo Muestra la temperatura ambiente y cerradura de seguridad 6 Botón Timer Participa en el temporizador de encendido apagado ...

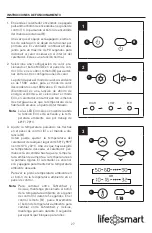
Page 27: ...a temperatura de la habitación alcance un punto determinado Note La luz LED ECO sólo se enciende cuando la función ECO está activado y la tem peratura ambiente cae por debajo de 68ºF 20ºC 2 HIGH LOW ECO C B 3 Ajuste la temperatura pulsando las flechas en el panel de control C o el mando a dis tancia B Usted puede ajustar la temperatura del calentador de cualquier lugar entre 50 F y 90 F o entre 10...

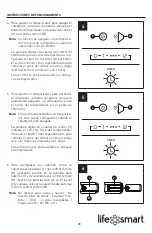
Page 28: ...que la unidad está apagada a continuación pulse el botón del temporizador en el panel de control C Note La función de encendido con temporiza dor solo puede configurarse cuando el calentador está apagado La pantalla digital en el panel de control C indicará el valor de hora del temporizador Presione el botón Timer repetidamente para cambiar el valor del número entre un rango de 0 a 12 horas en int...

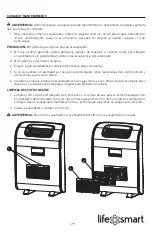
Page 29: ... a que la unidad esté completamente seca antes de usarla 5 Si no va a utilizar el calentador por un período prolongado retire las baterías del control remoto y almacénelas para su uso futuro 6 Cuandonoloutilice almaceneelcalentadorenunlugarfrescoyseco Paraevitarlasacumulaciones de polvo y suciedad use el empaque original para embalar la unidad LIMPIEZA DEL FILTRO DE AIRE 1 Limpie el filtro de aire...

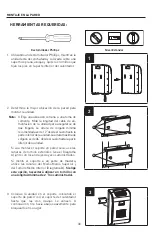
Page 30: ...dad Laalturamáximade colgado es de 36 desde el suelo hasta la parte inferior de la unidad Si va a montar el soporte en pared seca use las ranuras de tornillo exteriores vea el Diagrama A junto con los anclajes de yeso suministrados Si monta el soporte a un poste de madera utilice las ranuras del Medio Medio Superior y del Tornillo Medio Inferior Diagrama B Si elige esta opción necesitará utilizar ...

Page 31: ...las piezas y productos reemplazados bajo esta garantía serán de propiedad del fabricante El proveedor se reserva el derecho de cambiar de fabricante de las piezas de repuesto o productos para el uso para cubrir cualquier garantía existente Se pedirá al comprador que entregue al proveedor los documentos de la prueba de compra incluida la fecha de compra si se solicita Cualquier evidencia de alterac...

Page 32: ...O H2016 D Sugerencia Sobre El Interruptor TIPSW TIPSW TIPSW E Límite De Cambio LIMIT130 LIMIT130 LIMIT130 F Cuarzo Elemento De Calefacción QUAR R375 QUAR W250 QUAR R250 G Mica de alambre MICA 375 MICA 250 MICA 250 H Cable de termostato SENSOR SENSOR SENSOR I Control Remoto REMO H2016 REMO H2016 REMO H2016 B A C D E H I G F Impreso en China lifesmart es una marca registrada de Source Network Sales ...

Reviews: