background image

Installation

7

Accessing the Configuration Port

What you will need:

• PC capable of running a terminal emulation application, such as 

Microsoft Windows® HyperTerminal®.

• DB9 Null modem or file transfer cable. (The correct cable will have 

at a minimum, pins 2 and 3 crossed at the ends.) Null modem 

cables are commonly found in computers stores and may also be 

referred to as a file transfer cable.

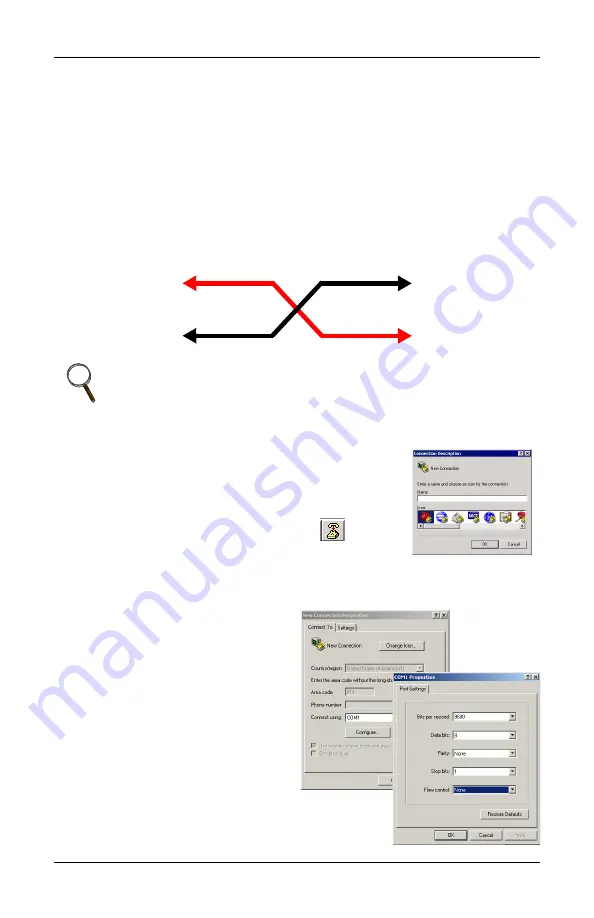
Figure 3

Null modem cable diagram

1. Launch HyperTerminal. When you see the 

screen at right, select 

Cancel

.

2. Select the disconnect icon from the menu bar. 

This step ensures that you will be able to 

modify the configuration settings.

3. Go to 

File > Properties

 to make 

configuration changes. Under the 

Connect 

To 

setting, choose the appropriate communications port for your 

computer. Generally this is Com 1.

4. Select the 

Configure

 button 

and adjust the terminal 

communication settings to:

• Bits per second: 9600
• Data  Bits:  8
• Parity: None
• Stop Bit: 1
• Flow Control: None
• Select 

OK

 to close both win-

dows.

5. After the communication 

settings are adjusted, press 

NOTE

Turn off the power management on your PC or laptop to ensure 

that the communications port will not “go to sleep” during the 

configuration process.

Null Connection

DTE Device

Receive Rx (pin2)

Transmit Tx (pin3)

DTE Device

Receive Rx (pin2)

Transmit Tx (pin3)

Summary of Contents for MONITORING OpenComms

Page 1: ...MONITORING OpenComms NIC USER MANUAL...

Page 2: ......

Page 3: ...t Service Terminal 6 3 0 SYSTEM CONFIGURATION 9 3 1 DIP Switch Settings 9 3 2 Service Terminal 9 4 0 OPERATION 14 4 1 SNMP 14 4 2 Liebert Global Products MIB 14 4 3 RFC 1628 UPS MIB 15 4 3 1 SNMP Trap...

Page 4: ...06 24 6 0 NIC SETUP AND TESTING 25 6 1 Jumper Placement 25 6 2 Testing the Network 26 6 3 Service Terminal Troubleshooting 26 6 4 SNMP Troubleshooting 26 6 5 Web Troubleshooting 27 6 6 Modbus Troubles...

Page 5: ...icroprocessors 38 9 4 Himod LNA 38 9 4 1 System Wiring Himod 39 9 4 2 Power Connection Himod 39 9 4 3 Communication Connection HiMod 39 9 5 Mini Mate2 39 9 6 Emerson Network Power CEMS100 LECS15 40 9...

Page 6: ...lation 34 Figure 11 Deluxe System 3 chilled water control cavity 35 Figure 12 ICS control cavity 35 Figure 13 Challenger installation location 36 Figure 14 Himod NIC installation location 38 Figure 15...

Page 7: ...for building management systems and SiteScan For the first time the system that monitors the status of your comput ing communication and facility infrastructure can comprehensively monitor your Lieber...

Page 8: ...h Graphics Advanced Microprocessor and standard microprocessor Mini Mate2 Level 00 Deluxe System3 Challenger 3000 Level 10 Deluxe System3 Challenger 3000 Level 05 15 UK Himod Emerson Network Power CEM...

Page 9: ...vel 00 05 10 15 Yes NIC Himod Yes Yes NIC Emerson Network Power CEMS100 LECS15 Yes 3 Yes 3 Consult sales department 3 Phase UPS Npower Yes Yes 2 37OP000NIC8 Hiross 7200 Italy Yes Yes 2 4645114G Hiross...

Page 10: ...maximum Environmental Conditions F C Operating Ambient Temperature 41 to 104 5 to 40 Storage Ambient Temperature 4 to 140 20 to 60 Relative Humidity 10 to 90 RH Non condensing Dimensions Inches mm Uni...

Page 11: ...it the circuit board is secured to a metal mounting plate The mounting plate then is attached to a flat metal surface in a low voltage section of the Liebert unit 2 2 Self Contained Unit The self cont...

Page 12: ...2 BMS Port The Modbus 485 connection will use the terminals marked Repeater TB2 The Modbus server uses RTU protocol and will allow for a maxi mum of 32 units on 4000ft of wire on a common line EIA 485...

Page 13: ...is step ensures that you will be able to modify the configuration settings 3 Go to File Properties to make configuration changes Under the Connect To setting choose the appropriate communications port...

Page 14: ...n the OpenComms NIC card This will also initiate communications and provide information on current revision status 6 When the message Initializing Network appears hit the Enter key on your keyboard Ad...

Page 15: ...vice terminal communication parameters are 9600 bps No parity 8 data bits 1 stop bit Flow Control None After connecting to the OpenComms NIC card press the space bar or Enter key to activate the servi...

Page 16: ...2 1 1 2 BootP 2 1 1 3 DHCP 2 1 2 IP Address 2 1 3 Netmask 2 1 4 Default Gateway 2 2 SNMP Communications 2 2 1 SNMP agent enable disable 2 2 2 Authentication Traps enable disable 2 2 3 Display Modify...

Page 17: ...en this feature is enabled at boot up the card will perform a DHCP or BOOTP request for configuration information including automatic assignment of an IP address If the card receives the information n...

Page 18: ...le the Telnet session Change User Name Password This section allows users to set or change the default user name and password Default user name is Liebert case sensitive Default password is Liebert ca...

Page 19: ...user can enable disable the Modbus sessions as well as assign the slave ID Q q will abort all changes X x will save configuration changes Once all parameters have been entered press escape to return t...

Page 20: ...the condition table within the appropriate MIB and a unique ID is assigned A description of the con dition along with the value of the system up time when the condition was generated is placed into t...

Page 21: ...alarm is placed into the alarm table and provides the alarm ID and the alarm description This trap is not sent on the following alarms On Battery and Test In Progress The Trap Alarm entry Removed is s...

Page 22: ...33 1 6 3 16 upsAlarmFanFailure 1 3 6 1 2 1 33 1 6 3 17 upsAlarmFuseFailure 1 3 6 1 2 1 33 1 6 3 18 upsAlarmGeneralFault 1 3 6 1 2 1 33 1 6 3 19 upsAlarmDiagnosticTestFailed 1 3 6 1 2 1 33 1 6 3 20 up...

Page 23: ...e unit s front bezel controls These browsers have been tested and are supported Microsoft Internet Explorer versions 5 x and later Limited Support for Netscape 6 0 Opera 5 Font size may need to be adj...

Page 24: ...LED locations LED Identifier Description DS1 Ethernet Port Collision DS2 Ethernet Port Receive DS3 Ethernet Port Transmit DS4 Ethernet Port Link DS5 Not used DS6 Not used DS7 Repeater Port Receive DS...

Page 25: ...twork is a multi drop or daisy chain configuration over EIA 485 where multiple slaves reside on a common wire or loop 5 1 1 Constraints The OpenComms NIC communicates with local database and there for...

Page 26: ...ed to reside on a maximum com mon line of 32 devices with a total cable length of 4000 feet In a nor mal environment all devices should be connected in daisy chain fashion with star configurations or...

Page 27: ...alternative solutions 5 4 Modbus Slave Functions 5 4 1 Data Type The OpenComms NIC supports data in a register block as one of the following types Signed integer 16 bit Unsigned integer 16 bit Signed...

Page 28: ...r 5 4 4 Read Input Registers 0x04 The input register block contains read only data accessible to the user A datum in the input register block occupies one or multiple registers such as described in th...

Page 29: ...ed by Modbus specification Modbus Packet Formats Each Modbus packet consists of the following fields Device Address Function Code Data Field s Error Check Field Device Address The address field immedi...

Page 30: ...unction Code 0x03 0x04 Query for reading holding input registers requested by a client Response for reading holding input registers response by the server 5 5 2 Write single holding register Function...

Page 31: ......

Page 32: ...e rebooted by pressing switch S1 on the card for approximately 2 seconds until the DS9 link light turns off If the card still does not connect to the network or ping still does not receive a reply fro...

Page 33: ...device DS8 indicates that the card is transmitting to the con nected device If neither of the link lights is blinking check the connection between TB1 and P3 TB1 is used to interface to the Environmen...

Page 34: ...st firmware can be found at this link on the Liebert Web site http www liebert com dynamic displayprod uct asp id 998 cycles 60Hz 7 1 Establishing Communication Necessary Components PC capable of runn...

Page 35: ...hat you will be able to modify the configuration settings 3 Go to File Properties to make configuration changes Under the Connect To setting choose the appropriate communications port for your compute...

Page 36: ...e adjusted press the Enter key on your keyboard This will initiate communications with the card and display the screen at right You can also cycle power on the Open Comms NIC card This action will als...

Page 37: ...ask whether you with to continue Select Y to continue 13 Select option 2 for Xmodem1K to facilitate a faster download for the remaining files Press Enter twice to initiate the download of the second...

Page 38: ...d The screen at right will appear You can also cycle power on the Open Comms NIC card This action will also initiate communications and provide information on current revision status Once the Initiali...

Page 39: ...e OpenComm Network Card is generally estab lished by using the unit s SiteScan interface port The specifics on location and wiring details can be found in the respective unit s user manual The unit s...

Page 40: ...s and instal lation help 9 1 1 Deluxe System 3 Position the OpenComms card in the low voltage control cavity of the Liebert Deluxe System 3 unit Refer to Figures 10 11 and 12 for typ ical positioning...

Page 41: ...igure 11 Deluxe System 3 chilled water control cavity Figure 12 ICS control cavity P25 P43 TB1 TB2 Connects to screw terminals 77 and 78 see schematic TB3 P25 P43 TB1 TB2 Connects to screw terminals 7...

Page 42: ...Installation 36 Figure 13 Challenger installation location The OpenComms Network card mounts on the Challenger s L plate P25 P43 TB1 TB2 Connects to screw terminals 77 and 78 see schematic TB3 Electr...

Page 43: ...the NIC 1 1 Locate the connector containing the two red wires plugged into P43 on the control board and unplug it Reconnect it to the connector in the middle of the supplied harness 2 2 Plug one end o...

Page 44: ...the interface card the other end connects to P25 of the environmental controller 9 3 3 Communication Connection Level 0 and Level 10 Microprocessors To connect communications wire to the NIC wire as d...

Page 45: ...d and the other end into TB3 of the OpenComms card 9 4 3 Communication Connection HiMod The second wiring harness provided p n 159083G1 has a connector fitted at either end and is the communications c...

Page 46: ...ds mount on the inside of the option door Options can be located in any available option slot however the OpenComms NIC should be mounted in the bottom most bottom cable entry posi tion 9 8 1 Power Co...

Page 47: ...Retrofit Installation 41 Figure 15 NPower UPS NIC installation Power Supply Board Option Section SiteScan IFM OpenComms NIC location see detail Control Door IGMnet Detail 24VAC...

Page 48: ...presentative or Liebert s Cus tomer Service and Support Department at Liebert Hiross Service Customer Service and Support Department Fourth Avenue Globe Park Marlow Buckinghamshire SL71YG Telephone 44...

Page 49: ...Retrofit Installation 43 Figure 16 7200 UPS NIC installation LogicOperator Board Network Interface Card...

Page 50: ...local Liebert representative or Liebert s Cus tomer Service and Support Department at Liebert Hiross Service Customer Service and Support Department Fourth Avenue Globe Park Marlow Buckinghamshire SL...

Page 51: ...Retrofit Installation 45 Figure 17 HiPulse installation...

Page 52: ...2 RS 232 DB 9 connector for setup only Uses standard computer serial port cable Customer supplied interconnecting cable Ethernet Network RJ 45 connector See Notes 1 2 Customer supplied interconnecting...

Page 53: ...esigned specifically for individual units Consult your local sales service representative for pricing part numbers and installation help All compatible PDU s and DataWave s require the use of an exter...

Page 54: ...Retrofit Installation 48...

Page 55: ......

Page 56: ...ems for sensitive electronics Environmental systems close control air conditioning from 1 to 60 tons Power conditioning and UPS with power ranges from 300VA to more than 1000kVA Integrated systems tha...

Reviews: