Making Measurements
Preparation Check Lists
4-4
Using the LI-6400
4
flow. The value is typically in the 700Õs if a CO2 mixer is installed, or higher
if not.
Now test the chemical tubes for flow restrictions by changing each from full
bypass to full scrub, and watching the affect on flow rate. Normally, scrub-
bing will drop the maximum flow by 5 or 10 µmol s
-1
per tube. Larger drops
may indicate that the air mufflers in the chemical tubes are getting clogged,
or that a flow diversion tube is pinched shut. See
Finally, set the flow to 500 µmol s
-1
.
After Warm Up
After the IRGAs have been on for about 10 minutes
1
, continue with the fol-
lowing steps:
1
Check the Flow zero
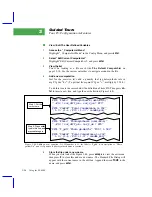
In New Measurements mode, monitor
Flow_µms
(display line
b
) and turn the
pump off (
2 f2 N
) and the chamber fan off (
3
f3
O
for off)
2
. The flow should
drop to within 1 or 2 µmol s
-1
of zero. If it doesnÕt, re-zero the flow meter (
on page 18-17). Turn the fan back on when done.
2
Adjust the latch, and close the chamber
1) Adjust the latch so that the chamber lips are slightly apart when the cham-
ber is closed. 2) With the chamber closed, close the adjustment knob until it
starts to become snug. 3) Open the chamber, and turn the knob one or two
more half turns. Now the chamber is adjusted properly for sealing when emp-
ty, or with thin leaves. Close the chamber for the next two steps.
3
Check the CO
2
IRGA zero
In New Measurements mode, with the mixer off (
2 f3 N
), and the flow set to
500 µmol s
-1
(
f2 F 500 enter
), monitor CO
2
reference and sample (display
line
a
). Turn the soda lime on full scrub, and the desiccant on full bypass. The
reference should quickly approach zero, while the sample will approach zero
a bit more slowly. If they are within 5 µmol mol
-1
of zero, it will be adequate.
1.
Or longer, if the system has just been moved from one temperature to another.
2.
Why turn off the chamber fan? If itÕs on when the pump is off, it will actually
push a bit of air (1 or 2 µmol s
-1
) back through the flow meter, throwing off your
zero reading.
Summary of Contents for LI-6400
Page 1: ...Using the LI 6400 Portable Photosynthesis System ...
Page 15: ...Part I The Basics ...
Page 16: ......
Page 174: ...Making Measurements Answers to Questions 4 56 Using the LI 6400 4 ...
Page 175: ...Part II Useful Details ...
Page 176: ......
Page 200: ...Standard Tools Power ON Hooks 5 24 Using the LI 6400 5 ...
Page 214: ...Real Time Data Real Time Graphics 6 14 Using the LI 6400 6 ...
Page 234: ...Environmental Control Light Control 7 20 Using the LI 6400 7 ...
Page 244: ...Light Sensor Considerations Gallium Arsenide Phosphide GaAsP Sensor 8 10 Using the LI 6400 8 ...
Page 288: ...Data Logging Making Your Own AutoPrograms 9 44 Using the LI 6400 9 ...
Page 289: ...Part III Working With Files ...
Page 290: ......
Page 312: ...The LPL File System Troubleshooting 10 22 Using the LI 6400 10 ...
Page 340: ...Downloading Files Using a Data Capture Program 11 28 Using the LI 6400 11 ...
Page 375: ...Part IV Configuration Issues ...
Page 376: ......
Page 420: ...Defining User Variables Old Style vs New Style 15 18 Using the LI 6400 15 ...
Page 454: ...Using an Energy Balance Further Reading 17 12 Using the LI 6400 17 ...
Page 455: ...Part V Maintenance Troubleshooting ...
Page 456: ......
Page 572: ...Troubleshooting Useful Information 20 46 Using the LI 6400 20 ...
Page 593: ...Part VI Programming ...
Page 594: ......
Page 622: ...Programming with LPL Compiler Directives 22 28 Using the LI 6400 22 ...
Page 846: ...Index I 16 Using the LI 6400 ...

