background image

14

PREPARATION

PREP

AR
A

T

ION

SECURING THE TV TO THE WALL TO PREVENT FALLING

You should purchase necessary components to prevent TV from falling off of the stand.
Image shown may differ from your TV.

We recommend that you set up the TV close to a wall so it cannot fall over if pushed backwards.
Additionally, we recommend that the TV be attached to a wall so it cannot be pulled in a forward direction, 

potentially causing injury or damaging the product.
Caution: Please make sure that children don’t climb on or hang from the TV.

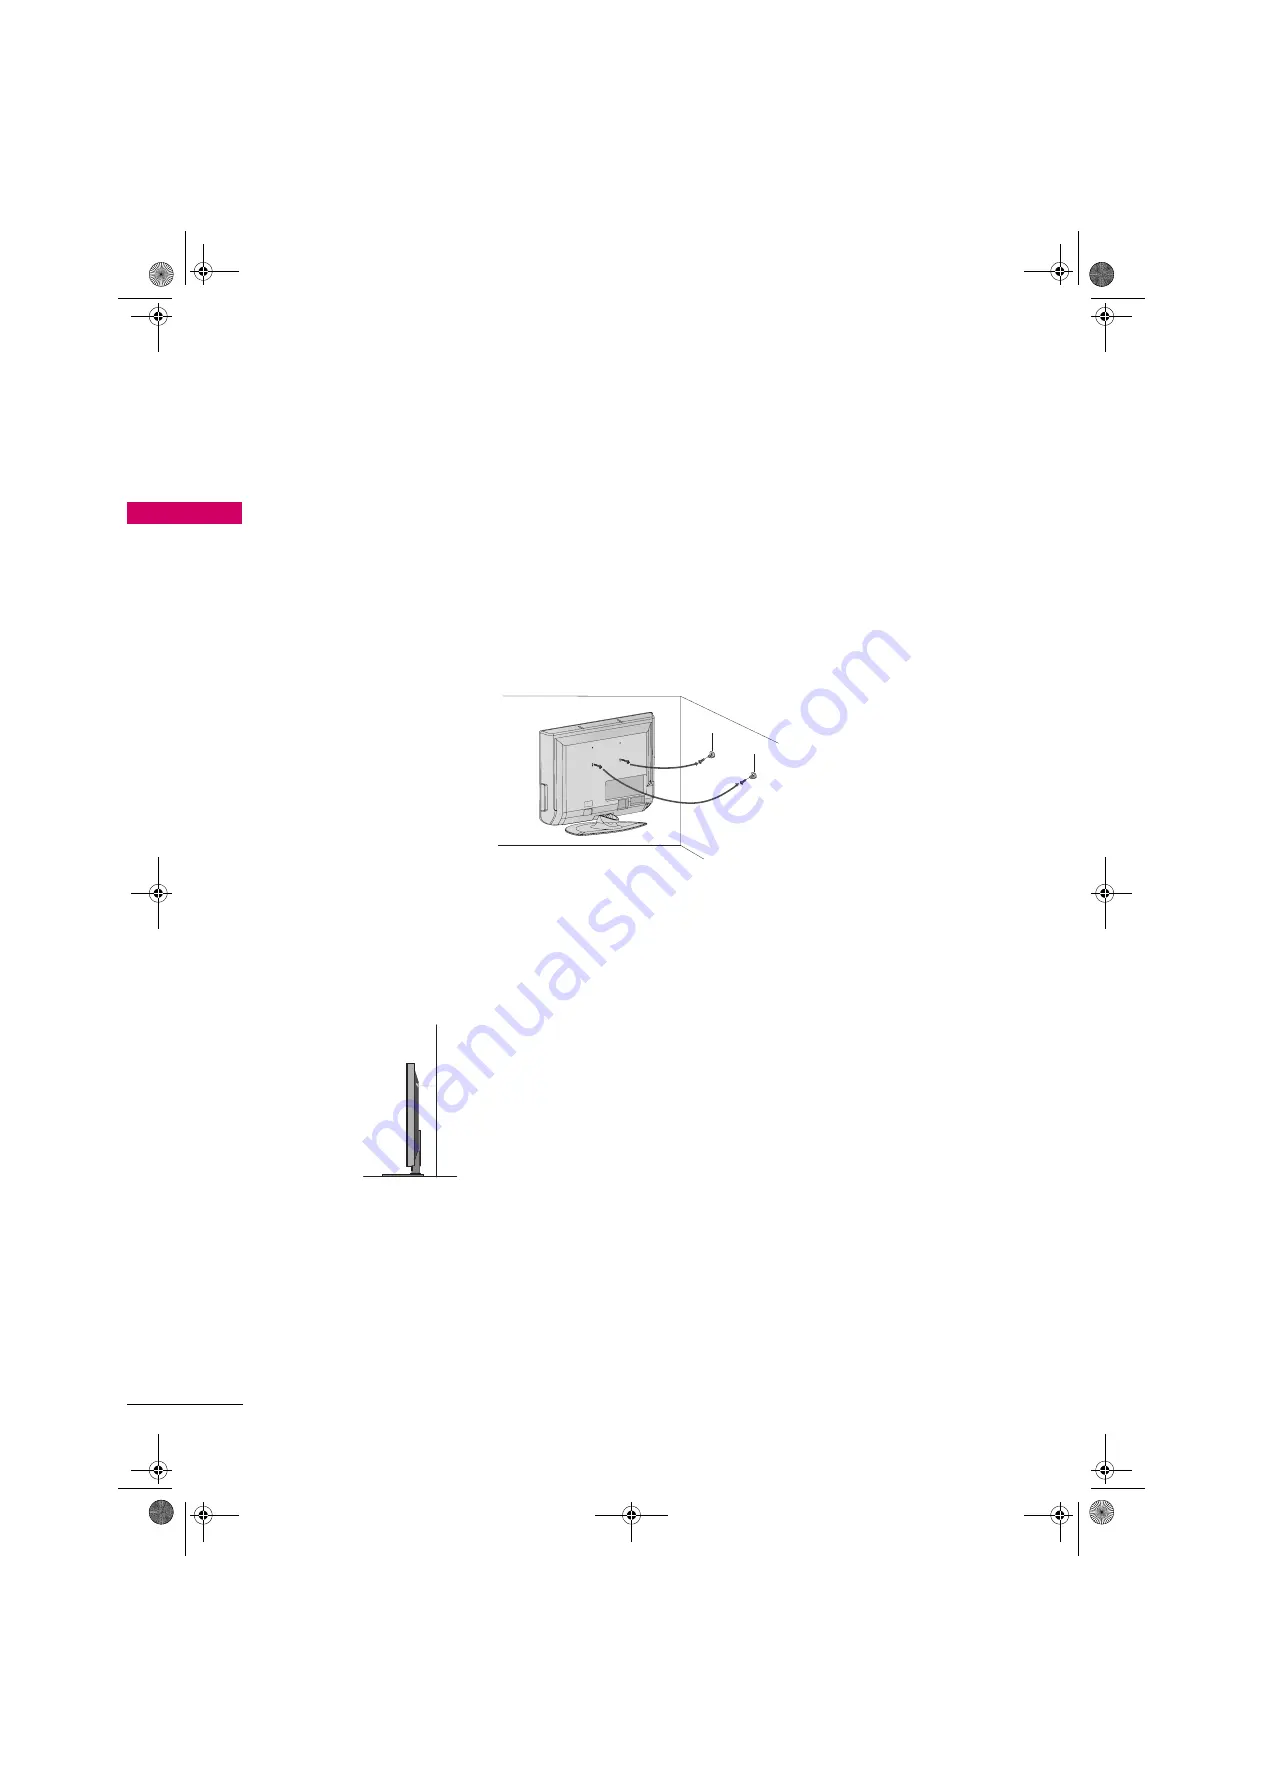
Insert the eye-bolts (or TV brackets and bolts) to tighten the product to the wall as shown in the picture. 
* If your product has the bolts in the eye-bolts position before inserting the eye-bolts, loosen the bolts. Secure

the wall brackets with the bolts (not provided as parts of the product, must purchase separately) to the wall.
Match the height of the bracket that is mounted on the wall to the holes in the product. 
Ensure the eye-bolts or brackets are tightened securely.

Use a sturdy rope (not provided as parts of the product, must purchase
separately) to tie the product. It is safer to tie the rope so it becomes
horizontal between the wall and the product.

Zenith.book  Page 14  Wednesday, April 2, 2008  11:46 AM

Summary of Contents for Zenith Z32LC6DUM

Page 1: ...er saving guidelines issued by the U S Environmental Protection Agency EPA As an ENERGY STAR Partner LGE U S A Inc has determined that this product meets the ENERGY STAR guidelines for energy efficiency Copyright 2008 LG Electronics USA Inc Zenith book Page 1 Wednesday April 2 2008 11 46 AM ...

Page 2: ...Zenith book Page 2 Wednesday April 2 2008 11 46 AM ...

Page 3: ...n accordance with the instructions may cause harmful interference to radio communications However there is no guarantee that interference will not occur in a particular installation If this equipment does cause harmful interference to radio or television reception which can be determined by turning the equipment off and on the user is encouraged to try to correct the interference by one or more of...

Page 4: ...ons Heed all warnings Follow all instructions Do not use this apparatus near water Clean only with dry cloth Do not block any ventilation openings Install in accordance with the manufacturer s instructions Do not install near any heat sources such as radiators heat registers stoves or other apparatus including amplifiers that produce heat When mounting a TV on the wall make sure not to install TV ...

Page 5: ...damaged or cracked wire insulation are dangerous Any of these conditions could result in electric shock or fire Periodically examine the cord of your appliance and if its appearance indicates damage or deterioration unplug it discontinue use of the appliance and have the cord replaced with an exact replacement part by an authorized servicer Protect the power cord from physical or mechanical abuse ...

Page 6: ...n Auto Tuning 34 Add Delete Channel Manual Tuning 35 Channel Editing 36 INPUT LIST 37 INPUT LABEL 38 KEY LOCK 39 PICTURE CONTROL PICTURE SIZE ASPECT RATIO CONTROL 40 PRESET PICTURE SETTINGS 41 Picture Mode Preset 41 Color Tone Preset 42 MANUAL PICTURE ADJUSTMENT 43 Picture Mode User Mode 43 Color Tone User Mode 44 DB PICTURE IMPROVEMENT TECHNOLOGY 45 ADVANCED CINEMA 3 2 PULL DOWN MODE 46 ADVANCED ...

Page 7: ...L CONTROL RATINGS SET PASSWORD LOCK SYSTEM 66 CHANNEL BLOCKING 68 EXTERNAL INPUT BLOCKING 68 MOVIE TV RATING 69 DOWNLOADABLE RATING 71 APPENDIX TROUBLESHOOTING 72 MAINTENANCE 74 PRODUCT SPECIFICATIONS 75 PROGRAMMING THE REMOTE CONTROL 76 IR CODES 79 EXTERNAL CONTROL THROUGH RS 232C 81 OPEN SOURCE LICENSE 88 Zenith book Page 5 Wednesday April 2 2008 11 46 AM ...

Page 8: ... product with general household waste Disposal of this product must be carried out in accordance to the regulations of your local authority High definition television High resolution digital television broadcast and playback system composed of roughly a million or more pixels 16 9 aspect ratio screens and AC3 digital audio A subset of digital television HDTV formats include 1080i and 720p resoluti...

Page 9: ...t Clip 4 Bolts for stand assembly Refer to p 10 Screw for stand fixing Refer to p 13 Polishing Cloth Wipe spots on the exterior only with the polishing cloth Do not wipe roughly when removing stain Please be cautions of that excessive pressure may cause scratch or discoloration D sub 15 pin Cable When using the VGA D sub 15 pin cable PC connection the user must use shielded signal interface cables...

Page 10: ...ape And then wipe the product with a cloth If a polishing cloth is included with your product use it CHANNEL S T Buttons VOLUME W X Buttons ENTER Button MENU Button INPUT Button POWER Button Power Standby Indicator Illuminates red in standby mode Illuminates green when the set is switched on Remote Control Sensor Zenith book Page 8 Wednesday April 2 2008 11 46 AM ...

Page 11: ...red remote control ANTENNA CABLE IN Connect over the air signals to this jack Connect cable signals to this jack DIGITAL AUDIO OUT Digital audio output for use with amps and home theater systems Includes an optical and or coaxial connection Note In standby mode these ports do not work RS 232C IN CONTROL SERVICE PORT Used by third party devices AUDIO OUT Analog audio output for use with amps and ho...

Page 12: ...erent from your TV Carefully place the product screen side down on a cushioned surface that will protect product and screen from damage Assemble the product stand with the product as shown Securely install the 4 bolts provided Zenith book Page 10 Wednesday April 2 2008 11 46 AM ...

Page 13: ...DESTAL INSTALLATION For proper ventilation allow a clearance of 4 inches on all four sides from the wall NOTE X Screw length needed depends on the wall mount used For further information refer to the instructions included with the mount CAUTION X Ensure adequate ventilation by following the clearance recommendations Z32LC6D 200 mm Z37LC6D 600 mm Z32LC6D 100 mm Z37LC6D 400 mm 4 inches 4 inches 4 in...

Page 14: ...NT SETUP section Install the CABLE MANAGEMENT CLIP as shown How to remove the CABLE MANAGEMENT CLIP X Hold the CABLE MANAGEMENT CLIP with both hands and pull it backward CABLE MANAGEMENT CLIP NOTE X Do not hold the CABLE MANAGEMENT CLIP when moving the product If the product is dropped you may be injured or the product may be broken Zenith book Page 12 Wednesday April 2 2008 11 46 AM ...

Page 15: ...sing injury or damaging the product Use only an attached screw WARNING X To prevent TV from falling over the TV should be securely attached to the floor wall per installation instructions Tipping shaking or rocking the machine may cause injury 1 Screw provided as parts of the product Stand Desk Zenith book Page 13 Wednesday April 2 2008 11 46 AM ...

Page 16: ...om the TV Insert the eye bolts or TV brackets and bolts to tighten the product to the wall as shown in the picture If your product has the bolts in the eye bolts position before inserting the eye bolts loosen the bolts Secure the wall brackets with the bolts not provided as parts of the product must purchase separately to the wall Match the height of the bracket that is mounted on the wall to the ...

Page 17: ... amplifier and install properly If the antenna needs to be split for two TV s install a 2 Way Signal Splitter If the antenna is not installed properly contact your dealer for assistance Wall Antenna Socket Outdoor Antenna VHF UHF Multi family Dwellings Apartments Connect to wall antenna socket RF Coaxial Wire 75 ohm Single family Dwellings Houses Connect to wall jack for outdoor antenna Copper Wir...

Page 18: ...input source on the TV using the INPUT button on the remote control If connected to COMPONENT IN2 input select the Component 2 input source on the TV Connect the video outputs Y PB PR of the digital set top box to the COMPONENT IN VIDEO 1 jacks on the set Match the jack colors Y green PB blue and PR red Connect the audio output of the digital set top box to the COMPONENT IN AUDIO 1 jacks on the TV...

Page 19: ...set top box to HDMI DVI IN 1 or HDMI IN 2 jack on the TV No separated audio connection is necessary HDMI supports both audio and video HDMI1 DVI DTV HDMI2 DTV mode Resolution Horizontal Frequency KHz Vertical Frequency Hz 720x480p 31 47 31 50 59 94 60 00 1280x720p 44 96 45 00 59 94 60 00 1920x1080i 33 72 33 75 59 94 60 00 1920x1080p 26 97 27 00 33 71 33 75 67 432 67 50 23 976 24 00 29 97 30 00 59 ...

Page 20: ...e TV using the INPUT button on the remote control Connect the DVI output of the digital set top box to the HDMI DVI IN 1 jack on the TV Connect the audio output of the digital set top box to the AUDIO RGB DVI jack on the TV NOTE X A DVI to HDMI cable or adapter is required for this connection DVI doesn t support audio so a separate audio connection is necessary DVI DTV OUTPUT Zenith book Page 18 W...

Page 21: ...te control If connected to COMPONENT IN2 input select the Component 2 input source on the TV Refer to the DVD player s manual for operating instructions Connect the video outputs Y PB PR of the DVD to the COMPONENT IN VIDEO 1 jacks on the TV Match the jack colors Y green PB blue and PR red Connect the audio outputs of the DVD to the COMPONENT IN AUDIO 1 jacks on the TV Component ports on the TV Y ...

Page 22: ...nect the S VIDEO output of the DVD to the S VIDEO input on the TV Connect the audio outputs of the DVD to the AUDIO input jacks on the TV 1 How to connect 2 How to use Select the HDMI1 or HDMI2 input source on the TV using the INPUT button on the remote control Refer to the DVD player s manual for operating instructions Connect the HDMI output of the DVD to the HDMI DVI IN 1 or HDMI IN 2 jack on t...

Page 23: ...Vs and is not covered by warranty Antenna Connection 1 How to connect 2 How to use Set VCR output switch to 3 or 4 and then tune TV to the same channel number Insert a video tape into the VCR and press PLAY on the VCR Refer to the VCR owner s manual Connect the RF antenna out socket of the VCR to the ANTENNA CABLE IN socket on the TV Connect the antenna cable to the RF antenna in socket of the VCR...

Page 24: ...ft white and Audio Right red S Video Connection 1 How to connect 2 How to use Insert a video tape into the VCR and press PLAY on the VCR Refer to the VCR owner s manual Select the AV 1 input source on the TV using the INPUT button on the remote control If connected to AV IN2 select AV 2 input source Connect the S VIDEO output of the VCR to the S VIDEO input on the TV Connect the audio outputs of t...

Page 25: ...utton on the remote control If connected to AV IN1 input select AV 1 input source Operate the corresponding external equipment Connect the AUDIO VIDEO jacks between TV and external equipment Match the jack colors Video yellow Audio Left white and Audio Right red Camcorder Video Game Set Zenith book Page 23 Wednesday April 2 2008 11 46 AM ...

Page 26: ...s settings VGA D Sub 15 pin Connection 1 How to connect 2 How to use Turn on the PC and the TV Select the RGB PC input source on the TV using the INPUT button on the remote control Connect the VGA output of the PC to the RGB PC jack on the TV Connect the PC audio output to the AUDIO RGB DVI jack on the TV Zenith book Page 24 Wednesday April 2 2008 11 46 AM ...

Page 27: ...n the PC and the TV Select the HDMI1 input source on the TV using the INPUT button on the remote control Connect the DVI output of the PC to the HDMI DVI IN 1 jack on the TV Connect the PC audio output to the AUDIO RGB DVI jack on the TV Zenith book Page 25 Wednesday April 2 2008 11 46 AM ...

Page 28: ... and contrast on the PICTURE menu until the picture is clear X Avoid keeping a fixed image on the screen for a long period of time The fixed image could become permanently imprinted on the screen X The synchronization input form for Horizontal and Vertical frequencies is separate X Depending on the graphics card some resolution settings may not allow the image to be positioned on the screen proper...

Page 29: ... X button to make appropriate adjustments The Phase adjustment range is 16 16 The Size adjustment range is 30 30 Press the ENTER button Resolution Resolution Size Phase Reset 1024 x 768 1280 x 768 1360 x 768 1366 x 768 MENU Prev Select Ok Resolution This function allows you select resolution of XGA WXGA Position This function is to adjust picture to left right and up down as you prefer Size This f...

Page 30: ...et Press the ENTER button and then use W or X button to select Yes Press the ENTER button Position Resolution Size Phase Reset Initialize Settings MENU Prev Select Ok Yes No Screen Picture Mode Color Temperature DB Advanced Aspect Ratio Picture Reset User1 Cool 16 9 Screen Picture Mode Color Temperature DB Advanced Aspect Ratio Picture Reset Selection X or leads you to the screen adjustment menu Z...

Page 31: ...IO OUT OPTICAL Connect the other end of the optical cable to the digital audio input on the audio equipment Set the TV Speaker option Off in the AUDIO menu Xp 53 See the external audio equipment instruction manual for operation NOTE X When connecting with external audio equipments such as amplifiers or speakers you can turn the TV speakers off in the menu Xp 53 CAUTION X Do not look into the optic...

Page 32: ...reen displays and return to TV viewing from any menu INPUT External input modes rotate in regular sequence VOLUME UP DOWN Increase decrease the sound level FAV Scroll through the programmed Favorite channels Xp 36 MUTE Switch the sound on or off Xp 32 CHANNEL UP DOWN Select available channels PAGE UP DOWN Move from one full set of screen information to the next one NUMBER button DASH Used to enter...

Page 33: ...lects the factory preset picture depend on the viewing environment Xp 41 SOUND Selects the factory preset sound for type of program Xp 50 SAP Analog mode Selects MTS sound Mono Stereo or a SAP Xp 54 DTV mode Changes the audio language CC Select a closed caption Xp 57 Installing Batteries Open the battery compartment cover on the back side and install the batteries matching correct polarity with wi...

Page 34: ...r Number 0 9 button on the remote control Select the viewing source by using the INPUT button on the remote control This TV is programmed to remember which power state it was last set to even if the power cord is out When finished using the TV press the POWER button on the remote control The TV reverts to standby mode CHANNEL SELECTION Press the CH or or NUMBER buttons to select a channel number P...

Page 35: ... Language Input Label Key Lock Caption Set ID English Off Off 1 Screen Picture Mode Color Temperature DB Advanced Aspect Ratio Picture Reset User1 Cool 16 9 Auto Tuning Manual Tuning Channel Edit Lock System Set Password Block Channel Movie Rating TV Rating Children Off TV Rating General Downloadable Rating Input Block Sound Mode Auto Volume Balance TV Speaker Standard On 0 On Clock Off Time On Ti...

Page 36: ...e SETUP menu Press the button and then use or button to select Auto Tuning Press the ENTER button to begin the channel search Allow Auto Tuning to complete the channel search cycle for ANTENNA and CABLE NOTE DTV Digital DTV antenna TV Analog TV antenna CADTV Digital CADTV cable CATV Analog CATV cable Auto Tuning Manual Tuning Channel Edit Selection X or leads you to the Auto Tuning screen Auto Tun...

Page 37: ...ss the MENU button and then use or button to select the SETUP menu Press the button and then use or button to select Manual Tuning Press the button and then use or button to select TV DTV CATV and CADTV Press the button and then use or button to select channel you want to add or delete Press the ENTER button to add or delete the channel Press RETURN button to return to TV viewing or press MENU but...

Page 38: ... the FAV button on the remote control when a channel is highlighted and then add or delete the channel to from your Favorite List Auto Tuning Manual Tuning Channel Edit Press the MENU button and then use or button to select the SETUP menu Press the button and then use or button to select Channel Edit Press the button You will now see a screen filled with channel numbers and a preview picture Use b...

Page 39: ... input source connected ex When connected only to AV 2 AV 2 Input List Antenna Cable AV 1 AV 2 Component 1 Antenna Cable AV 1 AV 2 Component 1 Component 2 RGB PC HDMI1 HDMI2 Antenna Cable Antenna Cable AV 2 Antenna Select it to watch over the air broadcasts Cable Select it to watch cable and digital cable AV 1 2 Select them to watch a VCR or other external equipment Component 1 2 Select them to wa...

Page 40: ...hen use or button to select Input Label Press the button and then use or button to select the source AV 1 AV 2 Component 1 Component 2 RGB PC HDMI1 or HDMI2 Press the or button to select the label Press RETURN button to return to TV viewing or press MENU button to return to the previous menu Language Input Label Key Lock Caption Set ID AV 1 AV 2 Component 1 Component 2 RGB PC HDMI1 HDMI2 Cable Box...

Reviews: