background image

49

TROUBLESHOOTING

ENGLISH

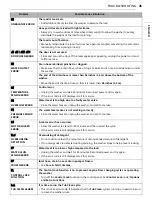
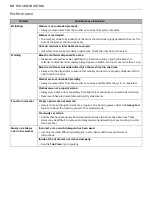
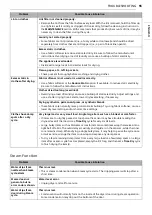
Washer is not filling 

properly.

Filter is clogged.

• Make sure that inlet filters on the fill valves are not clogged. Refer to 

Cleaning the Water 

Inlet Filters

 in 

MAINTENANCE

.

Inlet hoses may be kinked.

• Check that inlet hoses are not kinked or clogged.

Energy efficiency

• This is a High-Efficiency (HE) washer. As a result, the water level settings for this washer 

may be different than for conventional washer.

Insufficient water supply

• Make sure that both hot and cold water faucets are turned on all the way.

Washer door is open.

• Close the door and make sure that nothing is caught under the door preventing it from 

closing completely.

Water level is too low.

• The water will not normally cover the clothes. The fill level is optimized for the wash 

motion to achieve the best wash performance.

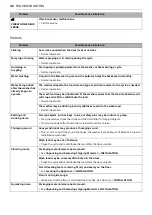
Water in the washer 

does not drain or 

drains slowly.

Drain hose is kinked, pinched, or clogged.

• Make sure that the drain hose is free of clogs or kinks and is not pinched behind or under 

the washer.

The end of the drain hose is more than 96 inches (2.4 m) above the bottom of the 

washer.

• Move the end of the drain hose so that it is lower than 96 inches (2.4 m).

Bleach does not 

dispense.

Bleach dispenser cover is not properly installed (on some models).

• Make sure that the bleach cover is properly installed and snapped into place before the 

beginning of the cycle.

Bleach dispenser is dirty or clogged.

• Lift out the bleach dispenser cover and clean out the reservoir. Lint and other foreign 

debris that are collected inside the dispenser may prevent proper dispensing of the 

bleach.

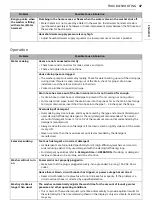
Premature 

dispensing of bleach

Bleach dispenser filled for future load.

• You cannot store bleach in the dispenser for future use. The bleach will be dispensed every 

load.

Overfilling the bleach dispenser

• Overfilling the bleach dispenser will cause the bleach to dispense immediately, which will 

damage the laundry or the washer. Always measure bleach, but never fill above the max 

line on the dispenser. A half cup of bleach is sufficient for most loads. Never use more than 

1 cup of bleach.

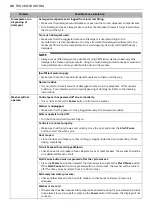
Problem

Possible Cause & Solution

Summary of Contents for WKEX200H A Series

Page 1: ... this owner s manual thoroughly before operating the appliance and keep it handy for reference at all times ENGLISH ESPAÑOL WKEX200H A WKGX201H A MFL71485405 Rev 02_072120 www lg com Copyright 2020 LG Electronics Inc All Rights Reserved ...

Page 2: ...dding Cleaning Products 15 Control Panel 18 Wash Cycles 21 Cycle Modifiers 21 Options and Extra Functions 23 OPERATION DRYER 23 Using the Dryer 25 Control Panel 27 Dry Cycles 29 Cycle Modifiers 29 Options and Extra Functions 31 SMART FUNCTIONS 31 Using LG ThinQ Application 35 Smart DiagnosisTM Function 37 MAINTENANCE 37 Washer 42 Dryer 44 TROUBLESHOOTING 44 Washer 52 Dryer 57 Common 58 LIMITED WAR...

Page 3: ...materials If flexible metal foil type duct is installed it must be of a specific type identified by the appliance manufacturer as suitable for use with clothes dryers Flexible venting materials are known to collapse be easily crushed and trap lint These conditions will obstruct clothes dryer airflow and increase the risk of fire To reduce the risk of severe injury or death follow all installation ...

Page 4: ...m for play Cartons covered with rugs bedspreads or plastic sheets can become airtight chambers The appliance must be installed and electrically grounded by qualified service personnel in accordance with local codes When installing or moving the appliance be careful not to pinch crush or damage the power cord Connect to a properly rated protected and sized power circuit to avoid electrical overload...

Page 5: ...hock by providing a path of least resistance for electric current The appliance is equipped with a cord having an equipment grounding conductor and a grounding plug The plug must be plugged into an appropriate outlet that is installed and grounded in accordance with all local codes and ordinances Operation Read all instructions before using the appliance and save these instructions Use this applia...

Page 6: ... could ignite or explode Do not dry unwashed items in the appliance Remove all objects from pockets such as lighters and matches Do not add gasoline dry cleaning solvents or other flammable or explosive substances to the wash water These substances give off vapors that could ignite or explode In the event of a gas leak propane gas LP gas etc do not operate this or any other appliance Open a window...

Page 7: ...ance and exhaust duct should be cleaned periodically by qualified service personnel CAUTION STATEMENTS CAUTION To reduce the risk of minor or moderate injury to persons malfunction or damage to the product or property when using this product follow basic precautions including the following Installation Install the product on a firm and level floor Operation Turn off the water faucets and unplug th...

Page 8: ... Panel b Lint Filter c Dryer Drum d Dryer Door e Dryer Door Magnet f Detergent Dispenser Drawer g Washer Door h Washer Drum i Washer Door Magnet j Drain Hose k Drain Pump Filter l Drain Pump Filter Cover m Leveling Feet Rear View a Power Cord for Gas Models b Terminal Block Access Panel for Electric Models c Cold Water Inlet d Exhaust Duct Outlet e Gas connection for Gas Models f Hot and Cold Wate...

Page 9: ... for product malfunction property damage or bodily injury caused by the use of separately purchased unauthorized components parts or non LG products Model WKEX200H A WKGX201H A Electrical Requirements Please refer to the rating label for detailed information Min Max Water Pressure 20 120 psi 138 827 kPa Dimensions Width X Height X Depth 27 X 74 3 8 X 30 3 8 70 cm X 189 cm X 77 cm Maximum Depth wit...

Page 10: ...a cycle immediately starts the Normal cycle with the default settings 5 Adjust settings Default settings for the selected cycle can be changed if desired using the cycle modifier and option buttons Not all modifiers and options are available on all cycles A different chime sounds and the LED does not light up if the selection is not allowed 6 Begin cycle Press the Start Pause button to begin the c...

Page 11: ...m light colors or whites Mixing dark clothes with light clothes can result in dye transfer or discoloration of the lighter clothes Soil Level Wash heavily soiled clothing together Washing lightly soiled clothing in the same load with heavily soiled clothing could result in poor wash performance for the lightly soiled clothing Fabric Type Delicate articles should not be mixed with heavy or sturdy f...

Page 12: ... shown Do not press down on items while stacking them in the drum Load clothes loosely and do not overfill the drum Clothes need room to circulate in order to get clean Combine large and small items in the drum Load large items first Large items should not be more than half of the total load The washer can be fully loaded but the drum should not be tightly packed with items The door of the washer ...

Page 13: ...ing 2X and 3X concentrated detergents because even a small amount of extra detergent can lead to problems Never use more than the maximum amount of detergent recommended by the manufacturer Using too much detergent can lead to oversudsing poor rinsing detergent buildup in clothing and residue buildup that can contribute to odors in the washer a Maximum fill line b Average load fill line c Liquid d...

Page 14: ... and powders If the dispenser has a liquid detergent cup and insert Make sure they are in place when using liquid detergent Make sure to remove them when using powdered detergent Powdered detergent will not dispense with the liquid detergent cup and insert in place If you use a detergent that does not dissolve easily or a detergent with high viscosity it will leave a residue and clog the dispenser...

Page 15: ...cle Once the desired cycle has been selected the standard presets will appear in the display These settings can be adjusted using the Cycle Modifier buttons at any time before starting the cycle c Start Pause Button Press and hold this button to start the selected cycle If the washer is running use this button to pause the cycle without losing the current settings NOTE If the Start Pause button is...

Page 16: ...ocked The indicator light stays on until the cycle is paused stopped or has finished d Signal Indicator This indicator lights up when the end of cycle and button tones are turned on e Estimated Time Remaining When a cycle is selected the default time for that cycle is displayed This time will change as modifiers or options are selected If the display shows I then the time will be displayed after t...

Page 17: ... Indicators These LEDs will blink when a cycle is selected to indicate which stages will run When a cycle is running the LED for the active stage will blink and the LEDs for the remaining stages will remain steady Once a stage is complete the LED will turn off If a cycle is paused the active stage LED will stop blinking ...

Page 18: ...ecting a cycle will cause the Normal cycle to begin immediately using the default settings Wash Temp Default Warm Available All Spin Speed Default Medium High Available High Medium High Medium Low Soil Level Default Normal Available All Cycle Bedding Description Suitable for washing blankets or bulky items which have difficulty absorbing water such as pillows blankets comforters sheets or pet bedd...

Page 19: ...ycle Speed Wash Description Quickly washes lightly soiled clothing and small loads For high wash and rinse efficiency wash small loads of 2 3 lightly soiled garments less than 3 lb 1 36 kg Use very little detergent in this cycle To add an extra rinse use the Extra Rinse option Wash Temp Default Very Warm Available Very Warm Warm Cool Cold Spin Speed Default High Available All Soil Level Default Li...

Page 20: ...20 OPERATION WASHER Delicates Heavy Duty Speed Wash Downloaded default Rinse Spin Cycle Steam Turbo WashTM Extra Rinse Pre wash ...

Page 21: ...rature of the cold water at the faucet Spin Higher spin speeds extract more water from clothes reducing drying time and saving energy Press the Spin button repeatedly until the desired speed is selected Some fabrics such as delicates require a slower spin speed Soil Adjusting the soil level setting will modify the cycle times and or wash actions Press the Soil button repeatedly until the desired s...

Page 22: ... controls This function can prevent children from changing cycles or operating this washer NOTE The function does not lock the door Once this function is set all buttons are locked except the Power button When the controls are locked CL and the remaining time are alternately shown on the display during the wash cycle Turning off the power will not reset this function You must deactivate this funct...

Page 23: ...different chime will sound and the LED will not come on if the selection is not allowed 6 Begin Cycle Press the Start Pause button to begin the cycle The cycle can be paused at any time either by opening the door or by pressing the Start Pause button If the cycle is not restarted within 14 minutes of being paused the dryer will shut off and the settings will be lost 7 End of Cycle When the cycle i...

Page 24: ...on as the dryer stops to reduce wrinkles Baby Clothes and Nightgowns Always check the manufacturer s instructions Rubber and Plastics Do not dry any items made from or containing rubber or plastics such as Aprons bibs and chair covers Curtains and tablecloths Bath mats Fiberglass Do not dry fiberglass articles in your dryer Glass particles left in the dryer could be picked up by your clothes the n...

Page 25: ...pause the cycle without losing the current settings NOTE If you do not press the Start Pause button to resume a cycle within 14 minutes the appliance turns off automatically and all cycle settings are lost d Cycle Modifier Buttons Press these buttons to select additional cycle options Press and hold any button marked with an asterisk for 3 seconds to activate a special function e Extra Options and...

Page 26: ... time for the selected cycle is displayed This time will change if you select extra options for the cycle The cycle time on Sensor Dry cycles may fluctuate as the appliance recalculates drying time for optimal results f AI Sensor Dry Indicator This feature optimizes drying times and temperatures by detecting the laundry s characteristics The indicator lights up when the Normal cycle is selected wi...

Page 27: ...is cycle for drying blankets or bulky items such as pillows blankets comforters sheets or pet bedding Temp Default Medium Available Medium Dry level Default Normal Available Very More Normal Cycle Delicates Description Use this cycle for drying dress shirts blouses nylons lingerie or sheer and lacy clothes which can easily be damaged Temp Default Medium Low Available Medium Low Dry level Default N...

Page 28: ...n on the dryer Cycle Downloaded Perm Press Description Use a smartphone to download a specialized cycle to this cycle position The default cycle is Perm Press This cycle is also available for download Refer to the LG ThinQ application to see the cycles available for download Temp Default Medium Available Medium Dry level Default Normal Available All Cycle Steam Winkle Care Reduce Static Energy Sav...

Page 29: ...settings NOTE The LED for the option will light up when the option is selected To protect your garments not every option is available with every cycle A chime will sound twice and the LED will not light up if the selected option is not allowed for the selected cycle Steam Adding the Steam option to a dry cycle helps reduce wrinkles and odor in fabrics WARNING Do not touch the door during steam cyc...

Page 30: ...l Lock Use this function to disable the controls This function can prevent children from changing cycles or operating this dryer NOTE The function does not lock the door Once this function is set all buttons are locked except the Power button When the controls are locked CL and the remaining time are alternately shown on the display during the dry cycle Turning off the power will not reset this fu...

Page 31: ...push message Settings Set various options on the appliance and in the application NOTE If you change your wireless router Internet service provider or password delete the connected appliance from the LG ThinQ application and connect it again This information is current at the time of publication The application is subject to change for product improvement purposes without notice to users Before Us...

Page 32: ...te Start 1 Load the laundry 2 Press the Power button 3 Press and hold the Remote button for 3 seconds to enable the remote control function 4 Start a cycle from the LG ThinQ application on your smartphone NOTE Once this function is enabled you can only start a cycle from the LG ThinQ smartphone application If the cycle is not started the appliance will wait to start the cycle until it is turned of...

Page 33: ...and washable items requiring delicate care Overnight Wash Reduces washing noise and continues tumbling after the cycle to prevent wrinkles Perm Press Optimized for wrinkle free clothes or tablecloths Rainy Day Cleans clothing that is damp from the rain Rinse Spin rinse and spin a load separately from a regular cycle Single Garments Quickly washes a single item Small Load Washes a small load of lau...

Page 34: ...ids Clothes Uses high temperatures to sanitize kids clothes Kids Gym Clothes Optimized for children s cotton sportswear Lingerie Optimized for lingerie Low Temp Dry Dries the load while reducing energy consumption Overnight Dry This energy efficient cycle dries a small load overnight Perm Press Optimized for permanent press fabrics or synthetic items Rack Dry Designed for use with the drying rack ...

Page 35: ...rranty disclaimers and copyright notices are available for download LG Electronics will also provide open source code to you on CD ROM for a charge covering the cost of performing such distribution such as the cost of media shipping and handling upon email request to opensource lge com This offer is valid for a period of three years after our last shipment of this product This offer is valid to an...

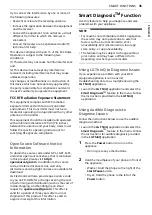
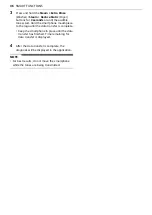
Page 36: ...smartphone mouthpiece to the logo until the data transfer is complete Keep the smartphone in place until the data transfer has finished Time remaining for data transfer is displayed 4 After the data transfer is complete the diagnosis will be displayed in the application NOTE For best results do not move the smartphone while the tones are being transmitted ...

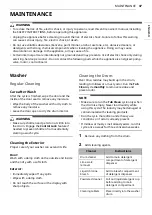
Page 37: ...n and pets do not climb into the drum Engage the Control Lock feature if needed to prevent children from accidentally starting a wash cycle Cleaning the Exterior Proper care of your washer can extend its life Door Wash with a damp cloth on the outside and inside and then dry with a soft cloth Exterior Immediately wipe off any spills Wipe with a damp cloth Do not touch the surface or the display wi...

Page 38: ... clean the mineral buildup on the internal components to extend the lifespan of the washer Use of a water softener is recommended in areas with hard water Use a descaler to remove visible mineral buildup on the washer drum After descaling always run the Tub Clean cycle before washing clothing Mineral scale and other spots may be removed from the stainless steel drum using a soft cloth soaked in st...

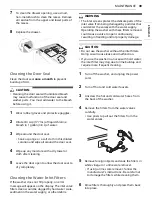
Page 39: ...ens could be clogged by hard water scale sediment in the water supply or other debris WARNING The inlet screens protect the delicate parts of the inlet valve from being damaged by particles that could enter the valves with the water supply Operating the washer with these filters removed could cause a valve to open continuously resulting in flooding and or property damage CAUTION Do not use the was...

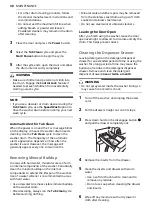
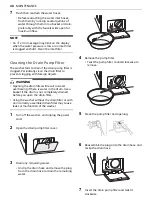
Page 40: ... WARNING Opening the drain filter will result in water overflowing if there is water in the drum Use a bucket if the drum is not completely drained before you open the drain filter Using the washer without the drain filter or with an incorrectly assembled drain filter may cause leaks or malfunction of the washer 1 Turn off the washer and unplug the power cord 2 Open the drain pump filter cover 3 D...

Page 41: ...ty drum and close the door Never use automotive antifreeze 6 Turn on the washer and press the Spin button 7 Press the Start Pause button to start the drain pump for 1 minute This will expel some of the antifreeze leaving enough to protect the washer from damage 8 Turn off the washer and unplug the power cord 9 Dry the drum interior with a soft cloth and close the door 10 Store the washer in an upr...

Page 42: ...damp cloth NOTE Do not use methylated spirits solvents or similar products Never use steel wool or abrasive cleansers they can damage the surface Cleaning the Interior Wipe around the door opening and seal with a soft damp cloth to prevent lint and dust buildup that could damage the door seal Clean the window with a soft cloth dampened with warm water and a mild nonabrasive household detergent The...

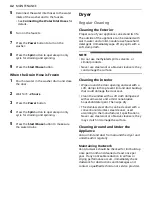
Page 43: ...pull the lint filter straight up Then 1 For everyday cleaning roll any lint off the filter with your fingers or 2 Vacuum the lint filter 3 If the lint filter has become very dirty or clogged with fabric softener wash the lint filter in warm soapy water and allow it to dry thoroughly before reinstalling NOTE NEVER operate the appliance without the lint filter in place ...

Page 44: ...the washer then press and hold the button that has Control Lock on or under it for 3 seconds Q Where should I pour the powdered laundry products when doing my laundry A If you are using powdered laundry detergent load it in the main detergent dispenser after removing the liquid detergent insert Powdered laundry agents or powdered color safe bleach should be put directly into the drum These product...

Page 45: ... due to a faulty water valve Close the water faucets unplug the washer and call for service PE PRESSURE SENSOR ERROR The water level sensor is not working correctly Close the water faucets unplug the washer and call for service LE MOTOR LOCKED ERROR A motor error has occurred Allow the washer to stand for 30 minutes and then restart the cycle If the error code is still displayed call for service s...

Page 46: ...ion Rattling and clanking noise Foreign objects such as keys coins or safety pins may be in drum or pump Stop the washer check the drum and the drain filter for foreign objects If noise continues after the washer is restarted call for service Thumping sound Heavy wash loads may produce a thumping sound This is normal but if the sound continues the washer is probably out of balance Stop and redistr...

Page 47: ...may create leaks and may be caused by the type and amount of detergent used HE High Efficiency detergent is the only detergent recommended The normal amount of detergent to use is 1 4 to 1 2 of the maximum amount recommended by the detergent manufacturer Always reduce the amount of detergent if the load is small or lightly soiled or if the water is very soft Never use more than the maximum amount ...

Page 48: ... not operate Control panel has powered off due to inactivity This is normal Press the Power button to turn on the washer Washer is unplugged Make sure that the power cord is plugged securely into an electrical outlet Water supply is turned off Turn both hot and cold faucets fully on Controls are not set properly Make sure that the cycle was set correctly close the door and press the Start Pause bu...

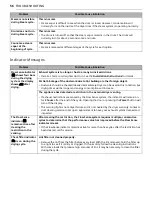
Page 49: ... or kinks and is not pinched behind or under the washer The end of the drain hose is more than 96 inches 2 4 m above the bottom of the washer Move the end of the drain hose so that it is lower than 96 inches 2 4 m Bleach does not dispense Bleach dispenser cover is not properly installed on some models Make sure that the bleach cover is properly installed and snapped into place before the beginning...

Page 50: ...y dispensed at the right time in the cycle Washer was not unloaded promptly Always remove items from the washer as soon as possible after the cycle is completed Clothes were not properly sorted Always wash dark colors separately from light colors and whites to prevent discoloration Never wash heavily soiled items with lightly soiled items Poor stain removal Proper options are not selected Heavier ...

Page 51: ...ors can occur from mold or foreign substances Be sure to clean the gasket and door seal regularly and check under the door seal for small items when unloading the washer Odors can occur if foreign substances are left in the drainage pump filter Be sure to clean the drainage pump filter regularly Odors can occur if the drainage hose is not properly installed causing siphoning water flowing back ins...

Page 52: ... the cycle not the estimated cycle time until the cycle is started Use the Time Dry button to adjust the load size setting for the number of garments you desire Problem Possible Cause Solution tE1 through tE7 TEMPERATURE SENSOR ERROR Temperature sensor failure Turn off the appliance and call for service Ps POWER ERROR Power cord is connected incorrectly Check the connection of the power cord to th...
Page 53: ...ngs for the type of load you are drying Some loads may require an adjustment of the dry level setting for proper drying Lint filter needs to be cleaned Remove the lint from the filter before every load With the lint removed hold the filter up to a light to see if it is dirty or clogged With some loads that produce high amounts of lint such as new bath towels it may be necessary to pause the cycle ...

Page 54: ...ry Problem Possible Cause Solution Problem Possible Cause Solution Clothes are wrinkled Clothes dried too long overdried Overdrying a load of laundry can lead to wrinkled clothes Try a shorter drying time or use a lower dry level setting and remove items while they still retain a slight amount of moisture Clothes left in dryer too long after cycle ends Use the Wrinkle Care option This option will ...

Page 55: ...y level setting if necessary Drying synthetics permanent press or synthetic blends These fabrics are naturally more prone to static buildup Try using fabric softener or use a lower dry level setting and or shorter time settings Clothes have damp spots after a dry cycle Very large load or very small load Single large item such as a blanket or comforter If items are too tightly packed or too sparse ...

Page 56: ...increase The appliance has detected a restriction in the external dryer venting If exhaust restrictions are sensed by the Flow Sense system the indicator will remain on for 2 hours after the end of the cycle Opening the door or pressing the Power button will turn off the display This warning light is not a dryer failure and is not covered by the dryer warranty Contact a duct cleaning service to se...

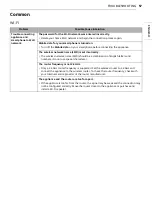
Page 57: ...ctly The wireless network name SSID should be a combination of English letters and numbers Do not use special characters The router frequency is not 2 4 GHz Only a 2 4 GHz router frequency is supported Set the wireless router to 2 4 GHz and connect the appliance to the wireless router To check the router frequency check with your Internet service provider or the router manufacturer The appliance a...

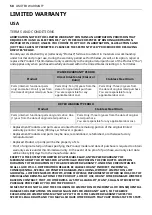
Page 58: ...LIED WARRANTY OF MERCHANTABILITY OR FITNESS FOR A PARTICULAR PURPOSE ON THE PRODUCT IS LIMITED IN DURATION TO THE DURATION OF THE ABOVE LIMITED WARRANTY UNDER NO CIRCUMSTANCES SHALL LG OR ITS U S DISTRIBUTORS DEALERS BE LIABLE FOR ANY INDIRECT INCIDENTAL CONSEQUENTIAL SPECIAL OR PUNITIVE DAMAGES INCLUDING WITHOUT LIMITATION LOST GOODWILL LOST REVENUES OR PROFITS WORK STOPPAGE IMPAIRMENT OF OTHER G...

Page 59: ...eplacement of light bulbs filters fuses or any other consumable parts Damage or failure of the Product caused by transportation storage and or handling including scratches dents chips and or other damage to the finish of your Product unless such damage is reported within one 1 week of delivery Damage or missing items to any display open box refurbished or discounted Product Refurbished Product or ...

Page 60: ... as a copy of this provision to the AAA in the manner described in the AAA Rules You must also send a copy of your written demand to LG at LG Electronics USA Inc Attn Legal Department Arbitration 111 Sylvan Avenue Englewood Cliffs NJ 07632 If there is a conflict between the AAA Rules and the rules set forth in this section the rules set forth in this section will govern This arbitration provision ...

Page 61: ...lephone a your name and address b the date on which the product was purchased c the product model name or model number and d the serial number the serial number can be found i on the product or ii online by accessing https www lg com us support repair service schedule repair continued and clicking on Find My Model Serial Number You may only opt out of the dispute resolution procedure in the manner...

Page 62: ...62 Memo ...

Page 63: ...NTRO DE LAVADO Lea el manual del propietario detenidamente previo a operar el electrodoméstico y mantengalo al alcance para futuras referencias ESPAÑOL www lg com Copyright 2020 LG Electronics Inc Todos los derechos reservados ...

Page 64: ...za 17 Panel de control 20 Ciclos de lavado 23 Modificadores de ciclo 23 Opciones y funciones adicionales 26 FUNCIONAMIENTO DE LA SECA DORA 26 Cómo usar la secadora 28 Panel de control 30 Ciclos de secado 32 Modificadores de ciclo 32 Opciones y funciones adicionales 35 FUNCIONES INTELIGENTES 35 Uso de la aplicación LG ThinQ 40 Función Smart DiagnosisTM Diagnóstico In teligente 41 MANTENIMIENTO 41 A...

Page 65: ...ión de plástico flexibles Si se instala un conducto flexible metálico tipo lámina de aluminio este debe ser de un tipo específico avalado por el fabricante como apto para el uso con secadoras de ropa Es sabido que los materiales de ventilación flexibles se colapsan se aplastan con facilidad y atrapan pelusas Estas condiciones obstruirán el flujo de aire de la secadora y aumentarán el riesgo de inc...

Page 66: ... ni a la intemperie Este artefacto no ha sido diseñado para ser usado en embarcaciones o instalaciones móviles tales como casas rodantes remolques o aeronaves Mantenga los materiales de empaque fuera del alcance de los niños Los materiales de empaque pueden ser peligrosos para los niños Corren riesgo de asfixia Destruya el cartón la bolsa de plástico y los demás materiales de empaque luego de dese...

Page 67: ... alrededor de la abertura de escape y las áreas adyacentes libres de acumulación de pelusa polvo y tierra El electrodoméstico no debe ser suministrado a través de un interruptor externo como un temporizador o conectado a un circuito que sea encendido y apagado regularmente No instale un ventilador auxiliar en el conducto de extracción Este es un artefacto individual y es una unidad individual para...

Page 68: ...toque los controles del artefacto con las manos húmedas No modifique ni extienda el cable de alimentación Si se daña el cable de electricidad solo el fabricante está autorizado para reemplazarlo o bien su agente de servicio técnico o una persona de calificación similar para prevenir riesgos No coloque prendas aceitosas o grasosas candelas o materiales inflamables encima del artefacto Mantenga el á...

Page 69: ...urante un CICLO DE VAPOR No toque la boquilla de vapor del tambor durante un CICLO DE VAPOR o después de él En los modelos con cajón alimentador de vapor no llene este alimentador con agua caliente más de 86 30 gasolina solventes de limpieza en seco u otras sustancias inflamables o explosivas Mantenimiento No repare ni reemplace ninguna parte del electrodoméstico Todas las reparaciones deben ser r...

Page 70: ...a que podría estar caliente Si las mangueras de drenaje y de entrada de agua se congelan en invierno descongélelas antes de utilizar el electrodoméstico No almacene ni vierta limpiadores blanqueadores blanqueador con cloro blanqueador oxigenado etc ni detergentes líquidos encima del artefacto Si lo hace podría ocasionar corrosión decoloración o daño de la superficie del artefacto Prendas o artícul...

Page 71: ... Imán de la puerta de la secadora f Bandeja Dispensadora de Detergente g Puerta de la lavadora h Tambor de la lavadora i Imán de la puerta de la lavadora j Manguera de Drenaje k Filtro de la Bomba de Drenaje l Cubierta del Filtro de la Bomba de Drenaje m Patas de nivelación Vista trasera a Cable de alimentación para modelos de gas b Panel de acceso del bloque de bornes para modelos eléctricos c En...

Page 72: ...l producto los daños a la propiedad o las lesiones corporales causadas por el uso de componentes partes o productos no autorizados adquiridos por separado Modelo WKEX200H A WKGX201H A Requisitos Eléctricos Consulte la etiqueta de datos de servicio para más información Presión de agua mín máx 20 120 psi 138 827 kPa Dimensiones ancho X altura X profundidad 27 X 74 3 8 X 30 3 8 70 cm X 189 cm X 77 cm...

Page 73: ...iedad y opción se muestran para el ciclo seleccionado El ciclo Normal debe seleccionarse para cambiar sus configuraciones predeterminadas Presionar el botón de Inicio Pausa sin seleccionar un ciclo inmediatamente inicia el ciclo Normal con las configuraciones predeterminadas 5 Ajuste la Configuración Pueden modificarse las configuraciones predeterminadas del ciclo seleccionado si así se lo desea c...

Page 74: ...entes el resultado puede ser un lavado deficiente transferencia de colores decoloración daño de las prendas o que se desprendan pelusas Las telas deben clasificarse en grupos tal como se describe a continuación Colores Clasifique las prendas según su color Lave la ropa oscura separada de los colores claros o blancos Si se mezclan prendas de colores oscuros con prendas de colores claros puede ocurr...

Page 75: ...pueden dañar las prendas y la lavadora Asegúrese de que los zípers y los ganchos de la ropa estén cerrados y amarre cualquier cordón para evitar que las prendas se enganchen o enreden Para mejores resultados trate previamente las áreas con manchas difíciles Con un cepillo quite el polvo los pelos y la suciedad más densa de los artículos antes de lavarlos El exceso de suciedad o arena puede raspar ...

Page 76: ... a mantener limpio el interior de la lavadora El empleo de un detergente que no sea de alta eficiencia puede producir demasiada espuma y un mal desempeño causando errores fallas en los ciclos y daños a la lavadora Puede que detergentes designados como Compatibles con HE no provean resultados óptimos Para lograr un buen desempeño de lavado siempre mida la cantidad de detergente usando el dispositiv...

Page 77: ... el detergente líquido para el lavado principal en el recipiente accesorio de detergente líquido del dispensador de lavado principal cuando corresponda para evitar que este ingrese junto con el detergente del prelavado La cantidad de detergente que debe colocar para la opción de Pre wash Prelavado es la mitad de la recomendada para el lavado principal Por ejemplo si para el ciclo de lavado princip...

Page 78: ...o en polvo no se dispensará apropiadamente Siga las recomendaciones del fabricante cuando añada blanqueador Nunca añada más de una taza y no sobrepase la línea de llenado máximo o el blanqueador se dispensará de inmediato y dañará las prendas El uso excesivo de blanqueador también puede dañar las telas Nunca vierta blanqueador con cloro líquido sin diluir directamente sobre la ropa o en el tambor ...

Page 79: ... Presione un botón para seleccionar el ciclo deseado Una vez haya seleccionado el ciclo deseado se mostrarán las configuraciones predeterminadas en la pantalla Estas configuraciones pueden ajustarse usando los Botones modificadores de ciclo en cualquier momento antes de iniciar el ciclo c Botón de Inicio Pausa Mantenga presionado este botón para iniciar el ciclo seleccionado Si la lavadora está fu...

Page 80: ...éstica b Indicador de inicio remoto Este indicador se enciende cuando se activa la función de Inicio remoto c Indicador de Bloqueo de Puerta Este indicador se enciende cuando el ciclo comienza y se bloquea la puerta La luz indicadora permanecerá encendida hasta que el ciclo haya finalizado o sea pausado o detenido d Indicador de señal Este indicador se ilumina cuando se encienden los tonos del bot...

Page 81: ...rm NOTA La función AI DD puede variar según el entorno y el modelo g Indicadores de Estado del Ciclo Estos indicadores LED parpadean cuando un ciclo ha sido seleccionado para indicar las etapas a ejecutar Cuando un ciclo está en progreso el indicador LED de la etapa activa parpadea y los indicadores LED de las etapas restantes permanecen estables Una vez que se completa una etapa el indicador LED ...

Page 82: ...ar todas las prendas normales como algodón lino camisas jeans o cargas mixtas excepto las de materiales delicados como lana o seda Presionar el botón Inicio Pausa sin haber seleccionado un ciclo hará que el ciclo Normal inicie inmediatamente utilizando la configuración predeterminada Temperatura de lavado Predeterminada Warm Tibia Disponible Todos Velocidad de centrifugado Predeterminado Medium Hi...

Page 83: ...gado Predeterminado High Alta Disponible High Alta Medium High Medio alta Medium Media Low Baja Nivel de suciedad Predeterminado Heavy Pesado Disponible Todos Ciclo Speed Wash Lavado rápido Descripción Lava rápidamente prendas ligeramente sucias y cargas pequeñas Para una mayor eficiencia de lavado y enjuague lave pequeñas cargas de 2 3 prendas ligeramente sucias menos de 3 lb 1 36 kg Utilice muy ...

Page 84: ...eterminado Cool Enfriado Disponible Cool Enfriado Velocidad de centrifugado Predeterminado Medium High Medio alta Disponible Todos Nivel de suciedad Predeterminado Disponible Ciclo Steam Vapor Turbo WashTM Extra Rinse Extra enjuague Pre wash Prelavado Normal Bedding Ropa de cama Delicates Delicadas Heavy Duty Muy sucia Speed Wash Lavado rápido Downloaded Descargado Predeterminado Rinse Spin Enjuag...

Page 85: ...idamente para seleccionar la combinación de temperatura de lavado y enjuague para el ciclo seleccionado Todos los enjuagues utilizan agua fría sin calentar Los enjuagues con agua fría consumen menos energía La temperatura real del enjuague frío depende de la temperatura del agua fría que sale de la llave Spin Centrifugado Las velocidades de giro más altas extraen más agua de la ropa reduciendo el ...

Page 86: ...a enjuague para añadir enjuagues adicionales al ciclo Uso de la opción de prelavado Esta opción añade un prelavado durante alrededor de 15 a 17 minutos para mejorar la limpieza de la ropa manchada o con alto nivel de suciedad NOTA Si selecciona Pre wash Prelavado después de agregar detergente directamente en el tambor es posible que el detergente desaparezca reduciendo así el desempeño de lavado C...

Page 87: ...anca que se ilumina cuando se enciende la lavadora La luz se apaga automáticamente cuando se cierra la puerta y se inicia el ciclo Mantenga presionado el botón Pre wash Prelavado por 3 segundos durante el ciclo para encender la luz del tambor La luz del tambor se apagará automáticamente transcurridos 4 minutos ...

Page 88: ... ciclo No todas las modificaciones y opciones están disponibles para todos los ciclos Sonará una alarma diferente y el indicador LED no se encenderá si la selección no está permitida 6 Comienzo del ciclo Presione el botón de Inicio Pausa para comenzar el ciclo El ciclo puede pausarse en cualquier momento abriendo la puerta o presionando el botón Inicio Pausa Si el ciclo no vuelve a iniciarse tras ...

Page 89: ...chado permanente y sintéticos No sobrecargue su secadora Extraiga los artículos de planchado permanente tan pronto como se detenga la secadora para disminuir las arrugas Ropa de bebé y camisones Siempre consulte las instrucciones del fabricante Goma y plástico No seque artículos hechos de goma o plástico ni que contengan estos materiales tales como los siguientes Delantales baberos y cubresillas C...

Page 90: ...rtefacto está funcionando use este botón para pausar el ciclo sin perder los ajustes actuales NOTA Si no presiona el botón de Inicio Pausa para reanudar un ciclo tras 14 minutos el artefacto se apagará de forma automática y se perderán todas las configuraciones del ciclo d Botones modificadores de ciclo Presione estos botones para seleccionar opciones adicionales del ciclo Presione y mantenga pres...

Page 91: ...ciclo de secado se ha seleccionado se mostrará el tiempo de secado estimado correspondiente Este tiempo cambiará conforme se seleccionen opciones adicionales para el ciclo El tiempo del ciclo en los ciclos Secado con sensor puede variar ya que el artefacto vuelve a calcular el tiempo de secado para obtener óptimos resultados f Indicador AI Sensor Dry AI Secado con Sensor Esta función optimiza el t...

Page 92: ... Utilice este ciclo para secar cobijas o artículos voluminosos como almohadas cobijas edredones sábanas o camas de mascotas Temp Temperatura Predeterminado Medium Medio Disponible Medium Medio Dry level Nivel de Secado Predeterminado Normal Disponible Very Muy More Más Normal Ciclo Delicates Delicadas Descripción Utilice este ciclo para secar camisas blusas prendas de nailon lencería o prendas fin...

Page 93: ...gado Planchado permanente Descripción Utilice un teléfono inteligente para descargar un ciclo especializado para esta posición de ciclo El ciclo predeterminado es Perm Press Planchado permanente Este ciclo también está disponible para descargar Consulte la aplicación LG ThinQ para ver los ciclos disponibles para descargar Temp Temperatura Predeterminado Medium Medio Disponible Medium Medio Dry lev...

Page 94: ... adicionales para personalizarlos de modo que cumplan con sus necesidades Seleccione la opción deseada después de elegir el ciclo y los ajustes que prefiere NOTA La luz LED de la opción se iluminará cuando sea seleccionada Para proteger sus prendas no se dispone de todas las opciones en cada ciclo Sonará una alarma dos veces y no se encenderá la luz LED si no se permite la opción seleccionada para...

Page 95: ...al dependiendo del tamaño de la carga Cuando se selecciona la opción Energy Saver Ahorro de Energía el ciclo comienza con una sección de secado con aire y el tiempo de secado se incrementa Control Lock Bloqueo de Panel Utilice esta función para desactivar los controles Esta función puede evitar que los niños cambien los ciclos o manejen esta secadora NOTA La función no traba la puerta Una vez que ...

Page 96: ...NTO DE LA SECADORA Mantenga presionado el botón Wrinkle Care Prevención de Arrugas por 3 segundos durante el ciclo para encender la luz del tambor La luz del tambor se apagará automáticamente transcurridos 4 minutos ...

Page 97: ... para diagnosticar y resolver problemas con el producto conforme a su patrón de uso Alertas Emergentes Cuando se completa el ciclo o el artefacto tiene problemas recibirá un mensaje emergente Configuración Ajuste varias opciones en el aparato y en la aplicación NOTA Si cambia de enrutador inalámbrico proveedor de Internet o contraseña borre el artefacto conectado de la aplicación LG ThinQ y proced...

Page 98: ...lización de forma remota de la lavadora secadora Remote Start Inicio remoto Utilice un teléfono inteligente para controlar su electrodoméstico de manera remota También puede monitorear el funcionamiento del ciclo para saber cuánto tiempo le queda Uso de Inicio remoto 1 Cargue las prendas 2 Presione el botón de Encendido Apagado 3 Mantenga presionado el botón Remote Remoto durante 3 segundos para h...

Page 99: ... especial para jeans Solo centrifugado Para centrifugar prendas lavables a mano Lavado de carga completa Ajustes de lavado optimizado para cargas de lavado completas Lavado de media carga Ajustes de lavado optimizado para media carga de lavado Manchas de jugos y comida Elimina manchas de jugos y comida de la ropa Lavado a mano lana Para lavar artículos de lana que se encogen o artículos de lavado ...

Page 100: ...timizado para la ropa deportiva de algodón de los niños Lencería Optimizado para lencería Secado a baja temperatura Seca la carga mientras reduce el consumo de energía Secado durante la noche Este ciclo de ahorro de energía seca una carga pequeña durante la noche Planchado permanente Optimizado para telas de planchado permanente o artículos sintéticos Secado sobre rejilla Diseñado para usar con la...

Page 101: ...rucción de este dispositivo que no cuente con la aprobación expresa de la parte responsable del cumplimiento puede anular la autorización del usuario para operarlo Declaración sobre exposición a la radiación de RF de la FCC Este equipo cumple con los límites de exposición a la radiación de la FCC establecidos para entornos no controlados Este transmisor no se debe ubicar ni operar junto con ningun...

Page 102: ...las instrucciones a continuación para utilizar el método de diagnóstico audible Inicie la aplicación LG ThinQ y seleccione la función Smart DiagnosisTM en el menú Siga las instrucciones para el diagnóstico audible provistas en la aplicación LG ThinQ 1 Presione el botón Encendido Apagado para encender el electrodoméstico No presione ningún otro botón 2 Mantenga el micrófono de su teléfono frente al...

Page 103: ...l tambor ADVERTENCIA Asegúrese de que ni los niños ni las mascotas ingresen al tambor Active la función Control Lock Bloqueo infantil si fuera necesario para evitar que los niños inicien un ciclo de lavado accidentalmente Limpieza del exterior El cuidado adecuado de su lavadora puede prolongar su vida Puerta Límpiela por fuera y por dentro con un paño húmedo y luego séquela con un paño suave Exter...

Page 104: ... con aguas duras se pueden formar sedimentos minerales en los componentes internos de la lavadora Limpie periódicamente la acumulación de minerales en los componentes internos para prolongar la vida útil de la lavadora Se recomienda utilizar un ablandador de agua en áreas con aguas duras Utilice un descalcificador para eliminar la acumulación visible de minerales en el tambor de la lavadora Luego ...

Page 105: ...oda la circunferencia del sello Empape una esponja o un paño suave en esta solución de cloro diluido y limpie alrededor del sello de la puerta 4 Seque la humedad con un paño o una toalla seca luego de limpiar 5 Deje la puerta abierta para permitir que el sello de la puerta se seque completamente Limpieza de los filtros de entrada de agua Si la lavadora no se llena correctamente aparecerá un mensaj...

Page 106: ...ando en la pantalla si la presión del agua es demasiado débil o si el filtro se encuentra obstruido por suciedad Limpie el filtro de entrada Limpieza del filtro de la bomba de desagüe La lavadora no podrá desagotar el agua del lavado si el filtro de la bomba de desagüe está obstruido Limpie el filtro de desagüe periódicamente para evitar que se obstruya con objetos extraños ADVERTENCIA Si abre el ...

Page 107: ... puede quedar expuesta a temperaturas bajo cero siga estos pasos para protegerla de daños NOTA Asegúrese de que el tambor esté vacío antes de seguir estos pasos 1 Apague la lavadora y desenchufe el cable de alimentación 2 Cierre las llaves de paso de agua 3 Desconecte las mangueras de entrada de agua Drene el agua que quede en ellas 4 Enchufe el cable de alimentación en un tomacorriente correctame...

Page 108: ...ongelar las mangueras de entrada de agua y poder retirarlas 4 Sumerja las mangueras de entrada de agua en agua caliente para descongelarlas 5 Vuelva a conectar las mangueras de entrada a las entradas de agua de la lavadora y a las llaves Consulte la sección Conexión de las mangueras de entrada de agua para obtener más detalles 6 Abra las llaves de paso 7 Presione el botón de Encendido Apagado para...

Page 109: ...s abrasivos ni de lana metálica pueden rayar o dañar la superficie Limpieza alrededor del artefacto y debajo de él Aspire con regularidad la pelusa y el polvo alrededor de la secadora y debajo de ella Mantenimiento de los conductos Se deben revisar los conductos de ventilación para verificar que no tengan acumulación de pelusa una vez por mes y se deben limpiar al menos una vez por año Si se perci...

Page 110: ...48 MANTENIMIENTO NOTA NUNCA haga funcionar el artefacto sin haber colocado el filtro de pelusa en su lugar ...

Page 111: ...ómo puede limpiar la ropa R Las lavadoras HE de alta eficiencia están diseñadas para lavar adecuadamente su ropa utilizando una cantidad mínima de agua y energía Debido a que el volumen de agua es bajo la escasa cantidad de detergente utilizado se encuentra más concentrado en el agua lo que tiene como resultado un lavado de rendimiento excelente P Cuando presiono un botón por qué la lavadora emite...

Page 112: ...es para que la lavadora logre equilibrar la carga Hay artículos pesados mezclados con otros más livianos Siempre trate de lavar artículos de peso más o menos similar para que la lavadora pueda distribuir de forma pareja el peso de la carga para el centrifugado La carga está desequilibrada Redistribuya la carga manualmente si los artículos se han enredado y están previniendo que el equilibrado auto...

Page 113: ...nciones adicionales tcL ALARMA DE LIMPIEZA DE CUBA Es tiempo de ejecutar el ciclo de Tub Clean Limpieza de la tina Este no es un código de error Este código indica que el ciclo Tub Clean Limpieza de la tina se está ejecutando o que es necesario hacerlo para limpiar el tambor de la lavadora vs ERROR DEL SENSOR DE VIBRACIÓN Mal funcionamiento del sensor de vibración Llame al servicio técnico Problem...

Page 114: ...clo y distribuya la carga después de que se desbloquee la puerta No todas las patas de nivelación están bien afirmadas al suelo y adecuadamente niveladas Consulte Nivelación del artefacto en INSTALACIÓN El suelo no es lo suficientemente rígido Asegúrese de que el piso es sólido y no se flexiona Vea Piso en INSTALACIÓN Ruido de chirridos No se quitaron todos los materiales de empaque Consulte Desem...

Page 115: ... máxima recomendada por el fabricante de detergente Siempre reduzca la cantidad de detergente si la carga es pequeña está poco sucia o si el agua es muy suave Nunca utilice más de la cantidad máxima recomendada por el fabricante del detergente Espuma excesiva Demasiado detergente o detergente incorrecto Los detergentes HE están formulados específicamente para lavadoras de alta eficiencia y contien...

Page 116: ...e llenado máximo del compartimiento para evitar que este se obstruya Utilice solamente detergente de alta eficiencia HE NOTA Siempre utilice la menor cantidad de detergente que sea posible Las lavadoras de alta eficiencia necesitan muy poca cantidad de detergente para lograr óptimos resultados Si usa mucho detergente puede hacer que el lavado y el enjuague sean deficientes y contribuir a que se pr...

Page 117: ...odelo de 4 a 60 minutos Presión de agua extremadamente baja Compruebe otro grifo de la casa para asegurarse de que la presión del suministro de agua doméstico es la adecuada La lavadora está demasiado fría Si la lavadora ha estado expuesta a temperaturas de congelación por un largo período de tiempo permita que entre en calor antes de presionar el botón Encendido Apagado De lo contrario la pantall...

Page 118: ...l mismo El blanqueador se dispensa antes de tiempo El dispensador se ha llenado para un uso futuro No puede almacenar blanqueador en el dispensador para que sea utilizado en el futuro El blanqueador se dispensará en cada carga Llenado en exceso del dispensador de blanqueador Llenar en exceso el dispensador de blanqueador causará que éste se dispense inmediatamente dañando así sus prendas o la lava...

Page 119: ... tener manchas que se han fijado Puede ser difícil eliminar estas manchas que quizás requieran un lavado a mano o un tratamiento previo para quitarlas Olor a humedad o a moho en la lavadora Se ha usado demasiado detergente o uno del tipo incorrecto Siempre utilice solo detergente de alta eficiencia HE de acuerdo con las instrucciones del fabricante El interior del tambor no se limpió correctamente...

Page 120: ...e inicie Use el botón Time Dry Secado con Temporizador para ajustar el tamaño de la carga según la cantidad de prendas que desee Problemas Causas posibles y solución tE1 a tE7 ERROR EN EL SENSOR DE TEMPERATURA Falla del sensor de temperatura Apague el artefacto y llame al servicio técnico Ps ERROR EN EL SUMINISTRO ELÉCTRICO El cable de alimentación no está bien conectado Revise la conexión del cab...

Page 121: ...ara ayudar a reducir y mantener tiempos de secado más constantes para tejidos pesados y de mayor tamaño separe estas prendas en cargas más pequeñas de un tamaño similar No se han ajustado adecuadamente los controles de la secadora Use los ajustes de control adecuados para el tipo de carga que esté secando Algunas cargas requieren un ajuste en la configuración de nivel de secado para un secado adec...

Page 122: ...onando normalmente Se selecciona la opción Energy Saver Ahorro de Energía en algunos modelos Si utiliza el ciclo Normal desactive la opción Energy Saver Ahorro de Energía que se selecciona de forma predeterminada Esta opción reduce el uso de energía al añadir una sección de secado con aire al inicio del ciclo Es normal no sentir calor al inicio del ciclo mientras está en modo Energy Saver Ahorro d...

Page 123: ...imiento Con algunas cargas que producen mucha pelusa puede ser necesario limpiar el filtro durante el ciclo La ropa no se clasificó correctamente Algunos tejidos producen pelusas p ej una toalla de algodón peluda blanca y deben secarse separadas de prendas que atrapen pelusa p ej un par de pantalones de lino negro Ropa con exceso de estática Use un suavizante de ropa para reducir la electricidad e...

Page 124: ...ado con temporizador para terminar de secar las prendas Problemas Causas posibles y solución Gotea agua de la boquilla cuando comienza el ciclo de vapor Esto es normal Se trata de la condensación de vapor al iniciar el ciclo de vapor El agua dejará de gotear después de unos momentos No se genera vapor pero no se muestra ningún código de error Error de nivel de agua Desenchufe la secadora y llame a...

Page 125: ...el botón Encendido Apagado se apagará la pantalla Esta luz de advertencia no se debe a una falla de la secadora y no está cubierta por la garantía de la secadora Comuníquese con un servicio de limpieza de tuberías para que limpien e inspeccionen su sistema de escape El indicador Flow Sense W permanece activo después de haber limpiado la obstrucción en el sistema de ventilación Luego de haber limpi...

Page 126: ... El nombre de la red inalámbrica SSID debe ser una combinación de letras y números No utilice símbolos especiales La frecuencia del enrutador no es de 2 4 GHz Sólo se admite una frecuencia de enrutador de 2 4 GHz Configure el enrutador inalámbrico a 2 4 GHz y conecte el electrodoméstico a éste Para verificar la frecuencia del enrutador consulte con su proveedor de servicios de internet o con el fa...

Page 127: ...fecha de compra En el caso de que no haya evidencia de compra la fecha de inicio de la garantía será noventa 90 días a partir de la fecha de fabricación SALVO DISPOSICIÓN LEGAL CONTRARIA CUALQUIER GARANTÍA IMPLÍCITA DE POSIBILIDAD DE COMERCIALIZACIÓN O ADECUACIÓN DEL PRODUCTO PARA UNA FINALIDAD ESPECÍFICA ESTÁ LIMITADA EN DURACIÓN A AQUELLA DE LA GARANTÍA LIMITADA PRECEDENTE BAJO NINGUNA CIRCUNSTA...

Page 128: ...ión no autorizada o cualquier otro daño o fallo en la propiedad que resulte de fugas de agua donde el Producto no esté correctamente instalado conforme al manual del propietario del Producto Daños o fallos del Producto causados por corriente o voltaje eléctricos incorrectos o por códigos de fontanería Daños o fallos del Producto causados por el uso de piezas accesorios componentes productos de lim...

Page 129: ...nosotros solamente a través de arbitraje vinculante sobre una base individual a menos que usted se excluya conforme a lo dispuesto a continuación Cualquier conflicto entre usted y LG no estarán combinados o consolidados con una controversia relacionada con cualquier otro producto o reclamo de otra persona o entidad Más específicamente y sin prejuicio de lo anterior no procederá bajo ninguna circun...

Page 130: ... una audiencia en persona según lo establecido por las Normas de la AAA Si su reclamo excede 25 000 el derecho a una audiencia estará determinado por las Normas de la AAA Cualquier audiencia de arbitraje en persona se realizará en un lugar dentro del distrito judicial federal en el cual resida a menos que ambos acuerden otra ubicación o estemos de acuerdo con el arbitraje telefónico Exclusión Uste...

Page 131: ...69 Memorándum ...

Page 132: ......

Reviews: