LG W7AWB Installation Manual Download Page 3

3

ENGLISH

IMPORTANT SAFETY INSTRUCTIONS

• 

If you are a professional installer, please read this manual carefully before installing the product.

• 

If you are a professional installer, please give this manual to the user after installing the product and ensure that 

the user also reads the manual carefully and retains it for future reference.

After reading the manual, please keep it handy for future reference.

 WARNING

• 

The product should be installed by a qualified professional specified by the retail store.


-

Product installation by non-qualified personnel is very dangerous and may cause personal injury.

• 

The product should be installed where its weight can be fully supported.


-

If the product is installed on a weak surface, the product may fall, causing injury.

• 

When moving or replacing the product after installation, contact a qualified installer specified by the retail 

store.


-

Installation or movement of the product must be carried out by a skilled professional. If an unqualified person 

moves and installs the product, it may cause safety risks.

• 

Do not hang on this product, protect the product from severe impacts after the installation.


-

The product may fall and cause injury.

 CAUTION

• 

Follow the instructions in this manual to product properly.


-

If you do not follow these instructions, the product may be installed incorrectly and cause serious injury or the 

product may become damaged.

• 

To install the product or level the product after installation, two or more people are required.


-

If you try to install or move the product alone, it may fall and cause injury or the product may become 

damaged.

• 

When installing the product, first check that the wall is strong enough. Use the anchors and screws provided.


-

If you use anchors and screws that are not specified by the manufacturer, they may not hold the weight of the 

product, causing safety issues.

• 

When drilling holes into the wall, make sure you use a drill and drill bit with the specified diameter. Ensure that 

you also follow the instructions regarding the depth of the holes.


-

Otherwise, the product may be installed incorrectly and cause safety issues.

• 

Do not clean the product with a wet towel, and do not place a heater, or humidifier beneath it.


-

Moisture, steam or heat permeating into this product may result in fire, electric shock or product damage.

• 

Keep this product away from sprinklers, sensors, high-tension wires and power sources. Do not install it in a 

location where vibrations or impacts are likely to occur.

• 

Make sure that the power cord is removed from the outlet before installing the product.


-

Otherwise, it may cause an electric shock or fire.

• 

Wear safety gloves when installing the product. Do not use your bare hands.


-

Otherwise, it may cause personal injury.
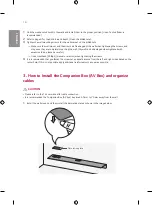
• 

When moving the Companion Box (AV box), be careful in that the friction between the box and the wall mount 

does not damage the cables.

Summary of Contents for W7AWB

Page 1: ...lease read this manual carefully before operating your set and retain it for future reference W7AWB Installation Manual Companion Box AV Box Wall Mount www lg com P No MFL69380613 1706 REV01 MFL69380613 ...

Page 2: ...2 ENGLISH COMPONENT Wall mounting anchor Wall mounting screw Decorative plate 4 units M5 x L65 4 units Installation Guide Sheet Installation manual Installation Guide Sheet ...

Page 3: ...ly and cause serious injury or the product may become damaged To install the product or level the product after installation two or more people are required If you try to install or move the product alone it may fall and cause injury or the product may become damaged When installing the product first check that the wall is strong enough Use the anchors and screws provided If you use anchors and sc...

Page 4: ...l wall Note Do not install on walls slanted at an angle outside the normal range or on severely tilted walls The manufacturer is not responsible for issues from installing the product on an angled wall or on the ceiling Check that the accessories provided with the product are all included before installing LG Electronics is not liable for any damage or loss of accessories after the package has bee...

Page 5: ...walls Marking the Screw Positions on the Wall Using the Installation Guide Sheet 1 Check the wall type before mounting When installing on a concrete or wooden wall use the holes within range A depending on the type of wall Refer to pages 8 10 for detailed instructions on how to install the wall mount The long vertical hole on the right may be useful for levelling the surface ...

Page 6: ...ice on the walls made from plasterboard marble or medium density fiberboard MDF In this case the anchor and screws must be inserted into the concrete behind the finish surface If there is no concrete on the other side then you must first install a separate hanger to securely install the anchors and screws If there are wooden pillars supporting the wall install by fastening the screws onto the pill...

Page 7: ... so that each location can withstand the pull out load of 70 kgf 686 N and shear load of 100 kgf 980 N or above Use the Ø 8 mm drill bit for concrete and hammer Impact drill 1 2 3 Wall mounting anchor 4 5 Wall mounting screw 1 Use a drill bit Ø 8 mm to drill a hole for the anchor location within a depth of 80 mm to 100 mm 2 Clean the drilled hole 3 Insert the sealed wall mounting anchor to the hol...

Page 8: ...crew M5 x L65 Fix the wall mount in place referring to the image If the screw cannot be assembled in the designated location inevitably it can be assembled by rearranging to the closest location It is recommended you tighten the screws in matching positions to the left and right of the hole in the centre Fix one wall mount screw each on the left and right Make sure the wall mount and the screws ar...

Page 9: ...ooden Wall Installation Wall mounting screw Screw Positions Drill bit ø Drill depth M5 x L65 2 ø 4 mm 76 mm Drywall 76 mm Wood stud A type B type Wall mounting screw M5 x L65 Wood stud Wood stud Drywall Marble Wall mounting screw M5 x L65 Drywall Marble ...

Page 10: ... when tightened with excessive force please be careful Use a crosshead Phillips manual or electric when tightening the screws 4 It is recommended that you fasten the screws at an equal distance from the left and right sides based on the center hole If this is not possible apply additional reinforcements as near as possible 3 How to Install the Companion Box AV Box and organize cables CAUTION Pleas...

Page 11: ...ion Box AV box may fall The long vertical hole on the right may be useful for levelling the surface 5 31 완료 Level 5 31 완료 3 Place the Companion Box AV box in the horizontal center of the wall mount Make sure the rubber attached to the bottom of the Companion Box AV box does not protrude outside of the wall mount s surface Rubber ...

Page 12: ...the center Connect the cables attached to the panel to the Companion Box AV box 60 mm 70 mm CAUTION Be careful not to apply a strong shock on the Companion Box or randomly move its position once its installation is complete It may fall and cause injury ...

Page 13: ...13 ENGLISH SPECIFICATIONS 1280 240 96 Model name W7AWB Width mm 1280 Height mm 96 Depth mm 240 Product weight kg 7 5 Max tensile load kg 15 21 194 194 41 5 16 6 224 427 477 5 497 Unit mm ...

Page 14: ...14 ENGLISH ...

Page 15: ...15 ENGLISH ...

Page 16: ...r of the product is located on the back or one side of the product Record it below should you ever need service Supported Displays Please contact the retailers or refer to the TV owner s manual for applicable models MODEL SERIAL ...

Reviews: