background image

14

Connecting the Display

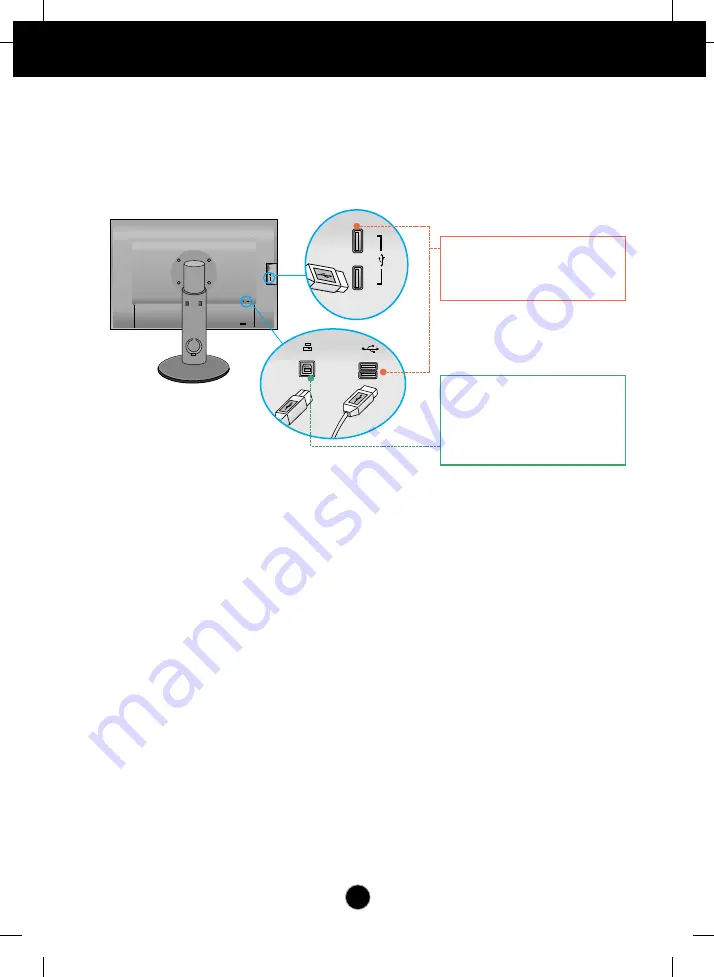
Connecting the USB(Universal Serial Bus) Cable 

1.

You can use the USB port at the back of the monitor to connect peripherals (USB
mouse, USB keyboard, etc.) to the monitor, not to the computer.  

2.

The monitor’s USB terminal supports USB 2.0 and High Speed cables.

   1                          2

Four USB Downstream ports  

Connect these ports to a mouse, 
memory stick or USB hard disk. 

One USB Upstream port 

Connect this port to the downstream 
port of a computer, laptop or USB 
monitor (Your computer or USB 
monitor must support USB and have 
USB ports).  

Summary of Contents for W2420RU

Page 1: ...Order Number GETEC C1 09 112 FCC Class B Certification Test Report Number GETEC E3 09 056 Page 1 1 EUT Type LCD Monitor FCC ID BEJW2420RU APPENDIX G USER S MANUAL ...

Page 2: ...nt Precautions before using the product Keep the User s Guide CD in an accessible place for future reference See the label attached on the product and give the information to your dealer when you ask for service W2420R User s Guide ...

Page 3: ...d Call your service technician for replacement As long as this unit is connected to the AC wall outlet it is not disconnected from the AC power source even if the unit is turned off Do not Open the Display There are no user serviceable components inside There are Dangerous High Voltages inside even when the power is OFF Contact your dealer if the display is not operating properly To Avoid Personal...

Page 4: ...x LCD permanently Do not press the LCD screen with your finger for a long time as this may cause some afterimages Some dot defects may appear as Red Green or Blue spots on the screen However this will have no impact or effect on the display performance If possible use the recommended resolution to obtain the best image quality for your LCD display If used under any mode except the recommended reso...

Page 5: ...emicals such as benzene paint thinners or alcohol Spray water onto a soft cloth 2 to 4 times and use it to clean the front frame wipe in one direction only Too much moisture may cause staining On Repacking Do not throw away the carton and packing materials They make an ideal container in which to transport the unit When shipping the unit to another location repack it in its original material On Di...

Page 6: ... look different from those shown here User must use shielded signal interface cables D sub 15 pin cable DVI cable with ferrite cores to maintain standard compliance for the product User s Guide Cards Power Cord DVI I Signal Cable To set it up this signal cable may be attached to this product before shipping out DVI D Signal Cable USB Cable Cable Holder Monitor Hood Calibrator Spyder3 ...

Page 7: ...front facing downward on a cushion or soft cloth 2 Align the hooks on the Stand Body with the matching slots in the Stand Base 3 Insert the hooks into slots IMPORTANT This illustration depicts the general model of connection Your monitor may differ from the items shown in the picture Do not carry the product upside down holding only the stand base The product may fall and get damaged or injure you...

Page 8: ...ocking pin may only be removed from those monitors equipped with a standing base when the base is pulled up Otherwise you may be injured by the protruding sections of the stand Screw Turn the screw by using the screw handle Positioning your display After installation adjust the angle as shown below 1 Adjust the position of the panel in various ways for maximum comfort Tilt Range 6 22 6 22 When adj...

Page 9: ...emove the Locking pin to adjust the height 100 0mm ERGONOMIC It is recommended that in order to maintain an ergonomic and comfortable viewing position the forward tilt angle of the monitor should not exceed 5 degrees WARNING You do not need to replace the Locking pin after it is removed to adjust its height ...

Page 10: ...andscape Portrait You can rotate the panel 90o clockwise Please be cautious and avoid contact between the monitor head and the Stand Base when rotating the screen to access the Pivot function If the monitor head touches the Stand Base then the Stand Base could crack 3 Be careful with the cables when rotating the screen Using the Pivot function Stand section Head section ...

Page 11: ...th the PC 1 2 Wall outlet type Variesaccordingtomodel NOTE This is a simplified representation of the rear view This rear view represents a general model your display may differ from the view as shown The HDMI DVI cable is not compatible with the DVD player or others C HDMI Headphone Output AV equipment Set Top Box DVD Video Video Game Console HDMI is optimized on the AV equipment Not supported PC...

Page 12: ...dividual input signals AUTO SET Function When you encounter problems such as blurry screen blurred letters screen flicker or tilted screen while using the device or after changing screen resolution press the AUTO SET function button to improve resolution 4 Press the Power Button on the front panel to turn the power on When monitor power is turned on the Self Image Setting Function is executed auto...

Page 13: ...nal cable in the cable holder 1 Press Pull 3 Please put the power cord and the signal cable in the cable holder 2 While pressing the bottom of cable holder 2 with one hand pull the top of it with the other hand as shown in the picture Cable holder 2 Cable holder 1 NOTE Use the cable holder to organize the cables in order to use the pivot function properly This picture shows how to organize cables ...

Page 14: ...efer to the TrueColorFinder manual in the provided CD 3 After executing the TrueColorFinder program connect the Calibrator Spyder3 to the monitor and computer respectively Connecting and Disconnecting the Monitor Hood 1 Connect the Monitor Hood as shown below 2 To disconnect the monitor hood follow the steps in the reverse order 1 2 4 5 6 3 8 7 9 10 11 12 Match the two hood sides 13 A click will b...

Page 15: ...tor Spyder3 to the monitor as shown below 14 13 11 10 9 12 AUDIO OUT 1 2 AUDIO OUT 1 2 1 2 NOTE Do not put excessive pressure on the monitor hood when fitting It may damage the hood Do not put any objects on the hood With the hood installed do not shake it or rotate the screen Pivot ...

Page 16: ...board etc to the monitor not to the computer 2 The monitor s USB terminal supports USB 2 0 and High Speed cables 1 2 Four USB Downstream ports Connect these ports to a mouse memory stick or USB hard disk One USB Upstream port Connect this port to the downstream port of a computer laptop or USB monitor Your computer or USB monitor must support USB and have USB ports ...

Page 17: ... that they cannot be inadvertently changed Press and hold the MENU button for several seconds The message OSD LOCKED should appear You can unlock the OSD controls at any time by pushing the MENU button for several seconds The message OSD UNLOCKED should appear MODE Button Use this button to move to items in COLOR MODE CUSTOM sRGB ADOBE RGB CALIBRATION EMULATION For more information refer to page 2...

Page 18: ...t functions in the On Screen Display Use this button to turn the display on or off Power Button When two or more input signals are connected you can select the input signal DVI I DVI D HDMI you want When only one signal is connected it is automatically detected The default input signal is DVI I analog SOURCE Hot key The power indicator stays red if the display is running properly On Mode If the di...

Page 19: ...ops up the menu screen To make adjustments in the On Screen Display follow these steps Move where you want to adjust Select a menu icon Adjust the status Exit from the menu screen Press the MENU Button then the main menu of the OSD appears To access a control use the or Buttons When the icon you want becomes highlighted press the AUTO SET Button Use the Buttons to adjust the image to the desired l...

Page 20: ...hitePoint and Gamma values through the Color Management System CMS EMULATION Adjusts colors by controlling the Brightness WhitePoint RGB Color Gamut and Gamma values through the Color Management System CMS BRIGHTNESS CONTRAST GAMMA WHITE BALANCE BLACK LEVEL PICTURE Standard image settings HDMI YUV signal HDMI RGB signal HDMI Y HDMI R DVI I Analog signal DVI I Digital signal DVI D Digital signal DV...

Page 21: ...PHASE SHARPNESS Adjusts the clarity and stability of the screen TRACKING Adjusts the position of the screen COLOR TEMP COLOR Color temperature adjustments RED GREEN BLUE HUE SATURATION SIXCOLOR RED GREEN BLUE CYAN MAGENTA YELLOW 5000K 6500K 7200K 8200K 9300K PRESET USER COLOR RESET DVI I A DVI I D DVI D HDMI Y HDMI R DVI I A DVI I A DVI I A DVI I D DVI D HDMI Y HDMI R DVI I A DVI I D DVI D HDMI Y ...

Page 22: ...ation Color Temperature Brightness Gamma and x and y coordinates of RGBCMY are adjusted based on the Adobe RGB specification COLOR MODE CALIBRATION Adjusts Color features by controlling the Brightness WhitePoint and Gamma values through the color management system CMS This function is available only after TrueColorFinder is installed on the computer and calibration has been performed with the cali...

Page 23: ...es and icon descriptions of the all items shown on the Menu Sub menus NOTE OSD On Screen Display menu languages on the monitor may differ from the manual Menu Name Icons Button Tip WHITE BALANCE NO BLACK LEVEL 2 2 MENU Exit Adjust Decrease Increase SET Enter Select another sub menu Restart to select sub menu Press the MENU Button then the main menu of the OSD appears Main Menu ...

Page 24: ...e becomes higher the screen grows brighter If the value becomes lower the screen grows darker Only for HDMI input Offset As the criteria for video signal it is the darkest screen the monitor can show If the output of the video card is different the required specifications the color level may deteriorate due to video signal distortion Using this function the signal level is adjusted to fit into the...

Page 25: ...ED GREEN BLUE COLOR TEMP USER 6500K USER Mode HUE SATURATION COLOR RESET NO SIX COLOR USER RED GREEN BLUE HUE SATURATION SIX COLOR COLOR RESET A user can create screen color by adjusting RED GREEN and BLUE Set your own red color levels Adjusts the screen hue Adjusts the color sharpness on the screen Lower values make the color sharpness weaker and colors lighter while higher values make the color ...

Page 26: ...ESS To minimize any vertical bars or stripes visible on the screen background The horizontal screen size will also change To adjust the focus of the display This item allows you to remove any horizontal noise and clear or sharpen the image of characters To adjust the clearness of the screen HORIZONTAL VERTICAL To move image left and right To move image up and down ...

Page 27: ... go off If you set ON at any time the power indicator will automatically be turned on OVERSCAN A R C R T C POWER INDICATOR FACTORY RESET OFF FULL ON ON NO NOTE If this does not improve the screen image restore the factory default settings If necessary execute the white balance function again The White Balance function is available only when the input signal is DVI I Analog RTC If you set ON you en...

Page 28: ...If the display is in power saving mode try moving the mouse or pressing any key on the keyboard to bring up the screen Try to turn on the PC This message appears when the signal from the PC video card is out of horizontal or vertical frequency range of the display See the Specifications section of this manual and configure your display again This message appears when the signal cable between your ...

Page 29: ...r display image to the ideal setting If the results are unsatisfactory decrease the horizontal bars using the PHASE icon in the on screen display Check Control Panel Display Settings and adjust the display to the recommended resolution or adjust the display image to the ideal setting Set the color setting higher than 24 bits true color IMPORTANT Check Control Panel Display Settings and see if the ...

Page 30: ...the recommend resolution The Audio function is not working Picture OK No sound Check whether volume is 0 Check sound muted HDMI cable installed properly Head phone cable installed properly Check sound format Not supply to compressed sound format Do you see an Unrecognized monitor Plug Play VESA DDC monitor found message Have you installed the display driver Be sure to install the display driver fr...

Page 31: ... 1920 x 1200 60 Hz Recommend DVI I DVI D Input VESA 1920 x 1200 60 Hz HDMI Video Input VESA 1920 x 1080 60 Hz Resolution Plug Play On Mode 60 W Typ Sleep Mode 2 W DVI I Input Off Mode 1 W Power Consumption With Stand Width 56 01 cm 22 05 inches Height 44 66 cm 17 58 inches Min 54 66 cm 21 52 inches Max Depth 27 02 cm 10 64 inches Weight excl packing 9 6 kg 21 16 lbs 10 5 kg 23 15 lbs With Hood Dim...

Page 32: ...Conditions Temperature 20 C to 60 C Humidity 5 to 90 non Condensing Environmental Conditions Attached Detached O Stand Base Wall outlet type Power cord NOTE Information in this document is subject to change without notice Standard USB 2 0 Self Power Data Rate Max 480 Mbps Power Consumption Max 2 5W x 4 USB ...

Page 33: ...0 023 67 500 47 776 60 289 63 981 79 976 75 000 64 674 65 290 74 038 59 940 75 000 59 901 70 156 60 317 75 000 60 004 75 029 75 000 59 870 74 893 60 020 75 025 60 000 59 883 60 454 59 950 VGA VESA VESA VGA VESA VESA VESA VESA VESA VESA VESA VESA VESA VESA VESA VESA VESA Recommend Mode Indicator On Mode Sleep Mode Off Mode Red Red Blinking Off LED Color MODE Display Modes Resolution Horizontal Freq...

Page 34: ...e for more details which is provided when Wall mount plate is purchased LG recommends that wall mounting be performed by a qualified professional installer Kensington Security Slot Connected to a locking cable that can be purchased separately at most computer stores 1 After moving the product to face downward make sure to place it on a soft cloth or a cushion to avoid surface damage 2 Separate the...

Page 35: ...e used with this System Canadian DOC Notice This Class B digital apparatus meets all requirements of the Canadian Interference Causing Equipment Regulations Cet appareil numérique de la classe B respecte toutes les exigences du Règlement sur le matériel brouilleur du Canada CE Conformity Notice for Europe Products with the CE Marking comply with the EMC Directive 89 336 EEC and LOW VOLTAGE Directi...

Page 36: ...one or more stages The length of time to reactivate the system unit shall be reasonable for the user Labelled products must meet strict environmental demands for example in respect of the reduction of electrical and magnetical fields as well as work load and visual ergonomics Below you will find a brief summary of the ecological requirements met by this product The complete ecological criteria doc...

Page 37: ...ty Emissions Electromagnetic fields Noise emissions Ecology The product must be prepared for recycling and the manufacturer must have a certified environmental management system such as EMAS or ISO 14 001 Restrictions on chlorinated and brominated flame retardants and polymers heavy metals such as cadmium mercury and lead The requirements included in this label have been developed by TCO Developme...

Page 38: ...ser Recyclingprogramm erfahren möchten wenden Sie sich bitte an Ihren lokalen LG Händler oder einen Unternehmensvertreter von LG Wir richten unsere Firmenpolitik auf eine sauberere Umwelt hin aus indem wir umweltspezifische Aspekte als wichtigen Punkt in die Weiterentwicklung unseres Unternehmens einfließen lassen Zusätzliche Informationen über unsere grüne Firmenpolitik erhalten Sie auf unserer W...

Page 39: ...limpio de LG en 1994 y este ideal ha servido para guiar nuestros principios empresariales desde entonces La Declaración es la base que nos ha permitido llevar a cabo tareas que respetan el medio ambiente siempre teniendo en cuenta aspectos sociales económicos y medioambientales Promocionamos actividades orientadas a la conservación del medio ambiente y desarrollamos nuestros productos específicame...

Page 40: ...houden bij het ontwikkelen onze producten specifiek rekening met de milieuvriendelijkheid van onze producten Wij minimaliseren het gebruik van schadelijke stoffen in onze producten Er wordt bijvoorbeeld geen cadmium verwerkt in onze monitors Nederlands Informatie met betrekking tot recycling Deze monitor bevat materialen die schadelijk zouden kunnen zijn voor het milieu Het is belangrijk dat deze ...

Page 41: ...ÏÔÓÌÂÌÚ Û ÛÚ ÚÓ Ë ÌÓ ËÒÔÓÎ ÁÓ Ì Ë ÛÚËÎËÁË Ó Ì ÚÓ ÂÏˇ Í Í Â Ì Â Â ÂÒÚ Ë ÚˇÊÂÎ Â ÏÂÚ ÎÎ Û ÛÚ Ó ÓÚ Ì Ò ÔÓÏÓ ÍÓÎÓ Ë ÂÒÍË Ô ËÂÏÎÂÏÓ Ó ÏÂÚÓ ÓΠÔÓ Ó ÌÓÈ ËÌÙÓ Ï ˆËÂÈ ÔÓ Ì ÂÈ Ô Ó ÏÏ ÛÚËÎËÁ ˆËË ÓÚıÓ Ó Ó ÈÚÂÒ Í ÏÂÒÚÌÓÏÛ ÔÓÒÚ ËÍÛ ËÎË Ô Â ÒÚ ËÚÂÎ ÍÓ ÔÓ ˆËË LG Ã Ó ËÂÌÚË ÛÂÏÒˇ Ì Ó ÂÒÔ ÂÌË ÍÓÎÓ Ë ÂÒÍÓÈ ÂÁÓÔ ÒÌÓÒÚË ÒÚ ˇ Ò  ˆÂÎ ÎÓ Î ÌÛ Á ËÚÛ ÓÍ ÛÊ ÂÈ Ò Â ƒÓÔÓÎÌËÚÂÎ ÌÛ ËÌÙÓ Ï ˆË Ó Ì ÂÈ ÔÓÎËÚËÍ ÔÓ Óı Ì ÓÍ ÛÊ...

Page 42: ...geven met het huishoudelijk afval maar moeten worden ingeleverd bij speciale inzamelingspunten die door de lokale of landelijke overheid zijn aangewezen 3 De correcte verwijdering van uw oude toestel helpt negatieve gevolgen voor het milieu en de menselijke gezondheid voorkomen Smaltimento delle apparecchiature obsolete Kassering av din gamla apparat Uw oude toestel wegdoen 1 Ce symbole représenta...

Page 43: ...saat ottamalla yhteyden paikallisiin viranomaisiin kierrätyskeskukseen tai myymälään josta ostit laitteen 1 Når der er et tegn med et kryds over en skraldespand betyder det at produktet er omfattet af EU direktiv 2002 96 EC 2 Alle elektriske og elektroniske produkter skal smides ud et andet sted end gennem den kommunale affaldsordning ved hjælp af specielle indsamlingsfaciliteter der er organisere...

Page 44: ...Regulatory Information cont 10 Portuguese Slovak Czech Croatian Hungarian Polish ...

Page 45: ...Regulatory Information cont 11 Estonian Latvian Lithuanian ...

Page 46: ...Digitally yours ...

Reviews: