LG vc9700 Owner'S Manual Download Page 16

16

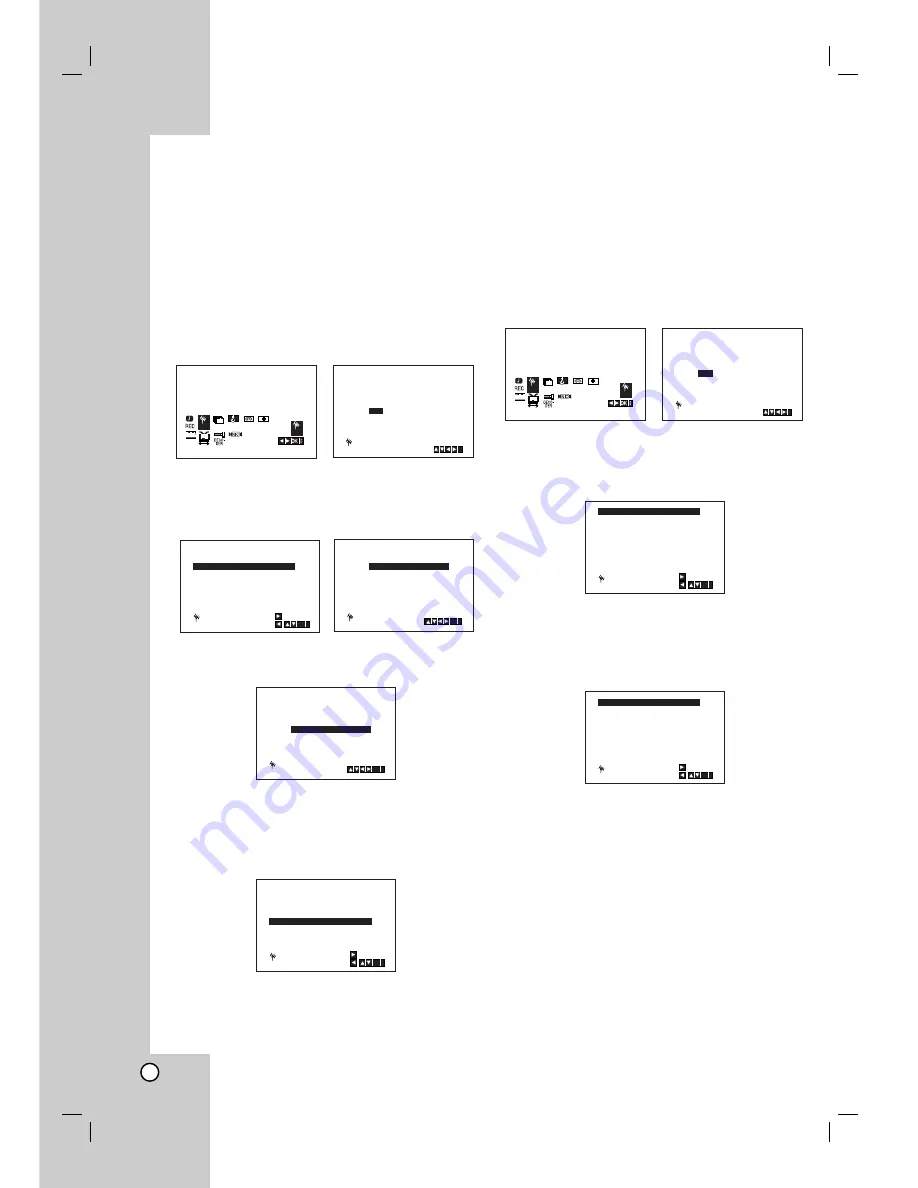
Changing the order of TV Stations

After tuning TV stations into your VCR you may
wish to change the order in which they are
stored without having to retune them against!
The instructions given on this page will show you
how you can simply move them into your desired
order.

1. Press 

i

.

The main menu will appear on the TV screen.
Press 

1

or 

2

to select the 

PR SET

.

Press 

OK

.

2. Press 

i

.

Press 

3

or 

4

to select the 

programme number

you want to move (for example, PR 03).
Press 

2

.

3. Press 

3

or 

4

to select the 

programme number

you want to move to (for example, PR 05).

4. Press 

OK

.

The selected 

programme

will be moved to 

the

new programme number

.

If you wish to move other TV stations repeat
stages 1 - 4. 

5. Press 

i

to remove the menus from the TV screen.

Deleting TV Stations

After tuning TV stations into your VCR you may
wish to delete a station.
how you can easily delete any unwanted TV 
stations.

1. Press 

i

.

The main menu will appear on the TV screen.
Press 

1

or 

2

to select the 

PR SET

.

Press 

OK

.

2. Press 

i

.

3. Press 

3

or 

4

to select the 

programme number

you want to delete. (for example, PR 01)

4. Press 

1

.

After a short while, the selected station will be 
deleted.
If you wish to delete other TV stations repeat
stages 

3 - 4

.

5. Press 

i

to remove the menus from the TV screen.

SYS

1 2

SET

OSD

ON

OFF

OSD

f

ACMS

Pr-12

PSET

R

PSET

R

SYS

1 2

SET

OSD

ON

OFF

OSD

f

ACMS

Pr-12

PSET

R

PSET

R

PR

CH

MFT

STATION

01

00

PR-03

CHANNEL/CABLE : AV

    C03

i

PSET

R

02

C02

00

PR-02

03

C04

00

PR-04

04

- -

- -

- - - - -

05

C03

00

PR-03

06

- -

- -

- - - - -

07

- -

- -

- - - - -

08

- -

- -

- - - - -

01

C01

00

PR-01

PSET

R

OK

i

,

DELETE :

MOVE :

02

C02

00

PR-04

03

- -

- - 

- - - - -

04

C03

00

PR-03

05

06

- -

- -

- - - - -

- -

- -

- - - - -

07

- -

- -

- - - - -

08

- -

- -

- - - - -

01

C01

00

PR-02

PSET

R

OK

i

,

DELETE :

MOVE :

PR

CH

MFT

STATION

01

00

PR-03

CHANNEL/CABLE : AV

    C03

i

PSET

R

02

C02

00

PR-02

03

C03

00

PR-03

04

C04

00

PR-04

05

- -

- -

- - - - -

06

- -

- -

- - - - -

07

- -

- -

- - - - -

08

- -

- -

- - - - -

01

C01

00

PR-01

OK

i

,

DELETE :

MOVE :

PSET

R

02

C02

00

PR-02

03

C03

00

PR-03

04

C04

00

PR-04

05

- -

- -

- - - - -

06

- -

- -

- - - - -

07

- -

- -

- - - - -

08

- -

- -

- - - - -

01

C01

00

PR-01

PSET

R

OK

i

02

C02

00

PR-02

03

C04

00

PR-04

04

- -

- -

- - - - -

05

C03

00

PR-03

06

- -

- -

- - - - -

07

- -

- -

- - - - -

08

- -

- -

- - - - -

01

C01

00

PR-01

PSET

R

OK

i

02

C02

00

PR-02

03

C04

00

PR-04

04

- -

- -

- - - - -

05

C03

00

PR-03

06

- -

- -

- - - - -

07

- -

- -

- - - - -

08

- -

- -

- - - - -

01

C01

00

PR-01

PSET

R

OK

i

,

DELETE :

MOVE :

Summary of Contents for vc9700

Page 1: ...DVD PLAYER VIDEO CASSETTE RECORDER OWNER S MANUAL MODEL VC9700 Before connecting operating or adjusting this product please read this instruction booklet carefully and completely PAL ...

Page 2: ...ULD NOTE THAT NOT ALL HIGH DEFINITION TELEVISION SETS ARE FULLY COMPATIBLE WITH THIS PRODUCT AND MAY CAUSE ARTIFACTS TO BE DISPLAYED IN THE PICTURE IN CASE OF 625 PROGRES SIVE SCAN PICTURE PROBLEMS IT IS RECOMMENDED THAT THE USER SWITCH THE CONNECTION TO THE STANDARD DEFINITION OUTPUT IF THERE ARE QUES TIONS REGARDING OUR TV SET COMPATIBILITY WITH THIS MODEL 625p DVD PLAYER PLEASE CONTACT OUR CUST...

Page 3: ...ing using On Screen Display 25 26 Playing a DVD or Video CD 27 29 General Features 27 Moving to another TITLE 27 Moving to another CHAPTER TRACK 27 Search 27 Changing the Audio Channel 27 Still Picture and Frame by Frame Playback 28 Slow Motion 28 Random 28 Repeat A B 28 Repeat 28 3D Surround 28 Time Search 28 Zoom 29 Marker Search 29 Special DVD Features 29 Title Menu 29 Disc Menu 29 Camera Angle...

Page 4: ...uch the playback side of the disc Hold the disc by the edges so that fingerprints do not get on the surface Never stick paper or tape on the disc Storing Discs After playing store the disc in its case Do not expose the disc to direct sunlight or sources of heat and never leave it in a parked car exposed to direct sunlight Cleaning Discs Fingerprints and dust on the disc can cause poor picture qual...

Page 5: ...nd Video CDs Some playback operations of DVDs and Video CDs may be intentionally programmed by software manufacturers This unit plays DVDs and Video CDs according to disc content designed by the software manufacturer therefore some playback features may not be available or other functions may be added Manufactured under license from Dolby Laboratories Dolby and the double D symbol are trademarks o...

Page 6: ... Playback control is available for Video CD VCD version 2 0 disc formats PBC allows you to interact with the system via menus search functions or other typical computer like operations Moreover still pictures of high resolution can be played if they are included in the disc Video CDs not equipped with PBC Version 1 1 operate in the same way as audio CDs Title DVD video discs only A title is genera...

Page 7: ...S copy is in progress Child Lock is engaged Forward Skip Scan Fast Forward Go to NEXT chapter track Press and hold for two seconds for a fast forward search Winds the tape forwards Reverse Skip Scan Rewind Go to beginning of current chapter track or to PREVIOUS chapter track Press and hold for two seconds for a fast reverse search Rewinds the tape STOP Á Á Stops playback Tape Compartment PLAY G St...

Page 8: ... adjust tracking To control vertical tremble during picture still ENTER OK Acknowledge menu selection DISC MENU Access menu of a DVD disc A B LP Repeat sequence Select the recording speed of the tape RANDOM CM SKIP Play tracks in random order CM SKIP OPEN CLOSE EJECT Open or close the the disc tray Tape Eject AV Select input source for recording into tape TV Control Buttons see p 38 TV POWER Turns...

Page 9: ...rial using this jack COAXIAL Digital audio out jack DVD EXCLUSIVE OUT Connect to digital coaxial audio equipment RF OUT Connect to your TV using this jack S VIDEO OUT DVD EXCLUSIVE OUT Connect to a TV with S Video input EURO AV1 AUDIO VIDEO VCR IN OUT DVD OUT Connect to your TV set or another video recorder AC Power Cord Connect to a power source COMPONENT PROGRESSIVE SCAN VIDEO OUT Y Pb Pr DVD EX...

Page 10: ...UT jacks on the DVD Player to the corresponding in jacks on the TV using the Y Pb Pr cable 2 Connect the Left and Right AUDIO OUT jacks of the DVD Player to the audio left right in jacks on the TV using the audio cables S Video connection 1 Connect the S VIDEO OUT jack on this unit to the S Video input jack on the TV using the S Video cable 2 Connect the Left and Right AUDIO OUT jacks of the DVD P...

Page 11: ...lti channel sound A digital multi channel connection provides the best sound quality For this you need a multi channel Audio Video receiver that supports one or more of the audio formats supported by your unit MPEG 2 Dolby Digital and DTS Check the receiver manual and the logos on the front of the receiver Warning Due to the DTS Licensing agreement the digital output will be in DTS digital out whe...

Page 12: ...ready pre tuned for optimum video playback on your TV 4 Store this channel on your TV You will need to look at the TV instruction book if you do not know how to do this 5 Only carry out stages 5 8 if you cannot obtain clear video playback as described in stages 1 4 Select a TV channel number on which you wish to watch video s Make sure that your VCR is in standby pressing POWER on the remote contr...

Page 13: ...ically when you enter the year 3 If you make a mistake press 1 or 2 and enter the correct details 4 Press i To set the colour system 1 Press i 2 The main menu will appear on the TV screen 3 Press 1 or 2 to select the SYS and press OK 4 Press 3 or 4 to select according to the COLOUR system used 5 Press 1 or 2 to select the RF AUDIO Press 3 or 4 to select according to the RF AUDIO used 6 Press i to ...

Page 14: ...ress 3 or 4 to select 4 Press i to remove the menus from the TV screen Tuning in TV Stations Automatically If the TV broadcast signal is weak your VCR may not detect the necessary information and will not be able to store them correctly To overcome this problem please turn to the MANUAL TUNING section on page 15 1 Press POWER to turn on your DVD VCR 2 Press i button The main menu will appear on th...

Page 15: ...stations Press 2 to select MFT Control the fine tuning of the station by using 3 or 4 6 Press 2 to select STATION so that you may name your TV station Press OK 7 Use 3 or 4 to select letters and numbers for the station name Use 1 or 2 to move back and forth between characters Press OK 8 Press i confirm the station placement If you wish to manually tune other stations repeat stages 3 8 9 Press i ag...

Page 16: ...n the TV screen Press 1 or 2 to select the PR SET Press OK 2 Press i 3 Press 3 or 4 to select the programme number you want to delete for example PR 01 4 Press 1 After a short while the selected station will be deleted If you wish to delete other TV stations repeat stages 3 4 5 Press i to remove the menus from the TV screen SYS 1 2 SET OSD ON OFF OSD f ACMS Pr 12 PSET R PSET R SYS 1 2 SET OSD ON O...

Page 17: ... available MARKER SEARCH 1 2 3 4 5 6 7 8 9 1 9 A B Title Example On Screen Display during playing VCD Items Title Number Chapter Number Time search Audio language and Digital Audio Output mode Subtitle language Angle Sound Selection Method b B Numbers ENTER b B Numbers ENTER Numbers ENTER b B or AUDIO b B or SUBTITLE b B or ANGLE b B 1 3 1 12 0 20 09 ABC 1 ENG 1 3 3D SUR Example On Screen Display ...

Page 18: ...ted item as well as alternate setting s 3 Use v V to select the second desired option then press B to move to the third level 4 Use v V to select the desired setting then press ENTER to confirm your selection Some items require additional steps 5 Press SETUP or N to exit the Setup menu LANGUAGE Menu Language Select a language for the Setup menu and on screen display Disc Audio Subtitle Menu Select...

Page 19: ...sive Scan format the picture will appear scrambled if you try Progressive Scan on the DVD Player 4 When the confirm menu appears on your screen Cancel is highlighted as default Use the b button to highlight Enter 5 Pressing ENTER will set this unit to Progressive scan mode Caution Once the setting for progressive scan output is entered an image will only be visible on a progressive scan compatible...

Page 20: ...to 48 kHz so your system can decode them If your receiver or amplifier is capable of handling 96 kHz signals select 96 kHz When this choice is made this unit passes each type of signal through without any further processing Check the documentation for your amplifier to verify its capabilities Dynamic Range Control DRC With the DVD format you can hear a program s soundtrack in the most accurate and...

Page 21: ...y not work for some DVDs DivX R VOD You can display the DivX DRM Digital Rights Management Registration code for your unit only The Registration code is used for VOD Video On Demand service agent You can purchase or rent an encrypt move file Notes If you rent the DivX VOD file it has several options of viewing limits as shown below Display the number which you can watch the file The rental has bee...

Page 22: ...ith the same rating or lower are played Higher rated scenes are not played unless an alternate scene is available on the disc The alternative must have the same rating or a lower one If no suitable alternative is found playback stops You must enter the 4 digit password or change the rating level in order to play the disc 4 Press ENTER to confirm your rating selection then press SETUP to exit the m...

Page 23: ...peed and without sound Press the N X2 button to return to playback at normal speed Picture search During playing back press either FORWARD or BACKWARD and this will enable you to rapidly wind the tape 7 times normal playback and see where you are on the tape Logic search During fast forwarding or rewinding press and hold FORWARD or BACKWARD the picture will be played back at 7 times normal playbac...

Page 24: ... the rear of your unit AV 3 for recording from VIDEO IN and AUDIO IN Left Right sockets on the front of your unit 5 Press LP if you wish to record in Long Play or Standard Play SP will produce improved picture and sound quality however LP will provide twice as much recording time as SP 6 Press REC ITR to start recording RECORD will appear on the TV screen Press REC ITR several times Each successiv...

Page 25: ...ter the date of the programme If you press OK before entering the date you may select one of the following automated recording features Press 1 or 2 to select then press OK to confirm DLY To record every day except Saturday and Sunday at the same time SU SA To record at the same time every week 6 Use v V 1 2 buttons to enter the recording start and end times of the programme that you wish to recor...

Page 26: ... mode If at a later date you wish to delete or change any of the settings in timer event memory you may do so without having to enter all the timer event infor mation again Simply display the timer event screen Use v or V to select the event that you wish to delete or change Press b to delete the event or Press OK to change then press b or B to select Station Date Start and End times and recording...

Page 27: ...layer The region code for this player is 2 two General Features Note Unless stated otherwise all operations described use the remote control Some features may also be available on the Setup menu Moving to another TITLE When a disc has more than one title you can move to another title Press DISPLAY while playback is stopped then the appropriate number 0 9 or use b B to move to another title You can...

Page 28: ... all track on a disc Press REPEAT during playback to select a desired repeat mode DVD Video Discs Repeat Chapter Title Off Chapter repeats the current chapter Title repeats the current title Off does not play repeatedly Video CDs Divx discs Repeat Track All Off Track repeats the current track All repeats all the tracks on a disc Off does not play repeatedly Notes On a Video CD with PBC you must se...

Page 29: ...AR and the marker number is erased from the list 4 You can play any marker by inputting its number on the marker search menu Special DVD Features Checking the contents of DVD discs Menus DVDs may offer menus that allow you to access special features To use the disc menu press DISC MENU Input the corresponding number or use the b B v V buttons to highlight your selection Then press ENTER Title Menu...

Page 30: ... Edit DISPLAY Info MUSIC 2 Music2 1 Music1 3 Music3 4 Music4 5 Music5 6 Music6 7 Music7 MP3 WMA disc compatibility with this player is limited as follows Sampling frequency within 8 48 kHz MP3 within 32 48kHz WMA Bit rate within 8 320kbps MP3 32 192kbps WMA The player cannot read an MP3 WMA file that has a file extension other than mp3 wma CD R physical format should be ISO 9660 If you record MP3 ...

Page 31: ... Random 1 Press RANDOM during playback or when playback is stopped Random Playback begins immediately and RANDOM appears on the menu screen 2 To return to normal playback press RANDOM repeatedly until RANDOM disappears from the menu screen Tip By pressing during random playback the unit selects another track and resumes random playback Repeat A B 1 To repeat a sequence during disc playback press A...

Page 32: ... track of CD or MP3 WMA list and then press PLAY Repeat Programmed Tracks 1 Press REPEAT when playing a disc The repeat icon appears 2 Press REPEAT to select a desired repeat mode Track repeats the current track All repeats all the tracks on programmed list Off No display does not play repeatedly Note If you press once during Repeat Track playback the repeat playback cancels Erasing a Track from P...

Page 33: ...e the photo image see 29 page To rotate picture Press v V during showing a picture to rotate the picture clockwise or counter clockwise To listen to MP3 WMA music watching picture You can display files while listening to MP3 WMA music files recorded on the same disc 1 Insert the disc containing the two types of file in the player 2 Press TITLE to display PHOTO menu 3 Press v V to select a photo fi...

Page 34: ...hat are specifically compatible with CPRM Maintenance and Service Refer to the information in this chapter before contacting a service technician Handling the Unit When shipping the unit Please save the original shipping carton and packing materials If you need to ship the unit for maximum protection re pack the unit as it was originally packed at the factory Keeping the exterior surfaces clean Do...

Page 35: ... this player is limited as follows Available resolution size of the DivX file is under 720x576 W x H pixel The file name of the DivX subtitle is available by 56 characters If there is impossible code to express in the DivX file it may be displayed as _ mark on the display If the number of the screen frame is over 30 per 1 second this unit may not operate normally If the video and audio structure o...

Page 36: ...ecording is complete Press BACKWARD The tape will rewind and automatically stop when the counter returns to 0 00 00 Lock Child Lock The control buttons on the front of the unit can be switched off so that your unit can only be operated using the remote control 1 Press LOCK and SAFE will appear in the display window None of the buttons on the front of your unit will work If any buttons on the front...

Page 37: ...REO The primary language willbe output from both channels when the audio setting is MONO Please note that when adjusting the tracking control Hi Fi stereo sound may revert to MONO Wide Screen Compatibility 16 9 Your DVD VCR can record and play back wide screen aspect ratio programmes 16 9 To record a wide screen format programme successfully the correct type of wide screen signal must be broadcast...

Page 38: ...of the DVD video film materi al or video material is determined from disc information MODE2 Suitable for playing film based content or video based material recorded by the progressive scan method MODE3 Suitable for playing video based content with comparatively little motion Note The video mode setting only works when the Progressive Scan mode is set to On on the setup menu Controlling other TVs w...

Page 39: ...ie ends or the unit may replay and record over and over again Recording from another video recorder With this video recorder you can make recordings from an external source such as copying from another video recorder or a camcorder Note In the following description this video recorder will be one used for recording and will be referred to as VCR B The other appliance will be used for playback and ...

Page 40: ...ssian 6669 Cambodian 7577 Catalan 6765 Chinese 9072 Corsican 6779 Croatian 7282 Czech 6783 Danish 6865 Dutch 7876 English 6978 Esperanto 6979 Estonian 6984 Faroese 7079 Language Code Fiji 7074 Finnish 7073 French 7082 Frisian 7089 Galician 7176 Georgian 7565 German 6869 Greek 6976 Greenlandic 7576 Guarani 7178 Gujarati 7185 Hausa 7265 Hebrew 7387 Hindi 7273 Hungarian 7285 Icelandic 7383 Indonesian...

Page 41: ...the path of the remote control and this unit The batteries in the remote control are exhausted Is the cassette compartment empty Audio mode is not set properly NICAM mode is not set properly Correction Refer to page 2 Plug the power cord into the wall outlet securely Insert a disc Check that the DVD or audio CD indicator in the display window is lit Select the appropriate video input mode on the T...

Page 42: ...z Signal to noise ratio More than 100dB ANALOG OUT connectors only Harmonic distortion Less than 0 008 Dynamic range More than 100 dB DVD More than 95 dB CD Inputs VCR Audio 6 0dBm more than 10 kohms SCART 6 0dBm more than 47 kohms RCA Video 1 0 Vp p 75 ohms unbalanced SCART RCA Outputs DVD VIDEO OUT 1 Vp p 75 ohms sync negative S VIDEO OUT Y 1 0 Vp p 75 ohms negative sync Mini Din 4 pin x 1 C 0 3...

Page 43: ...P NO 3834RV0036U ...

Reviews: