background image

ENGLISH

15

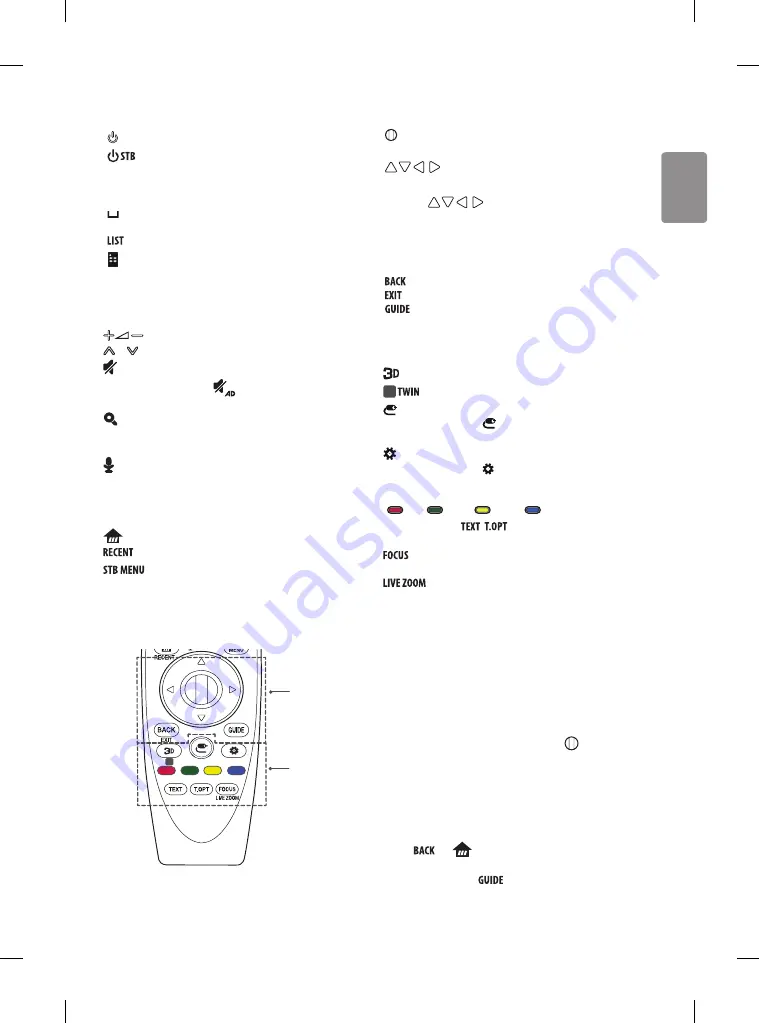
A


(POWER)

  Turns the TV on or off.


(STB POWER)  

You can turn your set-top box on or off by 

adding the set-top box to the universal remote control for your TV.

Number buttons

  Enters numbers.

Alphabet buttons

  Enters letters. (Depending on model)

 (Space) 

Opens an empty space on the screen keyboard. 

(Depending on model)


 Accesses the saved  programmes list.


(Screen Remote)  

Displays the Screen Remote. 

*Accesses the Universal Control Menu. (Depending on model)

B


Adjusts the volume level.

 P    

Scrolls through the saved programmes.

(MUTE)

  Mutes all sounds. 

*  By pressing and holding the 

 button, audio descriptions 

function will be enabled. (Depending on model)


(SEARCH)

  Search for content such as TV programmes, movies 

and other videos, or perform a web search by entering text in the 
search bar.

 (Voice recognition)

(Depending on model) 
Network connection is required to use the voice recognition function.

1.    Press the voice recognition button.

  2.   Speak when the voice display window appears on the TV screen.

 (HOME)  

Accesses the Home menu. 


Shows the previous history.


 Displays the set-top box Home menu.

* When you are not watching via a set-top box: the display changes 
to the set-top box screen.

C

D

C

 Wheel (OK)

  Press the center of the Wheel button to select a 

menu. You can change programmes by using the wheel button.

 Navigation buttons

  (up/down/left/right)

Press the up, down, left or right button to scroll the menu.
If you press 

  buttons while the pointer is in use, 

the pointer will disappear from the screen and Magic Remote will 
operate like a general remote control. 
To display the pointer on the screen again, shake Magic Remote to 
the left and right.


Returns to the previous level.


 Clears on-screen displays and returns to last input viewing.


 Shows programmes guide.

D


 Used for viewing 3D video. (Depending on model)


Turns the twin mode on or off. (Depending on model)


(INPUT) 


Changes the input source. 

* Pressing and holding the   button displays all the lists of 
external inputs.


(Q. Settings)  

Accesses the Quick Settings. 

* Pressing and holding the   button displays the 

All Settings


menu.

Coloured buttons  

These access special functions in some menus.  

(

: Red, 

: Green, 

: Yellow, 

: Blue)

TELETEXT buttons (

)


These buttons are used for 

teletext. 


You can zoom in on the area where the remote control is 

pointed.


By zooming in on the selected area, you can view it in 

full screen.

Registering magic remote

How to register the magic remote

To use the Magic Remote, first pair it with your TV. 
1  Put batteries into the Magic Remote and turn the TV on.
2  Point the Magic Remote at your TV and press the   

Wheel (OK)

 on 

the remote control.

*  If the TV fails to register the Magic Remote, try again after turning the 

TV off and back on.

How to deregister the magic remote

Press the 


and 


(HOME) 

buttons at the same time, for five 

seconds, to unpair the Magic Remote with your TV.
*  Pressing and holding the 


button will let you cancel and re-

register Magic Remote at once.

Summary of Contents for UH63 Series

Page 1: ...P No MFL69342472 1602 REV00 Printed in Korea LED TV UH63 www lg com X 4 M4 X L14 AA b a Depending on model Selon le modèle Dependendo do modelo ...

Page 2: ......

Page 3: ...1 4 2 5 3 6 M4xL8 2 1 2 2 b M4xL8 M4xL14 b b b b b a b a b ...

Page 4: ...HDMI IN LAN USB IN AUDIO OUT H P OUT ANTENNA CABLE IN HDMI IN ARC ...

Page 5: ...LAN AUDIO OUT H P OUT Satellite IN OPTICAL DIGITAL AUDIO OUT PCMCIA CARD SLOT Depending on model Selon le modèle Dependendo do modelo ...

Page 6: ...COMPONENT IN AV IN VIDEO VIDEO L MONO AUDIO R AUDIO ...

Page 7: ...1 2 4 3 ...

Page 8: ...A B C D E F F G 70UH635V TA 70UH635T TA 70UH635Y TA 1572 971 282 909 59 7 31 5 28 7 1 2 0 MFL69342472 D B E C A F G ...

Page 9: ... REV04 Printed in Korea MFL69340902 OWNER S MANUAL Safety and Reference Please read this manual carefully before operating your set and retain it for future reference LED TV Disclaimer LG LED TV applies LCD screen with LED backlights ...

Page 10: ...ture quality y y Changes to certain functionalities of this television TV Guide Picture sound etc may change the power consumption y y Depending upon such changed setting eg Retail mode the power consumption may vary which possibly could exceed the stated energy consumption To reset the television to Star rating qualified settings select Home mode from the initial set up procedure in factory setti...

Page 11: ... instructions Please read these safety precautions carefully before using the product WARNING Do not place theTV and or remote control in the following environments A location exposed to direct sunlight An area with high humidity such as a bathroom Near any heat source such as stoves and other devices that produce heat Near kitchen counters or humidifiers where they can easily be exposed to steam ...

Page 12: ...rop metallic objects such as coins hair pins chopsticks or wire into the product or inflammable objects such as paper and matches Children must pay particular attention Electrical shock fire or injury can occur If a foreign object is dropped into the product unplug the power cord and contact the service centre Do not spray water on the product or scrub with an inflammable substance thinner or benz...

Page 13: ...pending on model CAUTION Install the product where no radio wave occurs There should be enough distance between an outside antenna and power lines to keep the former from touching the latter even when the antenna falls This may cause an electric shock Do not install the product on places such as unstable shelves or inclined surfaces Also avoid places where there is vibration or where the product c...

Page 14: ...ons below to prevent the product from overheating The distance between the product and the wall should be more than 10 cm Do not install the product in a place with no ventilation e g on a bookshelf or in a cupboard Do not install the product on a carpet or cushion Make sure the air vent is not blocked by a tablecloth or curtain Otherwise this may result in fire Take care not to touch the ventilat...

Page 15: ...en into the apparatus the apparatus has been exposed to rain or moisture does not operate normally or has been dropped If the product feels cold to the touch there may be a small flicker when it is turned on This is normal there is nothing wrong with product This panel is an advanced product that contains millions of pixels You may see tiny black dots and or brightly coloured dots red blue or gree...

Page 16: ...dth Use an extension cable that supports USB 2 0 if the USB cable or USB memory stick does not fit into yourTV s USB port A B A B A 10 mm B 18 mm Use a certified cable with the HDMI logo attached If you do not use a certified HDMIcable the screen may not display or a connection error may occur Recommended HDMICableTypes High Speed HDMI TM Cable 3m or less High Speed HDMI TM Cable with Ethernet 3m ...

Page 17: ... or design may be changed depending on the upgrade of product functions manufacturer s circumstances or policies Depending on model AG F Cinema 3D Glasses AN MR650 Magic Remote AN VC550 Smart Camera AG F DP Dual Play Glasses AN TD700 LGTwinTV Engine Lifting and moving the TV Please note the following advice to prevent theTV from being scratched or damaged and for safe transportation regardless of ...

Page 18: ... from the wall for proper ventilation 10 cm 10 cm 10 cm 10cm 10 cm 2 Connect the power cord to a wall outlet CAUTION Do not place theTV near or on sources of heat as this may result in fire or other damage WARNING If a television is not positioned in a sufficiently stable location it can be potentially hazardous due to falling Many injuries particularly to children can be avoided by taking simple ...

Page 19: ...onnected When you do not use LG s wall mount bracket please use a wall mount bracket where the device is adequately secured to the wall with enough space to allow connectivity to external devices It is advised to connect all the cables before installing fixed wall mounts 10 cm 10 cm 10 cm 10 cm Make sure to use screws and wall mount bracket that meet theVESA standard Standard dimensions for the wa...

Page 20: ...quipment s manual for operating instructions If you connect a gaming device to theTV use the cable supplied with the gaming device In PC mode there may be noise associated with the resolution vertical pattern contrast or brightness If noise is present change the PC output to another resolution change the refresh rate to another rate or adjust the brightness and contrast on the PICTURE menu until t...

Page 21: ...change the TV s HDMI ULTRA HD Deep Colour setting to Off This feature is available on certain models which are supported ULTRA HD Deep Colour only NOTE Supported HDMI Audio format Dolby Digital 32 kHz 44 1 kHz 48 kHz DTS 44 1 kHz 48 kHz PCM 32 kHz 44 1 kHz 48 kHz 96 kHz 192 kHz Depending on model Remote control Depending on model The descriptions in this manual are based on the buttons on the remo...

Page 22: ...nput Returns to the previous level Clears on screen displays and returns toTV viewing D By Pressing AD button audio descriptions function will be enabled Depending on model Starts to record and displays record menu OnlyTime Machineready supported model Returns to LIVETV Control buttons Controls media contents 1 Coloured buttons These access special functions in some menus Red Green Yellow Blue Mag...

Page 23: ... left or right button to scroll the menu If you press buttons while the pointer is in use the pointer will disappear from the screen and Magic Remote will operate like a general remote control To display the pointer on the screen again shake Magic Remote to the left and right Returns to the previous level Clears on screen displays and returns to last input viewing Shows programmes guide D Used for...

Page 24: ... with the remote control Check the remote control sensor on the product and try again Check if there is any obstacle between the product and the remote control Check if the batteries are still working and properly installed to to No image display and no sound is produced Check if the product is turned on Check if the power cord is connected to a wall outlet Check if there is a problem in the wall ...

Page 25: ...odels DigitalTV Depending on Country AnalogueTV Depending on Country Television system DVB T T21 DVB T T2 C S S22 PAL B B PAL B G PAL D K PAL I SECAM B G SECAM D K NTSC M Programme coverage VHF UHF C Band2 Ku Band2 VHF UHF CATV Maximum numberof storable programmes DVB T T2 AnalogueTV 3 000 DVB S S2 6 000 External antenna impedance 75 Ω 1 Only DVB T2 support models Despite DVB T2 model DVB T T2 fun...

Page 26: ... Not placing the television set on tall furniture for example cupboards or bookcases without anchoring both the furniture and the television set to a suitable support Not placing the television set on cloth or other materials that may be located between the television set and supporting furniture Educating children about the dangers of climbing on furniture to reach the television set or its contr...

Page 27: ...for re sale to any unauthorized agencies scrap dealer kabariwalah c The product is not meant for mixing into household waste stream d Do not keep any replaced spare part s from the product in exposed area 3 Any disposal through unauthorized agencies person will attract action under Environment Protection Act 1986 4 This product is complied with the requirement of Hazardous Substances as specified ...

Page 28: ...Record the model number and serial number of the TV Refer to the label on the back cover and quote this information to your dealer when requiring any service MODEL SERIAL ...

Page 29: ...OWNER S MANUAL EXTERNAL CONTROL DEVICE SETUP Please read this manual carefully before operating the set and retain it for future reference www lg com ...

Page 30: ...7E Simplink R C Button 1E FAV Favorite Channel R C Button 8E Forward R C Button 20 Text Teletext R C Button 8F Rewind R C Button 21 T Opt Teletext Option R C Button AA Info R C Button 28 Return BACK R C Button AB Program Guide R C Button 30 AV Audio Video Mode R C Button B0 Play R C Button 39 Caption Subtitle R C Button B1 ꕗ Stop File List R C Button 40 Λ Arrow Key Cursor Up R C Button B5 RECENT R...

Page 31: ...232C IN CONTROL SERVICE TV TV PC TV PC SERVICE ONLY RS 232C IN CONTROL SERVICE RS 232C IN CONTROL SERVICE 1 3 2 1 3 2 LGTV supports PL2303 chip based Vendor ID 0x0557 Product ID 0x2008 USB to serial converter which is not made nor provided by LG It can be purchased from computer stores that carry accessories for IT support professionals RS 232C With RS232C Cable DE9 D Sub 9pin Type You need to pur...

Page 32: ...C TV PC SERVICE ONLY RS 232C IN CONTROL SERVICE RS 232C IN CONTROL SERVICE 1 3 2 1 3 2 Customer Computer RS 232C configurations 3 Wire Configurations Not standard 1 6 5 9 PC TV RXD 2 2 TXD TXD 3 1 RXD GND 5 3 GND OR RXD 3 2 TXD TXD 2 1 RXD GND 5 3 GND D Sub 9 Phone RS 232C Serial port Set ID For Set ID number see Real Data Mapping on p 6 1 Press SETTINGS to access the main menus 2 Press the Naviga...

Page 33: ... to 05 06 Contrast k g 00 to 64 20 Tune Command m a p 9 07 Brightness k h 00 to 64 21 Channel Programme Add Del Skip m b 00 to 01 08 Color Colour k i 00 to 64 22 Key m c Key Codes 09 Tint k j 00 to 64 23 Control Backlight Control Panel Light m g 00 to 64 10 Sharpness k k 00 to 32 24 Input select Main x b p 11 11 OSD Select k l 00 to 01 25 3D Only 3D models x t p 11 12 Remote Control Lock Mode k m ...

Page 34: ... OK Data x The set transmits ACK acknowledgement based on this format when receiving normal data At this time if the data is data read mode it indicates present status data If the data is data write mode it returns the data of the PC computer Error Acknowledgement Command2 Set ID NG Data x The set transmits ACK acknowledgement based on this format when receiving abnormal data from non viable funct...

Page 35: ...ull wide mode may work differently based on model and is supported for DTV fully and ATV AV partially 03 Screen Mute Command k d To select screen mute on off Transmission k d Set ID Data Cr Data 00 Screen mute off Picture on Video mute off 01 Screen mute on Picture off 10 Video mute on Ack d Set ID OK NG Data x In case of video mute on only TV will display On Screen Display OSD But in case of Scre...

Page 36: ... not turn on by power on key of IR Local Key 13 Treble Command k r To adjust treble You can also adjust in the AUDIO menu Transmission k r Set ID Data Cr Data Min 00 to Max 64 Ack r Set ID OK NG Data x Depending on model 14 Bass Command k s To adjust Bass You can also adjust in the AUDIO menu Transmission k s Set ID Data Cr Data Min 00 to Max 64 Ack s Set ID OK NG Data x Depending on model 15 Bala...

Page 37: ...Antenna TV 00 Result ma 00 00 0a 00 2 Tune to the digital antenna DVB T Channel 01 Set ID All 00 Data 00 01 Channel Data is 1 00 01 Data 02 Digital Antenna TV 10 Result ma 00 00 01 10 3 Tune to the satellite DVB S Channel 1000 Set ID All 00 Data 00 01 Channel Data is 1000 03 E8 Data 02 Digital Satellite TV 40 Result ma 00 03 E8 40 Ack a Set ID OK Data 00 Data 01 Data 02 x a Set ID NG Data 00 x For...

Page 38: ...t care in Satellite Data 03 High byte Channel Data Data 04 Low byte Channel Data Data 05 Input Source Digital Satellite for Japan 02 Antenna TV DTV 07 BS Broadcasting Satellite 08 CS1 Communication Satellite 1 09 CS2 Communication Satellite 2 Tune Command Examples 1 Tune to the digital antenna ISDB T channel 17 1 Set ID All 00 Data 00 Don t know Physical 00 Data 01 02 Major is 17 00 11 Data 03 04 ...

Page 39: ...ng If Data 00 is 00 3D On or 03 2D to 3D Data 03 works when 3D Mode Genre is manual only All 3D pattern options Data 01 may not be available according to broadcasting video signal Data 00 Data 01 Data 02 Data 03 00 O O O 01 X X X 02 X X X 03 X O O X don t care Ack t Set ID OK Data00 Data01 Data02 Data03 x t Set ID NG Data00 x 26 Extended 3D Command x v only 3D models Depending on model To change 3...

Page 40: ...ICE SETUP 27 Auto Configure Command j u Depending on model To adjust picture position and minimize image shaking automatically It works only in RGB PC mode Transmission j u Set ID Data Cr Data 01 Run Auto Configure Ack u Set ID OK NG Data x ...

Reviews: