background image

5.1.3 Delete Schedule

5.1.3.1 Delete elapsed schedules

You can delete all schedules whose date has passed using this
function.

5.1.3.2 Multiple

You can specify duration, and delete some schedules in the
duration using this function.

5.1.3.3 Delete all

You can delete all saved schedule contents using this function.

5.1.4 Set Up and Release Holiday

You can set up or release user holidays using this function.

5.1.5 Schedule Notification

If the user has configured the alarm setting, the specified alarm
sound will ring. If the notification time is before the schedule start
time, you can set up the alarm again so that it sounds repeatedly.

82

U8150 User Guide

Organiser

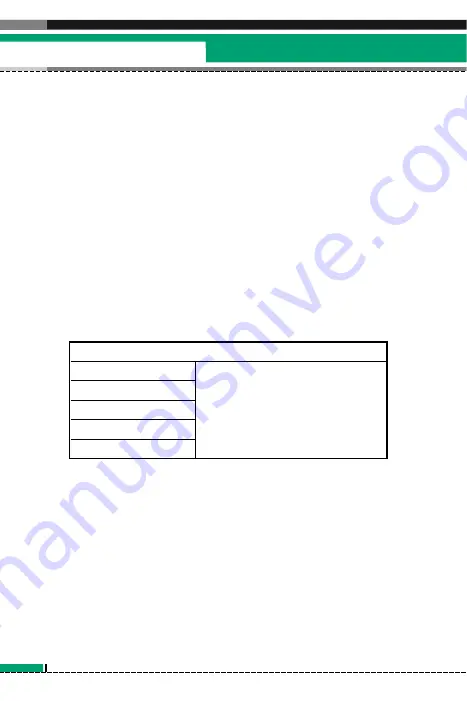
Configurable holiday options

On the day
Weekly
Monthly
Yearly
Multiple setting

When a date is configured as an
holiday, the date is displayed in
red. User configuration is used to
configure and cancel holidays of
2 to 10 days.

Summary of Contents for U8150

Page 1: ... usuario Alguno de los contenidos de este manual pueden variar respecto al teléfono dependiendo del software o del proveedor de servicio U U8 81 15 50 0 Manual del usuario Part No MMBB0128601 Issue 1 1 Printed in Korea ...

Page 2: ...ESPAÑOL U8150 Manual del usuario ...

Page 3: ...las 52 1 7 Emoticón 52 1 8 Editor comandos serv 53 1 9 Ajustes 53 2 Agenda 64 2 1 Añadir 64 2 2 Buscar 64 2 3 Grupos llam 65 2 4 Marc rápida 65 2 5 Borrar agenda 66 2 6 Copiar todo 66 2 7 Mover todo 66 2 8 Núm propio 67 2 9 Ajustes 67 3 Multimedia 68 3 1 Cámara 68 3 2 Álbum fotos 70 3 3 Vídeocam 72 3 4 Reprod vídeo 73 3 5 Reprod audio 75 4 emoción 77 Conexión a emoción Ajustes 77 Menú del buscador...

Page 4: ...cto conectar 91 Efecto descon 91 7 Juegos 92 7 1 Aplicaciones 92 7 2 Descargar 93 7 3 Ajustes 93 8 Extras 95 8 1 Favoritos 95 8 2 Alarma 95 8 3 Calculadora 96 8 4 Reloj mundial 97 8 5 Conversor unidades 97 8 6 Contador 100 8 7 Conectividad 101 9 Ajustes 102 9 1 Hora y fecha 102 9 2 Pantalla 103 9 3 Llamar 106 9 4 Red 120 9 5 Conexión 122 9 6 Seguridad 123 9 7 Estado de memoria 126 9 8 Idioma 127 9...

Page 5: ...tes de calor como radiadores u hornos No la deje caer No exponga esta unidad a vibraciones mecánicas o golpes El revestimiento del teléfono puede estropearse si se tapa con cubiertas de vinilo o envoltorios Utilice un paño seco para limpiar el exterior de la unidad No utilice disolventes como el benceno los diluyentes o el alcohol No exponga esta unidad a humo o polvo excesivo No coloque el teléfo...

Page 6: ...o consuma una cantidad de energía superior a la necesaria y se reduzca la duración de los tiempos de conversación y espera Si su teléfono móvil admite la opción de infrarrojos no dirija nunca el rayo de infrarrojos hacia los ojos de nadie Dispositivos electrónicos Todos los teléfonos móviles pueden generar interferencias que afecten a otros dispositivos electrónicos No utilice su teléfono móvil ce...

Page 7: ... vehículo dispone de un airbag no lo obstruya con equipos inalámbricos portátiles o instalados Puede causar lesiones graves debido a un mal funcionamiento Derribos No utilice el teléfono mientras se realizan trabajos de voladura explosivos Respete las restricciones y siga las normativas vigentes Entornos potencialmente explosivos No utilice el teléfono en gasolineras No lo utilice cerca de product...

Page 8: ...Desconecte siempre el cargador y el resto de los accesorios del teléfono antes de insertar o extraer la tarjeta USIM La tarjeta USIM sólo puede utilizarse en teléfonos que tengan activados tres servicios Si intenta utilizarla en otros teléfonos podría provocarles graves daños e impedir su posterior utilización incluso para realizar llamadas de emergencia Instalación de la tarjeta USIM 10 U8150 Man...

Page 9: ... USIM Aviso Antes de instalar la tarjeta asegúrese que el teléfono está apagado y ha quitado la batería El contacto metálico de la tarjeta puede dañarse fácilmente si se raya Manipule con cuidado la tarjeta y siga las instrucciones proporcionadas con ella ...

Page 10: ... tecnologías de almacenamiento no existe efecto memoria que pueda afectar al rendimiento de la batería Utilice sólo las baterías y cargadores de LG Los cargadores de LG han sido diseñados para maximizar la vida de la batería No desmonte o cortocircuite la batería Mantenga limpios los contactos metálicos de la batería Sustituya la batería cuando deje de funcionar correctamente La batería puede reca...

Page 11: ...Todos los derechos sobre este documento están reservados por LG Electronics Está prohibida la copia modificación y distribución de este documento sin el consentimiento de LG Electronics NM Administración de red VT Vídeo telefonía Glosario Introducción 12 U8150 Manual del usuario ...

Page 12: ...mación indicándole que se ha bloqueado la tarjeta Función de llamada de emergencia La tecla de función derecha está representada por SOS en la pantalla Marque el número de emergencia que desee con las teclas numéricas y a continuación pulse la tecla OK para realizar la llamada de emergencia La pantalla inactiva aparece cuando ha instalado una tarjeta Sim adecuada y ha encendido el teléfono Estruct...

Page 13: ...de las teclas El siguiente dibujo describe las funciones de las teclas con la pantalla inactiva 14 U8150 Manual del usuario Módulo principal 1 2 3 4 5 6 7 8 9 10 RSSI 3G Llamadas Itinerancia Rechaz Internet SMS Irda General Batería entrantes RSSI 2G Desvío MMS Alarma Silencio Ning Corr el Bloqueo Sólo servicio teléfono vibrar VMS Automóvil Notificación Auriculares MMS Push Exterior WAP Varios Def ...

Page 14: ...to U8150 Manual del usuario 15 Módulo principal Tecla Caracteres en orden de visualización Minúsculas Mayúsculas 1 1 _ 1 _ 2 a b c 2 á à â ã ä å æ ç A B C 2 Á À Â Ã Ä Å ÆÇ 3 d e f 3 é è ê ë D E F 3 É È Ê Ë 4 g h i 4 í ì î ï G H I 4 Í Ì Î Ï 5 j k l 5 J K L 5 6 m n o 6 ñ ó ò ô õ ö ø œ M N O 6 Ñ Ó Ò Ô Õ Ö Ø Œ 7 p q r s 7 ß P Q R S 7 ß 8 t u v 8 ú ü ù û T U V 8 Ú Ü Ù Û 9 w x y z 9 W X Y Z 9 0 tecla de...

Page 15: ...Pantalla Fuente de marcación Para realizar una llamada una vez escrito el número deseado pulse la tecla Enviar o Videoconf Tecla de función Puede utilizar las teclas de función para varios usos mientras marca un número Con la tecla de función izquierda puede enviar un mensaje al número marcado y buscar si ese número aparece en la agenda Con la tecla de función central puede guardar el número marca...

Page 16: ... de emergencia con la tecla de función derecha Al igual que en la pantalla inactiva sin tarjeta Sim se muestran los números de emergencia Función de desbloqueo Si pulsa la tecla OK aparece una pantalla que le pedirá que introduzca el código PIN para desbloquear el teléfono Para cambiar el código PIN seleccione Configuración Seguridad Cambiar códigos Si introduce un código PIN incorrecto el teléfon...

Page 17: ...uiente dibujo El menú principal consta de los siguientes submenús Menú principal 18 U8150 Manual del usuario 1 Mensajes 1 Escribir mensaje 2 Bandeja Ent 3 Buzón 4 Bandeja Sal 5 Borrador 6 Plantillas 7 Emoticón 8 Editor comandos serv 9 Ajustes 2 Agenda 1 Añadir 2 Buscar 3 Grupos llam 4 Marc rápida 5 Borrar agenda 6 Copiar todo 7 Mover todo 8 Núm propio 9 Ajustes 3 Multimedia 1 Cámara 2 Álbum fotos ...

Page 18: ...lerta Tono voz Línea1 2 Tono teléfono Vol tono tim Alerta mensaje Tono mensaje Alerta adver Efecto tono tecla Volumen teclado Efecto tono tapa Efecto conectar Efecto descon 7 Juegos 1 Aplicaciones 2 Descargar 3 Ajustes 8 Extras 1 Favoritos 2 Alarma 3 Calculadora 4 Reloj mundial 5 Conversor unidades 6 Contador 7 Conectividad 9 Ajustes 1 Hora y fecha 2 Pantalla 3 Llamar 4 Red 5 Conexión 6 Seguridad ...

Page 19: ...la tecla mientras está escribiendo un mensaje 3 Cuando haya terminado de escribir el mensaje pulse la tecla OK A continuación seleccione uno de los siguientes menús Enviar y guardar Enviar o Guardar en Borrador La opción Enviar y guardar almacena el mensaje después del envío la opción Enviar sólo envía el mensaje sin guardarlo y la opción Guardar en Borrador lo guarda en el borrador para utilizarl...

Page 20: ...aje seleccione el submenú número 1 Escriba el mensaje y a continuación seleccione MMS para crear un mensaje MMS A continuación detallamos como crear un mensaje MMS y una diapositiva 1 1 2 1 1 MMS 1 Creación de un mensaje MMS Servicio de mensajes multimedia 2 Seleccione MMS en el menú Escribir mensaje y a continuación pulse OK U8150 Manual del usuario 21 Mensajes ...

Page 21: ...mero de teléfono o la dirección de correo electrónico Para buscar en la agenda pulse la tecla de función derecha Cuando haya especificado un destinatario aparecerá otro campo en el que puede especificar otro destinatario pudiendo especificar hasta 20 destinatarios distintos 22 U8150 Manual del usuario Mensajes Selección del elemento Para Menú de opciones del elemento Para ...

Page 22: ...ar la dispositiva 6 Para guardar un mensaje en el borrador mientras lo esta escribiendo seleccione el menú Opción U8150 Manual del usuario 23 Mensajes Selección del elemento Título Menú de opciones del elemento Título Selección del elemento Diap Menú de opciones del elemento Diap ...

Page 23: ...ientras lo escribe seleccionando el menú Opción 8 Puede buscar y coger información de la agenda mientras escribe un mensaje con la tecla Buscar 9 Puede cargar el último mensaje mientras escribe otro 24 U8150 Manual del usuario Mensajes ...

Page 24: ...ulse OK y le aparecerá una lista con las distintas opciones Para enviar el mensaje seleccione Enviar mensaje para guardarlo seleccione Guardar en Borrador y para previsualizarlo seleccione Vista previa U8150 Manual del usuario 25 Mensajes ...

Page 25: ...vo de imagen video o audio mientras crea un mensaje MMS seleccione editar y aparecerá la siguiente pantalla 2 Puede cambiar la duración de la diapositiva en el campo Durac diap Si no la cambia se utilizará el valor predeterminado 26 U8150 Manual del usuario Mensajes ...

Page 26: ...ra cancelar un archivo adjunto seleccione Opción 4 Puede insertar el texto que desee en una diapositiva moviendo el cursor hasta Mensaje Cuando la página está llena los usuarios no pueden introducir más caracteres Para introducir plantilla emoticonos un nombre número de la agenda seleccione Opciones con la tecla de función izquierda U8150 Manual del usuario 27 Mensajes Archivo adjunto de imagen Ca...

Page 27: ...eleccione este menú para ir a la siguiente diapositiva Diap anterior seleccione este menú para ir a la diapositiva anterior 5 2 Diap Ningún arch adjunto Ning mensaje Posición del cursor campo Mensaje Añadir nueva diap seleccione este menú para añadir una nueva diapositiva Eliminar diapositiva seleccione este menú para eliminar la diapositiva Plantillas seleccione este menú para utilizar una planti...

Page 28: ...s de adjuntar un archivo o mientras se escribe un mensaje Posición del cursor campo Adjuntar Añadir nueva diap seleccione este menú para añadir una nueva diapositiva Eliminar diapositiva seleccione este menú para eliminar la diapositiva Sigu diapos seleccione este menú para ir a la siguiente diapositiva Diap anterior seleccione este menú para ir a la diapositiva anterior U8150 Manual del usuario 2...

Page 29: ...ara ir a la siguiente diapositiva Diap anterior seleccione este menú para ir a la diapositiva anterior 5 5 Ningún arch adjunto o mientras se escribe un mensaje Posición del cursor campo Mensaje Añadir nueva diap seleccione este menú para añadir una nueva diapositiva Eliminar diapositiva seleccione este menú para eliminar la diapositiva Plantillas seleccione este menú para utilizar una plantilla Em...

Page 30: ...or 5 6 Diap Ningún arch adjunto Ning mensaje Posición del cursor campo Durac diap Añadir nueva diap seleccione este menú para añadir una nueva diapositiva Eliminar diapositiva seleccione este menú para eliminar la diapositiva Sigu diapos seleccione este menú para ir a la siguiente diapositiva Diap anterior seleccione este menú para ir a la diapositiva anterior U8150 Manual del usuario 31 Mensajes ...

Page 31: ...r Envía el mensaje MMS y a continuación lo guarda 1 1 2 2 2 Enviar Envía el mensaje MMS 1 1 2 2 3 Guardar en Borrador Guarda el mensaje MMS en el borrador 1 1 2 2 4 Vista previa Muestra el mensaje MMS antes de enviarlo 32 U8150 Manual del usuario Mensajes ...

Page 32: ...ncio 5 Pulse la tecla Info para detener la reproducción y vaya a la pantalla Vista detallada para ver información detallada sobre el mensaje MMS 6 Cuando termine la reproducción del mensaje la visualización cambia a la pantalla Vista detallada Pulse la tecla Repr para reproducir el mensaje Pulse la tecla Editar para ir a la pantalla Crear mensaje Pulse la tecla Opción para acceder a las siguientes...

Page 33: ...mación detallada sobre el mensaje MMS 7 Cuando termine la reproducción del mensaje la visualización cambia a la pantalla Vista detallada Pulse la tecla Repr para reproducir el mensaje Pulse la tecla Editar para ir a la pantalla de edición de mensajes Pulse la tecla Opción para acceder a las siguientes funciones Bandeja de entrada menús de la pantalla de vista detallada Responder a todos crea una r...

Page 34: ...o Para un archivo con sólo una imagen consulte el menú 8 El menú Silencio o Sonido no aparecería Bandeja de salida menús de la pantalla de vista detallada Adelante reenvía el mensaje Obten núm extrae el número de teléfono del texto del mensaje Obt dir corr extrae la dirección de correo electrónico del texto del mensaje Conectar URL conecta a la URL incluida en el texto del mensaje Editar edita el ...

Page 35: ...natario del mensaje 5 Mueva el cursor al campo Cc Con copia e introduzca la dirección de correo electrónico a la que desea enviar copia del mensaje 6 Mueva el cursor al campo Cco Con copia oculta e introduzca una dirección de correo electrónico para enviar con copia oculta del mensaje 7 Sólo se permiten direcciones de correo electrónico válidas para los campos del destinatario Para copia Cc y copi...

Page 36: ...Mueva el cursor al campo Asunto y cree el asunto Puede buscar en la agenda con la tecla Buscar mientras rellena el campo Asunto y utilizar las siguientes funciones con la tecla Opción Guardar en Borrador seleccione este menú para guardar el mensaje en el borrador Plantilla seleccione este menú para utilizar una plantilla Emoticón seleccione este menú para utilizar un emoticono Insertar desde agend...

Page 37: ...e en el borrador Plantilla seleccione este menú para utilizar una plantilla Emoticón seleccione este menú para utilizar un emoticono Obtener de agenda seleccione este menú para insertar el nombre correspondiente a un número de teléfono a partir de la agenda Texto firma seleccione este menú para insertar el texto de la firma Diccionario seleccione este menú para utilizar el diccionario 38 U8150 Man...

Page 38: ...mento Vídeo Audio o Imagen y pulse la tecla OK Puede adjuntar hasta 2 archivos de 1 MB como máximo Para cambiar el archivo adjunto por otro archivo seleccione el nombre del primero Puede cancelar el archivo adjunto con la tecla Opción 12 Cuando haya terminado de escribir el correo electrónico pulse la tecla OK para enviarlo o guardarlo U8150 Manual del usuario 39 Mensajes ...

Page 39: ...spuesta Le permite establecer si desea recibir una confirmación de lectura del correo electrónico enviado 1 1 3 3 Menú de envío de correos electrónicos 1 1 3 3 1 Enviar y guardar Envía el correo electrónico creado y lo guarda en la bandeja de salida El envío se procesará en segundo plano y podrá realizar otra tarea 40 U8150 Manual del usuario Mensajes ...

Page 40: ... correo electrónico creado 1 1 3 3 3 Guardar en borrador Guarda el correo electrónico creado en el borrador 1 1 3 3 4 Vista previa Previsualiza el correo electrónico creado antes de enviarlo U8150 Manual del usuario 41 Mensajes ...

Page 41: ... nuevo mensaje 2 Resp Puede responder al mensaje seleccionado 3 Responder a todos crea una respuesta para todos los mensajes seleccionados realizando una copia de la dirección del remitente y las direcciones de referencia sólo mensajes MMS 4 Adelante reenvía el mensaje seleccionado No admitido para mensajes de notificación de MMS 5 Eliminar Uno elimina un mensaje seleccionado Eliminación múltiple ...

Page 42: ...minación múltiple elimina varios mensajes seleccionados Todo elimina todos los mensajes 3 Filtro muestra los mensajes por el tipo que desee 4 Info mensaje muestra información sobre el mensaje seleccionado 5 Info memoria muestra la cantidad de memoria que queda en el teléfono U8150 Manual del usuario 43 Mensajes ...

Page 43: ...a de correos electrónicos puede utilizar las siguientes funciones con la tecla Opción Escribir mensaje crea un nuevo mensaje de correo electrónico Resp crea una respuesta para el correo seleccionado que se puede escribir mediante SMS MMS o correo electrónico Eliminar elimina un correo electrónico guardándolo temporalmente en la papelera Para eliminar un correo puede seleccionar una de las siguient...

Page 44: ...icamente en la pantalla de visualización 3 Para ver el contenido del correo electrónico anterior o siguiente utilice las teclas izquierda derecha 4 En la pantalla de visualización de correos electrónicos puede seleccionar las siguientes funciones con la tecla Opción Resp crea una respuesta para el mensaje de correo electrónico seleccionado Reenviar reenvía el mensaje de correo electrónico seleccio...

Page 45: ...onect URL extrae la dirección URL del mensaje de correo electrónico seleccionado Eliminar elimina el mensaje de correo electrónico seleccionado Ver arch adjunto muestra los archivos adjuntos al correo electrónico seleccionado Info mensaje muestra información sobre el mensaje de correo electrónico seleccionado 46 U8150 Manual del usuario Mensajes ...

Page 46: ...taurar restaura un correo electrónico eliminado Uno restaura un correo electrónico seleccionado Todo restaura todos los correos de la papelera Eliminar elimina un correo electrónico de forma permanente Uno elimina el correo electrónico seleccionado de forma permanente Todo elimina todos los correos electrónicos de la papelera de forma permanente Info mensaje muestra información sobre el correo ele...

Page 47: ...mensaje puede escribir un nuevo mensaje Adelante puede reenviar un mensaje seleccionado Editar puede editar un mensaje seleccionado Eliminar Uno elimina un mensaje seleccionado Eliminación múltiple elimina varios mensajes Todo elimina todos los mensajes Filtro muestra los mensajes por el tipo que desee Info mensaje muestra información sobre el mensaje seleccionado Info memoria muestra la cantidad ...

Page 48: ...do Eliminar Uno elimina un mensaje seleccionado Eliminación múltiple elimina varios mensajes Todo elimina todos los mensajes Ver estado error muestra el motivo del fallo de la transmisión Filtro muestra los mensajes por el tipo que desee Info mensaje muestra información sobre el mensaje seleccionado Info memoria muestra la cantidad de memoria que queda en el teléfono U8150 Manual del usuario 49 Me...

Page 49: ...cancelar la transmisión de un mensaje mientras se está enviando mediante los menús Enviar y guardar o Enviar sólo mensajes MMS 50 U8150 Manual del usuario Mensajes Envío de un mensaje Cancelación de la transmisión ...

Page 50: ...ciones con la tecla Opción Escribir mensaje puede escribir un nuevo mensaje Eliminar Uno elimina el mensaje seleccionado Eliminación múltiple elimina varios mensajes Todo elimina todos los mensajes Filtro muestra los mensajes por el tipo que desee Info mensaje muestra información sobre el mensaje seleccionado Info memoria muestra la cantidad de memoria que queda en el teléfono 1 5 Borrador U8150 M...

Page 51: ...r a Puede añadir editar y eliminar frases útiles que utilice con frecuencia Para guardarlas utilice el menú Opciones Puede añadir editar y eliminar emoticonos que utilice con frecuencia En su teléfono aparecerán varios emoticonos guardados como valores predeterminados que podrán variar según el proveedor de servicios P _ Para guardarlos utilice el menú Opciones 1 7 Emoticón 1 6 Plantillas 52 U8150...

Page 52: ...ionado por el proveedor de servicios y pulse la tecla de envío para utilizarlo El usuario puede introducir hasta 182 caracteres 1 9 1 SMS 1 9 1 1 Tipo mensaje Texto Voz Fax X 400 E mail ERMES 1 9 1 2 Período validez 1 hora 12 h 1 día 1 semana máximo 1 9 1 3 Resp con mismo centro servicio Sí No 1 9 1 4 Informe entrega Sí No 1 9 1 5 Centro SMS Introduzca la dirección del SMSC 1 9 Ajustes 1 8 Editor ...

Page 53: ...o de confirmación de entrega a un destinatario y si se debe permitir el envío de un correo de confirmación de entrega a un remitente 1 Informe solic determina si se debe solicitar un correo de confirmación de entrega para un mensaje MMS 2 Autorizar informe determina si se debe permitir el envío de un correo de confirmación de entrega para una solicitud de correo de confirmación de entrega 54 U8150...

Page 54: ...etermina si se debe solicitar un correo de confirmación de lectura para un mensaje MMS 2 Autorizar respuesta determina si se debe permitir el envío de un correo de confirmación de lectura para una solicitud de correo de confirmación de lectura 1 9 2 3 Recuperación auto Este menú permite determinar si se debe descargar automáticamente un mensaje MMS cuando se recibe un mensaje de notificación MMS U...

Page 55: ... Período validez Este menú permite configurar el período de validez de un mensaje MMS El mensaje sólo se guardará en el servidor durante el período especificado 1 9 2 5 Prioridad Puede configurar la prioridad de un mensaje MMS para su transmisión ...

Page 56: ...o MMS Este menú permite configurar la información de red como por ejemplo MMSC y la puerta de enlace WAP para enviar un mensaje MMS En el menú Opción puede crear o eliminar un nuevo perfil con la tecla de función izquierda Para terminar la configuración pulse OK Centro MMS Creación del centro MMS con el menú Opción ...

Page 57: ...ca la dirección URL del centro MMS Dirección IP introduzca la dirección IP de la puerta de enlace WAP Núm puerto introduzca el número de puerto de la puerta de enlace WAP Modo de conexión especifique el UDP CO CL el TCP con proxy y el TCP sin proxy Punto acceso especifique el nombre del punto de acceso consulte los ajustes de la conexión WAP Pulse la tecla Listo para guardar los cambios y terminar...

Page 58: ...ración auto 1 9 3 2 Ajuste Recuperación auto Puede configurar Recuperación auto para recuperar correos electrónicos automáticamente del servidor de correos entrantes Cuando reciba un nuevo correo aparecerá un icono en la parte superior de la pantalla inactiva Puede definir que el límite de la hora de recuperación automática se establezca en Nínguno 1 3 6 y 12 horas U8150 Manual del usuario 59 Mens...

Page 59: ...r de correo y el ID de usuario 2 Puede editar una cuenta de correo pulsando la tecla Editar 3 Para seleccionar una cuenta de correo electrónico pulse la tecla OK 4 Pulse la tecla Opción para añadir eliminar una cuentad e correo electrónico Añadir crea una nueva cuenta de correo electrónico Eliminar elimina una cuenta de correo electrónico 60 U8150 Manual del usuario Mensajes Ajuste del texto de la...

Page 60: ...eo y configure la dirección de correo electrónico del correo saliente 7 Mueva el cursor al campo Dirección respuest y configure la dirección de correo electrónico para responder al correo 8 Mueva el cursor a Tam recep máx y configure el tamaño máximo del correo electrónico El tamaño máximo de recepción permitido es inferior a 500 KB 9 Desplace el cursor a la opción Guardar en servidor y determine ...

Page 61: ...15 Mueva el cursor al campo Autenticación SMTP y decida si el servidor de correo saliente necesita autenticación Puede seleccionar Sí o No con la tecla Lista 16 Mueva el cursor al elemento de recuperación automática y señale si desea recuperar automáticamente un correo electrónico en un período de tiempo determinado puede seleccionar Sí o No con la tecla Lista También puede seleccionar la opción d...

Page 62: ...usuario 63 Mensajes 1 9 4 Centro buz voz Los usuarios pueden configurar la dirección y el nombre del VMSC proporcionados por el proveedor de servicios así como activarlo o desactivarlo Se pueden configurar hasta 4 VMSC ...

Page 63: ...ompañía parte cargo profesión dirección particular dirección del trabajo dirección URL de la página de inicio tono de timbre y avatar o imagen fotografía en la información de la dirección del contacto Puede introducir y administrar hasta 500 ó 1000 direcciones de contactos según el uso de la memoria La operación de búsqueda se realiza por nombre Los resultados encontrados aparecerán en la ventana ...

Page 64: ...asignar una imagen y un tono de timbre para cada grupo Si no se ha especificado un timbre para un número la llamada de ese número sonará con el timbre del grupo al que pertenece Con este menú puede administrar marcaciones rápidas Las marcaciones rápidas están configuradas entre el 2 y el 9 Puede registrar marcaciones rápidas para cualquiera de los 5 números de un contacto 2 4 Marc rápida 2 3 Grupo...

Page 65: ...ormación de direcciones de contacto de la memoria del teléfono a la tarjeta USIM SIM o de la tarjeta USIM SIM a la memoria del teléfono Puede copiar todos los elementos o sólo los seleccionados Permite mover información de direcciones de contacto 2 7 Mover todo 2 6 Copiar todo 2 5 Borrar agenda 66 U8150 Manual del usuario Agenda ...

Page 66: ...acenan los datos de la agenda la memoria del teléfono móvil la tarjeta USIM SIM o ambas El ajuste predeterminado es Teléf SIM pero puede cambiar el ajuste con las teclas izquierda y derecha Además puede decidir si desea que aparezcan la imagen y el avatar en la pantalla Buscar 2 9 Ajustes 2 8 Núm propio U8150 Manual del usuario 67 Agenda ...

Page 67: ...lo al tomar una foto o Siempre desac no utilizar flash Zoom puede seleccionar 1 1 ó 1 2 Para fotografías con una resolución de 640x480 sólo se admite la función de zoom de 1 1 Brillo puede seleccionar un nivel entre 50 y 50 Cuanto más alto sea el nivel mayor será el brillo de la pantalla Balance de blancos con esta función puede ajustar el tono de la imagen de fondo según el tiempo seleccionando A...

Page 68: ...er para verla También puede enviar la fotografía seleccionada a otra persona mediante el servicio MMS o correo electrónico pulsando la tecla Enviar en la pantalla de la lista de miniaturas Resumen Hacer foto Pulse la tecla Acept Opción Tamaño Seleccione Tamaño 352 288 176 144 Tamaño papel tapiz Zoom Seleccione Zoom 1x ó 2x Álbum Ver fotografías tomadas 3 1 2 Toma de fotografías cuando la tapa está...

Page 69: ...iminación múltiple para eliminar todas las imágenes seleccionadas de una vez Eliminar todo para eliminar todas las imágenes Fondo pant para configurar la imagen seleccionada para modo inactivo una llamada entrante una llamada saliente un encendido un apagado o una LCD externa Modo diapositivas para visualizar automáticamente las imágenes guardadas de una en una Inform Archivo para ver información ...

Page 70: ...guiente con las teclas izquierda o derecha Seleccione Enviar para adjuntar la imagen seleccionada a un mensaje MMS o correo electrónico Resumen Mover Uso de las flechas arriba y abajo Opción Puede seleccionar las funciones Ir a cámara Renombrar Eliminar Fondo pant Modo diapositivas Inform archivo e Info memoria U8150 Manual del usuario 71 Multimedia Nota El dibujo que aparece arriba representa una...

Page 71: ...siempre flash Con vídeo sólo al grabar una fotografía y Siempre desac no utilizar flash Zoom puede seleccionar 1 1 ó 1 2 Brillo puede seleccionar un nivel entre 50 y 50 igual que en Cámara Efecto con este menú puede disponer de un efecto especial de Vídeocam seleccionando Normal Mono o Sepia Tiempo de grabación puede seleccionar tiempos de grabación 10 segundos 30 segundos o 1 minuto 3 Grabación d...

Page 72: ...cionado Seleccione Eliminación múltiple para eliminar todos los archivos de vídeo seleccionadas de una vez Seleccione Eliminar todo para eliminar todos los archivos de vídeo Seleccione Tema para configurar el vídeo seleccionado para modo inactivo una llamada entrante una llamada saliente un encendido un apagado o una LCD externa Seleccione Inform archivo para ver información sobre el archivo de ví...

Page 73: ... Todo Inform archivo e Info memoria Repr Reproduce el mensaje Enviar Adjunta el archivo de vídeo seleccionado mensaje MMS o correo electrónico 74 U8150 Manual del usuario Multimedia Nota La marca representa un vídeo protegido por tecnología DRM Aunque el uso del vídeo en el teléfono no está restringido no puede enviarlo mediante MMS y correo electrónico DRM Administración de derechos digitales tec...

Page 74: ...te se reproduce inmediatamente Puede utilizar varias funciones con la tecla Opción mientras reproduce un archivo de vídeo Seleccione Silencio para desactivar el sonido El archivo de audio seleccionado se reproduce pero no se oirá ningún sonido 3 5 Reprod audio U8150 Manual del usuario 75 Multimedia Nota La marca representa un archivo de audio protegido por tecnología DRM Aunque el uso del archivo ...

Page 75: ... ajustar el volumen utilice las teclas arriba y abajo Puede utilizar distintas funciones seleccionando Opción en la pantalla de la lista Sin embargo no puede adjuntar un archivo de audio protegido por DRM Seleccione Timbre para configurar el archivo de audio como sonido de tono de timbre de encendido o de apagado Seleccione Renombrar para cambiar el nombre del archivo de audio seleccionado Selecci...

Page 76: ...v en la parte derecha de la lista Los usuarios pueden añadir o editar otros ajustes además del ajuste MoviStar emoción Para cambiar la configuración de conexión predeterminada seleccione uno de los elementos que aparecen en el menú Ajustes y pulse OK El elemento seleccionado aparecerá con el icono Activ en la parte derecha de la lista seleccionada 2 Configuración adicional Seleccione Ajustes del m...

Page 77: ...l operador p ej 10 138 255 129 Puerto servidor proxy el operador proporciona los detalles del puerto que dependen del modo de conexión Seguridad si es necesario seleccione la conexión el valor predeterminado es No protegido Seguridad si es necesario seleccione la conexión el valor predeterminado es No protegido Tiempo de espera ajuste de tiempo límite el valor predeterminado es 300 segundos Punto ...

Page 78: ...o de acceso seleccionado Añadir nuevo desde el menú Opción La información detallada de los parámetros del punto de acceso es la siguiente U8150 Manual del usuario 79 emoción Título de conexión nombre del perfil del punto de acceso p ej Telefónica MoviStar Soporte seleccione el portador de la lista El valor predeterminado es Automático Autenticación seleccione la autenticación de la lista El valor ...

Page 79: ...Marcadores permite añadir la página como marcador y realizar otras operaciones de marcado Ajustes proporciona un menú con las opciones Borrar caché Info sesión Certificados y Borrar Cookies Atrás vuelve a la página anterior Adelante permite acceder a las siguientes páginas si el usuario ha accedido a páginas anteriores URL permite introducr la URL que desea visitar Marcar número introduzca el núme...

Page 80: ...del menú Opción Para editar el marcador existente seleccione Edit del menú Opción Para eliminar marcadores seleccione Eliminar del menú Opción y a continuación seleccione Uno o Todo El usuario puede introducir una URL para conectar directamente con la página Permite introducir una dirección URL para conectarse directamente a esta página Para introducir un símbolo presione la tecla asterisco y para...

Page 81: ...ia caché Con este menú puede acceder a los servicios USIM Si la tarjeta USIM insertada no proporciona el servicio USIM el menú no aparecerá Puede encontrar información acerca de los ajustes en apartados anteriores 4 6 Ajustes Servicios 4 5 Borrar caché ...

Page 82: ...a al año anterior y la tecla 9 se desplaza al año siguiente Para moverse de fecha utilice las teclas de dirección arriba abajo izquierda y derecha 5 1 1 2 Referencia por días Al pulsar la tecla OK en la referencia por mes se pasa a la referencia por día donde puede buscar su plan por días Puede pasar a la ficha de desplazamiento de fecha mediante las teclas izquierda y derecha Como resultado de la...

Page 83: ...e planificación las repeticiones la alarma y la melodía de la planificación entre 21 melodías posibles Tipos de planificación Cita Personal Opciones de repetición configurables Ning repetic No hay ningún icono Día Semana Mes Año Opciones de alarma configurables Ning alarma No hay ningún icono A tiempo 15 min antes 30 min antes 1 hora antes 1 día antes 3 días antes 1 semana antes ...

Page 84: ...ue se ha guardado 5 1 4 Configurar y finalizar vacaciones Esta función le permite configurar o finalizar las vacaciones del usuario 5 1 5 Notificación de la planificación Si el usuario ha configurado los ajustes de alarma sonará el sonido de alarma especificado Si la hora de notificación es anterior a la hora de inicio de la planificación puede configurar la alarma de nuevo para que suene varias v...

Page 85: ...llada y edición Para ver el contenido de una tarea detallada coloque el cursor sobre el elemento deseado de la lista de tareas pendientes y a continuación pulse la tecla Seleccionar Puede editar y eliminar una tarea mediante el Menú 5 2 3 Establecimiento del estado de la tarea Para configurar el estado de una tarea acabada o inacabada pulse la tecla Menú en la lista de tareas pendientes Las tareas...

Page 86: ...ién puede introducir frases o emoticonos útiles Para guardar y añadir contenido de la nota actual a la lista pulse la tecla Guardar 5 3 3 Visualización y edición de notas Coloque el cursor sobre la nota deseada y pulse la tecla para ver todo el contenido de la misma Puede editar o eliminar el contenido de una nota mediante la tecla Opción Para volver a la pantalla de gestión de notas pulse la tecl...

Page 87: ... electrónico 5 4 2 Cómo añadir una nota Para añadir una nota nueva pulse el botón Añadir Con la tecla los usuarios pueden seleccionar el números y letras en minúsculas o en mayúsculas Mediante el botón Opción los usuarios pueden introducir plantillas y emoticonos Pulse el botón Guardar para guardar el contenido de la nota y añadirla a la lista 5 4 3 Vista detallada de la nota Coloque el cursor sob...

Page 88: ...ione Editar en la pantalla de vista detallada de la nota y aparecerá la pantalla de edición donde podrá editar el contenido de la nota 5 4 5 Eliminación de notas Seleccione Opción en la pantalla de gestión de notas o al leer el contenido de la misma para poder eliminarla ...

Page 89: ... hay debajo de la pantalla Seleccione el menú Ver o Editar de cada perfil para ver o modificar su configuración Esta opción determina el modo de notificación de llamada entrante Puede seleccionar entre los modos Sonar Vibración Sonar y vibrar Vibrar después de sonar Sonar una vez y Un solo pitido Esta opción determina el tono de timbre de voz de las notificaciones de llamadas entrantes Esta opción...

Page 90: ... volumen de la alerta de advertencia lo determina el volumen del tono de timbre Esta opción determina el tono que suena cuando se pulsa una tecla Esta opción determina el tono que suena cuando se pulsa una tecla Esta opción determina el tono que suena cuando se abre la tapa Esta opción determina el efecto que suena cuando se enciende el teléfono móvil Esta opción determina el efecto que suena cuan...

Page 91: ...rchivo Muestra información sobre la aplicación como el nombre el proveedor la versión y el tamaño 7 1 3 Estab Autoriz Configura los permisos para cada aplicación 7 1 4 Ajuste APN 1 Configura el APN que debe utilizar la aplicación descargada 2 El elemento con el color inverso de la lista es el ajuste APN de Midlet actual 3 Seleccione el color inverso para el valor APN que desee y pulse OK o Selecci...

Page 92: ...rios para ejecutar una aplicación Java 7 3 1 Prioridad Configure si desea ejecutar las funciones de llamada alarma y mensaje mientras se ejecuta una aplicación Java Seleccione Activar para recibir llamadas alarmas y mensajes Si selecciona Desactivar no podrá recibir llamadas alarmas ni mensajes mientras se ejecuta Java 7 3 2 Sitio descarga Puede guardar un sitio para descargar aplicaciones Al sele...

Page 93: ... 7 1 4 Ajuste APN El primer valor de la lista se utiliza como valor predeterminado El valor no se puede eliminar ni modificar 1 Añadir añade un nuevo elemento 2 Editar edita el elemento seleccionado 3 Eliminar elimina el elemento seleccionado 4 Ver muestra el contenido del elemento seleccionado Cuando se elimina un valor de punto de acceso ...

Page 94: ...minar todos los menús registrados pulse la tecla izquierda Opción en la lista de opciones de menú añadidas Aparecerá Eliminar pulse la tecla Selec para acceder al submenú y seleccione Todo 4 Ver info en la lista de opciones de menú añadidas pulse la tecla izquierda Opción Seleccione Ver información en el menú para ver información sobre la ubicación real del menú añadido Si configura la alarma en l...

Page 95: ...uración pulse la tecla o Guardar Dispone de una de calculadora que proporciona 4 operaciones suma resta multiplicación y división 1 Pulse Func 2 Seleccione Funciones útiles 3 Seleccione Calculadora Puede introducir números con las teclas numéricas y operadores con las teclas de dirección arriba abajo izquierda y derecha Puede introducir un punto decimal pulsando la tecla de función izquierda Cada ...

Page 96: ...Pulse Menu 2 Seleccione Funciones útiles 3 Seleccione Conversor de unidades 8 5 1 Moneda 1 Seleccione el menú Moneda 2 Los usuarios pueden establecer un tipo de cambio de moneda con Rango 3 Introduzca la unidad estándar en Nacional y pulse Guardar A continuación puede ver el valor convertido en Extranjero 4 Puede ver el valor de la unidad de moneda del país de origen en Nacional introduciendo la u...

Page 97: ...ccione la unidad que desee convertir con Unidad 3 Introduzca la unidad estándar para ver el valor convertido 4 Pulse Reinic para borrar el campo de entrada actual y coloque el cursor en el campo de entrada 5 Para salir de la función de conversión de superficie 8 5 4 Peso 1 Seleccione el menú Peso 2 Seleccione la unidad que desee convertir con Unidad 3 Introduzca la unidad estándar para ver el valo...

Page 98: ...l menú Velocidad 2 Seleccione la unidad que desee convertir con Unidad 3 Introduzca la unidad estándar para ver el valor convertido 4 Pulse Reinic para borrar el campo de entrada actual 5 Para salir de la función de conversión de velocidad pulse la tecla Atrás 8 5 7 Temperatura 1 Seleccione el menú Temperatura 2 Pulse las teclas de dirección arriba y abajo para colocar el cursor en la unidad que d...

Page 99: ...a grabar la duración en el momento y continúe con el cronómetro 6 Los usuarios pueden guardar hasta 6 grabaciones de tiempos pulsando Marcar Si el número de tiempos grabados supera los 6 se eliminará el más antiguo Pulse Reinic para inicializar el cronómetro 8 6 2 Buscador de día D 1 Seleccione el menú Buscador de fechas 2 Introduzca la fecha que desee en el campo Desde 3 Introduzca el número de d...

Page 100: ...coloque el cursor sobre el elemento deseado de la lista del contador de fechas y pulse Ver La información del elemento seleccionado con los días que quedan aparecerá en la página Ver detalle Puede editar y eliminar un elemento del Contador de fechas mediante el Menú Puede configurar la comunicación PC Sync seleccionando el menú Herramientas y la opción número 8 Puede seleccionar USB o IrDA Para ut...

Page 101: ... desee Hora Minutos o AM PM con las teclas izquierda y derecha 3 Complete los campos Hora y Minutos con las teclas numéricas 4 Pulse la tecla OK o Confirmar para establecer la hora con el valor especificado 9 1 2 Fecha 1 Seleccione el elemento Fecha de la lista correspondiente a la opción Fecha y hora y pulse OK o Seleccionar 2 Seleccione el formato de fecha con las teclas izquierda y derecha o pu...

Page 102: ... de verano se aplica sólo al período configurado En este menú puede configurar las opciones de visualización de pantalla incluidos los ajustes de la LCD y el fondo 9 2 1 Luz de fondo Los usuarios pueden configurar los ajustes de la luz de fondo para ahorrar batería Básicamente se proporcionan 3 modos Estándar Ahorro y Def usuario 9 2 1 1 Estándar Configura los ajustes de la luz de fondo con los si...

Page 103: ...as de dirección 50 es el valor más tenue y 50 es el más brillante 9 2 2 2 CD secund Para ajustar el brillo de la pantalla LCD externa utilice la tecla de navegación 50 es el valor más tenue y 50 es el más brillante 9 2 3 Fuente de marcación Puede configurar el tamaño y color del número mostrado cuando se pulsan las teclas numéricas para la conexión de llamada durante el estado inactivo 104 U8150 M...

Page 104: ...inactivo 9 2 5 2 CD secund Puede seleccionar un fondo de LCD externa para que aparezca en modo inactivo 9 2 5 3 Llam Entrante Puede seleccionar un fondo de LCD externa para que aparezca al recibir llamadas entrantes La configuración se aplica a las llamadas de voz y de vídeo 9 2 5 4 Llamada saliente Puede seleccionar un fondo de LCD externa para que aparezca al realizar una llamada La configuració...

Page 105: ...que se transmitirá en lugar de su vídeo en directo Si pulsa Cambiar imagen sustituta aparecerán las imágenes y videoclips disponibles como vistas en miniatura Seleccione la imagen o vídeo que desee y pulse la tecla OK para convertir el archivo al formato adecuado de imagen sustituta El tamaño del archivo de conversión está limitado a 200 k Si se produce en ese momento una llamada de voz o de vídeo...

Page 106: ...omo por ejemplo la fecha la hora y la duración de la llamada Puede borrar los registros de llamadas 9 3 2 1 Llam perd Permite ver las llamadas perdidas realizar una llamada enviar un mensaje y guardar el número en la agenda 9 3 2 2 Llam rec Permite ver las llamadas recibidas realizar una llamada enviar un mensaje y guardar el número en la agenda 9 3 2 3 Llam env Permite ver las llamadas enviadas r...

Page 107: ...espuesta y Si no cobertura si no está disponible 9 3 3 1 Videoconf 9 3 3 1 1 Todas llam vídeo 1 Cuando está seleccionado el menú Desactiv se elimina el número de desvío de llamadas registrado en la red Se puede realizar la misma operación pulsando 21 11 Mientras espera la respuesta de la red aparecerán el mensaje y la animación de solicitud 2 Cuando está seleccionada la opción Al centro de buzón d...

Page 108: ...tivado el menú Todas llam vídeo selecciona el menú Opciones de la parte inferior de los menús aparecen los menús Canc todo y Ver estado El menú Ver estado muestra los ajustes de la red Si selecciona este menú aparece el mensaje Solicitando y la animación Cuando se recibe la información de la red aparecen los ajustes de red Puede realizar la misma operación seleccionando Estado en el menú de opcion...

Page 109: ... voz 3 Cuando está seleccionada la opción A otro número funciona igual que el menú Todas llam voz 4 Cuando se ha seleccionado un número de marcado se realiza la misma operación que si pulsara 61 DN 11 Funciona igual que el menú Todas llam voz 5 Cuando está seleccionado el menú Opciones se activa el menú Si no respuesta Funciona igual que el menú Todas llam voz pero con la excepción de que los usua...

Page 110: ... la opción Al centro de buzón de voz se activa o desactiva el número del centro de buzón de voz Se puede realizar la misma operación pulsando 21 VMSDN 11 Para registrar el número del buzón de voz seleccione Mensajes _ Ajustes _ Centro de buzón de voz en el menú Si selecciona este menú cuando no hay ningún número registrado aparece el mensaje VMS no activado Si lo hace cuando sí hay un número regis...

Page 111: ...cionando Estado en el menú de funciones de la derecha Si selecciona el menú Canc todo los números de desvío de llamada registrados en la red se eliminan tras la confirmación del usuario Después de seleccionar el menú Canc todo y de que aparezca el mensaje y la animación de solicitud podrá ver el resultado de la operación 9 3 3 2 2 Si ocupado 1 Cuando está seleccionado el menú Desactiv puede realiz...

Page 112: ... llam voz pero con la excepción de que los usuarios pueden configurar el tiempo de retraso en el menú para establecer el retraso de la lista de menús 9 3 3 2 4 Si fuera de cobertura 1 Cuando está seleccionado el menú Desactiv puede realizar la misma operación pulsando 62 11 Funciona igual que el menú Todas llam voz 2 Cuando está seleccionada la opción Al centro de buzón de voz puede realizar la mi...

Page 113: ...ctiv puede realizar la misma operación que si pulsara 21 21 Funciona igual que el menú Todas llam voz 2 Cuando está seleccionada la opción A otro número funciona igual que el menú Todas llam voz 3 Cuando se ha seleccionado un número de marcado se realiza la misma operación que si pulsara 21 DN 21 Funciona igual que el menú Todas llam voz 4 Cuando se selecciona el menú Opciones se activa el menú Ll...

Page 114: ...e la llamada se mostrará de acuerdo con la configuración 5 Seleccione Activ para configurar el límite del coste de llamada Cuando el coste alcanza el límite que se ha configurado no podrá realizar más llamadas 9 3 6 N marcación fija 1 Para introducir un número de marcación fija en la configuración debe autenticar el PIN 2 El primer menú muestra el número configurado actualmente Acceda al menú de c...

Page 115: ...icitud Cuando responde la red aparece el resultado de la operación Se puede realizar la misma operación pulsando 33 PWD 10 2 Cuando está seleccionado el menú Opciones se activa el menú Llam salient Seleccione las opciones en los menús de opciones del menú inferior A continuación aparecen los menús Activar Desactivar Desactivar todo Ver estado y Salir Seleccione el menú Activar para recibir la cont...

Page 116: ...menú Opciones se activa el menú Internacionales excep nacionales Funciona igual que el menú Llam salient Llam entran 1 Cuando se pulsa el botón OK se realiza la misma operación que pulsando 35 PWD 10 Funciona igual que el menú Llam salient 2 Cuando se selecciona el menú Opciones se activa el menú Llam entran Funciona igual que el menú Llam salient Llam entr en extranjero 1 Cuando se pulsa el botón...

Page 117: ...resultado de la operación 9 3 8 2 Enviar mi número 1 Def por red se configura con los ajustes predeterminados por el proveedor de servicios 2 Activ se configura para enviar el número del usuario cuando realiza una llamada saliente 3 Desac se configura para no enviar el número del usuario cuando realiza una llamada saliente 9 3 8 3 Rechazo de llamada Menú Automático los usuarios pueden configurar e...

Page 118: ...das 9 3 8 4 Resp auto 1 Si se selecciona Activ una llamada entrante se contesta automáticamente y el tono de timbre suena tres veces en el teléfono 2 Si se selecciona Desac no se contestará a la llamada entrante en el teléfono 9 3 8 5 Rellamada automática Si está función está activada el teléfono intentará volver a marcar automáticamente si hay un problema con la conexión de una llamada 9 3 8 6 Mo...

Page 119: ...seleccionar un elemento de la lista para registrarlo 9 4 2 Modo Red 1 Si configura el modo Red como GSM preferido el teléfono buscará en primer lugar los PLMN de GSM disponibles y a continuación los PLMN de UMTS una vez que esté encendido Es decir el teléfono se registrará primero en la red GSM y cuando esté encendido en la red UMTS 2 Si configura el modo Red como Preferentemente UMTS el teléfono ...

Page 120: ... para guardar los valores de la lista preferida en la tarjeta SIM 2 Puede editar y guardar una lista preferida en la tarjeta SIM seleccionando el menú cuando aparece la lista preferida Nuevo añade un elemento seleccionado de la lista emergente a la lista preferida Eliminar elimina el valor del elemento de la lista preferida Mover arriba mueve el elemento de la lista preferida hacia arriba Mover ab...

Page 121: ...nado es Automático Autenticación Seleccione la autenticación de la lista El valor predeterminado es Ning aut Nombre usuar Información proporcionada por el proveedor de servicios Contraseña Información proporcionada por el proveedor de servicios APN Información de APN para la red UMTS GPRS Información proporcionada por el proveedor de servicios QOS Seleccione el parámetro QOS de la lista El valor p...

Page 122: ...ción del PIN 1 Seleccione el elemento Solicitud PIN de la lista y pulse Seleccionar Aparece una ventana que le permite seleccionar Activar o Desactivar Seleccione Activar Desactivar de la lista pulse Seleccionar e introduzca el código PIN para establecer la solicitud del PIN Si Solicitud PIN ya está activado desactivado aparece el mensaje Ya activado Ya desactivado 2 Si realiza 3 entradas de códig...

Page 123: ...nar 3 Introduzca el nuevo PIN y pulse Seleccionar 4 Vuelva a introducir el nuevo PIN y pulse Seleccionar Si el PIN es diferente al que introdujo en el paso 3 el procedimiento se reinicia desde el paso 3 5 Si el PIN se ha cambiado correctamente aparecerá el mensaje Cambiado correctamente y el nuevo código PIN Si introduce el PIN de manera incorrecta en el paso 2 el procedimiento se reinicia desde e...

Page 124: ... código de seguridad se utiliza para cambiar la contraseña del teléfono Al contrario que en el PIN y el PIN2 no hay límite de intentos para introducir el código de seguridad 9 6 2 4 Contraseña restricción Consulte el apartado Llamadas entrantes en la sección Restricción llamadas 9 6 3 Bloqueo teléfono Puede bloquear el teléfono móvil para impedir que lo utilicen otras personas Se ofrecen las 4 opc...

Page 125: ...que el usuario los elimine 9 7 1 Memoria común Esta función muestra el estado de la memoria del usuario del teléfono Puesto que esta función examina todo el sistema de archivos para las estadísticas son necesarios unos segundos 9 7 2 Memoria reservada Muestra la cantidad de memoria que utiliza el teléfono multimedia Puesto que se buscan estadísticas en todo el sistema de archivos tardará unos segu...

Page 126: ...mático English Français Italiano Deutsch Nederlands Español Português Esta función muestra la versión del software del teléfono Esta función inicializa los valores configurados por el usuario Rest establece todos los valores predeterminados de fábrica 9 10 Reiniciar config 9 9 Info teléfono 9 8 Idioma ...

Page 127: ... 2 El mensaje de conexión del kit de Internet puede aparecer hasta 10 segundos después de que se haya establecido la conexión mediante el terminal MT según los programas que se ejecutan en Windows 98 Por ejemplo Cuando aparece el mensaje de conexión en un portátil la conexión se ha establecido El mensaje de conexión puede retrasarse en un PC según el número de programas que se están ejecutando y e...

Page 128: ......

Page 129: ...English U8150 User Guide ...

Page 130: ...ettings 52 2 Address Book 62 2 1 Add new 62 2 2 Search 62 2 3 Caller groups 63 2 4 Speed dials 63 2 5 Clear address book 63 2 6 Copy all 64 2 7 Move all 64 2 8 Own number 64 2 9 Settings 65 3 Multimedia 66 3 1 Camera 66 3 2 Picture album 68 3 3 Camcorder 70 3 4 Video player 71 3 5 Audio player 73 4 emoción 75 4 1 emoción 78 4 2 Bookmarks 78 4 3 Go to URL 79 4 4 Saved pages 79 4 5 Clear cache 79 Se...

Page 131: ...ect 87 7 Apps Games 88 7 1 Applications 88 7 2 Download 89 7 3 Settings 89 8 Extras 91 8 1 Shortcuts 91 8 2 Alarm clock 91 8 3 Calculator 92 8 4 World time 93 8 5 Unit converter 93 8 6 Timer 96 8 7 Connectivity 97 9 Settings 98 9 1 Time Date 98 9 2 Display 99 9 3 Call 102 9 4 Network 116 9 5 Connection 118 9 6 Security 119 9 7 Memory status 122 9 8 Language 123 9 9 Phone info 123 9 10 Reset Settin...

Page 132: ...diators or cookers Do not drop Do not subject this unit to mechanical vibration or shock The coating of the phone may be damaged if covered with wrap or vinyl wrapper Use dry cloth to clean the exterior of the unit Do not use solvent such as benzene thinner or alcohol Do not subject this unit to excessive smoke or dust Do not keep the phone next to credit cards or transport tickets it can affect t...

Page 133: ... it can affect call quality It also may cause the phone to operate as a higher power level that needed and shorten talk and standby times If your mobile phone supports infrared never direct the infrared ray at anyone s eye All mobile phones may get interference which could affect performance Do not use your mobile phone near medical equipment without requesting permission Avoid placing the phone o...

Page 134: ...ot obstruct with installed or portable wireless equipment It can cause serious injury due to improper performance Do not use the phone where blasting is in progress Observe restrictions and follow any regulations or rules Do not use the phone at a refueling point Don t use near fuel or chemicals Do not transport or store flammable gas liquid or explosives in the compartment of your vehicle which c...

Page 135: ...LG batteries and chargers LG chargers are designed to maximize the battery life Do not disassemble or short circuit the battery pack Keep the metal contacts of the battery pack clean Replace the battery when it no longer provides acceptable performance The battery pack may be recharged hundreds of times until it needs replacing Recharge the battery if it has not been used for a long time to maximi...

Page 136: ... disconnect the charger and other accessories from your handset before inserting and removing your USIM card Your USIM card may only be used in handsets which are enabled for 3 services Any attempt to use the USIM card in other handsets may result in serious damage to the handset and may prevent you from being able to use it including the making of emergency calls Installing the USIM card 10 U8150...

Page 137: ...ling always make sure that the phone is switched off and remove the battery The metal contact of the USIM card can be easily damaged by scratches Pay special attention to the USIM card while handling and installing Follow the instructions supplied with the USIM card ...

Page 138: ...o Mobile Phone All rights for this document are reserved by LG Electronics Copying modifying and distributing this document without the consent of LG Electronics are prohibited NM Network Management VT Video Telephony Glossary Introduction 12 U8150 User Guide ...

Page 139: ...one is invalid an animation telling you that the Sim card is locked appears Emergency Call Function The right soft key is represented by SOS on the screen Key in your desired emergency call number using the number keys and then press the OK key to make an emergency call The idle screen appears when you have installed a proper Sim card and turned the phone on Screen Structure Idle screen consists o...

Page 140: ...lowing information 14 U8150 User Guide Main Module 1 2 3 4 5 6 7 8 9 10 RSSI 3G In_Call Roaming Rehect Internet SMS Irda General Battery RSSI 2G Divert MMS Alarm Silent No E mail Phonelock Vibrate Service only VMS Automobile MMS Headset Noti WAP Outdoor push Several User msg define 1 User define 2 Key Functions The functions of the keys in the idle screen status are described below ...

Page 141: ...U8150 User Guide 15 Main Module Key Characters in the Order Display Lower case Upper case 1 1 1 2 a b c 2 à á â ã ä å æ ç A B C 2 À Á Â Ã Ä Å ÆÇ 3 d e f 3 è é ê ë D E F 3 È É Ê Ë 4 g h i 4 ì í î ï G H I 4 Ì Í Î Ï 5 j k l 5 J K L 5 6 m n o 6 ñ ò ó ô õ ö ø œ M N O 6 Ñ Ò Ó Ô Õ Ö Ø Œ 7 p q r s 7 ß P Q R S 7 ß 8 t u v 8 ù ú û ü T U V 8 Ù Ú Û Ü 9 w x y z 9 W X Y Z 9 0 Space 0 Space 0 ...

Page 142: ...r by pressing the Send or Video Call key Soft Key You can use the soft keys for several functions while dialling a number Using the left most soft key you can send a message to the current dialled number you can search for numbers in addressbook and using the key you can input hyphen manual hold or time hold characters within the number Using the middle soft key you can save the current dialled nu...

Page 143: ... call using the right soft key Like the No Sim Idle screen the emergency numbers are displayed Unlock Function If you press the OK key a popup screen appears asking you to input the PIN code to unlock the phone The PIN code is configured by selecting Settings Security Change codes If you key in an incorrect PIN code the phone will remain in phone lock status If you key in the correct PIN code the ...

Page 144: ...lows The main menu consists of the following high level and sub menus Main Menu 18 U8150 User Guide 1 Messaging 1 Write message 2 Inbox 3 Email inbox Mailbox 4 Outbox 5 Draftbox 6 Templates 7 Emoticon 8 Service commander 9 Settings 2 Address Book 1 Add new 2 Search 3 Caller groups 4 Speed dials 5 Clear address book 6 Copy all 7 Move all 8 Own number 9 Settings 3 Multimedia 1 Camera 2 Picture album...

Page 145: ...ne Ring tone volume Message alert Message tone Warning alert Key tone effect Key tone volume Flip tone effect Switch on effect Switch off effect 7 Apps Games 1 Applications 2 Download 3 Settings 8 Extras 1 Shortcuts 2 Alarm clock 3 Calculator 4 World time 5 Unit converter 6 Timer 7 Connectivity 9 Settings 1 Time Date 2 Display 3 Call 4 Network 5 Connection 6 Security 7 Memory status 8 Language 9 P...

Page 146: ...ing T9 by pressing the key while writing a message 3 When you have finished writing a message press the OK key Then select one from the Send Save Send and Save to the draft box menus The Send Save option saves the message after transmission the Send option just sends the message without saving the message and the Save to the draft box option saves the message in the draft box for future use withou...

Page 147: ...y displays the message menu In the menu select 1 Write message and then select MMS to create an MMS message You can create various types of messages 1 1 2 1 1 MMS 1 You can create an MMS Multimedia Messaging Service message 2 Select MMS from the Write Message menu and then press OK U8150 User Guide 21 Messaging ...

Page 148: ...pecify the recipient by either the phone number or the e mail address You can search the phone book by pressing the right soft key When a recipient has been specified another field where you can specify another recipient appears You can specify up to 20 recipients 22 U8150 User Guide Messaging Select To item To item option menu ...

Page 149: ...dd delete or edit the slide 6 You can save a message in the draft box by using the Option menu while you are writing the message U8150 User Guide 23 Messaging Select Title item Slide item option menu Select Title item Slide item option menu ...

Page 150: ...hile writing a message by using the Option menu 8 You can search and load information from the phone book by the Search key while writing a message 9 You can load the last message while writing a message 24 U8150 User Guide Messaging ...

Page 151: ...sage press OK You can send the message by selecting Send Message from the popup list and you can save the message by selecting Save to draft box You can preview the message by selecting Preview from the popup list U8150 User Guide 25 Messaging ...

Page 152: ...g an MMS slide 1 Press Edit in the slide item while creating an MMS message 2 You can change the slide duration in the Slide Duration field If you do not change it the default value is used 26 U8150 User Guide Messaging ...

Page 153: ...e attached file by using Option 4 You can insert desired contents into a slide by moving the cursor to the desired message When the page is full users can not enter any more characters You can insert templates or emoticons into the contents input window by using the Option menu You can insert a name or a phone number saved in the phone book into the contents input window by using Option U8150 User...

Page 154: ... Select this menu to move to the previous slide 5 2 Slide No attach No message Cursor position Message field Add new slide Select this menu to add a new slide Templates Select this menu to use a template Emoticon Select this menu to use an emoticon Get from Address book Select this menu to use the address book Dictionary Select this menu to use the dictionary Next slide Select this menu to move to...

Page 155: ...to move to the next slide Previous slide Select this menu to move to the previous slide 5 4 After attaching or while writing a message cursor position Attach field Remove attachment Select this menu to cancel an attachment Add new slide Select this menu to add a new slide Delete slide Select this menu to delete the slide Next slide Select this menu to move to the next slide U8150 User Guide 29 Mes...

Page 156: ...te Slide Select this menu to delete the slide Templates Select this menu to use a template Emoticon Select this menu to use an emoticon Get from address book Select this menu to use the address book Dictionary Select this menu to use the dictionary Next slide Select this menu to move to the next slide Previous slide Select this menu to move to the previous slide 30 U8150 User Guide Messaging ...

Page 157: ...uration field Add new slide Select this menu to add a new slide Delete slide Select this menu to delete the slide Next slide Select this menu to move to the next slide Previous slide Select this menu to move to the previous slide U8150 User Guide 31 Messaging ...

Page 158: ...eated MMS message and then saves the message 1 1 2 2 2 Send Sends created MMS message 1 1 2 2 3 Save to drafts Saves the created MMS message to the Draftbox 1 1 2 2 4 Preview Shows the created MMS message before sending it 32 U8150 User Guide Messaging ...

Page 159: ...the Sound key to cancel the mute function 5 Press the Info key to stop playback and move to the Detailed View screen to view detailed information about the MMS message 6 When message playback is complete the screen display changes to the Detailed View screen Press the Play key to play the message Press the Edit key to move to the Create Message screen You can use the following functions using the ...

Page 160: ...d move to the Detailed View screen so that you can view detailed information about the MMS message 7 When message playback is complete the screen display changes to the Detailed View screen Press the Play key to play the message Press the Edit key to move to the message edit screen You can use the following functions using the Option key Inbox view detailed screen menus Reply to all Creates reply ...

Page 161: ...ust an image Menu 8 The Mute or Sound menu would not appear Outbox view detailed screen menus Forward Forwards selected message Get number Extracts phone number from the message text Get e mail address Extracts the e mail address from the message text Connect URL Connects to the URL included in the message text Edit Edits the selected message by Soft2 key Delete Deletes selected message View attac...

Page 162: ...e mail 5 Move the cursor to CC Carbon Copy field and enter the reference e mail address to forward the e mail 6 Move the cursor to BCC Blind Carbon Copy and enter a hidden reference e mail address to forward the e mail without forwarding information 7 For the recipient To reference address CC and hidden reference address BCC fields only valid e mail addresses are allowed When an e mail address has...

Page 163: ...to configure the settings of the e mail that you wish to send 9 Move the cursor to the Subject field and create the subject You can search the address book by using the Search key while entering the Subject field and use the following functions by using the Option key Save to drafts Select this menu to save the message in the draft box Template Select this menu to use a template Emoticon Select th...

Page 164: ...ect this menu to save the message in the draft box Template Select this menu to use a template Emoticon Select this menu to use an emoticon Get from address book Select this menu to insert a name or phone number from the address book Signature text Select this menu to insert the signature text Dictionary Select this menu to use the dictionary 38 U8150 User Guide Messaging ...

Page 165: ...mage item and press the OK key to attach a file You can attach up to 2 files and the size of attached files should be 1MB or less You can change the attached file for another by selecting the attached file name You can cancel the attached file by using the Option key 12 When you have finished writing an e mail press the OK key to send or save the e mail U8150 User Guide 39 Messaging ...

Page 166: ...ither Low Normal or High 1 1 3 2 2 Read reply You can set whether you want to request a read receipt for a sent e mail 1 1 3 3 Send e mail menu 1 1 3 3 1 Send Save Sends the created e mail and then saves it in the Outbox Sending will be processed in the background and you can do another job 40 U8150 User Guide Messaging ...

Page 167: ...e previous or next message by using the left and right keys 3 To view an MMS Noti message select Retrieve in the message view screen Then the file is transmitted and you can view the file when the transmission is complete 4 You can use the following functions by using Option key For a normal message 1 Write message You can write a new message 2 Reply to all Creates reply to all copy of originator ...

Page 168: ...types 7 Message info Shows information on the selected message 8 Memory info Shows the amount memory the phone has left For WAP push message 1 Write message Creates a new message 2 Delete One Deletes a selected message Multiple delete Deletes more than one selected messages All Deletes all messages 3 Filter Displays messages by desired message types 4 Message info Displays information on the selec...

Page 169: ...age Creates a new e mail message Reply Creates a reply to the selected e mail You can write a reply using SMS MMS or e mail Delete Deletes an e mail Deleted e mails are temporarily saved in Trash The following Delete options are provided One Deletes the selected message Multiple delete Deletes more than one selected message All Deletes all messages Message info Displays information on the selected...

Page 170: ...en you can select the following functions by using the Option key Reply Creates a reply to the selected e mail message Forward Forwards the selected e mail message to another e mail address Save address Saves the address of the sender of the selected e mail message in the phone book Get number Extracts the number from the selected email message Get e mail address Extracts the e mail address from t...

Page 171: ...e deleted e mail list 3 Press the Delete key to delete a deleted e mail permanently 4 Press the Restore key to restore a deleted e mail 5 Using the Option key you can select the following functions Restore Restores a deleted e mail One Restores a selected e mail All Restores all the e mails in Trash Delete Deletes an e mail permanently One Deletes the selected e mail permanently All Deletes all th...

Page 172: ...fo Displays information about the selected e mail Memory info Displays information about the amount of phone memory used by the e mail The e mails in Trash would not be received again 46 U8150 User Guide Messaging ...

Page 173: ...sage Write message You can write a new message Forward You can forward a selected message Edit You can edit a selected message Delete One Deletes a selected message Multiple delete Deletes more than one selected messages All Deletes all messages Filter Displays messages by desired message types Message info Displays information on the selected message Memory info Shows how much memory the phone ha...

Page 174: ...e Delete One Deletes a selected message Multiple delete Deletes more than one selected messages All Deletes all messages View error status Shows the reason for transmission failure Filter Displays messages by desired message types Message info Displays information on the selected message Memory info Shows how much memory the phone has left 48 U8150 User Guide Messaging ...

Page 175: ...4 A message transmission can be canceled while sending the message by selecting Send Save or Send menu Only MMS U8150 User Guide 49 Messaging Sending a message Cancel Transmission ...

Page 176: ...g functions by using the Option key Write message You can write a new message Delete One Deletes the selected message Multiple delete Deletes more than one selected messages All Deletes all messages Filter Displays messages by desired message types Message info Displays information on the selected message Memory info Shows how much memory the phone has left 1 5 Draftbox 50 U8150 User Guide Messagi...

Page 177: ...e frequently used emoticons You can save emoticons that are frequently used in the input window in advance You can save the emoticons through Options menu According to the request of service provider the emoticons such as the following examples are saved as a default P _ This is an editor to enable the user to enter text which cannot be entered in the Idle Screen to use the USSD service specified ...

Page 178: ... Reply using same service centre Yes No 1 9 1 4 Delivery report Yes No 1 9 1 5 SMS centre Input the address of SMSC 1 9 2 MMS Option Setting Select 5 Messages from the top menu Select MMS from the menu to configure MMS message related options MMS setting Menu 1 9 Settings 52 U8150 User Guide Messaging Selecting Settings MMS Settings ...

Page 179: ...ines whether to allow sending a delivery confirmation mail for a delivery confirmation mail request 1 9 2 2 Read reply This menu allows you to determine whether to request a read confirmation mail to a recipient and whether to allow sending read confirmation mail to a sender 1 Request reply Determines whether to request a read confirmation mail for an MMS message 2 Allow reply Determines whether t...

Page 180: ...hether to automatically download an MMS message when an MMS notification message arrives 1 9 2 4 Validity period This menu allows you to configure the term of validity for a message when transmitting an MMS message The message would be saved in the MMS server only for the configured term ...

Page 181: ...150 User Guide 55 Messaging 1 9 2 5 Priority You can configure the priority of a message for MMS message transmission 1 9 2 6 MMS Size You can configure the size of a message for MMS message transmission ...

Page 182: ...igured value You can view and edit the contents of the profile in the edit mode by pressing the Edit key The edit screen also appears when creating a new profile under Options The meanings of the items are given below Title Profile name MMSC URL Enter the MMS center URL IP address Enter the WAP gateway IP address Port number Enter the WAP gateway port number Connection mode Specify the UDP CO CL t...

Page 183: ... save the changes and exit 1 9 3 E mail Option Settings 1 9 3 1 E mail settings You can configure settings for receiving and transmitting e mails such as Allow reply Priority Signature text E mail account and Auto retrieve U8150 User Guide 57 Messaging Generating a Profile Profile Edit E mail option settings ...

Page 184: ...ppears at the top of the idle screen You can select that auto receiving time slot have None 1 3 6 and 12 hours 1 9 3 3 Signature text You can configure a signature text to be attached to the end of an e mail The configured signature text is automatically attached to the end the e mail when it is sent 58 U8150 User Guide Messaging E mail signature text setting ...

Page 185: ... a selected e mail account Creating a new e mail account 1 Select Add new from the E mail account menu options 2 By moving the cursor to a desired item you can edit the item to create an e mail account 3 Move the cursor to the Title field and enter a title 4 Move the cursor to the User name field and enter the user name of the e mail account 5 Move the cursor to the Password field and configure e ...

Page 186: ...oming e mail server 13 Move the cursor to the Incoming server port field and configure the mail server port number In general the incoming mail server port number POP3 is 110 14 Move the cursor to the Access point field to select an access point to connect to the Internet You can select a configured access point using the List key 15 Move the cursor to the SMTP authentication field and decide whet...

Page 187: ... fields by moving the cursor up and down 3 When configuration is complete press the Save key to complete the e mail account configuration 1 9 4 VMS centre Users can configure the address and name of VMSC provided by the service provider Up to 4 VMSCs can be configured Users can activate or deactivate VMSC U8150 User Guide 61 Messaging ...

Page 188: ... image photograph in the contact address information You can input and manage up to 500 or 1000 contact addresses depending on the memory usage Performs the contact address search function The search operation is performed based on a name as a default The current search method and results found are displayed in the Search window On the right side of the screen an image or avatar registered to the ...

Page 189: ...the group ring tone assigned to the number for the group Using this menu you can manage speed dials Speed dials are configured between 2 9 You can register speed dials for any number of 5 numbers for a specific contact address and a contact address may have multiple speed dials Clears contact address information You can delete a contact address saved in the mobile phone memory as well as in the US...

Page 190: ... them You can move contact address information from the phone memory to the USIM SIM or from the USIM SIM to the phone memory You can move just selected items or all of them You can save up to 2 own numbers being used in the USIM card and send the number to another person through Card 2 8 Own number 2 7 Move all 2 6 Copy all 64 U8150 User Guide Address Book ...

Page 191: ...one memory USIM SIM card or both of them Phone SIM is the default setting You can change the setting by using the left and right keys In addition you can decide whether to show the image and the avatar on the Search screen 2 9 Settings U8150 User Guide 65 Address Book ...

Page 192: ... or Always off do not use flash Zoom You can select either 1 1 or 1 2 For pictures with 640x480 resolution only 1 1 zoom function is supported Brightness You can select a level from 50 to 50 The higher the level the more brighter the screen White balance Using this function you can adjust the tone of the background picture according to the weather by selecting either Auto Daylight Cloudy Shade or ...

Page 193: ...red picture to view and select View View to view the picture You can also send a selected picture to the other party through the MMS or E mail service by pressing the Send key in the thumbnail list screen Summary Take a Picture Press the Take key Option Size Select 352 288 176 144 or Wallpaper size Zoom Select either 1x or 2x Zoom Album View pictures taken 3 1 2 Taking a picture when the folder is...

Page 194: ...elete the selected image Select Multiple delete to delete all selected images at once Select Delete all to delete all images Select Screen theme to configure the selected image as an Idle mode an incoming call an outgoing call a switch on a switch off or a sub LCD 3 2 Picture album 68 U8150 User Guide Multimedia Note The mark represents an image being protected by DRM technology Although using the...

Page 195: ... function supports 1 2 1 4 and 1 8 zoom in functions Using the Edit image function you can rotate an image by 90 180 and 270 and can change the tone of image to black white or sepia or blue In the large image screen you can see the previous or next image by using the left or right keys Select Send to attach the selected image to an MMS message or E mail service Summary Move Using Up and Down keys ...

Page 196: ...ither 1 1 or 1 2 Brightness You can select a level from 50 to 50 that the same as with Camera Effect Using this menu you can select a special camcorder effect by selecting either Normal Mono or Sepia Recording time You can select recording times of 10 seconds 30 seconds or 1 minute 3 Recording a video Put the camcorder where you want it and press the Rec key to start recording Press the Stop key a...

Page 197: ...elected video Select Delete to delete the selected video Select Multiple delete to delete all selected video files at once Select Delete all to delete all video files Select Screen theme to configure the selected video as an idle mode a switch on a switch off or a sub LCD 3 4 Video player U8150 User Guide 71 Multimedia Note The mark represents a video being protected by DRM technology Although usi...

Page 198: ...ay at any time while playing a video Selecting Video list while playing a video moves to the Thumbnail list screen You can adjust the volume using the Up and Down keys while playing a video Summary Move Using Up Down Left and Right keys Option You can select either Rename Delete Multiple delete Delete all Screen theme all or File Information Memory info functions Play Plays the video Send Attaches...

Page 199: ...unctions by using the Option key while playing a file Select Mute to turn off the sound The selected audio file is played but no sound will be heard The Repeat function provides 3 options None Current file and All files so that you can repeat the current file or all files 3 5 Audio player U8150 User Guide 73 Multimedia Note The mark represents an audio file being protected by DRM technology Althou...

Page 200: ...use various functions by selecting Option in the list screen However you cannot attach an audio file protected by DRM Select Sound theme to configure the audio file as a ring tone switch on or switch off sound Select Rename to rename the selected audio file Select Delete to delete the selected file Select Sort to sort the selected audio file by name by data or by extension Select File information ...

Page 201: ...to connect to emoción is displayed with ON icon on the right side of the list Users can add or edit settings other than MoviStar emoción To change the default connection settings select one of the items listed in the settings menu and press OK The selected item will be displayed with ON icon on right hand side of the selected list 2 Additional Setup Select Settings from emoción menu Open Option me...

Page 202: ...Access Points by selecting Add New from Option menu The details for Access Point parameters are as follows 76 U8150 User Guide emoción Service Title Settings profile name e g emoción Connection Mode Choose from given list of connection modes default is TCP with Proxy IP address WAP Gateway IP address provided by the operator e g 10 138 255 129 Proxy Server Port Port details are provided by operato...

Page 203: ...Default is No auth Username Information provided by Service Provider Password Information provided by Service Provider APN APN name to access network Information provided by service provider QOS Choose the QOS from the list Default is Interactive Dial Up Number Required for connecting to CSD network Information provided by Service Provider Baud rate Choose the value from select list Default is 960...

Page 204: ...Title and associated URL information and press Save key to save To connect to desired bookmark select Connect from Option menu To edit the existing bookmark select Edit from Option menu 4 2 Bookmarks 4 1 emoción Browser Menu 78 U8150 User Guide emoción Homepage To access the homepage URL configured in current default setting Refresh Reloads the current page Bookmark Adding page displayed as Bookma...

Page 205: ...net For information about saving a page refer to the third item of Browser Option Menu Clears the cache memory Using this menu you can access USIM services When an inserted USIM card is not providing USIM service the menu will not appear With this menu users can use various USIM services The menu may be different depending on the services provided by the USIM card Settings information is explained...

Page 206: ...th Pressing key 7 moves to the previous year and key 9 moves to the next year You can move the date using the up down left and right direction keys 5 1 1 2 Reference by Days Pressing the OK key in the reference by month moves to reference by day where you can refer to your schedule by days You can refer to the moving date tab using the left and right key As a search result brief schedule contents ...

Page 207: ...n alarm and melody of the schedule You can select one of 21 melodies for a schedule Schedule types Appointment Personal Configurable repetition options No repeat Icon does not exist Daily Weekly Monthly Yearly Configurable alarm options No alarm Icon does not exist On time Before 15 mins Before 30 mins Before 1 hour Before 1 day Before 3 days Before 1 week ...

Page 208: ...ay You can set up or release user holidays using this function 5 1 5 Schedule Notification If the user has configured the alarm setting the specified alarm sound will ring If the notification time is before the schedule start time you can set up the alarm again so that it sounds repeatedly 82 U8150 User Guide Organiser Configurable holiday options On the day Weekly Monthly Yearly Multiple setting ...

Page 209: ...key to save the new job 5 2 2 Detailed View and Edit To view detailed job contents locate the cursor on the desired item in the To Do List and then press the Select key You can edit and delete a job using Menu 5 2 3 Set Job Status To set up the status of a job Done or Not complete press the Menu key in the To Do list The jobs set as finished are displayed with tick mark on the image below the unfi...

Page 210: ...mo through SMS or e mail 5 3 2 Move to secret memo Hide the memo in your secret memo box 5 3 3 Edit and delete Memo Locate the cursor on your desired memo and press the key to view all the contents of the memo This function shows all the memo contents You can edit or delete the contents of a memo using the Option key You can return to the memo management screen by pressing the Back key You can del...

Page 211: ...n Press Save button to save the contents of the memo and add the memo to the list 5 4 3 Detailed View of Memo Locate the cursor on the desired memo and press View button to view the entire contents of the memo By using Option button you can add delete and move the memo to normal memo box Press the Back key to return to memo management screen Press the Delete button to delete the memo 5 4 4 Editing...

Page 212: ...oftbar below the screen Select the View or Edit menu for each profile to view the configuration of the item or to change the configuration This option determines the incoming call notification mode You can select from Ring Vibration Ring Vibrate Ring after vibration Ring once and Beep once mode This option determines the Voice ring tone for incoming call notification This option determines the Vid...

Page 213: ...the volume of the ring tone This option determines the key tone that is sounded when a key is pressed This option determines the key tone volume for key pressing This option determines the flip tone effect that is sounded when the flip is opened This option determines the switch on effect that is sounded when the mobile phone is turned on This option determines the switch off effect that is sounde...

Page 214: ...lication 7 1 2 File information Displays information about the application such as the name vendor version and size 7 1 3 Set authorisation Configures the permissions for each application 7 1 4 APN setting 1 Configures the APN to be used by the downloaded application 2 The reverse colored item in the list is the current Midlet APN setting 3 Select a desired APN value reverse color and press OK or ...

Page 215: ...download site and APN settings required to run a Java 7 3 1 Priority settings Configure whether to execute call alarm and message functions while running a Java Select Enable to receive a call alarm and message If you select Disabled you cannot receive a call alarm and message while a Java is running 7 3 2 Download site settings You can save a site to download applications When you select 7 2 Down...

Page 216: ...escribed in 7 1 4 APN settings The first value of the list is used as a default value The value cannot be deleted or modified 1 Add new Adds a new item 2 Edit Edits the selected item 3 Delete Deletes the selected item 4 View Shows the contents of the selected item When an Access point value is deleted the default value is used ...

Page 217: ...added menu item list Then Delete appears Press the Select key to display the sub menu Then select All to delete all the menus 4 View Information In the added menu item list press the left Option key Select View information from the menu to view the information on the real location of the added menu If you set up alarm Alarm icon appears on the idle screen The specified alarm sounds at the schedule...

Page 218: ...ion subtraction multiplication and division 1 Press Func 2 Select Useful functions 3 Select Calculator You can input numbers using the number keys and operators using the up down left and right direction key You can input a decimal point by pressing the left soft key Whenever you press the Delete key characters are sequentially deleted in reverse direction When calculation is completed and the res...

Page 219: ...eight and volume velocity temperature 1 Press Menu 2 Select Useful functions 3 Select Unit converter 8 5 1 Currency 1 Select the Currency menu 2 Users can set a currency exchange rate using Rate 3 Input standard unit in Domestic and then press Save Then you can view converted value in Foreign 4 You can view the value in home country currency unit in Domestic by inputting standard unit in Foreign 5...

Page 220: ... 2 Select desired unit to convert using Unit 3 Input standard unit and view converted value 4 Press Reset to clear the current input filed and locate the cursor in the input field 5 To exit Surface conversion function press Back key 8 5 4 Mass 1 Select Mass menu 2 Select desired unit to convert using Unit 3 Input standard unit and view converted value 4 Press Reset to clear the current input filed...

Page 221: ... desired unit to convert using Unit 3 Input standard unit and view converted value 4 Press Reset to clear the current input field 5 To exit Velocity conversion function press Back key 8 5 7 Temperature 1 Select Temperature menu 2 Position the cursor in desired unit by using up or down arrow key 3 Input standard unit and view converted value 4 Press Reset to clear the current input field To exit Te...

Page 222: ...ration to record the duration of time at the moment and continue the stopwatch 6 Users can save up to 6 time records by pressing Lap If the number of recorded time exceeds 6 the oldest one is deleted Press Reset to initialise the stopwatch 8 6 2 Date finder 1 Select Date finder menu 2 Input desired date in From field 3 Input desired number of days in After field 4 Press OK and view the Deadline da...

Page 223: ...n the desired item in the Date counter List and press View Details of the selected item with days remain is displayed in View detail page You can edit and delete a Date counter item using Menu You can configure PC Sync communication by selecting the Tools menu and item number 8 You can select either USB or IrDA To use IrDA select IrDA and press OK or Select 8 7 Connectivity U8150 User Guide 97 Ext...

Page 224: ... the number keys 4 Press the OK or Confirm key to set the time with the specified value 9 1 2 Date 1 Select Date item from the Time Date list and then press OK Select 2 Select date format using Left and Right keys or by pressing the Setup key 3 Input Year Month and Day using the number keys 4 Press OK Confirm to set the date with the specified value 9 1 3 Auto Update Data Time When Auto Update is ...

Page 225: ... 2 1 Backlight Users can configure backlight setting to save battery charges Basically Standard Saving User define are provided In addition a custom function is provided that allows the user to specify the backlight setting 9 2 1 1 Standard Standard configures backlight settings with the following values 9 2 Display U8150 User Guide 99 Settings Item Default Value Main LCD duration 10 seconds Main ...

Page 226: ...ightest 9 2 3 Dialing Font When number keys are pressed for call connection in idle state the size and color of displayed number can be configured 9 2 4 Idle Clock Font You can configure the font size and color of the clock displayed on the internal LCD idle screen To select Size and Color use the Up and Down keys For the Size options you can select either Small or Large To select one of the displ...

Page 227: ...l LCD background to display when an incoming call arrives The configuration is applied to both voice and video calls 9 2 5 4 Outgoing Call You can select an external LCD background to display when dialling a call The configuration is applied to both voice and video calls 9 2 5 5 Switch on You can select an internal LCD background to display while 9 2 5 6 Switch Off You can select an internal LCD b...

Page 228: ...red image or video and press the OK key to convert the file into the proper substitute image format The file size for conversion is limited to 200k If an incoming voice or video call interrupts at this time you will be prompted with a popup menu whether to accept or reject the call If you select No which rejects the incoming call the conversion process is continued If you select Yes to call which ...

Page 229: ...all records You can make a call or send a message to the number you have selected from the records You can also save the number in the addressbook 9 3 3 Call divert Call divert menus for video voice data and fax calls are provided However available menus are determined by the SIM supporting CPHS The menu consists of Video Voice All fax calls and All data calls The Video menu provides menus to dive...

Page 230: ...red number displays Requesting message and animation When the network answers the result of the operation is displayed 3 When To other number is selected A dialogue window appears allowing you to enter a phone number to divert to Input a phone number to divert calls to and press OK button While waiting the result from the network Requesting message and animation appears When the network answers th...

Page 231: ...firmation Selecting the Cancel all menu will display the operation result after showing the Requesting message and animation 9 3 3 1 2 If busy 1 When the off menu is selected The same operation as pressing 67 11 It operates the same to All voice calls menu 2 When To voice mail centre is selected The same operation as pressing 67VMSDN 11 It operates the same to All voice calls menu 3 To other numbe...

Page 232: ... It operates the same to All voice calls menu except that users can configure delay time in the Set delay menu in the menu list 9 3 3 1 4 If out of reach 1 When off menu is selected The same operation as pressing 62 11 It operates the same to All voice calls menu 2 When To voice mail centre is selected The same operation as pressing 62 VMSDN 11 It operates the same to All voice calls menu 3 When T...

Page 233: ...red number displays Requesting message and animation When the network answers the result of the operation is displayed 3 When To other number is selected A dialogue window appears allowing you to enter a phone number to divert to Input a phone number to divert calls to and press OK button While waiting the result from the network Requesting message and animation appears When the network answers th...

Page 234: ...Selecting Cancel all menu will display the operation result after showing Requesting message and animation 9 3 3 2 2 If busy 1 When the off menu is selected The same operation as pressing 67 11 It operates the same to All voice calls menu 2 When To voice mail centre is selected The same operation as pressing 67VMSDN 11 It operates the same to All voice calls menu 3 To other number is selected It o...

Page 235: ... It operates the same to All voice calls menu except that users can configure delay time in the Set delay menu in the menu list 9 3 3 2 4 If out of reach 1 When off menu is selected The same operation as pressing 62 11 It operates the same to All voice calls menu 2 When To voice mail centre is selected The same operation as pressing 62 VMSDN 11 It operates the same to All voice calls menu 3 When T...

Page 236: ...ion as pressing 21 21 It operates the same to All voice calls menu 2 When To other number is selected It operates the same to All voice calls menu 3 When input dial number DN is selected It performs the same operation as pressing 21 DN 21 It operates the same to All voice calls menu 4 When Options menu is selected It activates and operates All data calls menu It operates the same to All voice call...

Page 237: ...splayed when a call is terminated 5 In the call cost limit configuration select On to configure the cost limit When cost limit is configured and call cost reaches the limit making a call will not be allowed 9 3 6 Fixed dial number 1 To enter the menu allowing FDN configuration PIN authentication is required 2 The first menu displays the current configured number Enter configuration menu through Op...

Page 238: ... Requesting message and animation appears When the network answers the result of the operation is displayed The same operation as pressing 33 PWD 10 2 When Options menu is selected It activates Outgoing calls menu Select options menu from the soft menus on the lowest menu Then Activate Deactivate Deactivate all View status and Exit menus appear Select Activate menu to receive Barring Password from...

Page 239: ...It activates and operates International except home country menu It operates the same to Outgoing calls menu Incoming calls 1 OK button select It performs the same operation as pressing 35 PWD 10 It operates the same to Outgoing calls menu 2 When Options menu is selected It activates and operates Incoming calls menu It operates the same to Outgoing calls menu Incoming calls when abroad 1 OK button...

Page 240: ...nd animation When the network answers the result of the operation is displayed 3 View status select Displays activated Call waiting service group item of the network as the same as that of pressing 43 11 Selecting this item displays requesting message and animation When the network answers the result of the operation is displayed 9 3 8 2 Send my number 1 Set by network Configures with the default ...

Page 241: ... When On is selected press and hold the side key for a while to reject a call by silence and press and hold the side key for a while once again to reject a call by disconnecting When Off is selected side key does not work for call reject operation 9 3 8 4 Auto answer 1 When On is selected an incoming call is automatically answered when the ring tone sounds three times in handset status 2 When Off ...

Page 242: ...is found and you can select one item from the list for registration 9 4 2 Network mode 1 If you configure the Network mode to GSM preferred the phone searches for available GSM PLMN first and then searches for UMTS PLMN when it is turned on That is the phone is registered to the GSM network first and then registered to UMTS when it is turned on 2 If you configure the Network mode to UMTS preferred...

Page 243: ...on 9 4 3 Preferred lists 1 Select Preferred lists to display the preferred list saved in the current SIM card 2 You can edit and save a preferred list in the SIM card by selecting the menu when the preferred list is displayed New Adds an item selected from the popup list to the preferred list Delete Deletes the value of the preferred list item Move up Moves the preferred list item up Move down Mov...

Page 244: ... 9 5 Connection 118 U8150 User Guide Settings Connection title Access Point profile name Bearer Choose the bearer from the list Default is Automatic Authentication Choose the authentication from the list Default is No auth Username Information provided by Service Provider Password Information provided by Service Provider APN APN name to access network Information provided by service provider QOS C...

Page 245: ... the PIN request If PIN request is already enabled disabled an Already enabled Already disabled message will be displayed 2 3 incorrect PIN code entries in the PIN code input window would invalidate the PIN code In this case you have to input the PUK PIN Unblock Key code to configure the PIN code again 3 The maximum allowed numeric of attempts of PUK input is 10 times 10 occasions of incorrect PUK...

Page 246: ...ocedure is restarted from step 3 5 When the PIN is properly changed a Successfully Changed message as well as new PIN code appears With an incorrect PIN input in step 2 the procedure is restarted from step 2 and the remaining allowed numeric of input attempts is decreased by 1 6 Press the Back key in the PIN code input window to return to the previous step 3 incorrect PIN code entries in the PIN c...

Page 247: ...tempts of security code input is not limited like PIN and PIN2 9 6 2 4 Barring password See Incoming call of Call Barring section 9 6 3 Phone Lock You can lock your mobile phone to prevent it being used by other people The following 4 lock functions are provided Power On Whenever the mobile phone is turned on If SIM Changed When the mobile phone s SIM card has been changed Immediate Locks the phon...

Page 248: ... user memory of the mobile phone Since this function scans the overall file system for statistics a few seconds are required 9 7 2 Reserved memory Displays the amount of memory the phone multimedia is using Since the entire file system is searched for statistics this will take a few seconds 9 7 3 SIM memory This function shows the status of the SIM card user memory This function requires a few sec...

Page 249: ...s Italiano Deutsch Nederlands Español Português This function shows the version of the mobile phone software This function initialises user configured values Reset sets all settings to factory defaults 9 10 Reset Settings 9 9 Phone info 9 8 Language U8150 User Guide 123 Settings ...

Page 250: ...The Internet kit connection message may appear up to 10 seconds after the connection is established through the mobile terminal MT depending on the programs running on Windows 98 For example When the connection message appears on a laptop the connection has been established The connection message may be delayed on a desktop PC depending on the number of programs running and the number of drivers i...

Page 251: ......

Page 252: ......

Page 253: ...Memo ...

Page 254: ...Memo ...

Page 255: ...Memo ...

Page 256: ...Memo ...

Reviews: