- 125 -
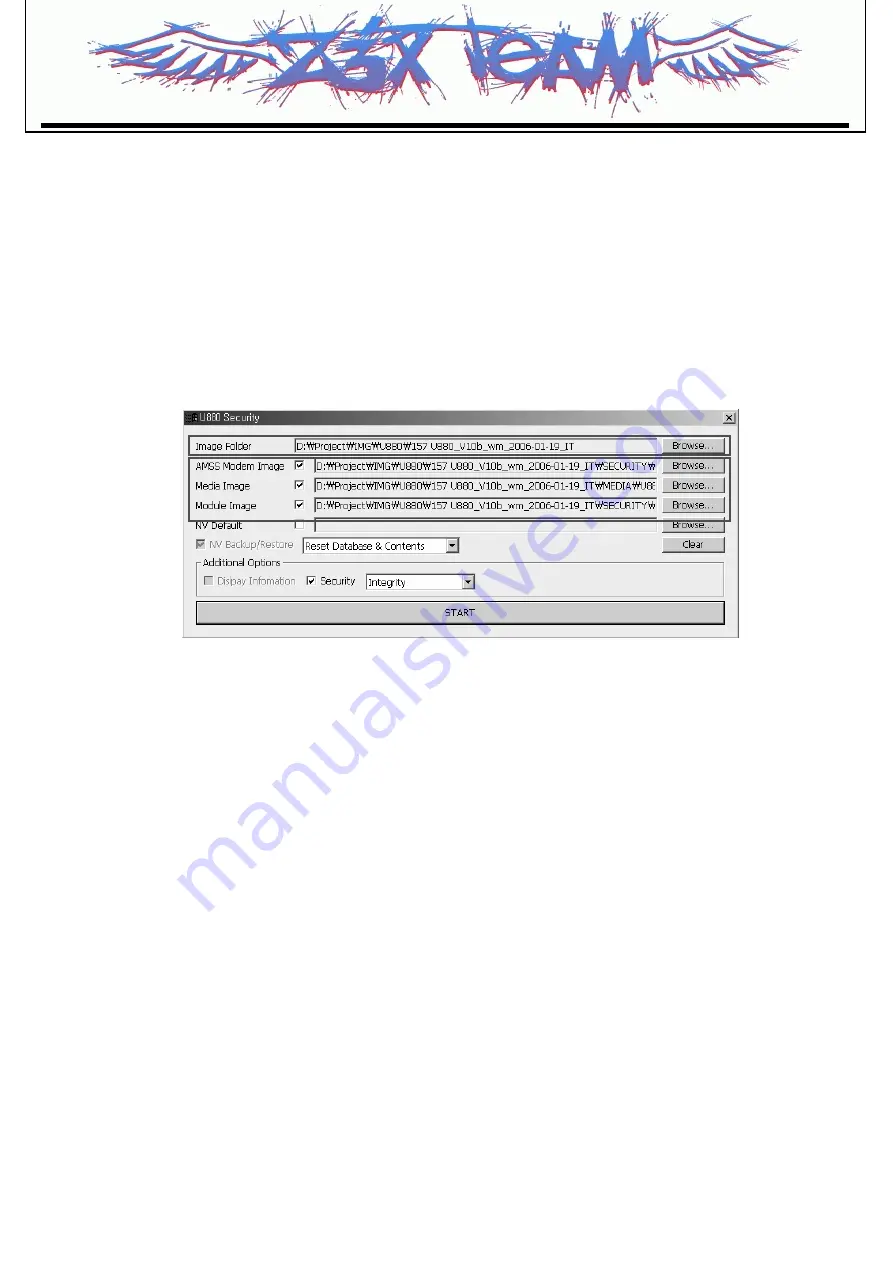
1) Image Folder indicates loot path where all image files are placed. To change location of the default
image path, select Browse... button. The edit box shows the file path where new images are
located. Please note that all images should be located in a selected folder.
2) Click on the Browse... button to select image files to be downloaded on the handset.
3) NV Backup/Restore: NV Backup/Restore always have to be done, and it is default selected option.
Backup the NV data and restore the backed up NV data automatically.
4) Reset database & Contents:
User related data including the setting data on the EFS is reset in the handset. The user contents in
the handset will be erased. If you want to reset all the user data back to the way they were before
you started downloading new images, check the option.
Erase_EFS:
The calibration data, user contents, media, and module are erased. Only calibration data is kept
when NV backup/restore is checked. The user contents and file system physically are wiped out.
Keep All Contents:
Maintain user data including WAP, AD, DRM, Email, Play lists, images when downloading a new
images, user data stated above are maintained if this option is enable. (Only For U880 Model)
5) Additional Options:
Display Information is defaulty not selected and user cannot choose.
Security:
The security option is automatically selected based on the country when security box is
selected.
➢
Integrity is selected when the selected country is UK, Italy, Hong Kong, Austria, or Israel.
➢
Ciphering is not applied or used for H3G user.
➢
Fake Security is not applied or used for H3G user.
➢
Int Ciphering is selected when the selected country is Australia, Sweden, or Denmark.
Please note that user cannot select the options stated above on the security
6) Clear:
Clearing all directory paths of images in the dialog.
7) Start:
Starting downloading the selected individual image.
1)
2)
3)
6)
4)
5)
7)
Z3X-BOX.COM
Summary of Contents for U300
Page 3: ... 4 Z 3 X B O X C O M ...
Page 24: ...3 TECHNICAL BRIEF 25 Figure 3 3 1 1 RFR6250 IC functional block diagram Z 3 X B O X C O M ...
Page 46: ...3 TECHNICAL BRIEF 47 Figure PM6650 2 Functional Block Diagram Z 3 X B O X C O M ...
Page 76: ...4 TROUBLE SHOOTING 77 4 5 Checking WCDMA Block Z 3 X B O X C O M ...
Page 77: ...4 TROUBLE SHOOTING 78 4 3 5 1 2 Z 3 X B O X C O M ...
Page 82: ...4 TROUBLE SHOOTING 83 4 5 5 Check RF Rx Level Test Point RF Rx Level Z 3 X B O X C O M ...
Page 85: ...4 6 Checking GSM Block 4 TROUBLE SHOOTING 86 Z 3 X B O X C O M ...
Page 87: ...4 TROUBLE SHOOTING 88 Z 3 X B O X C O M ...
Page 89: ...4 TROUBLE SHOOTING 90 Z 3 X B O X C O M ...
Page 92: ...4 TROUBLE SHOOTING 93 Z 3 X B O X C O M ...
Page 95: ...4 TROUBLE SHOOTING 96 Z 3 X B O X C O M ...
Page 110: ...4 TROUBLE SHOOTING 111 C515 C516 CN501 Z 3 X B O X C O M ...
Page 116: ...4 TROUBLE SHOOTING 117 C201 C202 for MIC capacitor Z 3 X B O X C O M ...
Page 119: ...4 TROUBLE SHOOTING 120 Q400 Q401 Q402 VBATT GND Z 3 X B O X C O M ...
Page 140: ...6 BLOCK DIAGRAM 141 Z 3 X B O X C O M ...
Page 141: ...6 2 Interface Diagram U300 Interface Diagram 6 BLOCK DIAGRAM 142 Z 3 X B O X C O M ...
Page 149: ... 150 8 PCB LAYOUT Z 3 X B O X C O M ...
Page 150: ... 151 8 PCB LAYOUT Z 3 X B O X C O M ...
Page 151: ... 152 8 PCB LAYOUT Z 3 X B O X C O M ...
Page 152: ... 153 8 PCB LAYOUT Z 3 X B O X C O M ...
Page 153: ... 154 Z 3 X B O X C O M ...
Page 156: ...9 Calibration 157 Check testing object Click Start for Calibration Z 3 X B O X C O M ...
Page 157: ...9 Calibration 158 Show result of calibration Show result Z 3 X B O X C O M ...
Page 159: ... 160 Z 3 X B O X C O M ...
Page 183: ...Note Z 3 X B O X C O M ...
Page 184: ...Note Z 3 X B O X C O M ...


