background image

32

Instructions

Ac 7

Ac 8

Ac 9

Ac 10

Ac 11

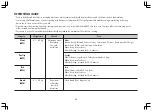
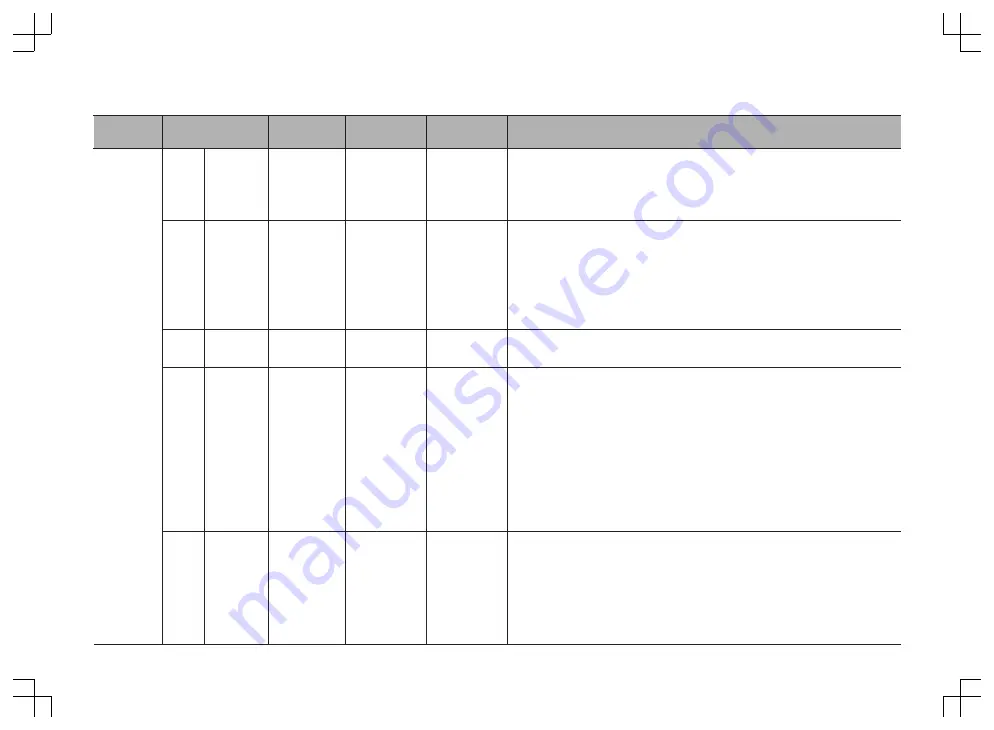
Roast

Beef

Jacket

Potatoes

Frozen 

Dinners

Fresh

Vegetables

Frozen

Vegetables

0.80~1.80kg

0.20~1.00kg

0.40~1.00kg

0.20~1.00kg

0.20~1.00kg

Low rack

+ Metal tray

High rack

+ Metal tray

Low rack

+ Metal tray

Metal tray +

Microwave-

safe bowl

with cover

Metal tray +

Microwave-

safe bowl

with cover

Refrigerated

Room

Frozen

Room

Frozen

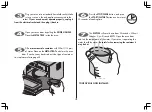
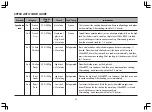
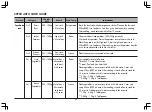
Brush the beef with melted margarine or butter. Place on the low rack.
When BEEP, turn food over. And then press start to continue cooking. 
After cooking, stand covered with foil for 10 minutes.

Choose medium sized potatoes. (200-220g per each)
Wash and dry potatoes. Pierce the potatoes several times with a fork.
Place the potatoes on the High rack. Adjust weight and press start.
When BEEP, turn food over. After cooking, remove the potatoes from the
oven. Let stand covered with foil for 5 minutes.

Place frozen dinner uncovered on low rack.

Cut vegetables into small pieces.
**Broccoli : Cut into floweret-size.
**Carrot : Peel and slice 5mm thick.
Place vegetables in a microwave-safe bowl. Add water. Cover with
wrap. When BEEP, stir once. After cooking, stir and allow to stand for 
2-3 minutes. Add amount of water according to the quantity.

** 0.2kg - 0.5kg : 2 Tablespoons
** 0.55kg - 1.0kg : 4 Tablespoons

Place vegetables in a microwave-safe bowl. Add water. Cover with
wrap. When BEEP, stir once. After cooking, stir and allow to stand for 
2-3 minutes. Add amount of water according to the quantity.

** 0.2kg - 0.5kg : 2 Tablespoons
** 0.55kg - 1.0kg : 4 Tablespoons

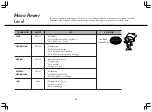
SPEED AUTO COOK GUIDE

Speed auto

cook

Function

Category

Food Temp.

Utensil

Weight 

Limit

Summary of Contents for SolarDOM MA3882QS

Page 1: ...OWNER S MANUAL MA3882QS www lg com LIGHT OVEN SolarDOM Please read this owner s manual thoroughly before operating MFL30207323_01 ...

Page 2: ... you eat your food Contents _________________________________________________2 Important safety instructions _________________________________3 15 Precautions_______________________________________________16 Unpacking Installing _____________________________________17 18 Control Panel _____________________________________________19 Setting the Clock __________________________________________20 Chi...

Page 3: ...hat you do not understand Important Safety Instructions WARNING This symbol will alert you to hazards or unsafe practices which could cause serious bodily harm or death This is the safety alert symbol This symbol alerts you to potential hazards that can kill or hurt you and others All safety messages will follow the safety alert symbol and either the word WARNING or CAUTION These word means CAUTIO...

Page 4: ... involves the removal of any cover which gives protection against exposure to microwave energy Do not operate the oven if the door seals and adjacent parts of the microwave oven are faulty Repairs should only be undertaken by a qualified service technician Unlike other appliances the microwave oven is high voltage and high current equipment Improper use or repair could result in harmful exposure t...

Page 5: ...rvised 4 The appliance is not intended for use by young children or infirm persons Only allow children to use the oven without supervision when adequate instructions have been given so that the child is able to use the oven in a safe way and understands the hazards of improper use Improper use may cause the damage of safety concerns such as a fire an electric shock and a burn 5 Accessible parts ma...

Page 6: ...nt or manufacturer about problems that you do not understand 7 This appliance is not intended for use by persons including children with reduced physical sensory or mental capabilities or lack of experience and knowledge unless they have been given supervision or instruction concerning use of the appliance by a person responsible for their safety 8 When the appliance is operated in the combination...

Page 7: ...the safety interlock It could result in harmful exposure to excessive microwave energy Safety interlocks automatically switch off any cooking activity when the door is opened 2 Do not place any object such as kitchen towel napkin etc between the oven front face and the door or allow food or cleaner residue to accumulate on sealing surfaces It could result in harmful exposure to excessive microwave...

Page 8: ...ching a fire and subsequent damage to your oven 5 When heating liquids e g soups sauces and beverages in your microwave oven Avoid using straight sided containers with narrow necks Do not overheat Stir the liquid before placing the container in the oven and again halfway through the heating time After heating allow to stand in the oven for a short time stir or shake them again carefully and check ...

Page 9: ... empty It is best to leave a glass of water in the oven when not in use The water will safely absorb all microwave energy if the oven is accidentally started Improper use could result in damage to your oven 8 Do not cook food wrapped in paper towels unless your cook book contains instructions for the food you are cooking And do not use newspaper in place of paper towels for cooking Improper use ca...

Page 10: ...ay and rack by placing it in water just after cooking This may cause breakage or damage Improper use could result in damage to your oven 12 Be certain to place the oven so the front of the door is 8 cm or more behind the edge of the surface on which it is placed to avoid accidental tipping of the appliance Improper use could result in bodily injury and oven damage 13 Before cooking pierce the skin...

Page 11: ...d keep the oven door closed in order to stifle any flames It can be the cause of serious damage of safety such as a fire an electric shock 17 When food is heated or cooked in disposable containers of plastic paper or other combustible materials keep an eye on the oven and check it frequently Your food may be poured due to the possibility of container deterioration which also can cause a fire 18 Th...

Page 12: ... possibly result in a hazardous situation 20 Only use the temperature probe recommended for this oven for appliances having a facility to use a temperature sensing probe You can not ascertain that the temperature is accurate with unsuitable temperature probe 21 If heating elements are provided during use the appliance becomes hot Care should be taken to avoid touching heating elements inside the o...

Page 13: ...h As the colours of the wires in the mains lead of this appliance may not correspond with the coloured markings identifying the terminals in your plug proceed as follows The wire which is colored BLUE must be connected to the terminal which is marked with the letter N or Colored BLACK The wire which is colored BROWN must be connected to the terminal which is marked with the letter L or colored RED...

Page 14: ...urposes Improper use could result in damage to your oven 26 The microwave oven must be operated with the door of built in cabinet open If the door of cabinet is closed while operating the airflow get worse and it could result in a fire or damage to your oven and the cabinet 27 The connection may be achieved by having the plug accessible or by incorporation a switch in the fixed wiring in accordanc...

Page 15: ... aged from 8 years and above and persons with reduced physical sensory or mental capabilities or lack of experience and knowledge if they have been given supervision or instruction concerning use of the appliance in a safe way and understand the hazards involved Children shall not play with the appliance Cleaning and user maintenance shall not be undertaken by children without supervision 31 The a...

Page 16: ...RNING When heating liquids e g soups sauces and beverages in your oven with microwave function delayed eruptive boiling can occur without evidence of bubbling This could result in a sudden boil over of the hot liquid To prevent this possibility the following steps should be taken 1 Avoid using straight sided containers with narrow necks 2 Do not overheat 3 Stir the liquid before placing the contai...

Page 17: ... the oven in the level location of your choice with more than 85cm height but make sure there is at least 20cm of space on the top and 10cm at the rear for proper ventilation The front of the oven should be at least min 8cm max 22cm from the edge of the surface to prevent tipping An exhaust outlet is located on bottom or side of the oven Blocking the outlet can damage the oven Unpack your oven and...

Page 18: ...Place on the METAL TRAY and close the oven door If you have any doubts about what type of container to use please refer to page 38 Open your oven door by pulling the DOOR HANDLE Place the METAL TRAY inside the oven Plug your oven into a standard household socket Make sure your oven is the only appliance connected to the socket If your oven does not operate properly unplug it from the electrical so...

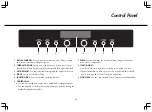
Page 19: ...ct the operating function 6 CONTROL DIAL You can set cooking time temperature weight and cooking categories You can lengthen or shorten the cooking time at any point by turning the dial knob except defrost mode 7 ENTER You can determine the selected cooking category microwave power level or temperature 8 START Q START In order to start cooking which is selected press button one time The quick star...

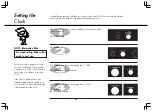
Page 20: ...eset the clock If the clock or display shows any strange looking symbols unplug your oven from the electrical socket and plug it back in and reset the clock NOTE Information Blink Make sure that you have correctly installed your oven as described earlier in this book Press STOP CLEAR Press CLOCK once Turn CONTROL dial knob until display shows 14 00 Press ENTER for hour confirmation Turn CONTROL di...

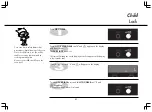
Page 21: ...ter If any button is pressed L and will appear on the display Press STOP CLEAR To cancel CHILD LOCK press and hold STOP CLEAR until L and disappears You will hear BEEP when it s released Your oven has a safety feature that prevents accidental running of the oven Once the child lock is set you will be unable to use any functions and no cooking can take place However your child can still open the ov...

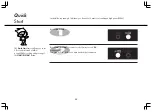
Page 22: ...gh power 900W Press STOP CLEAR Press START Q START four times to select 2 minutes on HIGH power 900W Your oven will start before you have finished the fourth press The Quick Start feature allows you to set 30 seconds intervals of HIGH power 900W cooking with pressing of the START Q START button ...

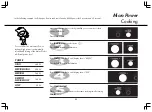
Page 23: ...TER for micro confirmation Turn CONTROL dial knob until display shows 600W Press ENTER for power confirmation Your oven has five microwave Power settings High power is automatically selected and turning of the dial will select a different power level POWER HIGH MEDIUM HIGH MEDIUM DEFROST MEDIUM LOW LOW Turn CONTROL dial knob until display shows 5 30 900 W 600 W 360 W 180 W 90 W Press START Q START...

Page 24: ...IUM DEFROST MEDIUM LOW LOW 900 W 600 W 360 W 180 W 90 W Boil Water Cook poultry pieces fish vegetables Cook tender cuts of meat All reheating Roast meat and poultry Cook mushrooms and shellfish Cook foods containing cheese and eggs Bake cakes and scones Prepare eggs Cook custard Prepare rice soup All thawing Melt butter and chocolate Cook less tender cuts of meat Soften butter cheese Soften ice cr...

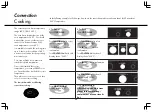
Page 25: ...you to brown and crisp food quickly The grill rack is placed on the metal tray at the grill mode The high rack must be used during grill cooking Category Display Heater Operating Grill 1 Gr 1 Upper Heater 1550W Grill 2 Gr 2 Upper Heater 1100W Grill 3 Gr 3 Lower Heater 700W Turn CONTROL dial knob until display shows 12 30 Press START Q START When cooking you can increase or decrease cooking time by...

Page 26: ...ch the selected temperature Once it has reached the correct temperature your oven will BEEP to let you know that it has reached the correct temperature Then place your food in your oven then set your oven to start cooking The low rack must be used during convection cooking Turn FUNCTION dial to select convection mode Press ENTER for convection confirmation Turn CONTROL dial knob until display show...

Page 27: ... 2 3 Press ENTER for speed combi confirmation Press STOP CLEAR Speed Combi Co 1 2 3 Turn CONTROL dial knob until display shows Co 1 Press ENTER for grill 1 confirmation Turn CONTROL dial knob until display shows 360W Press ENTER for power confirmation Turn CONTROL dial knob until display shows 25 00 Press START Q START When cooking you can increase or decrease cooking time by turning CONTROL dial ...

Page 28: ...lay shows 200 C Press ENTER for temp confirmation Turn CONTROL dial knob until display shows 360W Press ENTER for power confirmation Turn CONTROL dial knob until display shows 25 00 Press START Q START When cooking you can increase or decrease cooking time by turning CONTROL dial After cooking you must wear gloves to take metal tray container out of oven since its hot You can set four kinds of mic...

Page 29: ...ss ENTER for speed combi confirmation Press STOP CLEAR Speed Combi Co 5 Press START Q START When cooking you can increase or decrease cooking time by turning CONTROL dial After cooking you must wear gloves to take metal tray container out of oven since its hot Turn CONTROL dial knob until display shows 360W Press ENTER for power confirmation Turn CONTROL dial knob until display shows 25 00 Turn CO...

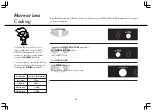
Page 30: ...tegory confirmation SPEED AUTO COOK menus are programmed and allows you to cook most of your favorite food quickly by selecting the food type and the weight of the food Turn CONTROL dial knob until display shows 0 60 kg Press START Q START When cooking you can increase or decrease cooking time by turning CONTROL dial After cooking you must wear gloves to take metal tray container out of oven since...

Page 31: ...e from the oven and stand for 1 2 minutes Brush whole chicken with melted margarine butter or seasonings if desired Place the whole chicken breast side down on the low rack When BEEP drain the juices and turn food over immediately And then press start to continue cooking After cooking let stand covered with foil for 10 minutes Place the chicken pieces on the high rack When BEEP turn food over And ...

Page 32: ...otatoes on the High rack Adjust weight and press start When BEEP turn food over After cooking remove the potatoes from the oven Let stand covered with foil for 5 minutes Place frozen dinner uncovered on low rack Cut vegetables into small pieces Broccoli Cut into floweret size Carrot Peel and slice 5mm thick Place vegetables in a microwave safe bowl Add water Cover with wrap When BEEP stir once Aft...

Page 33: ...P stir once Rice After cooking stand covered for 5 minutes or until water is absorbed Pasta During the cooking stir several times if required After cooking stand 1 2 minutes Rinse pasta with cold water SPEED AUTO COOK GUIDE Speed auto cook Function Category Food Temp Utensil Weight Limit Weight Water Rice Pasta 100g 300ml 400ml 200g 600ml 800ml 300g 900ml 1200ml Cover Cover and vent with wrap Unco...

Page 34: ...ic ties or wraps then place the food on microwave safe dish on the low rack on the metal tray and close the oven door Press ENTER for category confirmation Enter the weight of the frozen food that you are about to defrost Turn CONTROL dial knob until display shows 1 4kg for the weight of frozen food Press AUTO DEFROST Turn CONTROL dial knob until display shows dEF2 Press START Q START Your oven ha...

Page 35: ...s Fish Fillets Steaks Whole fish Sea foods When beep turn food over After defrosting let stand for 10 20 minutes Sliced bread Buns Baguette etc Food to be defrosted should be in a suitable microwave proof container and should be placed uncovered on the low rack on the metal tray If necessary shield small areas of meat or poultry with flat pieces of aluminum foil This will prevent thin areas becomi...

Page 36: ...or decrease cooking time by turning the CONTROL dial knob You can lengthen or shorten the cooking time except defrost mode at any point by turning the CONTROL dial knob Press STOP CLEAR Set the required SPEED AUTO COOK programme See SPEED AUTO COOK guide Select weight of food Press START Q START Turn CONTROL dial knob The cooking time will increase or decrease Cooking time 0 3 min 3 20 min 20 30 m...

Page 37: ... the oven Press STOP CLEAR Turn FUNCTION dial to select ez clean Press ENTER for ez clean confirmation The oven has a special function to remove the smell in the oven You can use the EZ CLEAN function without food in the oven Press START Q START Time counts down automatically ...

Page 38: ...s tumblers or wine glasses as these might shatter as the food warms Plastic storage containers These can be used to hold foods that are to be quickly reheated However they should not be used to hold foods that will need considerable time in the oven as hot foods will eventually warp or melt plastic containers Paper Paper plates and containers are convenient and safe to use in using microwave funct...

Page 39: ...ot become dry and brittle Height of food The upper portion of tall food particularly roasts will cook more quickly than the lower portion Therefore it is wise to turn tall food during cooking sometimes several times Moisture content of food Since the heat generated from microwaves tends to evaporate moisture relatively dry food such as roasts and some vegetables should either be sprinkled with wat...

Page 40: ...rnal temperature of foods will rise between 5 F 3 C and 15 F 8 C during standing time Standing time Foods are often allowed to stand for 3 to 10 minutes after being removed from the oven Usually the foods are covered during standing time to retain heat unless they are supposed to be dry in texture some cakes and biscuits for example Standing allows foods to finish cooking and also helps flavour bl...

Page 41: ...depends on the density of the food Q Is it possible to cook popcorn in this oven A Yes if using one of the two methods described below 1 Popcorn popping utensils designed specifically for microwave cooking 2 Prepackaged commercial microwave popcorn that contains specific times and power outputs needed for an acceptable final product FOLLOW EXACT DIRECTIONS GIVEN BY EACH MANUFACTURER FOR THEIR POPC...

Page 42: ... equipment group 2 contains all ISM RF equipment in which radio frequency energy in the frequency range 9 kHz to 400GHz is intentionally generated and used or only used in the form of electromagnetic radiation inductive and or capacitive coupling for the treatment of material or inspection analysis purposes Class B equipment is equipment suitable for use in domestic establishments and in establish...

Page 43: ...Memo ...

Page 44: ...Printed in Korea ...

Reviews: