background image

Connecting

15

Connecting

2

Wireless subwoofer 

connection

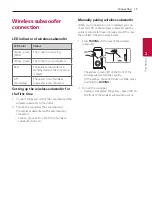
LED indicator of wireless subwoofer

LED Color

Status

Yellow - green


(Blink)

The connection is trying. 

Yellow - green

The connection is completed.

Red

The wireless subwoofer is in 
standby mode or the connection 
is failed.

Off 


(No display)

The power cord of wireless 
subwoofer is disconnected.

Setting up the wireless subwoofer for 

the first time

1.  Connect the power cord of the sound bar and the 

wireless subwoofer to the outlet.

2.  Turn on the sound bar. The sound bar and 

the wireless subwoofer will be automatically 
connected. 


-

Yellow - green LED on the front of wireless 
subwoofer turns on.

Manually pairing wireless subwoofer

When your connection is not completed, you can 
check red LED on the wireless subwoofer and the 
wireless subwoofer does not make sound. To solve 
the problem, follow the steps below.

1. Press 

PAIRING

 on the rear of the wireless 

subwoofer.


-

The yellow - green LED on the front of the 
wireless subwoofer blinks quickly.


(If the yellow - green LED does not blink, press 
and hold the 

PAIRING

.)

2.  Turn on the sound bar. 


-

Pairing is completed. The yellow - green LED on 
the front of the wireless subwoofer turns on.

Summary of Contents for SN4

Page 1: ...AL Wireless Sound Bar Please read this manual carefully before operating your set and retain it for future reference MODEL SN4 SN4 SPN4B W 2004_Rev02 www lg com Copyright 2020 LG Electronics Inc All Rights Reserved ...

Page 2: ...er heating The openings should never be blocked by placing the product on a bed sofa rug or other similar surface This product shall not be placed in a built in installation such as a bookcase or rack unless proper ventilation is provided or the manufacturer s instruction has been adhered to CAUTION No naked flame sources such as lighted candles should be placed on the apparatus NOTICE For safety ...

Page 3: ...CE INFORMATION To obtain the source code under GPL LGPL MPL and other open source licenses that is contained in this product please visit http opensource lge com In addition to the source code all referred license terms warranty disclaimers and copyright notices are available for download LG Electronics will also provide open source code to you on CD ROM for a charge covering the cost of performin...

Page 4: ...9 ARC Audio Return Channel function 19 What is SIMPLINK 20 Additional information for HDMI 21 Optional equipment connection 21 HDMI connection 22 OPTICAL IN connection 22 USB connection 22 Compatible USB devices 23 USB device requirement 23 Playable file 1 Getting Started 2 Safety Information 6 Introduction 7 Front panel 8 Rear panel 9 Remote control 12 Speakers position 13 Installing the sound ba...

Page 5: ...Bluetooth profiles 29 Listening to Music of a Bluetooth Device 31 Controls connected Bluetooth device 31 Bluetooth connection lock BT LOCK 31 Using BLUETOOTH App 31 Install Music Flow Bluetooth App onto Your BLUETOOTH Device 32 Activate BLUETOOTH with Music Flow Bluetooth App 4 Troubleshooting 33 Troubleshooting 33 General 34 NOTES to use wireless 35 NOTES to release Demo mode 5 Appendix 36 Tradem...

Page 6: ...Getting Started 6 Getting Started 1 Introduction Symbol used in this manual Note Indicates special notes and operating features Caution Indicates cautions for preventing possible damages from abuse ...

Page 7: ...1 Standby Switches the unit ON or OFF F Function Select the function and input source by pressing F repeatedly Input source Function Display Optical ARC LG Sound Sync Wired OPT HDMI ARC Bluetooth BT LG Sound Sync Wireless LG TV HDMI IN HDMI USB USB o p Volume Adjusts volume level This unit will turn itself off to save electric consumption when the main unit is not connected to an external device a...

Page 8: ...jack on the TV C HDMI IN Connect HDMI IN jack on the back of the unit to HDMI OUT jack on the external device You can enjoy the sound and picture from HDMI connection on an external device D HDMI OUT TV ARC Connect the HDMI OUT TV ARC jack on the back of the unit to ARC jack on the TV E USB Port Connect USB memory device to the USB port on the back of the unit ...

Page 9: ...nit ON or OFF b VOL Volume o p Adjusts speaker volume c C V Skip Search Press C or V to go to next or previous file Press and hold C or V during playback and release it at the point you want d N Play Pause Starts playback Pauses playback y y BT Bluetooth connection Lock It allows you to connect a Bluetooth device only on Bluetooth and LG TV functions Page 31 To turn on or off the Bluetooth connect...

Page 10: ...olume of this unit by your TV remote control even by other company s product Page 26 To turn on or off the TV Remote function press and hold SOUND EFFECT for about 3 seconds and press it again Supported TV brands LG Panasonic Philips Samsung Sharp Sony Toshiba Vizio f Sound tuning Adjusts sound level of each speaker Select the speaker you want to adjust by using and adjust the sound level by using...

Page 11: ... Bluetooth device name USB File information contained on a USB y y Auto Power ON OFF It allows the unit to turn on and off automatically by input signals Optical LG TV or Bluetooth Page 27 To turn on or off AUTO POWER function press and hold J for about 3 seconds and press it again j REPEAT Press REPEAT to select desired repeat or random mode k FOLDER W S Searches a folder on USB device ...

Page 12: ...Getting Started 12 Getting Started 1 Speakers position a b a a Front speakers b Subwoofer ...

Page 13: ...main unit Turn it slightly toward the center of the room to reduce the wall reflections If the sound bar covers the remote sensor of the TV please separate distance between the sound bar and TV by 10 15 cm or more Note y y For best performance of wireless connection such as Bluetooth or wireless subwoofer do not install the unit on Metallic furniture because wireless connection communicates throug...

Page 14: ...rovided Note Connecting the AC Adapter Connect the unit to the power supply with the supplied AC adapter 1 Connect the supplied AC power cord to the AC adapter 2 Connect the AC adapter cable to DC IN adapter input 3 Plug the AC power cord into an AC outlet Only use the AC adapter supplied with this device Do not use a power supply from another device or manufacturer Using any other power cable or ...

Page 15: ...Turn on the sound bar The sound bar and the wireless subwoofer will be automatically connected Yellow green LED on the front of wireless subwoofer turns on Manually pairing wireless subwoofer When your connection is not completed you can check red LED on the wireless subwoofer and the wireless subwoofer does not make sound To solve the problem follow the steps below 1 Press PAIRING on the rear of ...

Page 16: ...ommended to install the main unit and the subwoofer as close as possible and avoid the cases below There is an obstacle between the main unit and the subwoofer There is a device using same frequency with this wireless connection such as a medical equipment a microwave or a wireless LAN device Keep the sound bar and the subwoofer away from the device ex wireless router microwave oven etc over 1 m t...

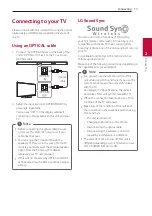
Page 17: ...Note LG Sound Sync You can control some functions of this unit by your TV s remote control with LG Sound Sync It is compatible with the LG TV that is supported LG Sound Sync Make sure of the LG Sound Sync logo on your TV Controllable function by LG TV s remote control Volume up down mute Make one of the following connections depending on the capabilities of your equipment y y You can also use the ...

Page 18: ...he display window if connecting normally between this unit and your TV LG Sound Sync with wireless connection 1 Turn on the unit by pressing 1 2 Select the LG TV function by pressing F repeatedly 3 Set up the sound output of TV to listen to the sound through this unit PAIRED appears on the display window for about 3 seconds and then you can see LG TV on the display window if connecting normally be...

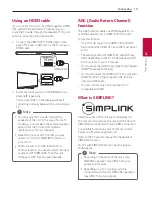
Page 19: ... function The ARC function enables an HDMI capable TV to send the audio stream to HDMI OUT of the unit To use this function Your TV must support the HDMI CEC and ARC function and the HDMI CEC and ARC must be set to On The setting method of HDMI CEC and ARC may differ depending on the TV For details about ARC function refer to your TV manual You must use the HDMI cable Type A High Speed HDMI cable ...

Page 20: ...d component y y If the video output signal is abnormal when your personal computer is connected to HDMI IN jack change the resolution of your personal computer to 576p or 480p 720p 1080i or 1080p Note HDMI cable Checklist Some HDMI cables have poor signal transmission which can cause problems with sound and video transmission Even after HDMI cable connections if no sound sound interrupted noise oc...

Page 21: ...ure from the external device you connect HDMI cable HDMI cable 1 Connect HDMI IN jack on the back of the unit to HDMI OUT jack on the external device such as Blu ray disc player DVD player etc 2 Connect HDMI OUT TV ARC jack on the back of the unit to HDMI IN jack on the TV 3 Select the input source to HDMI by pressing F repeatedly y y Audio and Video signal can t pass through when this unit is tur...

Page 22: ...as the cover Note Make sure to properly align and connect the optical cable improper alignment may cause damage to the jack O X Optical jack Optical cable Optical jack Optical cable Caution USB connection Connect USB memory device to the USB port on the back of the unit If HDMI cable is connected on the unit inserting a USB device may be limited depending on a USB device shape Note For more inform...

Page 23: ...ings on this unit External HDD Card readers Locked devices Hard type USB devices USB hub Using USB extension cable iPhone iPod iPad Android device Playable file Sampling Frequency MP3 within 32 to 48 kHz WMA within 32 to 48 kHz OGG within 32 to 48 kHz FLAC 32 kHz 44 1 kHz 48 kHz 88 2 kHz 96 kHz 176 4 kHz and 192 kHz 16 bit 24 bit WAV 32 kHz 44 1 kHz 48 kHz 88 2 kHz 96 kHz 176 4 kHz and 192 kHz 16 ...

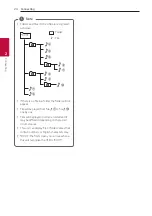
Page 24: ...he folder will not appear y y File will be played from file A to file J one by one y y Files will be played in order recorded and it may be different depending on the record circumstances y y This unit can display file or folder names that contain numbers or English characters only y y ROOT The first screen you can see when a this unit recognize the USB is ROOT Note ...

Page 25: ...e control during playback and release it at the point you want to listen to Play repeatedly or randomly Press REPEAT on the remote control repeatedly Refer to the note for details about the display change Search a folder Press FOLDER W S on the remote control Resume playback This unit memorizes a current song which is played before changing the function or turning off the unit y y The resume point...

Page 26: ...is function press and hold SOUND EFFECT on the remote control To turn off this function press and hold SOUND EFFECT on the remote control and press it once again while ON TV REMOTE is scrolled y y Make sure that the sound output of your TV is set to External speaker y y This function does not operate on LG TV s magic remote control y y This function may not work well when some TV control functions...

Page 27: ...matically turned off if there is no signal for a certain period of time from the TV connected by LG Sound Sync Optical Wireless y y After the unit is turned on by AUTO POWER function it will be automatically turned off if there is no signal for a certain period of time from the external device y y If you turned off the unit directly it cannot be turned on automatically by AUTO POWER function Howev...

Page 28: ...set top box or etc device set to on or connected CEC supported device is turned on If you want to use the auto function change turn off SIMPLINK function on your LG TV It takes for about 30 seconds to turn off SIMPLINK y y If the Bluetooth connection lock function is set Bluetooth connection will be only available on Bluetooth and LG TV function Page 31 Note Quick Start This unit can stay in stand...

Page 29: ...ribution Profile Listening to Music of a Bluetooth Device Before you start the pairing procedure make sure that the Bluetooth feature on your smart device is turned on Refer to your Bluetooth device s user guide Once a pairing operation is performed it does not need to be performed again 1 Select the Bluetooth function by pressing F repeatedly Appears BT and then READY in display window 2 Operate ...

Page 30: ...try pairing it again y y The sound may be interrupted when the connection has interference by the other electronic waves y y Pairing is limited to one Bluetooth device per unit and multi pairing is not supported y y Depending on the type of the device you may not be able to use the Bluetooth function y y You can enjoy Bluetooth function using smart phone MP3 Notebook etc y y The more distance betw...

Page 31: ...uto Power function to prevent it Page 27 Note Using BLUETOOTH App y y Only Android OS is available to use Music Flow Bluetooth app with this unit y y Additional data charges may apply according to your internet environment or mobile plan Note About Music Flow Bluetooth App Music Flow Bluetooth app brings a suite of new features to this unit To enjoy more features you are recommended to download an...

Page 32: ...f you use Music Flow Bluetooth app for operation there would be some differences between Music Flow Bluetooth app and the supplied remote control Use the supplied remote control as necessary y y Depending on the Bluetooth device Music Flow Bluetooth app may not work y y After connection of Music Flow Bluetooth app music may be output from your device In this case try connecting procedure again y y...

Page 33: ...e level of the device No woofer sound y y The power cord of the subwoofer is not connected Plug the power cord into the wall outlet securely y y Pairing between the unit and the subwoofer gets disconnected Connect the unit and the subwoofer Page 15 The remote control does not work properly y y The remote control is too far from the unit Operate the remote control within about 7 m y y There is an o...

Page 34: ...e wireless Symptoms Cause Solution This device may have wireless interference y y Wireless may not operate normally in weak signal area y y Please install the device close enough to wireless subwoofer y y Do not install the device on metal furniture for optimum performance Bluetooth device may malfunction or make noise in the following cases y y When any part of your body contact the transceiver o...

Page 35: ...such as BT Bluetooth HDMI etc and only DEMO indication is showing in the front display Unplug the power cord and plug it in again If that doesn t work after setting the volume to 2 press and hold F About 5 seconds on the main unit until the display indicates current selected function Remote Control does not work No response ...

Page 36: ... DTS Inc All Rights Reserved For DTS patents see http patents dts com Manufactured under license from DTS Licensing Limited DTS the Symbol DTS and the Symbol together Virtual X and the DTS Virtual X logo are registered trademarks or trademarks of DTS Inc in the United States and or other countries DTS Inc All Rights Reserved The Bluetooth word mark and logos are registered trademarks owned by the ...

Page 37: ...erating temperature 5 C to 35 C Operating humidity 5 to 90 Bus Power Supply USB 5 V 0 500 mA Available Digital Input Audio Sampling Frequency 32 kHz 44 1 kHz 48 kHz 88 2 kHz 96 kHz Available Digital Input Audio format Dolby Audio DTS Digital Surround PCM Input Output OPTICAL IN 3 V p p Optical jack x 1 HDMI IN 19 Pin Type A HDMI connector x 1 HDMI OUT 19 Pin Type A HDMI connector x 1 Amplifier RMS...

Page 38: ...e subwoofer Power consumption Refer to the main label on the subwoofer Type 1 Way 1 Speaker Impedance 3 Ω Rated Input Power 200 W RMS Max Input Power 400 W RMS Dimensions W x H x D Approx 171 0 mm x 390 0 mm x 261 0 mm y y Designs and specifications are subject to change without prior notice ...

Page 39: ... not use volatile liquids such as insecticide spray near the unit y y Wiping with strong pressure may damage the surface y y Do not leave rubber or plastic products in contact with the unit for a long period of time Cleaning the unit To clean the unit use a soft dry cloth If the surfaces are extremely dirty use a soft cloth lightly moistened with a mild detergent solution Do not use strong solvent...

Page 40: ......

Reviews: