background image

1. Application Object

These instructions are applied to all of the color TV, MC-049B.

2. Notes

(1) Because this is cold chassis, it is not necessary to use an

isolation transformer. However, the use of isolation
transformer will help protect test instrument.

(2) But, operate it using a transformer between the power

supply line and chassis input to prevent electric shock and
to protect the test instrument.

(3) All adjustments must be done in correct sequence.
(4) However, for the better productivity, it can be changed in

pre-permitted range.

(5) Environment conditions : If not specified, it must be done in

following conditions.
1) Temperature : 25±5°C
2) Humidity :

65±10%

(6) Power supply of a SET which is adjusted is (100-240V~)

±10%, 50~60 Hz

(7) If not specified, the receiver must be operated for more

than 20 minutes period to the adjustment.

(8) Signal : Receive the standard color signal (65dB±1dB uV)

LG standard signal means the digital pattern,EU
05 CH(PAL)

3. Focus voltage adjustment

(1) Receive the LG standard pattern

(digital pattern, PAL : Fig 1 & NTSC : Fig2)

(2) Set the picture condition on ‘STANDARD’ mode.
(3) Adjust the Focus volume of FBT for the best focus of

horizontal line A, vertical line B.

4. Purity & Convergence adjustment

4-1. Purity adjustment

(1) Preparation

1) Receive the RED Raster Pattern for purity adjustment.

(11CH)

2) Demagnetize the CPT and cabinet with a degaussing coil.

(2) Adjustment

1) Pre-adjust the static convergence(STC) with 4 and 6-

pole magnet.

2) Push the DY all way to the CPT panel.

3) Turn the purity magnet (2-pole magnet) so that the green

portion of left side and the blue portion of right side have
same portion.

4) Pull the DY slowly and fix it when the whole screen

become red.

4-2. Convergence adjustment

(1) Preparation

1) Receive the Cross Hatch pattern for convergence

adjustment. (09CH)

2) Let the contrast at the adequate luminance level.

(2) Adjustment

1) Converge the RED vertical line and BLUE vertical line in

the same line by changing the angle between the 2 tabs
of the 4 pole magnet.

2) Converge the RED horizontal line and BLUE horizontal

line in the same line by turning the 2 tabs of the 4pole
magnet. This time, do not changing the angle between
the 2 tabs.

3) Converge the R,G,B vertical line in the same line by

changing the angle between the 2 tabs of the 6pole
magnet.

4) Converge the R,G,B horizontal line in the same line by

turning the 2 tabs of the 6pole magnet. This time, do not
change the angle between the 2 tabs.

5. Screen voltage & White balance

adjustment

Screen adjustment mode:INSTART for line SVC MODE then
ADJ.
Vary screen volume of the FBT till horizontal line appear and
stop to the point that it starts to disappear.

5-1. Screen voltage adjustment

(1) Receive the PAL or SECAM(NTSC) signal into RF mode

regardless of channel.

(2) If you press the “ADJ”button in LINE SVC mode(IN-START

button),the LINE SVC mode changes to screen adjustment
mode.

(3) Adjust the screen volume of FBT jack,When width line is

seen turn the FBT screen volume at the position of
disappearance it.

(4) Press the TV/AV button to exit SVC mode.

5-2. White balance adjustment

- Prior to this adjustment, the Screen Voltage adjustment must

be finished.

(1) Necessary Instrument

1) Auto White Balance Meter
2) Color Analyzer (CA-100)
3) Factory SVC Remote control  

(2) Adjustment

1) Make the picture luminance 35±10 Ft-L by changing the

“CONTRAST” and “BRIGHTNESS”.

- 8 -

ADJUSTMENT INSTRUCTIONS

<Fig 1>

<Fig 2>

Summary of Contents for RT-21FD90VQ

Page 1: ...V SERVICE MANUAL CAUTION BEFORE SERVICING THE CHASSIS READ THE SAFETY PRECAUTIONS IN THIS MANUAL CHASSIS MC 049B MODEL RT 21FD90VQ VT website http biz LGservice com e mail http www LGEservice com techsup html ...

Page 2: ...ety Precautions 3 Control Descriptions 4 Specifications 7 Adjustment Instructions 8 T rouble Shooting 12 Printed circuit board 16 Block Diagram 19 Exploded View 20 Exploded View Parts List 21 Replacement Parts List 22 SVC Sheet ...

Page 3: ...perform an AC leakage current check on the exposed metallic parts of the cabinet such as antennas terminals etc to be sure the set is safe to operate without damage of electrical shock Leakage Current Cold Check Antenna Cold Check With the instrument AC plug removed from AC source connect an electrical jumper across the two AC plug prongs Place the AC switch in the on position connect one lead of ...

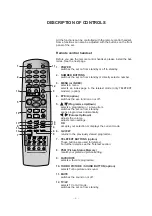
Page 4: ...ndby scans programmes automatically F F G G Volume Up Down adjusts the volume adjusts menu settings OK accepts your selection or displays the current mode 6 Q VIEW returns to the previously viewed programme 7 TELETEXT BUTTONS option These buttons are used for teletext For further details see the Teletext section 8 PSM Picture Status Memory recalls your preferred picture setting 9 FAVOURITE selects...

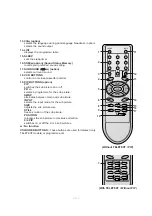
Page 5: ... and sub picture INPUT selects the input mode for the sub picture SIZE adjusts the sub picture size STILL freezes motion of the sub picture POSITION relocates the sub picture in clockwise direction 9 4 PIP switches on or off the 9 or 4 sub pictures No function COLOURED BUTTONS These buttons are used for teletext only TELETEXT models or programme edit Without TELETEXT PIP POWER MUTE 1 2 3 4 5 6 7 8...

Page 6: ...SOCKET option Connect the headphone plug to this socket 8 EYE option adjusts picture according to the surrounding conditions 9 TV AV option selects TV or AV mode clears the menu from the screen switches the set on from standby 10 Function option selects volume EYE option picture items or brief auto programme while the menus not display 11 D D E E option adjusts the function or selects a programme ...

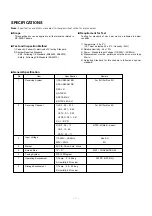
Page 7: ...ard input Voltage 110 240V 50 60Hz 4 Measurement must be performed after heat run more than 20min 5 Adjusting Standard for this chassis is followed a special standard No 1 2 3 4 5 6 7 8 Item Receiving System Receiving Channel Input Voltage Market Screen Size Tuning System Operating Environment Storage Environment Remark For EU For Non EU For EU For Non EU NTSC M Multi model Non EU EU FLAT CONVENTI...

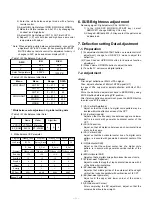
Page 8: ...ht side have same portion 4 Pull the DY slowly and fix it when the whole screen become red 4 2 Convergence adjustment 1 Preparation 1 Receive the Cross Hatch pattern for convergence adjustment 09CH 2 Let the contrast at the adequate luminance level 2 Adjustment 1 Converge the RED vertical line and BLUE vertical line in the same line by changing the angle between the 2 tabs of the 4 pole magnet 2 C...

Page 9: ... located within the effective screen of the CPT 2 VL Vertical Linearity Adjust so that the boundary line between upper and lower half is in accord with geometric horizontal center of the CPT 3 SC S Correction Adjust so that all distance between each horizontal lines are to be the same 4 VS Vertical Shift Adjust so that the horizontal center line of a digital circle pattern is in accord with geomet...

Page 10: ...ESCRIPTION JOP EXP 1 3141VMNN40A MAIN MC 049A B CHASSIS ASSY 104 137 162 117 148 OPTION 1 OPTION2 10 Menu Contents VA VL SC VS HS Vert Amplitude Vert Linearity S Correction Vert Position Hor Position 512 511 512 511 512 511 512 511 32 2047 150 50 140 6 151 range N50Hz PAL FLAT 21 INCH SYS SOUND CH AU Option Code 0 1 2 3 4 5 6 7 0 1 2 3 0 1 2 3 0 1 Function 21A 21B 21C 21FM TX ONLY 29F 25F 28WF 32W...

Page 11: ... EU 5EA EU ETC GREECE EU ALL FARSI ARAB URDU E HINDI E I M V E THAI E CHINA WEST EU EAST EU1 TURKEY EU EAST EU2 CYRILLIC1 CYRILLIC2 CYRILLIC3 TURK GRE1 TURK GRE2 TURK GRE3 ARAB FRA ARAB ENG ARAB HEB1 ARAB HEB2 FARS ENG FARS FA FARS ALL AUTO Disable HOTEL function Enable HOTEL function MAX VOLUME VALUE LNA A2_ST ECO TILT BOOST VN3MN CHINA FM LH Option Code 0 1 0 1 0 1 0 1 0 1 0 1 0 1 0 1 Function L...

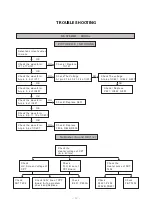
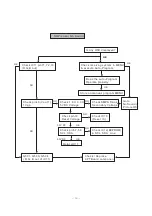
Page 12: ...k The voltage At pin of IC821 IC822 Q807 Check Replace C821 IC822 Q807 Check The Voltage At pin 2 19 20 21 24 of IIC11 Check Replace TU 101 Check Replace F806 D828 D805 OK OK OK OK OK OK NO NO NO NO NO NO No Raster Sound OK 1 2 Check the Heater voltage of CPT 6 6 4Vrm s Check HV Screen Voltage of CPT Check the Heater pulse of FBT T402 Check R G B out of CPT Board Check FBT T402 Check 185V line of ...

Page 13: ...Check T401 each pin voltage Check Replace T402 Check the Voltage Of C803 Check the Voltage Pin 4 OF IC801 Check Replace IC801 IC802 IC826 Check Fuse and Diode of secondary Load of SMPS trans T803 Check Replace IC11 Check Replace IC11 Check Replace Q402 Check Replace T401 Check Replace Q401 Check Replace Fuse Check Replace DB801 Check Replace Fuse IC801 NO OK OK OK NO Open NO 18 20V Normal Yes Yes ...

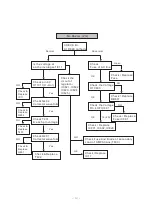
Page 14: ...p Check 1 8V 3 3V 5V DC Voltage Check SMPS Trans Secondary Voltage Check pin18 Reset Voltage Check IC13 Reset IC Check pin57 58 SCL SDA Check IC12 EEPROM SCL SDA Line RelaceIC11 Q501 Q503 Q504 R G B out of IC11 Check Replace CPT Board com ponent Go to No Sound Picture OK OK OK OK OK NO NO NO NO NO NO 3 3V DC OK OK 3 3V DC Check receiving system in MENU execute Auto Program ...

Page 15: ...age Of pin2 19 20 21 24 of IC11 Check the signal line of SPK L R Check pin 55 m ute of IC11 Check the waveform At pin2 4 of IC601 Check the waveform At pin6 of IC601 Check the waveform At pin8 9 11 12 of IC601 Check thevpltage At pin7 5 of IC601 Check Replace D828 D805 F806 Check the connection of side or Front AV Board P603A Replace IC601 AV OK OK OK OK NO NO OK OK NO NO NO NO Correct the Board N...

Page 16: ... 16 PRINTED CIRCUIT BOARD MAIN ...

Page 17: ... C2 IC11 B4 IC12 A4 IC13 B4 IC301 E4 IC601 A3 IC801 G2 IC802 F3 IC821 D2 IC822 E1 IC824 E1 IC825 D1 IC826 D3 IC853 E1 IC901 A1 L11 E1 L12 C3 L101 A5 L102 B5 L103 B5 L201 C5 L202 D5 L203 D5 L204 C5 L205 E5 L206 C5 L207 D5 L208 D5 L210 B5 L211 D5 L212 C5 L213 D5 L251 C1 L252 C1 L253 B1 L254 C1 L255 C1 L401 F4 L402 E4 L501 C3 L502 C4 L503 C4 L504 C4 L505 B5 L506 B5 L507 C3 L508 B3 L509 C4 L510 B4 L60...

Page 18: ... 18 PIP CONTROL SIDE A V ...

Page 19: ... AMP IC301 TDA4863A 14V 14V VA H OUT 35V H Vc c TU 33V S Vc c 6 5 V 12V B SAW FILTER Z101 PIP_BOARD SDA9489X S1117 18 IC825 S111 7 33 IC853 KIA78S06P IC824 KA78R33 KA78R05C ST 5V ST 3 3V ST 1 8V 3 3 V GAME HIC HIC01 190 V VB H FLB IIC 33V 5V TV MONITOR OUT SCART RGB IN Y Cb Cr IN AV IN H Vc c 5V S Vc c PIP RGB PIP VIDEO IIC VS H FLB 5V ST 5V ON OFF DATA CLOCK RESET VIDEO AUDIO 190V ...

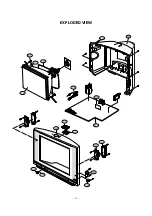
Page 20: ... 20 EXPLODED VIEW 600 700 330 320 300 150 170 913 112 120 174 520 943 400 121 570 310 530 ...

Page 21: ...320 320 062E SPRING KNOB 330 5020V01064A BUTTON POWER RN 21FD90 ABS HF 380 1KEY 400 3809V00577B BACK COVER ASSEMBLY RT 21FD90VQ DVD 1PHONE 049B SHAHAB LOCAL 520 6871VMM901R PWB PCB ASSEMBLY MAIN MC 049B RT 21FD90VQ LMLLKS8 6871VMM901S PWB PCB ASSEMBLY MAIN MC 049B RT 21FD90VT LMLLKS8 530 6871VSMAAPG PWB PCB ASSEMBLY SUB CONT MC049B 21FD90 SHAHAB 570 6871VSML08A PWB PCB ASSEMBLY SUB PIP MC049B 600 ...

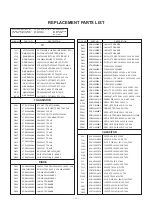
Page 22: ...2UF STD 16V M FL TP5 0 1UF D 50V 80 20 F Y5V TA52 1000PF D 50V 10 B Y5P TA52 100PF D 50V 10 B Y5P TA52 100PF D 50V 10 B Y5P TA52 100PF D 50V 10 B Y5P TA52 LOCA NO PART NO DESCRIPTION IC11 IC12 IC13 IC301 IC601 IC801 IC802 IC821 IC822 IC824 IC825 IC826 IC853 IC901 ICP01 ICP02 Q104 Q11 Q301 Q401 Q402 Q501 Q502 Q503 Q504 Q505 Q507 Q508 Q510 Q601 Q802 Q803 QP01 QP02 D301 D403 D405 D406 D407 D501 D502 ...

Page 23: ...ON C520 C521 C523 C524 C525 C526 C527 C527 C528 C528 C529 C529 C530 C531 C532 C533 C534 C535 C536 C537 C538 C540 C541 C542 C543 C545 C546 C547 C548 C550 C552 C553 C602 C603 C604 C605 C606 C607 C608 C609 C610 C611 C612 C613 C614 C615 C616 C617 C618 C619 C620 C625 0CE107DD618 0CN1040K949 0CN1040K949 0CE107DD618 0CN3310K519 0CN1040K949 0CN1040K949 0CN1040K949 0CN1040K949 0CN1040K949 0CN1040K949 0CN10...

Page 24: ...LP13 LP14 T401 T803 C1 C2 C3 C4 P102 P10A P1205 P1206 P12A P12B P201A P551A P551B P552A P552B P601 P602 P902 0LA0102K139 0LA0101K119 0LA0102K119 0LA0101K119 0LA0102K119 0LA0102K119 0LA0102K119 0LA0102K119 0LA0102K119 0LA0102K119 6140VE0001V 6140VB0001F 0LA0102K119 0LA0102K119 0LA0102K139 0LA0101K119 0LA0102K119 0LA0102K119 0LA0101K119 0LA0101K119 0LA0101K119 0LA0102K119 0LA0821K119 150 C02F 0LA047...

Page 25: ...9 R31 R310 R312 R313 R314 R315 R32 R328 R33 R35 R37 R38 R403 R404 R409 R410 R412 R42 R421 R422 R501 R502 R503 R505 R506 R507 R508 R509 R510 R511 R512 R513 R514 R515 R516 R517 R518 R519 R520 R521 R522 R523 R524 R525 R526 0RD2400A609 0RD0561A609 0RD1002F609 0RD1002F609 0RD3601F609 0RN4702F409 0RD2001F609 0RD3301F609 0RN4702F409 0RD4701F609 0RN0471H609 0RN0471H609 0RS2700K607 0RD3301F609 0RN3602F409 ...

Page 26: ...6 W 5 00 TA52 82 OHM 1 2 W 7 0 5 00 TA52 3 3K OHM 2 W 5 00 TA62 8 2M OHM 1 2 W 5 00 TA52 1K OHM 1 6 W 5 TA52 15 OHM 1 6 W 5 00 TA52 0 47M OHM 1 2 W 5 TA52 LOCA NO PART NO DESCRIPTION R823 R827 R828 R838 R840 R903 R904 R905 R906 R907 R908 R909 R910 R911 R912 R914 RP01 RP03 RP04 RP06 RP11 RP12 RP13 RP14 SW1111 SW1112 SW1113 SW1114 SW1115 SW1116 SW801 FB801 FB802 FB803 FB825 T802 X11 XP01 Z101 JK202 ...

Page 27: ...002F 164 003G WAFER ASSY PLUG 2P WAFER ASSY PLUG 2P REMOTE CONTROLLER W PIP TEXT OPTION ANTENNA 3SECTION 750MM NTSC W ADP FUSE 4000MA 250 V 5 2X20 REMOTE CONTROLLER RECEIVER KSM 913LG1T SOCKET CIRC CPT PCS030A 8PIN 14 360 FBT BSC25 N1648 21 YY THERMISTOR PTC J503P84D140M290Q TUNER TAEW G002D W W LGIT MULTI VARISTOR TVR621D14A THINKING 620V LOCA NO PART NO DESCRIPTION ACCESSORIES MISCELLANEOUS ...

Page 28: ...P NO 3854VA0162A S1 2004 6 12 ...

Page 29: ...SVC SHEET 3854V A0162A S ...

Page 30: ...Aug 2005 Printed in Korea P NO 3828VD0202N ...

Reviews: