background image

15

Auto setup - more you can do

Adjust the programmed channels

Press HOME, then use 

b

b B

B

to select [Easy Menu] option. Press ENTER while

[SETUP] is selected. The SETUP menu appears on the screen. Select the
[Program Edit] on the second level options then press 

B

B

to move to the third

level. Press ENTER while [Edit] option is selected. The channel editing screen
appears on the screen.

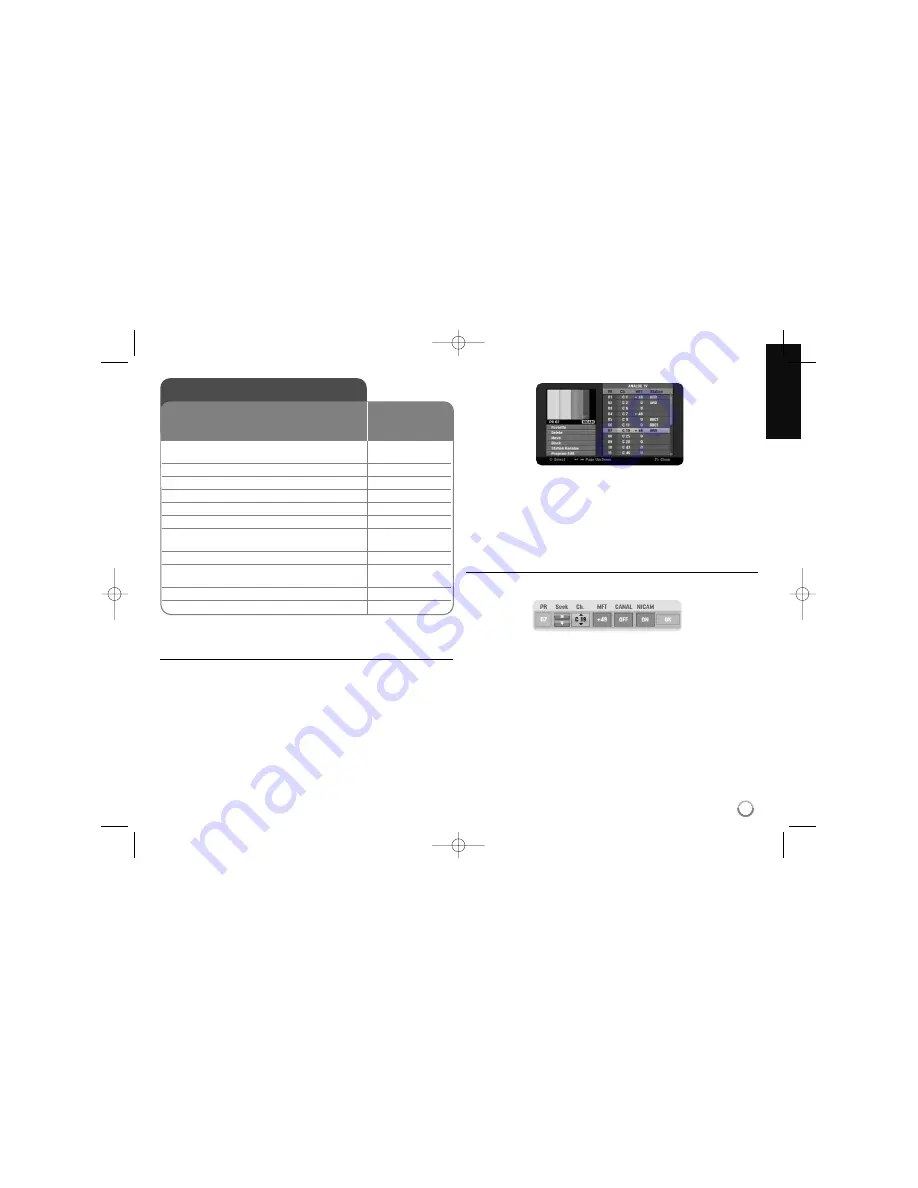
Select which channel you would like to edit and press ENTER. An option menu
on the left side of the screen will be highlighted.

[Favorite] Set the program to favorite channel.
[Delete]: Delete the selected channel from programmed channel list.
[Move]: Change the order of the channels and which numerical button they
correspond to.
[Block] Blocks the program.
[Station Rename] (Analog channel only): change a name of the selected
channel.
[Program Edit] (Analog channel only): Change the settings of a channel 
manually.

Editing a channel (Analog channel only)

You can change the settings of programmed channel by selecting 
[Program Edit] option on the left side of the channel editing screen.

[PR]: Indicates the selected channel position.
[Seek]: Searches for a channel automatically. Searching stops when the unit
tunes in a channel.
[Ch.] Changes the channel number.
[MFT] Fine tunes the channel to obtain a clearer picture.
[CANAL]: Sets the channels for the decoder. You need this setting to watch
or record PAY-TV/Canal plus programs.
[NICAM]: Sets the channels for the NICAM broadcast.
[OK]: Confirm the settings and return to the channel list menu.

Auto setup

1

Turn on the unit:

POWER

The initial setup wizard appears on the screen.

2

Choose a language:

v

v  V

V

3

Select the chosen language: 

ENTER

4

Check the antenna and go to the next step:

ENTER

5

Choose a clock setting mode:

v

v  V

V

6

Select the chosen clock setting mode:

ENTER

7

Set the clock:

v

v  V

V  b

b B

B

,

This step is not available for Auto mode

ENTER

8

Choose a country you are using the unit:

v

v  V

V

9

Choose a broadcasting type: 

B

B  v

v  V

V

All or Analog 

10 Select the [Start] and starts channel scan:

B

B

ENTER

11 Close the initial setup:

ENTER

ON REMOTE

When the first time to turn on the unit, the initial setup
wizard sets the language, clock and channels 
automatically.

RH497D-P-BESPLLK-ENG  1/9/09  3:42 PM  Page 15

Summary of Contents for RHT497H

Page 1: ...H P NO MFL42689420 As an ENERGY STAR Partner LG has determined that this product or product models meet the ENERGY STAR guidelines for energy efficiency ENERGY STAR is a U S registered mark RH497D P BESPLLK ENG 1 9 09 3 42 PM Page 1 ...

Page 2: ...e exposed to water dripping or splash ing and no objects filled with liquids such as vases should be placed on the apparatus CAUTION concerning the Power Cord Most appliances recommend they be placed upon a dedicated circuit That is a single outlet circuit which powers only that appliance and has no addi tional outlets or branch circuits Check the specification page of this owner s manual to be ce...

Page 3: ...LLY COMPATIBLE WITH THIS PRODUCT AND MAY CAUSE ARTIFACTS TO BE DISPLAYED IN THE PICTURE IN CASE OF 625 PROGRESSIVE SCAN PICTURE PROBLEMS IT IS RECOMMENDED THAT THE USER SWITCH THE CONNECTION TO THE STANDARD DEFI NITION OUTPUT IF THERE ARE QUESTIONS REGARDING OUR TV SET COMPATIBILITY WITH THIS MODEL 625p HDD DVD RECORDER PLEASE CONTACT OUR CUSTOMER SERVICE CENTER Open source software notice This pr...

Page 4: ...on 23 24 Using the digital EPG 25 26 Play a disc 26 27 Playing DivX movie files 28 29 Listening to a music 30 Viewing a photo 31 Recording 32 34 Editing a title 34 37 Dubbing a title 38 Language Codes 39 Area Codes 39 Troubleshooting 40 41 Specifications 42 Before connecting operating or adjusting this product please read this instruction booklet carefully and completely RH497D P BESPLLK ENG 1 9 0...

Page 5: ... mode VR mode Auto Auto Auto Yes Limited Yes Yes Limited Limited Yes The player must compatible with corresponding media and the media has to be finalized Mitsubishi 8x 16x Mitsubishi 4x Mitsubishi 3x Mitsubishi 8 16x Mitsubishi 2 4x 8x Mitsubishi 4x Verbatim 8x 16x Verbatim 4x Maxell 5x Verbatim 8x 16x HP 4x JVC 4x Verbatim 4x Maxell 4x Ricoh 4x RW R R RAM RWVideo RWVR R HDD DVD Audio CD Data dis...

Page 6: ...r company has no right to grant such permission Permission should always be sought from the copy right owner Availability of copying or moving feature From To MP3 WMA JPEG DivX Title 1 HDD DISC Yes DISC HDD Yes Yes Yes Yes USB drive HDD Yes Yes Yes 1 The title is recorded from this unit Restrictions on copying Some video material is copy once protected Such material cannot be copied to HDD or DVD ...

Page 7: ...e program list RETURN O Removes the on screen displays DISPLAY Accesses On Screen Display EPG Displays the EPG menu PR PR Scans up or down through memorized channels PR LIST Displays the program list menu d Color buttons Use when an EPG screen is displayed or when tuned to a teletext program of a digital broadcast The function of each button will be described on screen and changes depending on the...

Page 8: ...ying time elapsed time title number chapter track num ber channel etc f N X PLAY PAUSE Starts playback Pause playback or recording temporarily press again to exit pause mode g x STOP Stops playback or recording h z REC Starts recording Press repeatedly to set the recording time i OPEN CLOSE Z Opens or closes the disc tray j RESOLUTION Sets the output resolution for HDMI and COM PONENT OUTPUT jacks...

Page 9: ...k on the unit and other end to ANTENNA IN jack on your TV Passes the signal from the ANTENNA IN jack to your TV monitor c SCART connection Connect one end of the scart cable into the AV1 SCART jack on the unit and other end to the corresponding in jack on your TV You can get Audio and Video signals together with this connection d Power cord connection Connect the mains lead to the AC IN terminal o...

Page 10: ...s are distributed to your wall antenna outlet If you have your own antenna system you must make sure that it is equipped with antennas filter and or amplifier that can handle those frequen cies that the digital channels are transmitted on Cable TV Please observe that this recorder is not designed for the reception of regular digital cable TV signals QAM signal Despite this operators of smaller cab...

Page 11: ...ceiver Dolby Digital MPEG DTS decoder or other equipment with a digital input Connect one end of the digital audio cables COAXIAL or OPTICAL to the digi tal audio output jack COAXIAL or OPTICAL on the unit and other end to the digital audio input jack COAXIAL or OPTICAL on your amplifier This recorder does not perform internal 2 channel decoding of a DTS sound track To enjoy DTS multi channel surr...

Page 12: ...m If your TV is not equipped with Dolby Digital and MPEG decoder set the Dolby Digital and MPEG options to PCM on the setup menu See page 19 If your TV is not equipped with DTS decoder set the DTS options to OFF on the setup menu See page 19 To enjoy DTS multi channel surround you must connect this unit to a DTS compatible receiver via one of this unit s digital audio outputs If there is noise or ...

Page 13: ...signals from the connected tuner on your TV To watch or record the source from AV2 DECODER jack set AV2 Connection option to Others see page 18 and set AV2 Recording option to Auto CVBS RGB or S Video as required see page 21 Pictures containing copy protection signals that prohibit any copying cannot be recorded If you pass the unit signals via the VCR you may not receive a clear image on your TV ...

Page 14: ...traight in until it fits into place Removing the USB Flash Drive Withdraw the USB Flash Drive carefully when the connected USB Flash Drive is in use Notes on USB Flash Drive The contents on the disc or HDD cannot be moved or copied to a USB Flash Drive Keep the USB Flash Drive out of reach of children If swallowed seek med ical advice immediately This unit supports only USB Flash Drive with FAT16 ...

Page 15: ... left side of the channel editing screen PR Indicates the selected channel position Seek Searches for a channel automatically Searching stops when the unit tunes in a channel Ch Changes the channel number MFT Fine tunes the channel to obtain a clearer picture CANAL Sets the channels for the decoder You need this setting to watch or record PAY TV Canal plus programs NICAM Sets the channels for the ...

Page 16: ... is then input back through the AV2 DECODER jack so you can record or watch PAY TV Canal Plus programs Press AV INPUT once while the channel editing screen appears The Decoder On Off option on the option menu Press ENTER to turn on the option and press ENTER again to turn off The Canal appears on the screen when this option is turned on Using the Home Menu more you can do MOVIE HDD Displays the Ti...

Page 17: ...DVD R or a DVD ROM title without copy protection page 38 TV HDD Returns to live TV viewing in HDD mode Pressing the HDD button on the remote control will also allow you to directly choose this option DVD Returns to live TV viewing in DVD mode Pressing the DVD button on the remote control will also allow you to directly choose this option Timer Record Displays Timer Record menu page 32 17 Adjust th...

Page 18: ...er the wide picture with bands on the upper and lower portions of the screen 4 3 Pan Scan Select this when connecting to a standard 4 3 screen TV and prefer the wide picture on the entire screen cuts off the portions that do not fit 16 9 Wide Select this when connecting to a wide screen TV AV2 Connection You can connect a decoder or the other device to the AV2 DECODER jack on the rear panel Decode...

Page 19: ...iewing digital TV viewing DivX Subtitle Select a language code for the DivX subtitle Adjust the audio settings Dolby Digital DTS MPEG Selects the type of digital audio signal when using the DIGITAL AUDIO OUTPUT jack Bitstream Select this when you connect this unit s DIGITAL AUDIO OUTPUT jack to an audio component with a built in Dolby Digital DTS or MPEG decoder PCM for Dolby Digital MPEG Select t...

Page 20: ...password twice after entering the current password Delete Delete the current password after entering the current password Area code Select a code for a geographic area as the playback rating level This determines which area s standards are used to rate DVDs controlled by the parental lock See the Area Codes on page 39 DivX Reg Code We provide you with the DivX VOD Video On Demand registration code...

Page 21: ...e unit will initialize the disc automatically See Formatting mode new disc on page 5 for more information Finalize Finalizing is necessary when you play disc recorded with this unit on other DVD equipment How long finalization takes depends on the disc condi tion recorded length and number of titles Finalize The Finalize menu appears The unit starts finalizing after confirmation Unfinalize The fin...

Page 22: ...s Do not unplug your recorder while an update is in progress The update is not available during recording Timeshift viewing teletext or EPG menu Standby mode Updates the software when this unit is turned off The check mark appears when this option is selected Operation Mode Update the software when this unit is turned on The check mark appears when this option is selected Time Set the time to upda...

Page 23: ...ing playback press DISPLAY twice to display the playback menu Use v V to select the subtitle option then use b B to select desired subtitle language OR During playback press SUBTITLE then press b B repeatedly to select a desired subtitle language Watching from a different angle If the disc contains scenes recorded at different camera angles you can change to a different camera angle during playbac...

Page 24: ...ogram Use PR PR on the remote control to change the programs in memory or use numbered 0 9 buttons to select a program directly Changing TV program with program list You can display TV program list using the PR LIST button and switch into other TV program on the channel list While watching a program press PR LIST to display the TV program list Select your desired channel using the v V and press EN...

Page 25: ...button when the EPG menu is displayed Now Next The screen shows now and next programs 8 Days The screen shows programs within 8 days When the EPG menu with 8 days is displayed you can also change the date of the EPG menu by pressing the green color button then use b B to select a date You can set a timer record using EPG menu with 8 days Select a program then press red color button The red timer i...

Page 26: ...ring selection you press a wrong number you must complete the three digit number and then enter the correct page number again Use RED GREEN buttons to move up and down pages Play a disc more you can do Playing a disc that contains a menu The menu screen may be displayed first after loading a DVD which contains a menu Use the b B v V buttons to select the title chapter you want to view then press E...

Page 27: ...TLE to displays the title menu or disc menu If the current DVD title has a menu the title menu appears on the screen Otherwise the disc menu may appears Playing repeatedly Press REPEAT repeatedly to select an item to be repeated The current title chapter folder or track will be played back repeatedly To return to normal play back press REPEAT repeatedly to select OFF Repeating a specific portion A...

Page 28: ...48kHz WMA Bit rate within 8 320kbps MP3 within 32 192kbps WMA CD R Format ISO 9660 and JOLIET DVD R RW Format ISO 9660 UDF Bridge format Maximum Files Disc Less than 1999 total number of files and folders Notes on DivX format The DivX subtitle file name has to be identified with the DivX file name to be display on the unit If the subtitle file does not display properly change the language code in ...

Page 29: ...enu appears by pressing ENTER while Rename option is selected Copying file s or folder s to the HDD You can copy file s or folder s to the HDD Select file s or folder s you would like to copy then press ENTER Select Edit option then press ENTER to show sub options The Copy menu appears by pressing ENTER while Copy option is selected Select a directory that you would like to copy to Select the Copy...

Page 30: ...folders Creating your own program You can play the contents in the order you want by arranging the order of the musics The program is cleared when exit the Music List screen To add or erase a music s on the program list press MENU LIST to display the Program List Select a desired music from the Music List then press ENTER If you want to select multiple files tracks press MARKER at the every desire...

Page 31: ...all files Speed option Sets the Slide Show speed to Slow Normal or Fast Listening to music during slide show You can slide show photo files while listening to MP3 WMA music files on HDD Press ENTER while Simultaneous Music play option is selected on the Slide Show menu The music file selection menu appears on the screen Press MARKER at the desired files to play then press ENTER while Start option ...

Page 32: ...ess ENTER to display Timer Record menu Adjust the each field as described below using v v V V b b B B Media Choose a media to record HDD or DVD CH PR Choose a memorized program number or one of the external inputs from which to record You cannot select DV input and radio channel Date Choose a date up to 1 month in advance Start Time Set the start time End Time Set the end time Repeat Choose a desi...

Page 33: ... or dubbing The DivX file cannot be played while recording When you recording on a DVD the contents on the DVD can not be played Time Slip You can watch the title that you are currently recording to HDD with this func tion After the recording is progressed over 15 seconds press PLAY to playback the title that you are currently recoding If you stop playback the title returns to the current recordin...

Page 34: ...ion Using time shift function automatically If the Time Shift option in the SETUP menu is set to ON timeshift starts automatically without pressing TIMESHIFT button in HDD mode If you want to quit timeshift function set the Time Shift function to OFF Editing a title more you can do About title list menu Press MENU LIST to display the Title List menu Playback should be stopped when you do this You ...

Page 35: ...in the Original still remains However if you delete a chapter or title from Original the title or chapter deleted from the Original are also removed from PlayList Select a title or chapter that you want to delete and press ENTER Select Delete option from the menu on the left of the screen and press ENTER to confirm HDD You can delete multiple files using MARKER button Press MARKER at the desired f...

Page 36: ...e that you want to divide and press ENTER Select Divide in the Edit option from the menu on the left of the screen and press ENTER to display the Divide menu Find the point you want to divide a title using PLAY SCAN PAUSE STEP buttons and press ENTER while Divide option is selected The playback screen shows the divided point Select Done option and press ENTER to divide You cannot select dividing p...

Page 37: ...tween chapter thumbnails Press ENTER to combine indicated two chapters This function is not available in conditions as listed below There is only one chapter within the title The first chapter is selected The chapters that you want to combine are created by deleting a part from an Original title The chapters that you want to combine are created from different titles One of the playlist chapter tha...

Page 38: ... Press MARKER at the desired titles to select multiple titles and press ENTER to display the menu on the left of the screen Select Dubbing option from the menu on the left of the screen and press ENTER to display the Dubbing menu Use v v V V b b B B to select Start icon then press ENTER to con firm Dubs a currently playing title This feature copies a single title to the HDD in real time When you s...

Page 39: ...moan 8377 Sanskrit 8365 Scots Gaelic 7168 Serbian 8382 Serbo Croatian 8372 Shona 8378 Sindhi 8368 Singhalese 8373 Slovak 8375 Slovenian 8376 Spanish 6983 Sudanese 8385 Swahili 8387 Swedish 8386 Tagalog 8476 Language Code Tajik 8471 Tamil 8465 Telugu 8469 Thai 8472 Tonga 8479 Turkish 8482 Turkmen 8475 Twi 8487 Ukrainian 8575 Urdu 8582 Uzbek 8590 Vietnamese 8673 Volapük 8679 Welsh 6789 Wolof 8779 Xh...

Page 40: ...in the path of the remote control and the unit b The batteries in the remote control are exhausted Playback The unit does not start playback b Insert a playable disc Check the disc type color system and regional code b Place the disc with the playback side down b Place the disc on the disc tray correctly inside the guide b Clean the disc b Cancel the Rating function or change the rating level Cann...

Page 41: ...48 kHz on the setup menu When this choice is made this unit will automatically convert any 96 kHz signals to 48 kHz so your system can decode them b If your TV is not equipped with Dolby Digital and MPEG decoder set the Dolby Digital and MPEG options to PCM on the setup menu b If your TV is not equipped with DTS decoder set the DTS options to OFF on the setup menu To enjoy DTS multi channel surrou...

Page 42: ...mat MPEG2 Audio recording format Sampling frequency 48kHz Compression format Dolby Digital Playback Frequency response DVD PCM 48 kHz 8 Hz to 22 kHz CD 8 Hz to 20 kHz DVD PCM 96 kHz 8 Hz to 44 kHz Signal to noise ratio More than 90 dB AUDIO OUT connector Harmonic distortion Less than 0 02 AUDIO OUT connector Inputs ANTENNA IN Antenna input 75 ohms VIDEO IN 1 0 Vp p 75 ohms sync negative RCA jack x...

Page 43: ...de esta tarjeta de garantía Como colaborador Energy Star LG ha establecido que este producto o modelos de producto cumplen las directrices Energy Star de rendimiento energético ENERGY STAR es una marca registrada de EE UU RH497D P BESPLLK SPA 1 9 09 3 44 PM Page 1 ...

Page 44: ... NO MIRE FIJAMENTE AL HAZ PRECAUCIÓN no deberá exponerse el aparato a agua goteo o salpicadura ni colocar sobre el mismo objetos con líquido como jarrones PRECAUCIÓN sobre el cable de alimentación Se recomienda colocar la mayoría de los aparatos en un circuito dedicado Es decir un circuito de salida única que alimente sólo a ese aparato y que no tenga tomas o circuitos adicionales Compruebe la pág...

Page 45: ...LMENTE COMPATIBLES CON ESTE PRODUCTO Y QUE PUEDE PROVOCAR LA APARICIÓN DE OBJETOS EXTRAÑOS EN LA IMAGEN EN EL CASO DE PROBLEMAS EN LA IMAGEN DE 625 DE ESCANEO BARRIDO PROGRESIVO SE RECOMIENDA QUE EL USUARIO CAMBIE LA CONEXIÓN A LA SALIDA STANDARD DEFINITION EN CASO DE DUDA EN RELACIÓN CON LA COMPATIBILIDAD DE NUESTRO TELEVISOR CON ESTE MODELO DE REPRODUCTOR DVD Y HDD 625p LE ROGAMOS QUE SE PONGA E...

Page 46: ...disco 23 24 Uso de EPG digital 25 26 Reproducción de un disco 26 27 Reproducción de archivos de película DivX 28 29 Cómo escuchar música 30 Visualización de una imagen 31 Grabación 32 34 Edición de un título 34 37 Copia de un título 38 Códigos de idioma 39 Códigos de país 39 Solución de problemas 40 41 Especificaciones 42 Antes de conectar utilizar o ajustar este producto lea completa y atentament...

Page 47: ...odo vídeo Modo vídeo Modo VR Automático Automático Automático Sí Limitada Sí Sí Limitada Limitada Sí El reproductor debe ser compatible con el soporte correspondiente y el soporte debe estar finalizado Mitsubishi 8x 16x Mitsubishi 4x Mitsubishi 3x Mitsubishi 8 16x Mitsubishi 2 4x 8x Mitsubishi 4x Verbatim 8x 16x Verbatim 4x Maxell 5x Verbatim 8x 16x HP 4x JVC 4x Verbatim 4x Maxell 4x Ricoh 4x RW R...

Page 48: ...nibilidad para copiar o mover De A MP3 WMA JPEG DivX Título 1 HDD DISCO Sí DISCO HDD Sí Sí Sí Sí Unidad USB HDD Sí Sí Sí 1 El título se graba desde esta unidad Restricciones para realizar copias Algunos vídeos están protegidos con la función copy once una sola copia Ese tipo de material no puede copiarse al disco duro ni al DVD Puede identificar el material protegido contra una copia durante la re...

Page 49: ...de programas RETURN O sale del menú de visualización en pantalla DISPLAY accede a la visualización en pantalla EPG muestra la programación televisiva PR PR busca hacia arriba o abajo en los canales memorizados PR LIST muestra la lista de programas d Botones de colores a utilizar cuando aparezca una pantalla con una guía electrónica de programas EPG o al sintonizar un programa de teletexto en una e...

Page 50: ... el reloj tiempo total de reproducción tiempo transcurrido número de título número de pista capítulo canal etc f N X PLAY PAUSE Inicia la reproducción Hace una pausa temporal en la reproducción o grabación púlselo de nuevo para salir del modo pausa g x STOP Detiene la reproducción o grabación h z REC Inicia la grabación Pulse varias veces para ajustar el tiempo de grabación i OPEN CLOSE Z Abre y o...

Page 51: ...d y el otro extremo a la toma ANTENNA IN de su TV Pasa la señal de la toma de ANTENNA IN a su televisor Monitor c Conexión SCART Conecte un extremo del cable en la toma AV1 SCART de la unidad y el otro extremo a la toma de entrada correspondiente de su TV Puede obtener señales de audio y de vídeo mediante la misma conexión d Conexión del cable de alimentación Conecte el cable principal del termina...

Page 52: ...berá asegurarse de tener toma de antena en la pared para la recepción de señales digitales terrestres Si dispone de su propio sistema de antena deberá cerciorarse de que tiene las antenas el filtro y o amplificador adecuado para las frecuencias recibidas en los canales digitales captados Cable de televisión Señales de televisión señal QAM Además de lo indicado los operarios de redes por cable de m...

Page 53: ...al MPEG DTS u otro equipo con una entrada digital Conecte un extremo de los cables de audio digital COAXIAL o OPTICAL a la toma de salida de audio digital COAXIAL o OPTICAL de la unidad y el otro extremo a la toma de entrada de audio digital COAXIAL o OPTICAL del amplificador Esta grabadora no ejecuta la descodificación interna 2 canales de un pista de sonido DTS Para disfrutar del sonido envolven...

Page 54: ...ones Dolby Digital y MPEG a PCM en el menú de configuración consulte la página 19 Si su TV no está equipado con un descodificador de DTS configure las opciones DTS a OFF en el menú de configuración consulte la página 19 Para disfrutar del sonido envolvente multicanal DTS debe conectar esta unidad a un receptor compatible con DTS mediante una de las salidas de audio digital de la unidad Si hay ruid...

Page 55: ...R ajuste la opción CONECCION AV2 a Otros consulte la página 18 y ajuste la opción GRABACION AV2 a Auto CVBS RGB o S Video según se necesite consulte la página 21 No pueden grabarse imágenes que contengan señales de protección anticopia que prohíban dicho copiado Si pasa las señales de la unidad a través del VCR no recibirá imágenes nítidas en la pantalla de su TV Asegúrese de conectar su VCR a la ...

Page 56: ...idad USB Flash con cuidado cuando ésta conectada y en uso Notas acerca de una unidad USB Flash El contenido del disco o de la unidad de disco duro no puede moverse o copiarse a una unidad USB Flash Mantenga la unidad USB Flash fuera del alcance de los niños Si se la tragan solicite asistencia médica inmediatamente Esta unidad sólo es compatible con la unidad USB Flash con formato FAT16 ó FAT32 No ...

Page 57: ...ica la posición del canal seleccionado Seek busca un canal automáticamente La búsqueda se detiene cuando la unidad sintoniza un canal Ch cambia el número del canal MFT realiza una sintonización fina del canal para obtener una imagen más nítida CANAL ajusta los canales para el decodificador Necesita este ajuste para visualizar o grabar programas de TV de pago Canal Plus NICAM ajusta los canales par...

Page 58: ... señales de vídeo codificadas Esta opción configura la unidad para emitir la señal codificada desde la toma del Euroconector AV1 a la toma del Euroconector AV2 DESCODIFICADOR para su descodificación La señal descodificada vuelve otra vez a través del euroconector AV2 DESCODIFICADOR para que usted pueda grabar o ver los programas de TV de pago Canal plus Presione una vez AV INPUT durante la visuali...

Page 59: ... un título actualmente en reproducción a partir de un DVD R finalizado o un título DVD ROM sin protección anticopia Página 38 TV HDD vuelve a la visualización en directo del televisor en modo HDD Si pulsa el botón HDD en el mando a distancia podrá elegir directamente esta opción DVD vuelve a la visualización en directo del televisor en modo DVD Si pulsa el botón DVD en el mando a distancia podrá e...

Page 60: ...a con ban das en la parte superior e inferior de la pantalla 4 3 Pan Scan seleccione esta opción cuando conecte un TV de pantalla estándar con resolución 4 3 y prefiera una imagen panorámica en toda la pantalla cortando las partes que no quepan 16 9 Ancho seleccione esta opción cuando conecte un TV panorámico CONECCION AV2 puede conectar un decodificador u otro dispositivo a la toma AV2 DECODER qu...

Page 61: ...ón digital terrestre TDT DIVX Subtítulo selecciona un código de idioma para los subtítulos DivX Ajuste de los valores de audio Dolby Digital DTS MPEG selecciona el tipo de señal de audio digital cuando utilice una toma DIGITAL AUDIO OUTPUT Bitstream seleccione esta opción cuando conecte la toma DIGITAL AUDIO OUTPUT de esta unidad a un componente de audio con un decodificador MPEG DTS o Dolby Digit...

Page 62: ...ña Cambiar introduzca la contraseña nueva dos veces tras introducir la contraseña actual Borrar elimina la contraseña actual tras introducir la contraseña actual Código de área selecciona un código para un área geográfica como el nivel de clasificación de reproducción Determina qué estándares de país se utilizan para clasificar DVDs controlados por el control paterno Consulte los códigos de país e...

Page 63: ...idad inicializará el disco Consulte Modo de formateo discos nuevos en la página 5 si desea más información Finalizar la finalización es necesaria si reproduce discos grabados con esta unidad en otros equipos de DVD La duración de la finalización depende del estado del disco la duración de la grabación y el número de títulos Finalizar aparece el menú Finalizar La unidad comienza la finalización tra...

Page 64: ...necte la grabadora mientras la actualización está en curso La actualización no está disponible durante la grabación la diferencia de tiempo la visualización de teletexto o menú EPG Modo Standby Actualiza el software cuando la unidad está apagada La marca aparece al seleccionar esta opción Modo de Operación Actualiza el software cuando la unidad está encendida La marca aparece al seleccionar esta o...

Page 65: ...isualizar el menú de reproducción Utilice v V para seleccionar la opción de subtítulos y a continuación utilice b B para seleccionar el idioma deseado para los subtítulos O Durante la reproducción pulse SUBTITLE y a continuación b B repetidamente para seleccionar un idioma de subtítulos deseado Visualización desde un ángulo diferente Si el disco contiene escenas grabadas desde diferentes ángulos p...

Page 66: ...bien utilice los botones numéricos 1 a 9 para seleccionar el programa directamente Cambio de programa de televisión con la lista de programas Puede visualizar la lista de programas de televisión utilizando el botón PR LIST y alternando entre diferentes programas de televisión de la lista de canales Mientras ve un programa pulse PR LIST para visualizar la lista de programas de televisión Seleccione...

Page 67: ... los programas actuales y los siguientes 8 Días la pantalla muestra los programas de los próximos 8 días Cuando el menú EPG muestra la información correspondiente a los próximos 8 días puede cambiar la fecha del menú EPG pulsando el botón de color verde y utilizando después b B para seleccionar la fecha Puede configurar una grabación mediante temporizador utilizando el menú EPG correspondiente a l...

Page 68: ...lección pulsa un número erróneo deberá completar los tres dígitos y después volver a especificar el código correcto de la página que buscaba Utilice los botones ROJO VERDE para desplazarse hacia arriba abajo por las diferentes páginas Reproducción de un disco qué más puede hacer Reproducción de un disco que contiene un menú La pantalla del menú puede aparecer inmediatamente después de introducir u...

Page 69: ...ad normal Visualización del menú del título Pulse TITLE para visualizar el menú del título o del disco Si el título del DVD actual tiene un menú éste aparecerá en la pantalla De lo contrario aparecerá el menú del disco Repetición de la reproducción Pulse REPEAT varias veces para seleccionar el elemento que desea repetir El título capítulo carpeta o pista actual se reproducirá de forma repetida Par...

Page 70: ...8 kHz WMA Velocidad de bits entre 8 320 kbps MP3 entre 32 192 kbps WMA Formato CD R ISO 9660 y JOLIET Formato DVD R RW ISO 9660 formato UDF Bridge Nº máximo de archivos disco inferior a 1 999 número total de archivos y carpetas Notas acerca del formato DivX El nombre del archivo de los subtítulos DivX debe corresponder al nombre del archivo DivX para visionarlos en esta unidad Si el archivo de sub...

Page 71: ...del teclado aparece al pulsar ENTER con la opción Renombrar seleccionada Para copiar archivo s o carpeta s al disco duro Puede copiar archivo s o carpeta s al disco duro Seleccione el los archivo s o carpeta s que desee copiar y a continuación pulse ENTER Seleccione la opción Editar y a continuación pulse ENTER para visualizar las subopciones El menú Copiar aparece al pulsar ENTER con la opción Co...

Page 72: ...enido en el orden que desee si organiza la música El programa se elimina cuando se sale de la pantalla Liste de musiques Para agregar o borrar música en la lista de programas pulse MENU LIST para visualizar la Lista programa Seleccione la música deseada de la Liste de musiques y a continuación pulse ENTER Si desea seleccionar múltiples archivos pistas pulse MARKER en cada archivo pista que desee S...

Page 73: ...n Velocidad selecciona la velocidad de presentación de las diapositivas eligiendo entre Normal Lento o Rápido Para escuchar música durante la presentación Puede visualizar archivos de imágenes como una presentación mientras escucha archivos de música en formato MP3 WMA en el disco duro Pulse ENTER con la opción Repro Simul de música seleccionada en el menú Slide Show El menú de selección de archiv...

Page 74: ...n reservada Ajuste cada campo tal y como se describe a continuación con v v V V b b B B Media elige un soporte en el que grabar disco duro o DVD CH PR elige un número de programa memorizado o una de las entradas externas desde la que grabar No puede seleccionar una entrada de televisión digital ni un canal de radio Fecha elige una fecha como máximo de ahora a 1 mes hora comz ajusta la hora de inic...

Page 75: ...producir otro contenido mientras copia o duplica El archivo DivX no puede reproducirse durante la grabación Al grabar en un DVD el contenido del DVD no puede reproducirse Time Slip Puede visualizar el título que está grabando en ese momento en el disco duro con esta función Transcurridos 15 segundos de la grabación pulse PLAY para reproducir el título que está grabando Si detiene la reproducción d...

Page 76: ...está ajustada en ON el Timeshift comienza de manera automática sin pulsar el botón TIMESHIFT en modo HDD Si desea salir de la función Timeshift ajuste la función Time Shift en OFF Edición de un título qué más puede hacer Acerca del menú Lista de título Pulse MENU LIST para visualizar el menú Title List Debería detenerse la grabación al hacer esto Puede acceder a él también con el menú HOME selecci...

Page 77: ...lista de reproducción se conserva el título o capítulo del original Sin embargo si borra un título o capítulo original también desaparecerá de la lista de reproducción Seleccione un título o capítulo que desee borrar y pulse ENTER Seleccione la opción Borrar del menú en la parte izquierda de la pantalla y pulse ENTER para confirmar HDD puede borrar múltiples archivos con el botón MARKER Pulse MARK...

Page 78: ...ividir y pulse ENTER Seleccione Dividir en la opción Editar del menú en la parte izquierda de la pantalla y pulse ENTER para visualizar el menú Dividir Busque el punto en que desea realizar la división con los botones PLAY SCAN PAUSE STEP y pulse ENTER con la opción Dividir seleccionada La pantalla de reproducción muestra el punto dividido Seleccione la opción Completo y pulse ENTER para dividir N...

Page 79: ...dicador de combinación entre las miniaturas de los capítulos Pulse ENTER para combinar dos capítulos indicados Esta función no está disponible en los siguientes casos Si sólo hay un capítulo en el título Si se selecciona el primer capítulo Los capítulos que desea combinar se crean borrando una parte de un título Original Los capítulos que desea combinar se crean desde diferentes títulos Uno de los...

Page 80: ...tulo sino múltiples títulos con el botón MARKER Pulse MARKER en los títulos deseados para seleccionar múltiples títulos y pulse ENTER para visualizar el menú en la parte izquierda de la pantalla Seleccione la opción Doblado del menú en la parte izquierda de la pantalla y pulse ENTER para visualizar el menú Doblado Utilice v v V V b b B B para seleccionar el icono Comenzar y a continuación pulse EN...

Page 81: ...5 Gaélico escocés 7168 Serbio 8382 Serbo croata 8372 Shona 8378 Sindhi 8368 Cingalés 8373 Eslovaco 8375 Esloveno 8376 Español 6983 Sudanés 8385 Swahili 8387 Sueco 8386 Tagalo 8476 Idioma Código Tajiko 8471 Tamil 8465 Telougou 8469 Tailandés 8472 Tonga 8479 Turco 8482 Turkmeno 8475 Twi 8487 Ucraniano 8575 Urdu 8582 Uzbeco 8590 Vietnamita 8673 Volapuk 8679 Galés 6789 Wolof 8779 Xhosa 8872 Yiddish 74...

Page 82: ...dad b Las pilas del mando a distancia están agotadas Reproducción La unidad no inicia la reproducción b Introduzca un disco reproducible Compruebe el tipo de disco el sistema de color y el código de región b Introduzca el disco con la cara de reproducción hacia abajo b Coloque el disco en la bandeja de discos correctamente dentro de las guías b Limpie el disco b Cancele la función rating o cambie ...

Page 83: ...z realizada la selección esta unidad convertirá automáticamente cualquier señal de 96 kHz en señales de 48 kHz para que su sistema las pueda descodificar b Si su TV no está equipado con un decodificador de Dolby Digital y MPEG seleccione las opciones Dolby Digital y MPEG a PCM en el menú de configuración b Si su TV no está equipado con un decodificador de DTS seleccione las opciones DTS a OFF en e...

Page 84: ...e audio Frecuencia de muestreo 48 kHz Formato de compresión Dolby Digital Reproducción Respuesta en frecuencia DVD PCM 48 kHz 8 Hz a 22 kHz CD 8 Hz a 20 kHz DVD PCM 96 kHz 8 Hz a 44 kHz Relación señal ruido Superior a 90 dB conector AUDIO OUT Distorsión armónica Inferior a 0 02 conector AUDIO OUT Entradas ANTENNA IN Entrada de la antena 75 ohmios VIDEO IN 1 Vp p 75 ohmios sincronización negativa 1...

Reviews: