background image

39

Safety instructions

Monitor Overview

Connections

Basic operation

Sleep timer

Picture & Sound

Special features

Others

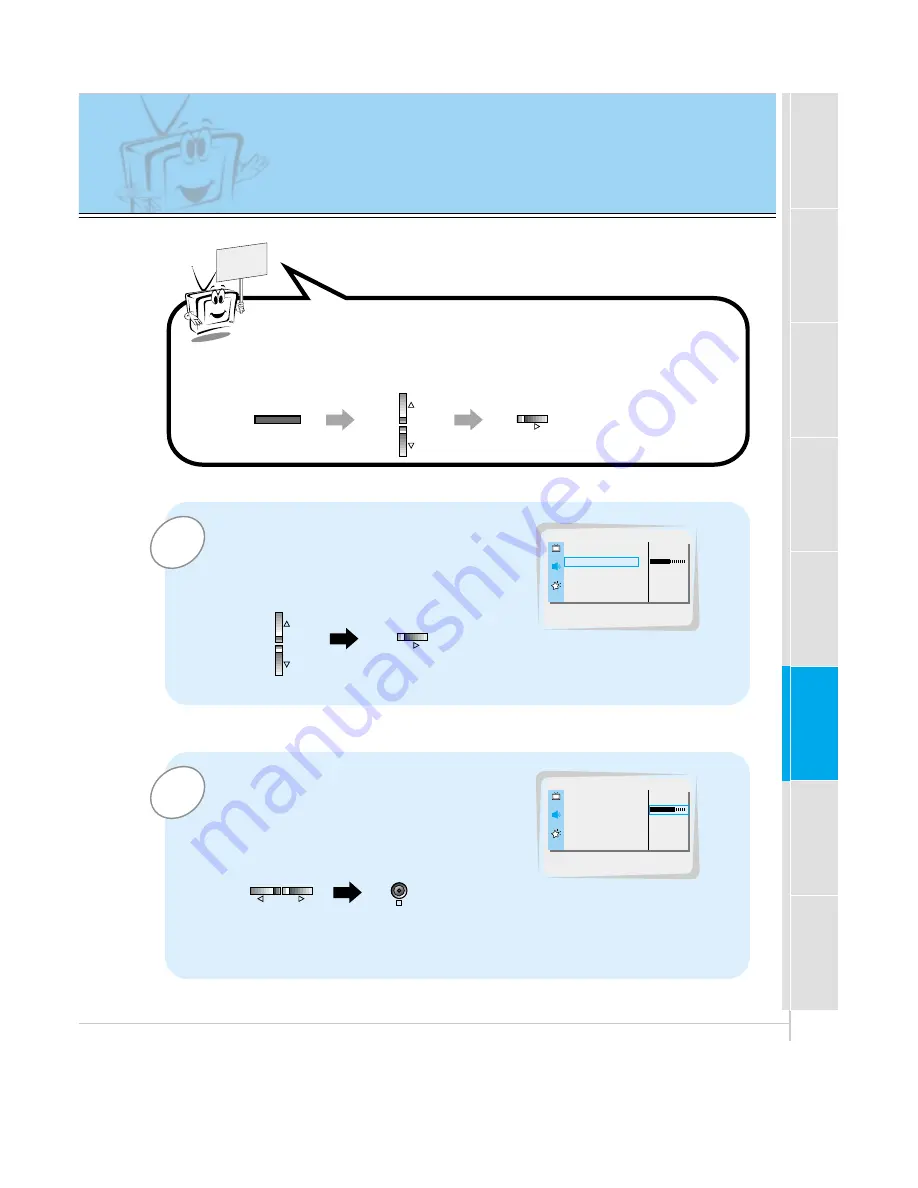
Adjusting sound

Manual setting

2

1

READY

Example : Adjustment treble
Use the 

E

buttons to select 

TREBLE

and then press the 

G

button.

• Adjust 

BASS

and 

BALANCE

in the same way.

Use the 

G

buttons to make appropri-

ate adjustment and then press the OK
button to exit.

• Press the 

/

E

buttons to select other options.

Press the MENU button and then press the 

E

button to

select 

SOUND

menu.

Press the 

G

button.

DASP

G

AVL

G

TREBLE

50  

G

BASS

50  

G

BALANCE

0  

G

SOUND

TREBLE

50

DASP

G

AVL

G

TREBLE

70  

G

BASS

50  

G

BALANCE

0  

G

SOUND

OK

VOL

VOL

MENU

VOL

VOL

Summary of Contents for MU-60PZ11

Page 1: ...ting the Monitor Retain it for future reference Record model number and serial number of the Monitor See the label attached on the back of the Monitor and quote this information to your dealer when you require service Model number Serial number MU 60PZ11 MU 60PZ11A MU 60PZ11B MU 60PZ11K MU 60PZ11S OWNER S MANUAL ...

Page 2: ... would be acceptable in line with other PDP manufacturers and would not mean that the PDP is faulty We hope you will understand that the product which corresponds to this standard is regarded as acceptable It means that it could not be changed or refunded We promise that we ll do our best to develop our technology to minimize the cell defects The explanation about noise of 60 PDP In the same way t...

Page 3: ... In Picture PIP function 26 Twin picture function 29 Using the remote control 31 Basic Features Setup and Operation Turning on the Monitor 32 Selecting language for the menus 33 Checking features 34 Sleep Timer Setting Sleep Timer Monitor turn off time 35 Picture Sound Auto picture control 36 Adjusting picture appearance 37 DRP Digital Reality Picture 38 Adjusting Sound Bass Treble Balance 39 Auto...

Page 4: ...ct s enclosure that may be of sufficient magnitude to consti tute a risk of electric shock to persons The exclamation point within an equilateral triangle is intended to alert the user to the presence of important operating and maintenance servicing instructions in the literature accompanying the appliance WARNING TO PREVENT FIRE OR SHOCK HAZARDS DO NOT EXPOSE THIS PRODUCT TO RAIN OR MOISTURE CAUT...

Page 5: ...ed to 5 Cleaning Unplug this product from the wall outlet before cleaning Do not use liquid cleaners or aerosol cleaners Use a damp cloth for cleaning 6 Water and Moisture Do not use this product near water for example near a bath tub wash bowl kitchen sink or laundry tub in a wet base ment or near a swimming pool 7 Accessories Carts and Stands Do not place this product on a slippery or tilted sur...

Page 6: ... antenna or cable system is grounded so as to provide some protection against voltage surges and built up static charges Article 810 of the National Electrical Code U S A ANSI NFPA 70 provides information with regard to proper grounding of the mast and supporting structure grounding of the lead in wire to an antenna discharge unit size of grounding conductors location of antenna discharge unit con...

Page 7: ...uctions as an improper adjustment of other controls may result in damage and will often require extensive work by a qualified technician to restore the product to its normal operation e If the product has been dropped or the cabinet has been damaged f If the product exhibits a distinct change in performance 21 Replacement Parts When replacement parts are required be sure the service technician has...

Page 8: ...VOLUME INPUT SELECT VOLUME Front Panel Controls Main power button INPUT SELECT button Power standby indicator Illuminates red in standby mode Illuminates green when the Monitor is turned on Sub power button VOLUME F F G G buttons Remote control sensor ...

Page 9: ...TV INPUT RGB PC INPUT R AUDIO INPUT EXTERNAL SPEAKER 8Ω R L AC INPUT L AUDIO VGA SVGA XGA SXGA RGB DTV INPUT 480p 720p 1080i VIDEO Y PB PR DVD DTV INPUT 480i 480p 720p 1080i RS 232C Back Panel A V INPUT S VIDEO COMPONENT 480i 480p 720p 1080i DVD DTV INPUT jacks EXTERNAL SPEAKER 8 ohm output RGB PC INPUT VGA SVGA XGA SXGA RGB DTV INPUT 480p 720p 1080i AUDIO INPUT RS 232C jacks Connection Panel Over...

Page 10: ...Monitor POWER SLEEP INPUT SELECT APC DASP ARC STILL PIP PIP INPUT MENU MUTE OK VOL POWER STOP PLAY FF REC REW P STILL VOL POSITION TWIN PICTURE POWER SLEEP Refer to p 35 APC Refer to p 36 ARC Refer to p 45 PIP Refer to p 26 PIP INPUT Refer to p 27 30 MENU OK VCR BUTTONS controls a LG video cassette recorder VOLUME F G ...

Page 11: ... PIP PIP INPUT MENU MUTE OK VOL POWER STOP PLAY FF REC REW P STILL VOL POSITION TWIN PICTURE Remote control Owner s Manual Alkaline batteries INPUT SELECT button on the remote control Each press of this button changes the mode as shown below S VIDEO COMPONENT VIDEO RGB INPUT SELECT DASP Refer to p 40 STILL Refer to p 42 POSITION Refer to p 27 D E selects a menu item MUTE switches the sound on or o...

Page 12: ...pedestal as shown on the next page Wall mount and stands are optional and are not supplied with the monitor Wall Mount Installation The monitor can be installed on the wall as shown above For further information refer to the optional Tilt wall mounting bracket Installation and Setup Guide Speakers are optional and shown for illustration only Tips Install this monitor only in a location where adequ...

Page 13: ...lation ON OFF INPUT SELECT VOLUME The Monitor can be installed on a desk as shown above For further information refer to the optional Desktop Stand Installation and Setup Guide Speakers shown are optional and shown for illustration only 4inch 4inch 2 36inch 4inch 1 18inch b Pedestal mount minimum allowable clearances for adequate ventilation ...

Page 14: ...ght red If you have a mono VCR connect the audio cable from the VCR to the AUDIO L MONO input of the Plasma Monitor If you connect an S VIDEO VCR to the S VIDEO input the picture quality is improved compared to connecting a regular VCR to the Video input Avoid having a fixed image remain on the screen for a long period of time A frozen still picture from a VCR or if a CH label is displayed display...

Page 15: ...480p 720p 1080i DVD DTV INPUT AUDIO MONO R L AV INPUT S VIDEO COMPONENT 480i 480p 720p 1080i DVD DTV INPUT RGB PC INPUT R AUDIO INPUT EXTERNAL SPEAKER 8Ω R L AC INPUT L AUDIO VGA SVGA XGA SXGA RGB DTV INPUT 480p 720p 1080i VIDEO Y PB PR RS 232C Back panel of the Monitor To watch VCR Press INPUT SELECT button on the remote control and select VIDEO When connecting with S Video select the S VIDEO 1 I...

Page 16: ...VGA XGA SXGA RGB DTV INPUT 480p 720p 1080i DVD DTV INPUT AUDIO MONO R L AV INPUT S VIDEO COMPONENT 480i 480p 720p 1080i DVD DTV INPUT RGB PC INPUT R AUDIO INPUT EXTERNAL SPEAKER 8Ω R L AC INPUT L AUDIO VGA SVGA XGA SXGA RGB DTV INPUT 480p 720p 1080i VIDEO Y PB PR RS 232C RS 232C To watch cable TV Press INPUT SELECT button on the remote control and select VIDEO source 1 Tune to cable service provid...

Page 17: ...R AUDIO INPUT EXTERNAL SPEAKER 8Ω R L AC INPUT L AUDIO VGA SVGA XGA SXGA RGB DTV INPUT 480p 720p 1080i VIDEO Y PB PR Camcorder Video game set DDR RS 232C RS 232C To watch external AV source Press INPUT SELECT button on the remote control of the monitor to select VIDEO 1 Operate the corresponding external equip ment See external equipment operating guide 2 External AV Source Setup As shown below wh...

Page 18: ... input jacks as indicated below AUDIO MONO R L VIDEO Y PB R P AV INPUT AUDIO R L R L EXTERNAL SPEAKER 8Ω AC INPUT AUDIO INPUT S VIDEO COMPONENT 480i 480p 720p 1080i RGB PC INPUT VGA SVGA XGA SXGA RGB DTV INPUT 480p 720p 1080i DVD DTV INPUT AUDIO MONO R L AV INPUT S VIDEO COMPONENT 480i 480p 720p 1080i DVD DTV INPUT RGB PC INPUT R AUDIO INPUT EXTERNAL SPEAKER 8Ω R L AC INPUT L AUDIO VGA SVGA XGA SX...

Page 19: ...SXGA RGB DTV INPUT 480p 720p 1080i DVD DTV INPUT AUDIO MONO R L AV INPUT S VIDEO COMPONENT 480i 480p 720p 1080i DVD DTV INPUT RGB PC INPUT R AUDIO INPUT EXTERNAL SPEAKER 8Ω R L AC INPUT L AUDIO VGA SVGA XGA SXGA RGB DTV INPUT 480p 720p 1080i VIDEO Y PB PR RS 232C RS 232C Turn on the digital SET TOP BOX Refer to the owner s manual for the digital SET TOP BOX Press INPUT SELECT button on the remote ...

Page 20: ...keeping a fixed image on the Monitor s screen for a long period of time The fixed image may become permanently imprinted on the screen use a screen saver when possible If the resolution output of the PC computer is over SVGA connect the PC to the RGB PC VGA SVGA XGA SXGA input port on the Monitor Change the PC computer resolution output accordingly Back panel of the Monitor INPUT SELECT Setup Inst...

Page 21: ...0 03 53 011 100 04 64 062 120 00 35 156 56 25 37 879 60 31 48 077 72 18 46 875 832x624 1024x768 1280x720 1152x864 1152x870 1280x960 1280x1024 75 00 53 674 85 06 56 000 90 00 64 016 100 00 49 725 74 55 48 363 60 00 56 476 70 06 60 023 75 02 68 677 84 99 54 348 60 05 52 400 69 98 63 995 70 01 67 500 75 00 77 487 85 05 68 681 75 06 60 000 60 00 75 000 75 00 63 981 60 02 79 976 75 02 Resolution Horizo...

Page 22: ...ct a feature you want to use Press the OK button to exit menus Press the D E button to select a menu Each press will cycle through the different menus as shown below APC G DRP G CONTRAST 85 G BRIGHTNESS 50 G COLOR 50 G TINT 0 G SHARPNESS 50 G MOVE GNEXT AEXIT PICTURE D E DASP G AVL G TREBLE 50 G BASS 50 G BALANCE 0 G MOVE GNEXT AEXIT SOUND D E LANGUAGE G ARC G SCREEN G TRANSPARENCY G PIP DW G SET ...

Page 23: ...s the D E button to select AUTO CONFIG and then press the G button When AUTO CONFIG has finished OK will be shown on screen If the position of the image is incorrect try Auto adjustment again LANGUAGE G CAPTION G AUTO OFF G SCREEN G RGB OUTPUT G AUTO CONFIG G V POSITION G H POSITION G PHASE G RESET G G TO SET AUTO CONFIG LANGUAGE G ARC G SCREEN G TRANSPARENCY G PIP DW G SET ID G G TO SET SPECIAL S...

Page 24: ...t change even though you have adjusted the horizontal or vertical position with this function Press the F G buttons to adjust until you get desired horizontal or vertical position and then press the OK button to remove menus Press the MENU button and then press the D E button to select SPECIAL menu Press the G button LANGUAGE G CAPTION G AUTO OFF G SCREEN G RGB OUTPUT G AUTO CONFIG G V POSITION G ...

Page 25: ...ilable Initializing Reset to factory value To initialize the adjusted value select RESET with the D E button and then press the G button Press the D E button to select PHASE and then press the G button The adjustment range of PHASE is 0 63 Press the F G button to adjust phase and then press the OK button LANGUAGE G CAPTION G AUTO OFF G SCREEN G RGB OUTPUT G AUTO CONFIG G V POSITION G H POSITION G ...

Page 26: ...n picture you can watch video cable TV or DVD for sub picture Color of main picture may be different from PIP s in PIP Twin picture mode If input source for main picture is changed while in PIP Twin picture mode sub picture will disappear When watching PIP Twin picture SCREEN option is not available in Special menu With PIP active not all picture formats can be used for the main sub picture Watchi...

Page 27: ... button in PIP mode Each time you press PIP INPUT button you toggle VIDEO S VIDEO and COMPONENT COMPONENT source only works in 480i mode VIDEO S VIDEO COMPONENT PIP INPUT F VIDEO G Moving the Sub inset picture Press the POSITION button in PIP mode Each press of the POSITION button will change the position of the sub picture on the screen as shown below PIP INPUT POSITION ...

Page 28: ...on to select SPECIAL menu Press the G button SOUND SELECT LANGUAGE G CAPTION G AUTO OFF G SCREEN G RGB OUTPUT G DW G PIP G INPUT G SOUND SELECT G POSITION G SOUND M SOUND S LANGUAGE G ARC G SCREEN G TRANSPARENCY G PIP DW G SET ID G G TO SET SPECIAL PIP DW To select main or sub inset sound This function only works with the following resolutions 640x480 800x600 1024x768 only in Vertical frequency 60...

Page 29: ...640x480 only in Vertical frequency 60 Hz With TWIN PICTURE active not all picture formats can be used for the main sub picture Press the TWIN PICTURE button Each time you press TWIN PICTURE or F G buttons you can select ON or OFF ON OFF DW F OFF G DW F ON G Sub picture Main picture To avoid a permanent image being burned into the screen the sub picture will move every 2 hours Center Upside Downsid...

Page 30: ... the Twin picture Press the PIP INPUT button in TWIN PICTURE mode Each time you press PIP INPUT button you toggle VIDEO S VIDEO and COMPONENT COMPONENT source only works in 480i input signal PIP INPUT F VIDEO G VIDEO S VIDEO COMPONENT PIP INPUT ...

Page 31: ...arity match with and match with Install two 1 5V AAA alkaline batteries Don t mix used batteries with new batteries Notes for using the remote control Make sure these are no objects between the remote control and its sensor Don t place the remote control near a heater or damp place Strong impact on the remote con trol may cause operation failure Signal from the remote control may be disturbed by s...

Page 32: ...nitor or press the POWER or INPUT SELECT button on the remote control and then the Monitor will be turned on If the Monitor is turned off with the button on the Monitor Press the main ON OFF button on the Monitor to turn on the Monitor If the Monitor is turned off with the ON OFF button on the Monitor Press the main ON OFF button on the Monitor and then press the or INPUT SELECT button on the Moni...

Page 33: ... button Press the D E button to select the desired language Press the OK button to exit Press the MENU button and then press the D E button to select SPECIAL menu Press the G button LANGUAGE G ARC G SCREEN G TRANSPARENCY G PIP DW G SET ID G ENGLISH ESPAÑOL PORTUGUÊS FRANÇAIS SPECIAL LANGUAGE 한국어 LANGUAGE G ARC G SCREEN G TRANSPARENCY G PIP DW G SET ID G ENGLISH ESPAÑOL PORTUGUÊS FRANÇAIS SPECIAL 한...

Page 34: ...lected item Press the OK button to exit APC G DRP G CONTRAST 100 G BRIGHTNESS 50 G COLOR 50 G TINT 0 G SHARPNESS 50 G MOVE GNEXT AEXIT PICTURE D E DASP G AVL G TREBLE 50 G BASS 50 G BALANCE 0 G MOVE GNEXT AEXIT SOUND D E LANGUAGE G ARC G SCREEN G TRANSPARENCY G PIP DW G SET ID G MOVE GNEXT AEXIT SPECIAL D E Picture menu Sound menu Special menu Use the remote control to make adjustments Select VIDE...

Page 35: ...or F G button repeatedly to select F G SLEEP 1 will be displayed one minute before the Monitor is due to switch off F G F 10 G F 20 G F 30 G F 120 G F 180 G F 240 G F 90 G F 60 G Tips When the sleep time you want is displayed on the screen don t press the SLEEP button After 20 seconds the screen display disappears and sleep time is set To check remaining sleep time after setting press the SLEEP or...

Page 36: ...ns changes the screen display as shown below You can also select CLEAR SOFT or USER in the PIC TURE menu User refers to adjustments you made to the picture menu items See next page CLEAR SOFT USER F CLEAR G APC Auto picture control Use APC to set the Monitor for the best picture appearance APC is not available in RGB or PIP TWIN PICTURE modes APC ...

Page 37: ... buttons to make appro priate adjustments and then press the OK button Press the D E buttons to select other items Press the MENU button and then press the D E button to select PICTURE menu Press the G button Adjusting picture appearance APC G DRP G CONTRAST 100 G BRIGHTNESS 50 G COLOR 50 G TINT 0 G SHARPNESS 50 G PICTURE CONTRAST 100 APC G DRP G CONTRAST 70 G BRIGHTNESS 50 G COLOR 0 G TINT 0 G SH...

Page 38: ...RAST 100 G BRIGHTNESS 50 G COLOR 50 G TINT 0 G SHARPNESS 50 G CLEAR SOFT PICTURE DRP 2 Press the D E button to select CLEAR or SOFT APC G DRP G CONTRAST 100 G BRIGHTNESS 50 G COLOR 50 G TINT 0 G SHARPNESS 50 G CLEAR SOFT PICTURE CLEAR This function works in video component 480i mode Press the MENU button and then press the D E button to select PICTURE menu Press the G button MENU VOL OK VOL ...

Page 39: ...hen press the G button Adjust BASS and BALANCE in the same way Use the F G buttons to make appropri ate adjustment and then press the OK button to exit Press the D E buttons to select other options Press the MENU button and then press the D E button to select SOUND menu Press the G button DASP G AVL G TREBLE 50 G BASS 50 G BALANCE 0 G SOUND TREBLE 50 DASP G AVL G TREBLE 70 G BASS 50 G BALANCE 0 G ...

Page 40: ...matically selects the appropriate audio tone levels based on the program content 1 Press the DASP button 2 Press the DASP or F G buttons to select a sound setup Each press of DASP or F G buttons changes the screen display as shown below You can also select FLAT SPORTS CINEMA MUSIC or USER in the SOUND menu FLAT SPORTS USER CINEMA MUSIC F USER G DASP DASP ...

Page 41: ...ou change channels 3 1 READY Press the D E button to select AVL and then press the G button Press the OK button to exit Press the MENU button and then press the D E button to select SOUND menu Press the G button DASP G AVL G TREBLE 50 G BASS 50 G BALANCE 0 G ON OFF SOUND AVL 2 Press the D E button to select ON or OFF ON OFF SOUND ON DASP G AVL G TREBLE 50 G BASS 50 G BALANCE 0 G OK MENU VOL VOL ...

Page 42: ...rn to normal viewing press the STILL button again Tips If still picture is on the screen for more than 5 minutes the image becomes dark If another function is activated normal brightness of the screen is restored This is a protective feature designed to reduce a ghost image burning into the monitor This feature does not work with RGB source This feature isn t available for RGB input source Use wit...

Page 43: ...ime you press the D E button you toggle between TV and VCR Press the OK button to exit Press the MENU button and then press the D E button to select SPECIAL menu Press the G button LANGUAGE G ARC G SCREEN G TRANSPARENCY G PIP DW G SET ID G TV VCR SPECIAL SCREEN LANGUAGE G ARC G SCREEN G TRANSPARENCY G PIP DW G SET ID G TV VCR SPECIAL VCR Using the screen options This function works only in the vid...

Page 44: ...s to adjust OSD transparency The adjustment range of TRANSPARENCY is 0 5 Press the OK button to exit Press the MENU button and then press the D E button to select SPECIAL menu Press the G button LANGUAGE G ARC G SCREEN G TRANSPARENCY G PIP DW G SET ID G 5 SPECIAL TRANSPARENCY LANGUAGE G ARC G SCREEN G TRANSPARENCY G PIP DW G SET ID G SPECIAL 3 OK MENU VOL VOL VOL VOL ...

Page 45: ... SPECIAL menu Each time you press ARC or F G buttons you can select 16 9 4 3 or ZOOM alternatively ARC F 16 9 G 16 9 4 3 Zoom ARC F 4 3 G ARC F ZOOM G With the RGB PC DTV input you can select either 16 9 or 4 3 screen aspect ratios If 4 3 mode is used for a long time the outline of the image may remain on the screen after you change to the 16 9 screen Don t display 4 3 picture format or TWIN PICTU...

Page 46: ...NT 480i 480p 720p 1080i DVD DTV INPUT RGB PC INPUT AUDIO INPUT EXTERNAL SPEAKER 8Ω R L AC INPUT VGA SVGA XGA SXGA RGB DTV INPUT 480p 720p 1080i VIDEO Y PB PR RS 232C RS 232C R L AUDIO Monitor Rear Connections Panel Connect the serial port of the control device to the RS 232C jack on the Monitor back panel RS 232C connection cables are not supplied with the Monitor The Monitor remote control and fr...

Page 47: ...D and GND Pin No 4 DTR and Pin No 6 DSR must be connected to the monitor The cable must be disconnected from the Monitor to be able to use the remote control and Monitor front panel controls With the RS 232 input connected the Monitor cannot be controlled by both an external control device and the remote control at the same time The Monitor can only be controlled by either the remote control or th...

Page 48: ...nd remote control adjustment using a control line Note If the control line is high the monitor is con trolled by the external control device If the control line is low the Monitor is controlled by the Monitor s remote control 3 Wire Cable Configuration When using a 3 Wire cable configuration there is no control line The external control device must put the Monitor into the change into remote contr...

Page 49: ... monitor ID number SET ID READY Press the MENU button and then press the D E button to select the SPECIAL menu Press the G button 2 Use the F G button to adjust SET ID to choose the desired monitor ID number The adjustment range of SET ID is 1 99 LANGUAGE G ARC G SCREEN G TRANSPARENCY G PIP DW G SET ID G 1 SPECIAL SET ID LANGUAGE G ARC G SCREEN G TRANSPARENCY G PIP DW G SET ID G 1 SPECIAL 1 MENU V...

Page 50: ...de 0x0D ASCII code space 0x20 Command Set ID Data Cr OK Acknowledgement The Monitor transmits ACK acknowledgement based on this format when receiving normal data At this time if the data is data read mode it indicates present status data If the data is data write mode it returns the data of the PC computer Set ID OK x Data x Error Acknowledgement The Monitor transmits ACK acknowledgement based on ...

Page 51: ...mat Acknowledgement data feed back presents status about each function Set ID OK x Data x 03 Aspect Ratio Command r G To adjust the screen format You can also adjust the screen format using the ARC Aspect Ratio Control button on remote control or in the Special menu Transmission Data 0 Wide screen 16 9 1 Normal screen 4 3 2 Full screen Zoom r Set ID Data Cr Acknowledgement Data 0 Wide screen 16 9 ...

Page 52: ...ness in the Picture menu Transmission Data Min 0 Max 64 Refer to Real data mapping as shown below b Set ID Data Cr Acknowledgement Data Min 0 Max 64 Set ID OK x Data x 09 Color Command c G To adjust the screen color You can also adjust color in the Picture menu Transmission Data Min 0 Max 64 Refer to Real data mapping as shown below c Set ID Data Cr Acknowledgement Data Min 0 Max 64 Set ID OK x Da...

Page 53: ...ol PIP DW using the pip twin picture button on remote control or in the Special menu Transmission Data 0 PIP DW off 1 PIP small 2 PIP large 3 Twin picture DW z Set ID Data Cr Acknowledgement Data 0 PIP DW off 1 PIP small 2 PIP large 3 Twin picture DW PIP only works in the following resolutions RGB PC 640x480 VGA 800x600 SVGA 1024x768 XGA only in vertical frequency 60Hz Component 480p 720p 1080i Tw...

Page 54: ...ce adjustment turn the Monitor off and then on again 18 Change into Remote control adjustment mode Command j G To control the Monitor with the remote control while the cable is still connected Transmission j Set ID Data Cr Acknowledgement Data 0 PC adjustment mode 1 Remote control adjustment mode Data 1 Remote control adjustment mode Set ID OK x Data x 17 PIP position Command x G To select sub pic...

Page 55: ... is off the screen and then let it air dry before you turn on your Monitor Cleaning the cabinet To remove dirt or dust wipe the cabinet with a soft dry lint free cloth Please be sure not to use a wet cloth Extended absence If you leave your Monitor dormant for a long time such as a vacation it s a good idea to unplug the power cord to protect against possible damage from lightning or power surges ...

Page 56: ...and press the VOL UME G button Refer to p 37 Increase the distance between the Monitor and the VCR Activate any function to restore the brightness of the picture If still picture is on the screen for more than 5 minutes the screen gets dark The remote control doesn t work Check to see if there is any object between the Plasma Display and the remote control causing obstruction Check to see if the b...

Page 57: ...57 Safety instructions Monitor Overview Connections Basic operation Sleep timer Picture Sound Special features Others Note ...

Page 58: ...58 Note ...

Page 59: ...s mm Height inches mm Depth inches mm Weight pounds kg Power requirement Resolution Color Temperature In operation Humidity In operation MU 60PZ11 A B K S 57 3 1455 34 8 883 3 9 99 154 3 70 120V 60Hz 1280 x 720 Dot 16 770 000 256 steps of each R G and B 0 40 C under 80 The specifications shown above may be changed without prior notice for quality improvement ...

Reviews: