background image

22

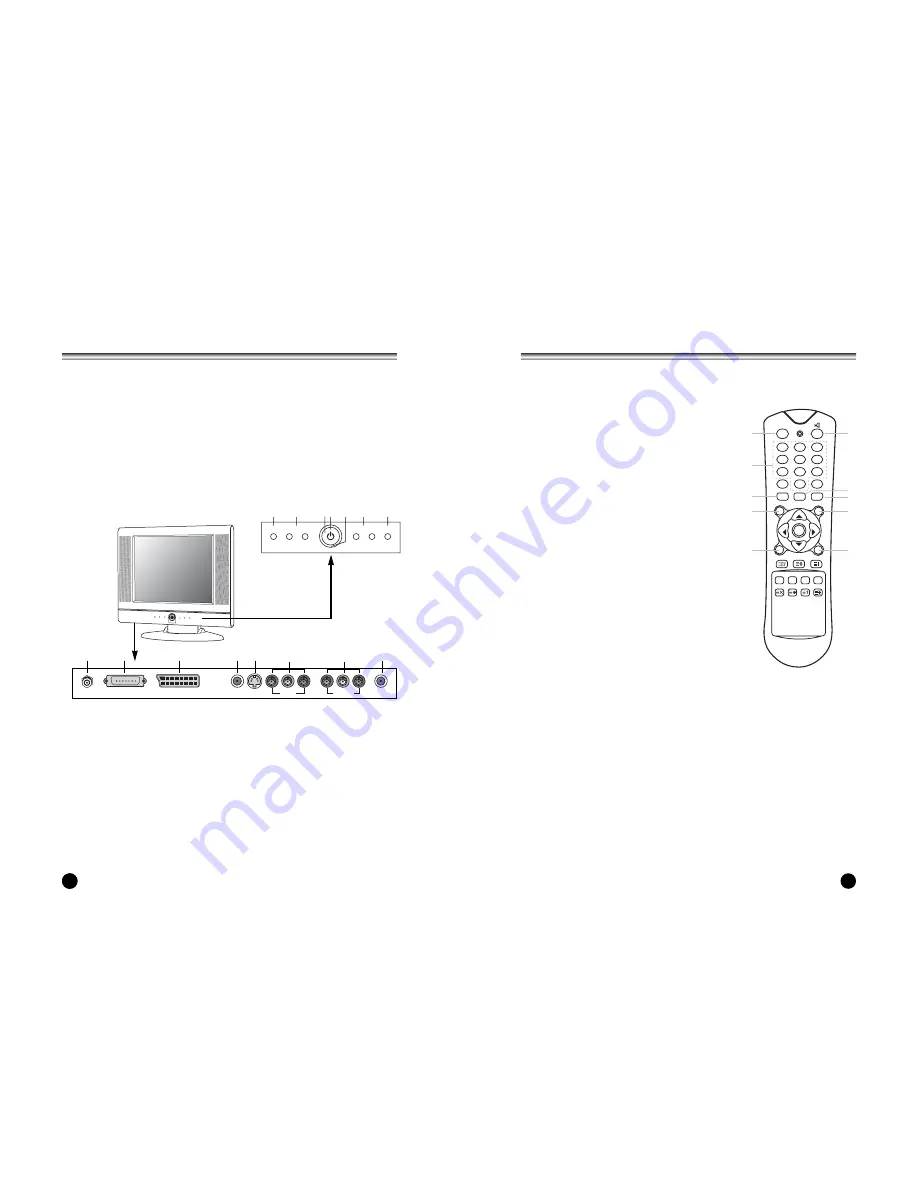
Controls

9

8

Controls

All the functions can be controlled with the remote controller. Some functions can
also be adjusted with the buttons on the front panel of the set.  

Remote controller

Before you use the remote controller, please install the
batteries.  

1. POWER

Turns the TV on from standby or off to standby mode.

2. MUTE

Turns the sound on and off.

3. NUMBER buttons

Select programme numbers.

4. PSM (Picture Status Memory)

Recalls your preferred picture setting

5. SSM (Sound Status Memory)

Recalls your preferred sound setting

6. I/II

Selects the language during dual language broadcast.
Selects the sound output.

7. MENU

Displays a main menu.

8. TV/AV

Selects TV, SCART, VIDEO,  S-VIDEO or PC mode.
Clears the menu from the screen.

9. SLEEP

Sets the sleep timer.

10. TV/PC

Selects TV or PC mode.

<<CONTROLLER OF PANEL>>

1. MENU

Displays a menu.

2.

 PR + 

(Programme Up/Down)

Selects a programme or a menu item.

3. POWER STANDBY INDICATOR

Illuminates brightly when the TV is in standby mode. / Dims when the TV is switched on.

4. POWER

Switches TV set on or off.

5. Remote control sensor

Accepts the IR signal of remote controller.

6. –VOL+

(Volume Up/Down)

Adjusts the volume./ Adjusts menu settings.

7. TV/AV

Selects TV, SCART, VIDEO, S-VIDEO or PC mode / Clears the menu from the screen.

1. Ant. (Antenna input)
2. PC/DTV INPUT
3. SCART
4. HEADPHONE out

Connect a headphone to this socket.

5. S-VIDEO input

Connect the output of an S-VIDEO VCR to the S-VIDEO input.
Connect the audio outputs of an S-VIDEO VCR to the AV-IN audio inputs.

6. A/V-IN inputs

Connect the Audio/Video outputs of external equipment to these inputs.

7. A/V-IN Outputs 

Connect the Audio outputs(L, R) of the set to Audio-IN(L, R) of another displayer or
the amplifier and the Video output of the set to Video IN of another displayer.

8. DC 15V adaptor input

POWER

MENU

TV/AV

PR

OK

PR

VOL

VOL

TV/PC

SLEEP

TEXT/MIX

UPDATE TIME REVEAL HOLD

Q.VIEW

LIST

PSM

SSM

I/II

1

2

3

4

5

6

7

8

9

*

*

0

1

2

5
6

8

10

MENU

1

2

3 4

5

6

7

- PR +


 - VOL +

TV/AV

1

2

3

4

5

6

8

7

ANT.

PC/DTV INPUT

SCART

H/P S-VIDEO

A/V-IN

A/V-OUT

DC 15V

Summary of Contents for LT-20AEP

Page 1: ...500 008C Owner s Manual Model LT 20AEP 20 1 LCD Color TV Monitor ...

Page 2: ...operates on an AC mains supply the voltage is as indicated on the label of the AC DC adaptor a Connect the DC plug of the AC DC adaptor to the 12V socket of the set b Connect the AC DC adaptor and its power cord c Connect the power cord to an AC mains In the event of thunderstorms or power cuts please pull out the mains plug of the AC DC adaptor and the aerial plug Do not allow anything to rest up...

Page 3: ...e edit 15 Picture Control 16 Manual picture control 16 Auto picture control 16 Sound Control 17 Other functions 18 19 TV SCART VIDEO and S VIDEO modes 18 Auto sleep 18 Blue back 18 Sleep timer 19 Sound output selection 19 Teletext 20 21 Text On Off 20 TOP text 20 FLOF text 20 Special Teletext function 21 External Equipment Connection 22 23 Antenna connection 22 SCART jack 22 A V Inputs 22 A V Outp...

Page 4: ...n Options You can install the TV on a wall or place it on a table like surface To eliminate any risk of injury from the TV falling it should be mounted securely 1 Wall Installation Caution Do not install the TV on a weak wall surface like plaster etc It is not needed any bracket or installation accessory with the exception of 2 nails or screws Distance of holes of back panel is 380mm a Drive 2 nai...

Page 5: ...OR Illuminates brightly when the TV is in standby mode Dims when the TV is switched on 4 POWER Switches TV set on or off 5 Remote control sensor Accepts the IR signal of remote controller 6 VOL Volume Up Down Adjusts the volume Adjusts menu settings 7 TV AV Selects TV SCART VIDEO S VIDEO or PC mode Clears the menu from the screen 1 Ant Antenna input 2 PC DTV INPUT 3 SCART 4 HEADPHONE out Connect a...

Page 6: ...ation MENU TV AV Language English Deutsch Français Italiano Español POWER MENU TV AV PR OK PR VOL VOL TV PC SLEEP TEXT MIX UPDATE TIME REVEAL HOLD Q VIEW LIST PSM SSM I II 1 2 3 4 5 6 7 8 9 0 O O Battery installation uInserting batteries 1 Remove the battery cover by pulling it upward in the direction shown by the arrow 2 Insert the batteries with correct polarity to and to 3 Replace the battery c...

Page 7: ...me number with the PRx xy y button or NUMBER buttons 8 Press the VOLÏq button to start Auto programme 9 Press the MENU button to finish Auto programme 10 Press the TV AV button to return to normal TV viewing POWER MENU TV AV PR OK PR VOL VOL TV PC SLEEP TEXT MIX UPDATE TIME REVEAL HOLD Q VIEW LIST PSM SSM I II 1 2 3 4 5 6 7 8 9 0 POWER MENU TV AV PR OK PR VOL VOL TV PC SLEEP TEXT MIX UPDATE TIME R...

Page 8: ...n select Programme edit 4 Select the programme name to edit with the PRx xy y and VOLÏ Ïq q button Deleting a programme 1 Select a programme to be deleted with the PRx xy y or VOLÏ Ïq q button 2 Press the RED button twice The selected programme is deleted all the following programmes are shifted up one position Copying a programme 1 Select a programme to be copied with the PRx xy y or VOLÏ Ïq q bu...

Page 9: ...options Dynamic Standard Mild Game and User are programmed for optimum reproduction at the factory and cannot be changed PSM Picture Status Memory 1 Press the PSM button 2 Press the PSM button repeatedly to select PSM Each press of the button changes the screen display as below Dynamic Standard Mild Game User Dynamic Vivid Picture Appearance Standard Standard Picture Appearance Mile Softer Picture...

Page 10: ...lue programmes They have been set up to be skipped by auto programming or in the programme edit mode b Some programmes with the channel number shown in the programme list indicate there is no station name assigned Selecting a programme in the programme list Select a progranne with the PRx xy y or VOLÏ Ïq q button Then press the OK button The set switches to the chosen programme number Paging throu...

Page 11: ...The VOLÏ Ïq q button can be used to select the preceding or following page Special Teletext functions Changes Teletext mode Only Teletext mode text mode superimposed on the TV picture TV mode Selects double height text Press this button to enlarge the top half of the page Press this button again to enlarge the bottom half of the page Press this button again to return to the normal display Stops th...

Page 12: ...d clock phase manually Reset This function allows you to return to the good picture reproduction programmed at the factory and cannot be changed 5 Press the TV AV button to store the adjustment VGA DTV INPUT 1 Connect the VGA IN cable D sub jack from the monitor output socket of the PC to the PC DTV input socket of the set 2 Connect the Audio cable from the PC to the A V IN L MONO R of the set 3 P...

Page 13: ...cellular phones may also cause interference Use the unit as far apart as possible from devices that may cause possible interference Make sure BRIGHTNESS setting is not set too low Check to see if BRIGHTNESS setting Lamp may have malfunction Change the batteries Make sure the infrared transmitter window is not receiving strong light such as light from fluorescent lamps Make sure AV INPUT is not set...

Page 14: ...28 Limited Warranty ...

Reviews: