3-2
COMPONENT ACCESS
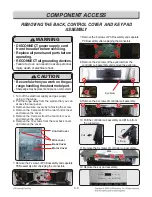
1. Turn off the electrical supply and gas supply
going to the range.
2. Pull the range away from the wall so that you can
access the rear panel.
3. Remove two wire covers by removing the screw.
4. Remove the 3 screws from the rear control cover
and remove the cover.
5. Remove the 3 screws from the fan motor cover
and remove the cover.
6. Remove the 10 screws from the rear back cover
and remove the cover.
7. Remove the 6 screws of PCB assembly and separate
PCB assembly after unpluging the connectors.
8. Remove the 2 screws of the eyebrow from the
controller sub assembly and remove the eyebrow.
9. Remove the 4 screws of controller sub assembly.
10. Pull the controller sub assembly and lift it up from
the supporters.
11. Remove the 3 screws of controller sub assembly.
12. Replace the key pad assembly.
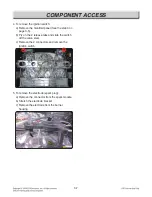
7. Remove the 2 screws of PCB assembly and separate
PCB assembly after unpluging the connectors.
REMOVING THE BACK, CONTROL COVER AND KEY PAD
ASSEMBLY
WARNING
• DISCONNECT power supply cord
from the outlet before servicing.
• Replace all panels and parts before
operating.
• RECONNECT all grounding devices.
- Failure to do so can result in severe personal
injury, death or electrical shock.
CAUTION
• Be careful when you work on the gas
range handling the sheet metal part.
- Sharp edge may be present and you can cut yourself.
Eyebrow
Pull
Lift up
Control Cover
Wire cover
Back Cover
Motor Cover

