background image

27

Menu Operation

Motion Detection setting

The motion detection detects the moving objects in the 

scene by monitoring changes in brightness level. You can 

select the level of sensitivity for motion detection to 4 zone.


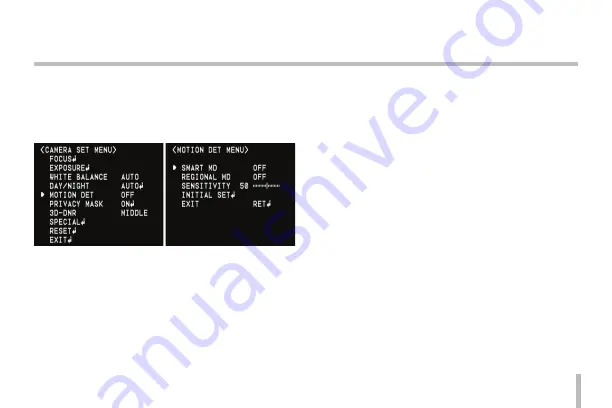
1.  Select [MOTION DET] option on the [CAMERA SET] 

menu.

2. Use 

[N]

 or 

[F]

 button to select a [ON] and press 

[M]

. The 

MOTION DETECTION menu appears.

• 

SMART MD : You can detect the movement of objects 

easily by displaying motion mask.

• 

REGIONAL MD : Use 

[N]

 or 

[F]

 button to select [ON] 

then press 

[M]

.

 -

Use 

[N]

 or 

[F]

 button to select a zone number on 

the [ZONE NUMBER].

 -

Use 

[N]

 or 

[F]

 button to set up the ON or OFF on 

the ZONE STATE.

 -

Use 

[T]

 or 

[W]

 to select an option then use 

[N]

 or 

[F]

 button to adjust the option.


>

HEIGHT: Enlarge or decrease the vertical size 

of the mask.


>

WIDTH: Enlarge or decrease the horizontal 

size of the mask.


>

MOVE Y: Moves vertical position of the mask.


>

MOVE X: Moves horizontal position of the 

mask. 


>

MOTION ZOOM: Select the motion zoom. 

3.  Use [SENSITIVITY] option to obtain the optimum 

detection level.

4.  Select the motion zoom level. If you set the motion 

zoom, the camera is activated according to the selected 

motion zoom level and after some time passes, it 

returns to the previous zoom level when the motion is 

detected.

Summary of Contents for LCZ3750 Series

Page 1: ...OWNER S MANUAL Color Video Camera Please read this manual carefully before operating your set and retain it for future reference MODEL LCZ3750 DN LCZ3750 DP LCZ3750 series ...

Page 2: ... interference unless the modifications are expressly approved in the instruction manual The user could lose the authority to operate this equipment if an unauthorized change or modification is made REGULATORY INFORMATION FCC Part 15 This equipment has been tested and found to comply with the limits for a Class A digital device pursuant to Part 15 of the FCC Rules These limits are designed to provi...

Page 3: ...all be in accordance with the National Electric Code ANSI NFPA 70 This is a class A product In a domestic environment this product may cause radio interference in which case the user may be required to take adequate measures To reduce a risk of fire or electric shock do not expose this product to rain or moisture Caution This installation should be made by a qualified service person and should con...

Page 4: ...s 3 The correct disposal of your old appliance will help prevent potential negative consequences for the environment and human health 4 For more detailed information about disposal of your old appliance please contact your city office waste disposal service or the shop where you purchased the product LG Electronics hereby declares that this these product s is are in compliance with the essential r...

Page 5: ...ctrician for replacement of the obsolete outlet 10 Protect the power cord from being walked on or pinched particularly at plugs convenience receptacles and the point where they exit from the apparatus 11 Only use attachments accessories specified by the manufacturer 12 Use only with the cart stand tripod bracket or table specified by the manufacturer or sold with the apparatus When a cart is used ...

Page 6: ...ity of neutral detergent then wipe dry Avoid the use of volatile solvents such as thinners alcohol benzene and insecticides They may damage the surface finish and or impair the operation of the camera Operating and storage location Avoid viewing a very bright object such as light fittings during an extended period Avoid operating or storing the unit in the following locations Extremely hot or cold...

Page 7: ...D function settings 14 FOCUS and ZOOM Function Settings 15 Menu Operation 17 General Operation 19 Focus settings 20 Exposure Settings 22 White Balance setting 24 Day Night setting 26 Motion Detection setting 27 Privacy Mask setting 28 3D DNR setting 29 Special menu settings 30 Reset settings 32 Reference 33 On Screen Display 33 RS 485 Protocol Optional 36 Specifications 38 Contents ...

Page 8: ...se in monitoring system High resolution and high sensitivity with a 4 5 mm 1 4 Type Super HAD CCD II High magnitude of zoom lens with optical x37 Digital x12 Maximum x444 Auto Focus Auto White Balance Auto exposure with DC Iris control Day Night function ...

Page 9: ...b a Lens mount cap The cap is installed to protect the lens mount section Remove the lens mount cap before install the camera sold separately b Camera installation bracket The bracket can be fixed at the top or bottom of the camera ...

Page 10: ...t near M MENU button If you want to set up a diverse function you can push this button W WIDE button When push picture is wide angle F FAR button In a manual situation focus get far H HOT button When you set the DAY NIGHT mode to EXT you can change the Day Night mode using this button e Video output connector BNC type Connect this connector to a device such as a VCR or monitor with a VIDEO IN conn...

Page 11: ...e alarm input of an external device COM Common OSD D N OSD Connect the external controller to control the OSD function manually D N Connect the external controller to set the D N function manually If you use the external D N function you should set the DAY NIGHT option to EXT on the camera setup menu FOCUS ZOOM Connect the external controller to control the Focus and Zoom function manually Part Na...

Page 12: ...n on the power cable as illustrated 2 Attach the terminal tips 3 Connect to the 12V 1 UL Listed Class 2 Power Supply only on the camera 2mm 2mm Connecting Monitor The video signal connection between the camera and the monitor or DVR Connections ...

Page 13: ... a buzzer or lamp to the ALARM terminal When the camera detects motion the alarm output signal is supplied to the connected external device Contact Ratings Maximum load current is 130mA Do not connect any system or device that has over 40 Vp p DC 30 V bias voltage on the contact terminal Note Use a relay unit if the voltage or current of the connected device exceeds the ratings ...

Page 14: ... the D N mode is set to Night mode In case that current D N mode is set to Night mode When you input the 5V signal to the OSD D N terminal and the COM is connected to ground the D N mode is set to the Day mode OSD 5V 12V COMMON D N 5V 12V COMMON OSD function settings When you connect the 5V signal to the OSD D N terminal the menu is displayed or the sub menu is displayed or the selected menu optio...

Page 15: ...tings You can set the FOCUS and ZOOM function manually Using the external controller or receiver unit to control the FOCUS and ZOOM functions FOCUS function FOCUS Near Far COMMON COMMON ZOOM function FOCUS Near Far COMMON ZOOM Tele Wide COMMON ...

Page 16: ...the position of the camera mounting bracket you should always reuse the screws that have been removed Note If using a camera mounting bracket select a location that is strong enough to bear the full weight of the camera and the mounting bracket for long periods and install the camera and mounting bracket securely ...

Page 17: ... ZTRK MODE AUTO MANUAL AUTO ONLY INITIAL SET EXIT RET TOP END EXPOSURE IRIS AUTO MANUAL AGC 1 to 10 WDR BLC OFF WDR BLC HSBLC BRIGHTNESS 0 to 100 SHUTTER X512 x2 AUTO OFF A FLK 1 160 1 120 000 SENS UP OFF AUTO x2 to AUTO x128 INITIAL SET EXIT RET TOP END Main Menu Sub Menu Contents WHITE BALANCE AUTO ONE PUSH MANUAL COLOR TEMP INDOOR OUTDOOR RED 100 to 100 BLUE 100 to 100 INITIAL SET EXIT RET TOP ...

Page 18: ... to 7 MOVE Y 1 to 5 MOTION ZOOM OFF x1 x37 EXIT RET TOP END SENSITIVITY 0 to 100 INITIAL SET EXIT RET TOP END Main Menu Sub Menu Contents PRIVACY MASK OFF ON MASK NUMBER MASK1 to MASK8 MASK STATE OFF ON MASK COLOR RED GREEN BLUE 0 to 255 TRANSPARENCY 0 to 16 RET TOP END WIDTH 2 to 320 HEIGHT 2 to 240 MOVE X 1 to 319 MOVE Y 1 to 239 RESET MASK INITIAL SET EXIT RET TOP END ...

Page 19: ...T TOP END RESET FACTORY RESET S W VERSION REBOOT PROTOCOL LG PELCO D PELCO P EXIT RET TOP END EXIT General Operation 1 Press M button on the rear of the camera The setup menu screen appears on the monitor 2 Use T or W button to select an option then press M button on the rear of the camera Submenu appears on the monitor 3 Use T or W button to select a submenu option 4 Use N or F button to select a...

Page 20: ...e the value of the option M button Executes selections and displays a submenu for an item with the mark Focus settings The camera adjusts the focus automatically by sensing the center of the picture FOCUS MODE Setting Select FOCUS MODE option on the FOCUS menu then select the following mode ZOOM TRIG The focus is activated manually If you change the zoom the focus is activated Automatically and th...

Page 21: ...e zoom always will start at the selected zoom start position Select ZOOM START option on the FOCUS menu then set a zoom start position ZOOM END setting You can set the zoom end position of the camera If you set the zoom end position the zoom is operated up to the selected zoom end position Select ZOOM END option on the FOCUS menu then set the zoom end position ZOOM SPEED setting Selects a zoom spe...

Page 22: ...RE menu 2 Use N or F button to select a value WDR BLC setting Use WDR BLC option to set the options for BLC or WDR camera 1 Select WDR BLC option on the EXPOSURE menu 2 Use N or F button to select a mode then press M WDR WDR Wide dynamic range feature can be very helpful to cope with very challenging lighting conditions It is capable of capturing both of the dark part and bright part and combining...

Page 23: ...STATE Use N or F button to select ON or OFF If you set the MASK STATE to ON the mask function is activate only when the HSBLC is activated by auto mode OFF Not used BRIGHTNESS setting You can increase the brightness of the darkened video If you set the brightness to lower value the image is darkened If you set the brightness to higher value the image gets bright 1 Select BRIGHTNESS option on the E...

Page 24: ... menu the SENS UP setting is not available and mark is displayed White Balance setting Select the method by which the camera shifts its output colors to compensate for the color of a light source 1 Select WHITE BALANCE option on the CAMERA SET menu 2 Use N or F button to select a mode then press M AUTO In this mode the color temperature range for the proper white balance is approximately 2 700 K t...

Page 25: ...the proper white balance is approximately 3 200 K OUTDOOR The color temperature range for the proper white balance is approximately 5 100 K RED Set the desired red value BLUE Set the desired blue value ATW Auto Tracing White Balance In this mode the color temperature range for the proper white balance is approximately 1 800 K to 10 500 K Proper white balance may not be obtained under the following...

Page 26: ...he SHUTTER options except AUTO on the EXPOSURE menu the AUTO mode of the DAY NIGHT function is not available and mark is displayed D N LEVEL Use N or F button to select a level DWELL TIME Use N or F button to select a dwell time BURST MODE Select ON or OFF to set the color burst in Night status DAY Color mode enabled NIGHT Black and white mode enabled EXT Switches between color picture and black a...

Page 27: ...ton to select a zone number on the ZONE NUMBER Use N or F button to set up the ON or OFF on the ZONE STATE Use T or W to select an option then use N or F button to adjust the option HEIGHT Enlarge or decrease the vertical size of the mask WIDTH Enlarge or decrease the horizontal size of the mask MOVE Y Moves vertical position of the mask MOVE X Moves horizontal position of the mask MOTION ZOOM Sel...

Page 28: ...nd set to ON the mask zone box appears on the monitor 5 Select RESET MASK and press M If you register the mask zone for the first time the mask zone box appears on the center of the monitor If you already registered mask zone it will be returned to its initial state and appear on the center of the monitor 6 Use N or F button to select the color of the mask zone box on the MASK COLOR option 7 Use T...

Page 29: ...SK8 If you change the mask color the registered mask color will be changed automatically with the same color for each of group MASK1 to 4 MASK5 to 8 3D DNR setting 1 Select 3D DNR option If pictures are not clear due to brightness use for reduce the noise of picture 2 Use N or F button to select a option Notes If you set the AGC to 0 on the EXPOSURE menu the 3D DNR function is not available When y...

Page 30: ...e SPECIAL menu 2 Use N or F button to select a digital effect MIRROR Turn on the mirror effect V FLIP Flip the picture vertically ROTATE Rotate the picture 180 OFF Turn off the digital effect Color setting You can switch the displayed picture to grayscale or color 1 Select COLOR option on the SPECIAL menu 2 Use N or F button to change a color effect ON To display the picture with color Select ON a...

Page 31: ... set the STABILIZER to ON the Digital zoom is set to x1 1 automatically OSD setting You can set the Function On Screen Display options using the OSD menu The Function On Screen Display of this camera can be turned on or off 1 Select OSD option on the SPECIAL menu 2 Use N or F button to select a ON and press M The OSD menu appears 3 Use T or W to select an option then use N or F button to set the o...

Page 32: ...ight Language setting Select a language for setup menu and information display Reset settings 1 Select RESET option 2 Press M button and the RESET menu appears 3 Use T or W to select option FACTORY RESET Clear certain settings and information and return to factory default settings S W VERSION Displays the software version on the monitor REBOOT Reboot the camera system PROTOCOL Select the protocol ...

Page 33: ...rated a b cdefg h ijkl X20 35 TITLE 1 m m n Function OSD Format Description a Focus Mode None Display Zoom Trigger Mode X20 35 Auto Mode X20 35 Manual Mode X20 35 One Push Mode b Camera ID 0 to 255 Displays the camera ID c Manual Focus Action X20 35 TITLE 1 Focus Near X20 35 TITLE 1 Focus Far Reference ...

Page 34: ...ion Mode None Display Backlight Compensation is turned off X20 35 WDR On X20 35 TITLE 1 BLC On X20 35 TITLE 1 HSBLC On Function OSD Format Description g 3D DNR None Display 3D DNR is turned off 35 3D DNR is turned on h User Title Text A to Z 0 to 9 User Title i Day Night Mode None Display Day Mode X20 35 Night Mode j D Effect Status None Display D Effect Off X20 35 V Flip X20 35 Mirror X20 35 Rota...

Page 35: ...k Color On Off Status None Display Color On 35 Color Off l Freeze On Off Status None Display Freeze Off X20 35 Freeze On m Motion Detection Status 35 Displays when the motion is detected n Zoom Display X1 to X444 Optical Zoom 37X Digital Zoom 12X ...

Page 36: ...1 Bit Parity Bit None Baud rate 9 600 bps Format Byte 1 Byte 2 Byte 3 Byte 4 Byte 5 Byte 6 Byte 7 0xE5 0x87 Camera ID 0x60 Key In or Key Out Key Code C S C S Check Sum The data of total 7 bytes is transmitted from the external RS 485 device to the camera Byte 7 The value of Check Sum from Byte 1 to Byte 6 ...

Page 37: ...e Menu Down Key In E5 87 ID 60 00 04 CS 1 Menu Defined Speed Wide Key Action 2 When OSD is being displayed select lower menu item Key Out E5 87 ID 60 FF 04 CS Near Menu Right Key In E5 87 ID 60 00 02 CS 1 Menu Defined Speed Near Key Action 2 When OSD is being displayed select option item in the right side Key Out E5 87 ID 60 FF 02 CS Far Menu Left Key In E5 87 ID 60 00 01 CS 1 Menu Defined Speed F...

Page 38: ...fective Pixels Number 480 000 Pixels 570 000 Pixels Image Device 4 5 mm 1 4 Type Super HAD CCD II ISP XDI II Lens x37 Zoom F 1 5 Wide End F 4 1 Tele End f 3 5 mm to 129 5 mm Digital Zoom x 12 IRIS Control Auto Manual Sync System Internal Scanning Frequency H V 15 734 kHz 59 94 Hz 15 625 kHz 50 Hz Horizontal Resolution 600 TV Lines ...

Page 39: ...ens up ON Color 0 2 lx Sens up OFF 0 003 lx Sens up ON Video Output Signal 1 Vp p Composite 75 Ω Day Night AUTO DAY NIGHT EXT Backlight WDR BLC HSBLC OFF DNR 3D DNR Electronic Shutter Speed 1 60 to 1 120 000 1 50 to 1 120 000 White Balance AUTO ATW ONE PUSH MANUAL Control Method RS 485 Power Source DC 12 V Power Consumption 3 6 W ...

Page 40: ... LCZ3750 DN LCZ3750 DP Operation Temperature 10 ºC to 50 ºC Storage Temperature 20 ºC to 60 ºC Operation Humidity 0 RH to 80 RH Storage Humidity 0 RH to 90 RH Weight 520 g Dimension H x V x D 64 mm x 78 6 mm x 118 2 mm ...

Page 41: ......

Reviews: