background image

46

Multi F Ceiling Cassette Indoor Unit

Due to our policy of continuous product innovation, some specifications may change without notification.  

©LG Electronics U.S.A., Inc., Englewood Cliffs, NJ. All rights reserved. “LG” is a registered trademark of LG Corp.

MAX

MULTI 

F

MULTI 

F

ELECTRICAL WIRING

LG SIMS - Self Diagnosis Functions 

LG SIMs

WLAN Module

LG SIMs App

on Smart Phone

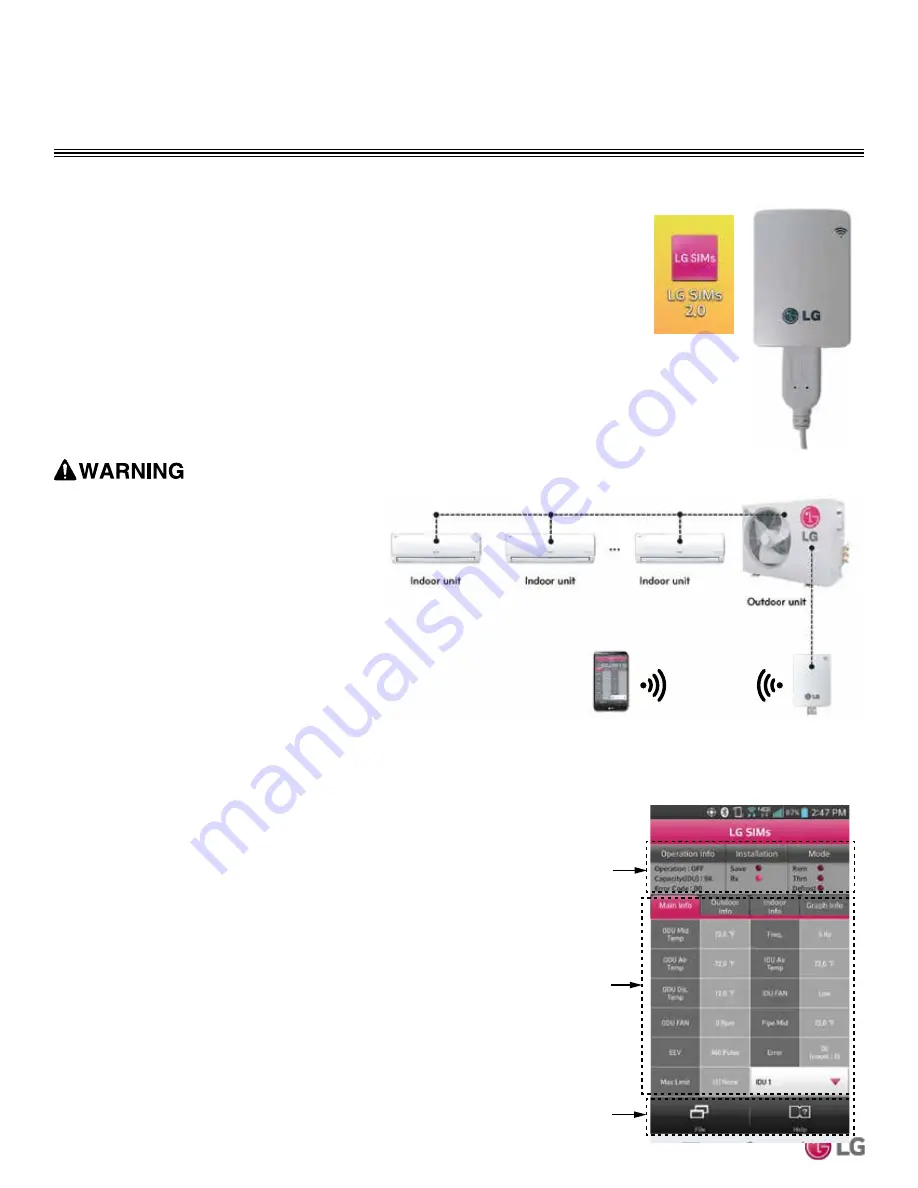
The SIMs WLAN module and the smart phone app together provide monitoring and trouble-

shooting capability for LG Duct Free Systems. SIMs functions only with LG Duct Free products 

(Figure 63).
SIMs can display and graph operational data for the air conditioner system including the indoor 

unit and the outdoor unit. SIMs also displays error codes and a troubleshooting guide. A full 

copy of the LG SIMs Smart Inverter Monitoring System User’s Manual is available on the www.

lghvac.com website. 
To use SIMs you must be a trained HVAC service technician familiar with variable refrigerant 

flow (VRF) systems in general and with LG’s Duct Free System products. You should under-

stand the inverter air conditioning operation cycle, the meaning of the data displayed by SIMs, 

and how to use the data to troubleshoot the system.
Figure 64 shows a typical Multi F configuration used with the SIMs module and app.

Note:

• The Duct Free System air conditioning system must run for 

at least 15–20 minutes before data collected by SIMs 2.0 is 

valid for troubleshooting.

• You must have the free SIMs app correctly installed on your 

smart phone before using SIMs. 

• Some ODUs have an LGMV extension cable accessed by 

removing the side handle cover. If the ODU does not have 

this extension cable, access the LGMV connector by remov-

ing the top cover of the ODU. 

High voltages capable of causing death are used in 

this equipment. Outdoor unit power remains connected 

during this procedure. Take extreme caution not to 

touch electrical components or connections.  Failure to 

observe this warning can result in death or severe injury.

Figure 63: LG SIMs App and WLAN Module

Figure 64: SIMs WLAN Module to a Typical Multi F System.

Figure 65: SIMs App Main Info Screen

The main screen (Figure 65) is the first screen displayed after wireless 

connection is established. Tap the Main Info tab to display current read-

ings regarding your indoor and outdoor unit(s). The Operational Info area 

of the screen will show active functions or modes by illuminating the light 

to the right of the function. 
Additional Help information can be accessed by tapping the Help Menu 

buttons at the bottom of this screen. 

Operational

Information

AC Cycle

Information on

Main Info Tab

Help Menu

(File is Factory Use Only)

SIMs App Main Info Screen

Summary of Contents for LCN097HV4

Page 1: ...CEILING CASSETTE INDOOR UNIT INSTALLATION MANUAL MAX MULTI F MULTI F LMCN077HV 7 kBtu LCN097HV4 9 kBtu LCN127HV4 12 kBtu LMCN185HV 18 kBtu ...

Page 2: ...lation For more technical materials such as submittals engineering databooks and catalogs visit www lghvac com For continual product development LG Electronics U S A Inc reserves the right to change specifications without notice LG Electronics U S A Inc This document as well as all reports illustrations data information and other materials are the property of LG Electronics U S A Inc PROPRIETARY D...

Page 3: ...igerant Piping 23 Piping Materials and Handling 31 Piping Connections 32 Piping Preparation 32 IDU to ODU 33 Piping Insulation 36 Electrical Wiring 38 General Guidelines 38 Power Wiring Specifications and Best Practices 39 Controller Options 40 Power Wiring Communications Cable Installation Guidelines 40 Indoor Unit Electrical Connections Procedure 41 Decorative Grille Kit Installation 43 Self Dia...

Page 4: ...rials safely Packing materials such as nails and other metal or wooden parts may cause puncture wounds or other injuries Tear apart and throw away plastic packaging bags so that children may not play with them and risk suffocation and death Do not install the unit in any location exposed to open flame or extreme heat Do not touch the unit with wet hands There is risk of fire electric shock explosi...

Page 5: ...ng foods works of art wine coolers or other preci sion air conditioning applications This equipment is de signed to provide comfort cooling and heating There is risk of property damage Do not make refrigerant substitutions Use R410A only If a different refrigerant is used or air mixes with original refrigerant the unit will malfunction and be damaged Do not install the unit in a noise sensitive ar...

Page 6: ...the absence of local codes with the National Electrical Code and the instructions given in this manual If the power source capacity is inadequate or the electric work is not performed properly it may result in fire electric shock physical injury or death Ensure the system is connected to a dedicated power source that provides adequate power If the power source capacity is inadequate or the electri...

Page 7: ...e fire electric shock physical injury or death Avoid excessive cooling and periodically perform ventilation to the unit Inadequate ventilation is a health hazard Do not touch the refrigerant piping during or after operation It can cause burns or frostbite Do not operate the unit with the panel s or protective cover s removed keep fingers and clothing away from moving parts The rotating hot cold an...

Page 8: ...during operation There is risk of unit failure Provide power to outdoor unit to warm the compressor crankcase at least six 6 hours before operation begins Starting operation with a cold compressor sump s may result in severe bearing damage to the compressor s Keep the power switch on during the operational season Periodically verify the hanging bolts and other hardware securing the unit have not d...

Page 9: ...er disciplines Applicable Codes Personnel must be familiar with and follow the applicable national state and or local codes In the event of a conflict between any applicable code and the instructions in this manual comply with the applicable code Connecting cable power and control Pipes vapor line and liquid line with insulation 3 8 or 1 2 Threaded hanger rods 3 8 or 1 2 nuts flat washers and lock...

Page 10: ...One 1 Set M4 Screws Two 2 Washers for Hanging Bracket Eight 8 Wireless Handheld Controller with Holder AKB73757604 1 One 1 Typical Unit Model Number Nominal Capacity Cooling Btu Heating Btu LMCN077HV 7 000 8 100 LCN097HV4 9 000 10 400 LCN127HV4 12 000 13 800 LMCN185HV 18 000 20 800 Table 1 Multi F Ceiling Cassette Indoor Units INTRODUCTION Table 2 Included Items 1 Wireless Handheld Controller for ...

Page 11: ...Unit Nominal Capacity Nominal cooling capacity in Btu h Component AN Art Cool Wall Mounted Indoor Unit N Standard Wall Mounted Indoor Unit CN Four Way Ceiling Cassette Indoor Unit DN Ceiling Concealed Duct Low Static Indoor Unit HN Ceiling Concealed Duct High Static Indoor Unit VN Vertical Horizontal Air Handling Indoor Unit L LG 077 7 000 097 9 000 125 12 000 185 18 000 L Voltage for all equipmen...

Page 12: ... systems Piping wall thickness must comply with the applicable local state and federal codes for the 551 psi design pressure of R410A Inadequate piping may fail when pressurized Indoor units Outdoor units Model Number Indoor Unit Nominal Capacity Btu h LMU18CHV LMU24CHV LMU30CHV LMU36CHV LMU480HV LMU540HV LMU600HV Maximum No of Connectable Indoor Units 2 3 4 4 8 8 8 LMCN077HV 7 000 O O O O O O O L...

Page 13: ...dy Shipping Weight lbs 34 37 42 Grille Sold separately Shipping Weight lbs 11 9 9 11 Power Wiring Communications Cable No x AWG 5 4 x 18 Heat Exchanger Row x Column x Fin inch x No 2 x 8 x 18 x 1 2 x 10 x 18 x 1 Pipe Size Liquid in 1 4 Vapor in 3 8 1 2 Drain O D I D in 1 1 4 1 1 Nominal capacity is rated 0 ft above sea level with corresponding refrigerant piping length in accordance with standard ...

Page 14: ... inch LMCN077HV Ø3 8 Ø1 4 LCN097HV4 LCN127HV4 LMCN185HV Ø1 2 Table 6 Multi F Multi Zone Art Cool Mirror Wall Mounted Indoor Unit Refrigerant Pipe Connection Port Diameters Figure 2 Multi F Four Way Ceiling Cassette Indoor Unit Refrigerant Flow Diagram Heat exchanger Gas pipe connection port flare connection Liquid pipe connection port flare connection Turbo fan Cooling Heating M Thermistor for Eva...

Page 15: ...ypical Multi F Max system consists of an ODU refrigerant piping one or two branch distribution units BDU and two 2 to eight 8 IDUs The ceiling cassette units described in this manual are one of the types of IDUs that can be connected to a Multi F Max system Example LMU540HV outdoor unit with four 4 indoor units and one 1 branch distribu tion unit connected ODU Outdoor Unit IDU Indoor Unit BDU Bran...

Page 16: ...tem with Two Branch Distribution Units Table 8 Multi F MAX LMU480HV LMU540HV and LMU600HV Outdoor Unit Refrigerant Piping System Limitations Pipe Length ELF Equivalent Length of pipe in Feet Total piping length ΣA ΣB 475 7 feet Main pipe Outdoor Unit to Branch Distribution Units ΣA Minimum 9 8 feet Maximum 180 4 feet Total branch piping length ΣB 295 3 feet Branch pipe Branch Distribution Units to...

Page 17: ...dditional pressure losses in equivalent pipe length calculations for each elbow Y branch and branch distribution unit The equivalent pipe length of each elbow Y branch and or branch distribution unit must be added to each pipe segment to ensure maximum lengths are not exceeded Using Refrigerant Components Field Supplied Refrigerant Piping Type ACR copper is the only approved refrigerant pipe mater...

Page 18: ...stall the unit in a location where acidic solution and spray sulfur are often used Do not use the unit in environments where oil steam or sulfuric gas are present Avoid installing the unit near high frequency generators or near any equipment that generates an electromagnetic field minimum 3 1 3 feet away Do not install the unit near a doorway GENERAL INSTALLATION GUIDELINES Location Selection If t...

Page 19: ... weights of the ceiling cassette units are listed in Table 5 To help avoid injury to personnel use two people when carrying a unit by hand Do not unpack the unit and remove the protective materials until ready to install Before unpacking carefully move the packaged unit to a work area near the installation location To help avoid damage to the unit use two people when carrying a unit by hand After ...

Page 20: ...nd inspect for freight damage DO NOT lift by the refrigerant piping or drain pipe stub Lift by the frame only If damage is found repack the unit as it was received in the original container 11 If the unit is undamaged remove and retain the installation manual Preparing the Installation Area 1 Installation guide template depicts the exact dimensions necessary for the ceiling opening 2 Choose the lo...

Page 21: ...t must be installed horizontally or condensate will drip out and cause product malfunction Measure the unit at each corner to verify that it is level 5 Remove the installation guide template For New Ceilings 1 Use a sunken insert a sunken anchor or any other field supplied part to reinforce the ceiling so that it can bear the weight of the indoor unit Use a temporary washer plate to more easily se...

Page 22: ...n drain system see the Multi F Multi F MAX Outdoor Unit Engineering Manual Pour Water Drain Pump Drain Pan Flexible drain hose accessory Field Installed Drain Piping Glue the Joint Drain Port Drain Hose Connection Use the clip accessory Checking the Drain Pump The drain pump must be tested before the system operates Connect flexible drain hose to the field supplied drain piping leave it as is unti...

Page 23: ...esign software or as conveyed in the product installation instructions Using a different size is prohibited and may result in a system malfunction or failure to work at all Elbow Drain Pump Indoor Unit Drain Piping Field Supplied Insulation Field Supplied Insulating the Drain Piping Drain piping insulation should be made of polyethylene foam with a minimum thickness of 7 16 inches Secure drain hos...

Page 24: ...ot make U turns The Y branch kit must be located at least three 3 feet from the outdoor unit Provide a minimum of 20 inches between a Y branch and the branch distribution unit Figure 19 Y Branch Port Identification and Dimensions Figure 20 Y branch Horizontal Installation Alignment Multi F MAX Y Branch Kit PMBL5620 Y Branch Kit Insulation Each Y branch kit comes with clam shell type peel and stick...

Page 25: ...e piping during installation Contaminants can cause mechanical failure Selecting Field Supplied Copper Tubing Copper is the only approved refrigerant pipe material for use with Multi F products and LG recommends seamless phosphorous deoxidized ACR type copper pipe hard drawn rigid type K or L or annealed tempered copper pipe Drawn temper rigid ACR copper tubing is available in sizes 3 8 through 2 ...

Page 26: ...is insulated in a similar fashion The natural fixed point of the pipe segment is typically where the expansion Loop or U bend should be Linear pipe expansion can be calculated using the following formula 1 In Table 18 find the row corresponding with the actual length of the straight pipe segment 2 Estimate the minimum and maximum temperature of the pipe In the column showing the minimum pipe tempe...

Page 27: ... 0 16 0 17 0 18 0 19 0 20 0 21 0 22 0 22 0 23 0 26 0 28 0 29 0 30 30 0 12 0 12 0 15 0 18 0 20 0 21 0 23 0 24 0 26 0 27 0 29 0 30 0 32 0 33 0 32 0 35 0 39 0 42 0 44 0 45 40 0 16 0 16 0 20 0 24 0 26 0 28 0 30 0 32 0 34 0 36 0 38 0 40 0 42 0 44 0 43 0 46 0 52 0 56 0 58 0 60 50 0 20 0 20 0 25 0 30 0 33 0 35 0 38 0 40 0 43 0 45 0 48 0 50 0 53 0 55 0 54 0 58 0 65 0 70 0 73 0 75 60 0 24 0 24 0 30 0 36 0 ...

Page 28: ...Max 12 Max 12 Max 12 Figure 26 Typical Pipe Support Location Change in Pipe Direction Max 12 12 19 Pipe supports should never touch the pipe wall supports should be installed outside around the primary pipe insulation jacket Insulate the pipe before installing the sup ports Pipe supports are field provided and must meet local code If local codes do not specify pipe support spacing install pipe sup...

Page 29: ...ver Sheathing Sheathing O Ring Band Lags Do not compress the insulation with the saddle type support If the insulation is compressed it may tear open and allow condensation to generate during product operation Welding Refrigerant Pipe Insulated Support Band Insulated Support Band Down Stop Welding Plate Nut Hexagonal Nut O ring Band Support at Intervals Between 5 and 6 3 4 Feet Figure 31 Saddle Ty...

Page 30: ...r example Diameter of Gas Piping 1 2 Diameter of Liquid Piping 1 4 Thickness of Gas Piping Insulation 0 4 x 2 Thickness of Liquid Piping Insulation 0 4 x 2 Surplus 0 8 Sleeve diameter total 3 1 minimum Note Pipe diameter plus insulation thickness determines wall penetration diameter Underground Refrigerant Piping Route refrigerant pipe installed underground inside a vapor tight pro tective sleeve ...

Page 31: ...on Poor insulation of the compressor System does not operate properly Solutions Remove moisture from the piping Piping ends should remain capped until connections are complete Do not install piping on a rainy day Connect piping properly at the unit s side Remove caps only after the piping is cut the burrs are removed and after passing the piping through the walls Evacuate system to a minimum of 50...

Page 32: ...ured distance Cut the cable 4 9 ft longer than the pipe length 2A Remove the burrs Completely remove all burrs from pipe ends When removing burrs point the end of the copper pipe down to avoid introducing foreign materials in the pipe 2B Slide the flare nut onto the copper tube 3 Flaring the pipe end Use the proper size flaring tool to finish flared connections as shown Refer to the diagram in ste...

Page 33: ...CHV LMU24CHV LMU30CHV LMU36CHV Liquid Line Connection in OD x Qty 1 4 x 2 1 4 x 3 1 4 x 3 1 4 x 4 Vapor Line Connection in OD x Qty 3 8 x 2 3 8 x 3 3 8 x 3 3 8 x 4 Table 24 Outdoor Unit Piping Connections Table 25 Ceiling Cassette Indoor Unit Pipe Sizes Indoor Unit Capacity Vapor Line Connection in OD Liquid Line Connection in OD 7 000 Btu h Ø3 8 Ø1 4 9 000 Btu h 12 000 Btu h 18 000 Btu h Ø1 2 IDU...

Page 34: ... and vapor refrigerant pipes and connection wiring to the appropriate branch distribution ports Clearly note on the indoor unit s refrigerant piping liquid vapor which branch distribution port it is connected to A B C D Outdoor Unit Piping Connections LMU480HV LMU540HV and LMU600HV Liquid Line Connection in OD x Qty 3 8 x 1 Vapor Line Connection in OD x Qty 3 4 x 1 Avoid Pipe Damage When routing f...

Page 35: ...Flare side pipe from branch distribution unit or ODU Flare side to branch distribution unit or ODU Figure 45 Connection Socket Diagram PIPING CONNECTIONS IDU to ODU Multi F MAX Outdoor Unit System Piping Connections continued Table 30 Ceiling Cassette Indoor Unit Pipe Sizes Table 31 Ceiling Cassette Indoor Unit Piping Connections Connection sockets included as a factory supplied accessory with the...

Page 36: ...come blocked Proper system operation depends on the installer using best practices and utmost care while assembling the piping system Store pipe stock in a dry place and keep stored pipe capped and clean Purge all pipe sections clean with dry nitrogen prior to assembly 2 Proper system operation depends on the installer using best practices and the utmost care while assembling the piping system Use...

Page 37: ...ted below are present When piping passes through an indoor area where the indoor unit does not operate When the humidity is high and there is no air flow in the location where the piping is installed Piping Insulation PIPING CONNECTIONS WARNING Ensure all refrigerant piping is insulated Any exposed piping will cause burns if touched Note Any exposed piping may generate condensate that may damage w...

Page 38: ...ions related to electrical equipment and wiring and following the instructions in this manual Using an oversized breaker or fuse may result in electric shock physical injury or death Do not connect ground wire to refrigerant gas or water piping to lightning rods to telephone ground wiring or to the building plumbing system Failure to properly provide a National Electrical Code approved earth groun...

Page 39: ...ge wires to a terminal block Figure 51 Proper and Improper Power Wiring Connections If power wires are not properly terminated and firmly attached there is risk of fire electric shock and physical injury or death Note 6 16 2 16 13 16 GN YL Power Wiring Ground to Outdoor Unit Power Wiring Ground Communication Cable From Outdoor Unit To Indoor Unit or from the Outdoor Unit to the Branch Distribution...

Page 40: ...separation of at least 1 8 inch in each active phase conductor A voltage drop may cause the following problems 1 Magnetic switch vibration fuse breaks or disturbance to the normal function of an overload protection device 2 Compressor will not receive the proper starting current BACnet is a registered trademark of ASHRAE LonWorks is a regis tered trademark of Echelon Corporation Always verify the ...

Page 41: ...s on the indoor unit 4 Neatly arrange power wiring communications cable and secure with the appropriate cable restraint When clamping do not apply force to the wiring connections 5 Firmly reattach the control box cover do not catch the wiring in the electric box cover and make sure the cover firmly closes 6 Fill in any gaps around the wiring access holes with sealant to prevent foreign particles f...

Page 42: ...4 way _ 19 Rubber Stopper Cable Conduit Screws Conduit Bracket Using a Conduit 1 Remove the rubber stopper on the indoor unit Pass the power wiring communications cable through the conduit the conduit mounting plate and to through the control panel of the indoor unit 2 Tighten the conduit and the conduit mounting plate together 3 Connect the power wiring communications cable to the indoor unit ter...

Page 43: ...nging bolts as shown 4 Attach the other two screws and then tighten all four screws until panel is secure 5 Attach the corner covers 5 6 Unscrew the two screws holding the control panel cover 6 7 Connect the one display connector CN DISP and the two vane control connectors CN VANE1 CN VANE2 of the front panel to the indoor unit PCB 7 8 Reattach the control box cover 8 Attach the filter grille reta...

Page 44: ...ure Inverter compressor discharge temperature Front outdoor coil pipe temperature Back outdoor coil pipe temperature Liquid line pipe temperature Subcooler inlet temperature Subcooler outlet temperature Average indoor unit IDU pipe temperature Inverter compres sor operation indicator light Liquid injection valves operation indicator lights Hot gas bypass valve operation indicator light Four way re...

Page 45: ... to RS 485 connector kit When connected through an IDU the user will not be able to record data This software can be used to both commission new systems and troubleshoot existing systems LGMV data can be recorded to a CSV file and emailed to an LG representative to assist with diag nostic evaluations Error Codes LGMV software helps the service technician or commissioning agent to troubleshoot syst...

Page 46: ...uration used with the SIMs module and app Note The Duct Free System air conditioning system must run for at least 15 20 minutes before data collected by SIMs 2 0 is valid for troubleshooting You must have the free SIMs app correctly installed on your smart phone before using SIMs Some ODUs have an LGMV extension cable accessed by removing the side handle cover If the ODU does not have this extensi...

Page 47: ...ge EEV Mode Restart Timer Comp Mode EEV Indoor Info Tab Displays the following information Frequency Operation THM Mode REM Mode FAN EEV Air Temp Pipe in Pipe mid Pipe out Graph Info Tab This tab has three sub sections IDU Indoor Unit Temperature graph Displays IDU information in graph format Information displayed is for the IDU selected on the Main screen ODU Outdoor Unit Temperature and Frequenc...

Page 48: ...tal air flow direction 6 Up Down Air flow Button Stops or starts louver movement and sets the desired air flow direction to up or down 7 On Time Button Sets the time when the operation begins 8 Sleep Timer Button Sets the sleep mode operation 9 Set Clear Button Sets or cancels the timer also sets the current time 10 Plasma Button Starts or stops plasma purification functions 11 Room Temperature Se...

Page 49: ...d be coiled and stored near the indoor unit control panel 3 If additional cable length is needed order a thirty three 33 foot LG Wired Remote Group Control Extension cable Model No PZCWRC1 4 If the cable between the zone controller and the indoor unit is too long do not cut the cable and shorten Coil any spare communications cable tie wrap it and leave it next to the indoor unit location Hanging t...

Page 50: ...Remote Temperature Sensor can be used in lieu of the return air thermistor either alone or in conjunction with a wired controller thermistor as previously described Hanging the Wired Controller continued Connect indoor unit and wired controller using included connection cable Use an LG manufactured extension cable sold separately if the distance between wired remote controller and the indoor unit ...

Page 51: ...he error code does not display Error Codes Decoding the Error Display The first and second number on the LED indicates error number Example 21 LED1 2x blink LED2 1x blink Error Code Nomenclature Definitions MICOM Non volatile memory chip where unit setup information is stored EPROM Non volatile memory chip where device identification size and factory defined default component operating param eters...

Page 52: ... Overheat 3X 2X 40 CT Sensor Error Thermistor is disconnected or shorted out 4X 41 D Pipe Sensor INV is disconnected or shorted out 4X 1X 44 Outdoor Air Sensor is disconnected or shorted out 4X 4X 45 Middle thermistor of outdoor unit condenser coil is disconnected or shorted out 4X 5X 46 Outdoor unit suction line thermistor is disconnected or shorted out 4X 6X 48 Outdoor unit coil outlet liquid li...

Page 53: ...imit for the application If the refrigerant leaks and safety limits are exceeded it could result in personal injuries or death from oxygen depletion 1 American Society of Heating Refrigeration and Air Conditioning Engi neers Inc ASHRAE Atlanta GA ASHRAE Inc Information about ASHRAE Standard 15 2010 34 2010 and addenda current as of the date of this publication Take appropriate actions at the end o...

Page 54: ...possession a copy of the As Designed LATS Multi F piping tree diagram BEFORE ANY FIELD PIPE SIZE OR LENGTH CHANGES ARE MADE PROPOSED CHANGES MUST BE FORWARDED TO THE DESIGN ENGINEER SO THAT THEY CAN INPUT THE CHANGES INTO LATS and RE ISSUE A NEW LATS PIPING TREE DIAGRAM Installer must receive change authori zation from the design engineer because any change made requires the review of the entire t...

Page 55: ...terminated at the unit The power supplied was clean with voltage fluctuations within specifications 10 of nameplate Power wiring to the Multi F Multi F MAX outdoor unit was installed per all local electrical code requirements Power wiring to the indoor units and branch distribution unit s Multi F MAX only was installed per all local electrical code requirements LG supplied cable was used between e...

Page 56: ...nnovation some specifications may change without notification LG Electronics U S A Inc Englewood Cliffs NJ All rights reserved LG is a registered trademark of LG Corp INSTALLATION CHECKLIST PAGE 3 Major Component Rough In Piping and Insulation Brazing Practices ...

Page 57: ... Electronics U S A Inc Englewood Cliffs NJ All rights reserved LG is a registered trademark of LG Corp Installation Refrigerant Piping Installation Branch Distribution Unit Multi F MAX Systems Only Installation Condensate Pump Drain Installation Installation Power Wire and Communications Cables INSTALLATION CHECKLIST PAGE 4 ...

Page 58: ...Length L x a Installed Length of Branch D Chargeless Pipe Length L x a CF Correction Factor x 5 29 Multi F Outdoor Unit Model Min to Max Piping Length for One Branch ft Max Total System Piping Length ft Chargeless Pipe Length per Branch L ft Additional Charge Needed a oz ft LMU18CHV 10 to 82 164 24 6 0 22 LMU24CHV 10 to 82 246 1 24 6 0 22 LMU30CHV 10 to 82 246 1 24 6 0 22 LMU36CHV 10 to 82 246 1 2...

Page 59: ...r x 3 53 Number of installed length of branches depends on system specifications CF Maximum number of connectible indoor units Total number of connected indoor units LG Multi F MAX outdoor units ship from the factory with a charge of R410A refrig erant A trim charge may need to be added to take into account additional piping length To determine the additional refrigerant that is needed apply the f...

Page 60: ...ng Parts Your LG Manufacturer Representative Freight Damage and Unit Replacements Your LG Manufacturer Representative Received Wrong Indoor Unit Model Your LG Manufacturer Representative Installation Startup and Commissioning Technical Assistance 1 888 865 3026 For warranty information visit www lghvac com ...

Page 61: ...nics U S A Inc Commercial Air Conditioning Division 4300 North Point Parkway Alpharetta Georgia 30022 www lg vrf com LG Customer Information Center Commercial Products 1 888 865 3026 USA Follow the prompts for commercial A C products and parts 20001747 ISO 9001 2008 LG ELECTRONICS INC ...

Reviews: