background image

Getting Started

11

Ge
tting S

tar

ted

1

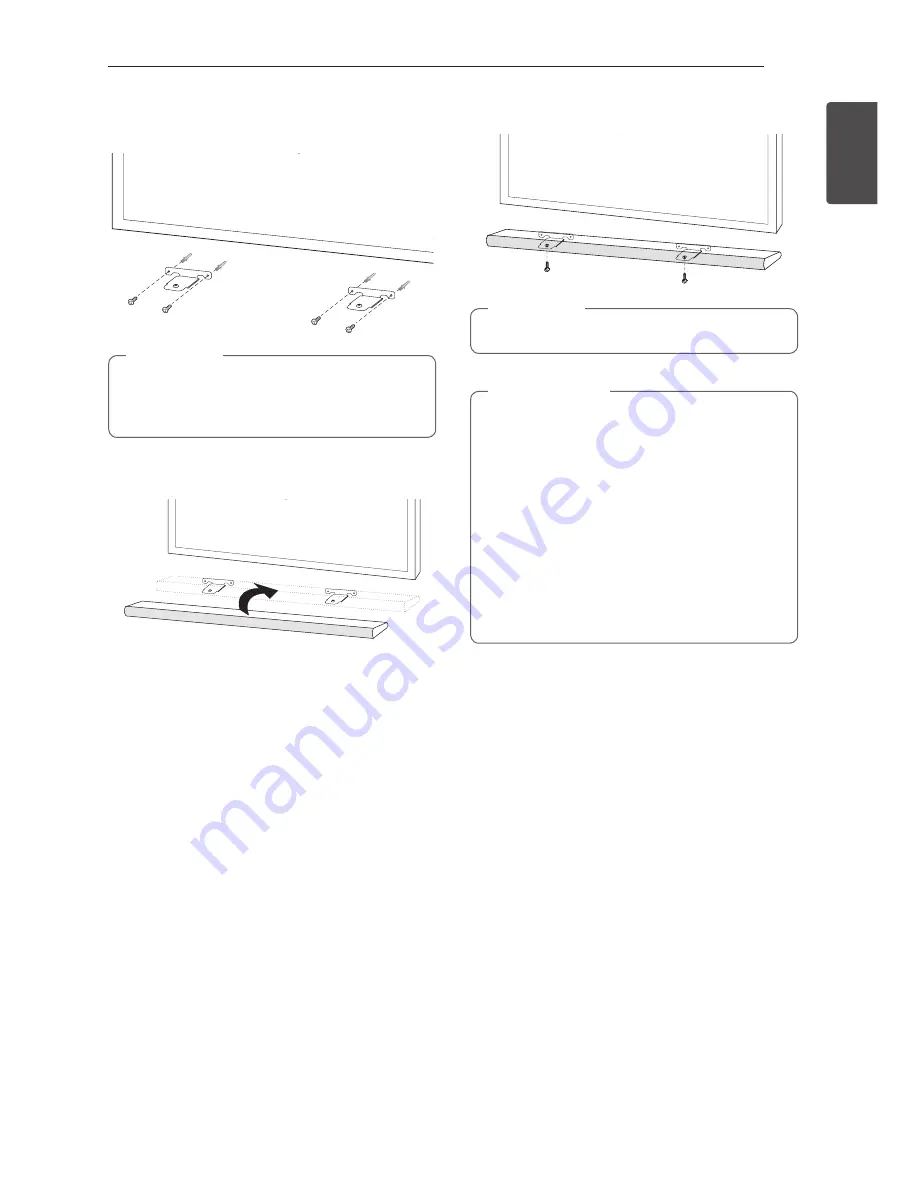
4.  Fix the brackets with screws (

A

) as shown in the 

illustration below.

Screws (

A

) and Wall Plugs are not supplied for 

mounting the unit. We recommend the Hilti 
(HUD-1 6 x 30) for the mounting.


,

Note

5.  Put the unit on the brackets to match screw 

holes on the bottom of the unit.

6.  Fix the unit with the screws firmly.

To detach the unit, perform it in reverse order.


,

Note


y

Do not install this unit upside down. It can 
damage the parts of this unit or be the 
cause of personal injury.


y

Do not hang onto the installed unit and 
avoid any impact to the unit.


y

Secure the unit firmly to the wall so that it 
does not fall off. If the unit falls off, it may 
result in an injury or damage to the product.


y

When the unit is installed on a wall, please 
make sure that a child does not pull any of 
connecting cables, as it may cause it to fall.


>

Caution

Summary of Contents for LAS350B

Page 1: ...Please read this manual carefully before operating your set and retain it for future reference LAS350B LAS350B S35A1 W OWNER S MANUAL Sound Bar www lg com ...

Page 2: ...nd to ensure reliable operation of the product and to protect it from over heating The openings shall be never be blocked by placing the product on a bed sofa rug or other similar surface This product shall not be placed in a built in installation such as a bookcase or rack unless proper ventilation is provided or the manufacturer s instruction has been adhered to CAUTION concerning the Power Cord...

Page 3: ...cal free reimbursement systems batteries and accumulators The battery should not be exposed to excessive heat such as sunshine fire or the like RF Radiation Exposure Statement This equipment should be installed and operated with minimum distance 20 cm between the radiator and your body y y The appliance is not intended for use by young children or infirm persons without supervision y y Young Child...

Page 4: ...IN connection 3 Operating 14 Operations 14 DRC Dynamic Range Control 14 Turn off the sound temporarily 14 AV Sync 14 Displaying input information 14 Sleep timer setting 14 Adjusting the brightness of the display window 15 Using your TV remote control 16 AUTO POWER On Off 16 Auto function change 17 LG Sound Sync 18 Using BLUETOOTH technology 19 Listening to music stored on the BLUETOOTH devices 20 ...

Page 5: ...Table of Contents 5 1 2 3 4 5 6 4 Troubleshooting 24 Troubleshooting 5 Appendix 26 Trademarks and licenses 27 Specifications 28 Maintenance 28 Handling the unit ...

Page 6: ...of your LG TV that is compatible with LG Sound Sync Introduction Symbols used in this manual Note Indicates special notes and operating features Caution Indicates cautions for preventing possible damages from abuse Accessories Please check and identify the supplied accessories Designs and specifications of the accessories are subject to change without prior notice Remote control 1 Batteries 2 Wall...

Page 7: ...fer h Changes input source to Bluetooth LG TV Changes input source to LG TV PORT IN Changes input source to Portable b SOUND EFFECT Selects a sound effect mode AV SYNC Synchronizes the audio and video A D Selects Sound Effects or adjusts AV sync Night mode Turns on or off Night mode c DRC Turns on or off DRC function INFO Displays the information of an input source and Bluetooth address Controls T...

Page 8: ...window Standby LED It lights up in red on standby mode C 1 Standby On D F Function Selects the function and input source E p o Volume Adjusts volume level Front panel A Power cord B SUB WOOFER 4Ω Connector C OPT IN Optical input D PORT IN Portable input Rear panel ...

Page 9: ...ful not to make scratches on the surface of the Unit Sub Woofer when installing or moving them y y Use caution when handling the Sub Woofer The speaker on the rear is exposed Avoid making contact with the exposed speaker Caution Installing the cover foot You can extend the height of the unit by using cover foot height 17 mm 1 Turn the unit upside down 2 Peel off a sticker attached to the cover foo...

Page 10: ...paration materials Unit Wall bracket install guide Screws Screws A Wall plug Wall bracket Not supplied 1 Match the TV s BOTTOM EDGE of Wall bracket install guide with the bottom of TV and attach to the position TV 2 When you mount it on a wall concrete use the wall plugs You should drill some holes A guide sheet Wall bracket install guide is supplied to drill Use the sheet to check the point to dr...

Page 11: ...ws firmly To detach the unit perform it in reverse order Note y y Do not install this unit upside down It can damage the parts of this unit or be the cause of personal injury y y Do not hang onto the installed unit and avoid any impact to the unit y y Secure the unit firmly to the wall so that it does not fall off If the unit falls off it may result in an injury or damage to the product y y When t...

Page 12: ...PTICAL cable Optical cable 2 Set the INPUT source to OPTICAL Press OPTICAL on the remote control or F on the unit until the function is selected y y Before connecting the optical cable be sure to remove the protection plug cover if your cable has the cover y y You can enjoy the TV audio through the speakers of this unit In the case of some TV models you must select the external speaker option from...

Page 13: ...Listen to sound Before connecting the optical cable be sure to remove the protection plug cover if your cable has the cover Note PORTABLE IN connection MP3 player etc Listening to music from your portable player The unit can be used to play the music from many types of portable players or external devices 1 Connect the portable player to the PORTABLE IN connector of the unit by using 3 5 mm stereo...

Page 14: ...s of connected Bluetooth device Sleep timer setting This unit will be turned off automatically by your timer set Press SLEEP repeatedly to select the desired time period options in minutes DISPLAY OFF display window will turns off DIMMER display window will be darkened by half Sleep timer value 180 10 Display on To check the remaining time press SLEEP To cancel the sleep function press SLEEP repea...

Page 15: ...y Supported TV brands LG Panasonic Philips Samsung Sharp Sony Toshiba Vizio y y Make sure that the sound output of your TV is set to External speaker y y Depending on the remote control this function may not work well y y This function may not work well when you use LG Sound Sync Note Auto power down This unit will be off itself to save electric consumption in the case main unit is not connected t...

Page 16: ...on by AUTO POWER function when optical signal comes in after 5 seconds of no signal y y Depending on the connected device this function may not operate y y If you disconnect Bluetooth connection by this unit some Bluetooth devices try to connect to the unit continually Therefore it is recommended to disconnect the connection before turn off the unit y y When you turn on this unit for the first tim...

Page 17: ...f this unit and the connection in the cases below when using LG Sound Sync Turn off the unit Changing the function to the others Disconnecting the optical cable Disconnecting the wireless connection caused by interference or a distance y y The amount of time to turn off this unit is different depending on your TV when you set AUTO POWER function to ON y y Details of TV setting menu vary depending ...

Page 18: ...uld reconnect the TV and the unit y y Details of TV setting menu vary depending on the models of your TV Note Using BLUETOOTH technology About BLUETOOTH Bluetooth is wireless communication technology for short range connection The sound may be interrupted when the connection interfered by the other electronic wave or you connect the Bluetooth in the other rooms Connecting individual devices under ...

Page 19: ...droid or iOS devices Multi pairing connection may not be supported depending on the connected device specifications y y Removable detachable Bluetooth device Ex Dongle etc doesn t supported multi pairing Note 3 When this unit is successfully connected with your Bluetooth device PAIRED will be appear on the display window and change to Bluetooth device name soon y y PAIRED will be momentarily appea...

Page 20: ...rate the device the volume level can be synchronized with each other Note Using BLUETOOTH App Only Android OS is available to use Music Flow Bluetooth app with this unit Note About Music Flow Bluetooth App Music Flow Bluetooth app brings a suite of new features to this unit To enjoy more features you are recommended to download and install free Music Flow Bluetooth app Install Music Flow Bluetooth...

Page 21: ... on the User guide y y Music Flow Bluetooth app will be available in the software version as follow Android O S Ver 4 0 3 or later y y If you use Music Flow Bluetooth app for operation there would be some differences between Music Flow Bluetooth app and the supplied remote control Use the supplied remote control as necessary y y Depending on the Bluetooth device Music Flow Bluetooth app may not wo...

Page 22: ... sound FLAT Provides balanced sound BOOST Boosts the mid range for sound reinforcement TRE BASS TREBLE BASS Reinforces the treble and bass y y In some of sound effect mode some speakers there s no sound or low sound It depends on the mode of sound and the source of audio it is not defective y y You may need to reset the sound effect mode after switching the input sometimes even after the sound fil...

Page 23: ... VOL o p to adjust the sound level Adjust the woofer level settings You can adjust the sound level of woofer from 20 dB to 6 dB Press WOOFER LEVEL W or WOOFER LEVEL S to adjust the sound level of the woofer Night mode This function is useful when you want to watch movies at low volume late at night Press button on the remote control So you can activate Night mode To cancel it press button again ...

Page 24: ...ing connection with a external device set top box Bluetooth device etc adjust volume level of the device No woofer sound y y Connect the unit and the subwoofer Refer to the page 12 No display y y The DISPLAY OFF function is activated Press SLEEP repeatedly to cancel the function Refer to the page 14 The remote control does not work properly y y The remote control is too far from the unit Operate t...

Page 25: ...tate of DRC function to OFF by using remote controller y y With the sound bar connected with TV change the AUDIO DIGITAL OUT setting on TV Setup Menu from PCM to AUTO or BITSTREAM y y With the sound bar connected with Player change the AUDIO DIGITAL OUT setting on Player Setup Menu from PCM to PRIMARY PASS THROUGH or BITSTREAM y y Change Audio DRC setting on Player setup menu to OFF state ...

Page 26: ...DTS Digital Surround is a trademark of DTS Inc DTS Inc All Rights Reserved Bluetooth wireless technology is a system which allows radio contact between electronic Connecting individual devices under Bluetooth wireless technology does not incur any charges A mobile phone with Bluetooth wireless technology can be operated via the Cascade if the connection was made via Bluetooth wireless technology T...

Page 27: ...ing humidity 5 to 90 Input Output OPT IN 3 V p p Optical jack x 1 PORT IN 0 5 Vrms 3 5 mm stereo jack x 1 Available Digital Input Audio Sampling Frequency 32 kHz 44 1 kHz 48 kHz 96 kHz Amplifier Total 120 W Front 25 W x 2 6 Ω at 1 kHz Subwoofer 70 W 4 Ω at 100 Hz THD 10 Subwoofer S35A1 W Type 1 Way 1 Speaker Impedance 4 Ω Rated Input Power 70 W Max Input Power 140 W Dimensions W x H x D 156 mm x 3...

Page 28: ... y Do not use volatile liquids such as insecticide spray near the unit y y Wiping with strong pressure may damage the surface y y Do not leave rubber or plastic products in contact with the unit for a long period of time Cleaning the unit To clean the player use a soft dry cloth If the surfaces are extremely dirty use a soft cloth lightly moistened with a mild detergent solution Do not use strong ...

Page 29: ......

Reviews: