background image

11

c

a

LOCK(Parental Control)
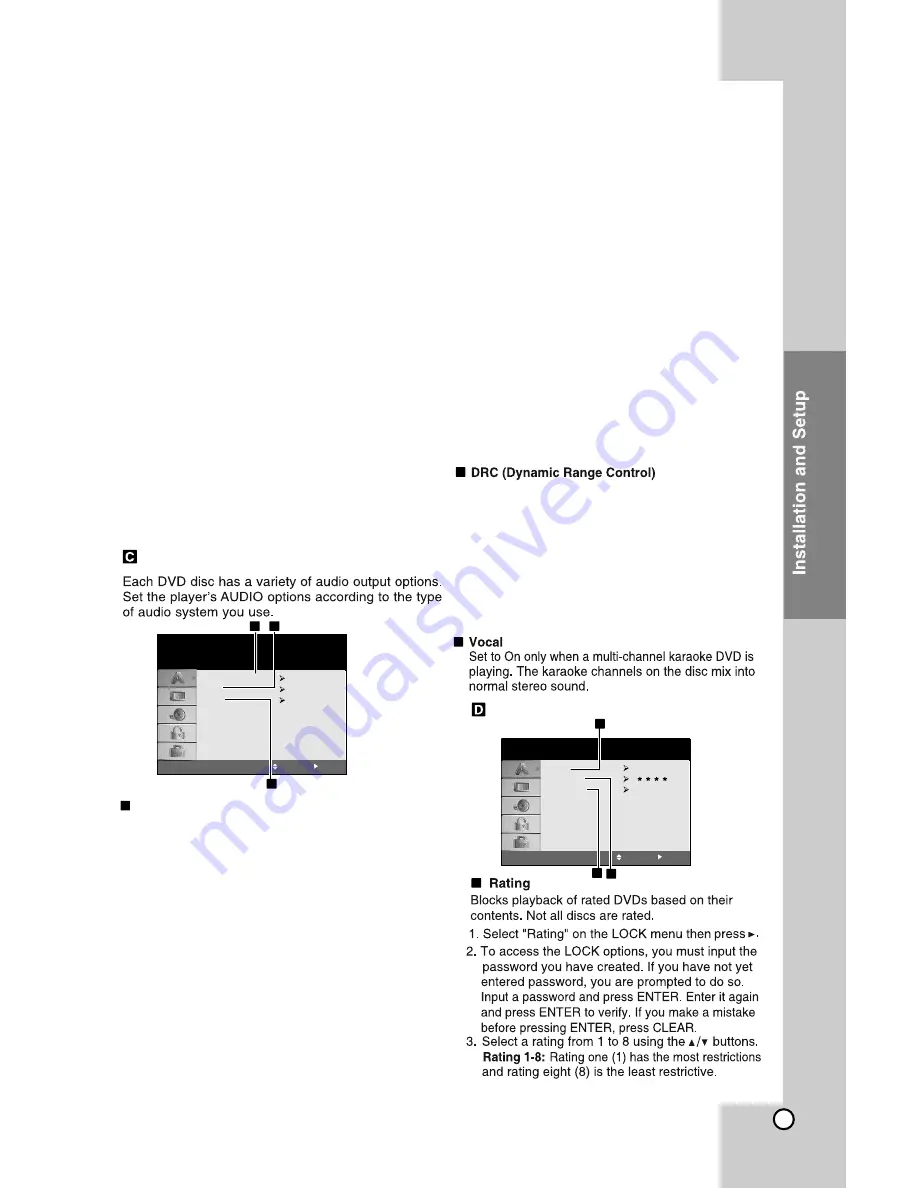
Rating

Password

Area Code

Unlock

IN

LOCK

Move

Select

b

c

a

Continued on page No. 15

5.1 Speaker Setup

DRC

Vocal

On

On

AUDIO

Move

Select

a

a

b

AUDIO

c

Select

5.1 Speaker Setup

Make  the  following  settings  for  the  built-in  5.1 
channel surround decoder.
1. Press  ENTER  and  5.1  Speaker  Setup  menu 

appears.

2. Use 

ƒ

/

„

 to select the desired speaker.

3. Adjust options using 



/

‚

/

ƒ

/

„

buttons.

4. Press  ENTER  to  confirm  your  selection. 

Returns to the previous menu.

Speaker Selection

Speaker selection Select a speaker that you want 
to adjust. [Front speaker (Front L), Front speaker 
(Front  R),  Center  Speaker  (Center),  Subwoofer 
(SubWoofer),  Rear  speaker  (Rear  L),  Rear 
speaker (Rear R)]

Certain  speaker  settings  are  prohibited  by  the 
DolbyDigital licensing agreement.

Size

Since  the  speaker  settings  are  fixed,  you  cannot 
change the settings.

Volume

Press 

ƒ

/

„


to adjust the output level of the selected


speaker. (-5dB ~ 5dB)

Distance

If  you  connected  speakers  to  your  DVD/CD 
Receiver,  setting  the  Distance  lets  the  speakers 
know how far the sound has to travel to reach your 
set listening point. This allows the sound from each 
speaker to reach the listener at the same time.
Press 

ƒ

/

„

 to adjust the Distance of the selected 

speaker.(You can’t adjust front /Woofer speakers)

Test

Press 

ƒ

/

„

to  test  the  signals  of  each  speaker. 

Adjust


the  volume  to  match  the  volume  of  test 

signals


memorized in the system.

Note:

Front Left (L) 

→Center 

→Front 

Right 

(R) 

Rear Right (R) →Rear Left (L) →SubWoofer

b

With the DVD* format, you can hear a program’s 
sound  track  in  the  most  accurate  and  realistic 
presentation,  thanks  to  digital  audio  technology. 
However, you may wish to compress the dynamic 
range of the audio output (the difference between 
the loudest sounds and the quietest ones). Then, 
you may listen to a movie at a lower volume without 
losing clarity of sound. Set DRC to On for this effect.
*1:Dolby Digital only

If you are using the Component Video jacks for 
connection  to  a  TV  or  monitor  that  is 
compatible with a progressive scan signal, set 
Progressive Scan to On. 

To Turn ON progressive scan:

Connect  component  out  of  the  DVD/CD 
Receiver  to  the  input  of  your  monitor  / 
television,  set  your  television  or  monitor  to 
Component Input.

Select “Progressive Scan” on the DISPLAY
menu then press 

„

.

Select “On” using the 



/

‚

 buttons.

Pressing ENTER will set the player to
Progressive scan mode. 

1.

2.

 3.

Once the setting for progressive scan output is 
entered,  an  image  will  only  be  visible  on  a
progressive scan compatible TV or monitor. If 
you  set  Progressive  Scan  to  On  in  error,  you 
must reset the unit. First, remove the disc in the 
DVD/CD  Receiver.  Next,  press  STOP  on  the 
remote control(

¢

) and hold it for five seconds 

before  releasing  it.  The  video  output  will  be 
restored to the standard setting, and a picture 
will  once  again  be  visible  on  a  conventional 
analog TV or monitor

Caution:

Summary of Contents for HT302SD

Page 1: ...justing this product please read this instruction booklet carefully and completely P No MFL62665902 00 Model HT302SD HT302SD A8 SH32SD SZ SH32SD WZ Go to page 15 USB Plus Go to page 8 XTS XTS Pro USBplus Go to page 19 Virtual Sound Go to page 15 FM AM Tuner Function ...

Page 2: ......

Page 3: ...nce contact an authorized service center Use of controls adjustments or the performance of procedures other than those specified herein may result in hazardous radiation exposure To prevent direct exposure to laser beam do not try to open the enclosure Visible laser radiation when open DO NOT STARE INTO BEAM CAUTION The apparatus shall not be exposed to water dripping or splashing and no objects f...

Page 4: ... Troubleshooting Language Codes Area Codes Specifications 12 13 22 22 22 Displaying Disc Information Operations Equalizer Effect XTS XTS Pro Virtual Sound Sound Mode Other Operations Playing a Disc or File Playing a DivX Movie File Programmed Playback Viewing a JPEG File Listening to Music from External Device Presetting the Radio Stations Listening to the Radio Using an USB Device Types of Playab...

Page 5: ...5 CD G Discs CD G It is recommended to remove any disc from the player while moving the set Always keep a disc inside the Receiver to prevent optical lens damage due to dust Before Use CD Receiver ...

Page 6: ...6 Front Panel Rear Panel Connect a microphone to MIC Port ...

Page 7: ...7 EQ EQ You Can Choose 8 Fixed Sound Impressions ...

Page 8: ...ne output for audio mono connect it to the left white connect it to the left white audio jack on the unit AM FM connection AM Connect the AM loop aerial to the DVD receiver FM Connect the FM aerial The reception will be its best when the two loose ends of the aerial are in a straight and horizontal line A B C ANTENNA FM M A INPUT AUX IN L R ANTENNA FM FM INPUT X I AU N L R OUTPUT AUDIO OUT INPUT I...

Page 9: ... Receiver and other components Be sure to fully extend the FM wire aerial After connecting the FM Wire aerial keep it as horizontal as possible Connect the supplied FM AM antenna for listening to the radio INPUT AUX IN L R FM Wire Antenna Supplied AM Loop Antenna Supplied Be careful of the following Be careful to make sure children do not put their hands or any objects into the speaker duct Speake...

Page 10: ...elect b a D I S P L A Y Progressive Scan Off c Progressive Scan c Initial Settings DRC Vocal On On AUDIO Move 5 1 Speaker Setup Select Select First Level AUDIO Prev Enter 5 1 Speaker Setup Select DRC Vocal On On Second Level AUDIO Speaker Front L m ft Select Move Return Size Test Small off dB Volume Distance o o Third Level Progressive Scan Video provides the highest quality pictures with less fli...

Page 11: ...lume to match the volume of test signals memorized in the system Note Front Left L Center Front Right R Rear Right R Rear Left L SubWoof b 1 With the DVD format you can hear a program s sound track in the most accurate and realistic presentation thanks to digital audio technology However you may wish to compress the dynamic range of the audio output the difference between the loudest sounds and th...

Page 12: ... Placed within the guide The disc is dirty A menu is on the TV screen The Rating level is set The disc is dirty The speakers and components are connected poorly The DVD CD Receiver is located too close to the TV The antenna is positioned or connected poorly Radio Stations cannot be tuned in The signal strength of the stations is too weak when tuning in with automatic tuning No stations have been p...

Page 13: ...on the disc tray correctly inside the guide Clean the disc Press the SETUP button to turn off the menu screen Cancel the Rating function or change the rating level Clean the disc Connect the Speakers and components securely Move your TV away from the audio components Connect the antenna securely Adjust the antennas and connect an external antenna if necessary Tune in the station manually Point the...

Page 14: ...e sound Semi Karaoke on Turn the Semi Karaoke function on When you finished singing a score will appear on the screen Semi Karaoke off Turn the Semi Karaoke function off Fanfare and score do not appears on the screen Available discs for the Semi Karaoke function DVD discs DVD Karaoke Discs VCD discs with more than 2 tracks Notes This function operate on the DVD CD mode The Semi Karaoke function is...

Page 15: ... above 6 When the sound level is completed press the ENTER button on the remote control Other operations Sleep Timer Setting You can set the DVD CD Receiver to turn off automatically at a specified time 1 Press SLEEP to set the desired sleep time The SL indicator and the sleep time appears in the display window 2 Each time you press SLEEP the setting SL180 1 5 0 1 2 0 9 0 8 0 7 0 6 0 5 0 4 0 3 0 2...

Page 16: ...en to the sound quicker than playing at a normal speed on the disc 1 Press the PLAY button during the normal play back The screen will appear at 1 5 speed with sound 2 To return to the normal PLAY press PLAY VCD MP3 Note This receiver does not memorize the scene of a disc if youswitch off the receiver before commencing to play the disc Press REPEAT key repeatedly and the current title chapter or a...

Page 17: ...rive containing with DivX MP3 WMA and JPEG files together you can select menu of files which you would like to play by pressing Title key If This file has the non supported type on the Player pops up then press Enter key to come back mixed ...

Page 18: ...18 ...

Page 19: ...19 ...

Page 20: ...be searched To prevent data loss back up all data If you use a USB extension cable or USB hub the USB device is not recognized Using NTFS file system is not supported Only FAT 16 32 file system is supported This unit is not supported when the total number of files is 1000 or more External HDD Card readers Locked devices or hard type usb devices are not supported USB port of the unit cannot be conn...

Page 21: ...ual is not available on that specific DVDvideo disc Do not attach any seal or label to either side the labeled side or the recorded side of a disc Do not use irregularly shaped CDs e g heart shapedor octagonal It may result in malfunctions M a n u f a c t u r e d u n d e r l i c e n s e f r o m D o l b y Laboratories Dolby Pro Logic and the double D symbol are trade marks of Dolby Laboratories Con...

Page 22: ... Weight Approx 2 4 kg Operating temperature 5 C to 35 C Operation status Horizontal Operating humidity 5 to 85 External dimensions W x H x D 36 6 7 Stereo mode 45W 45W Rated Output Power 30W 4 at 1 kHz THD 10 Surround mode Front 45W 45W Rated Output Power 30W THD 10 Center 45W Surround 45W 45W Rated Output Power 30W 4 at 1 kHz THD 10 Tuner FM Amplifier Speaker 160 20 000 Hz 82 dB W 1m 45 W 90 W 98...

Page 23: ......

Page 24: ......

Reviews: