background image

7

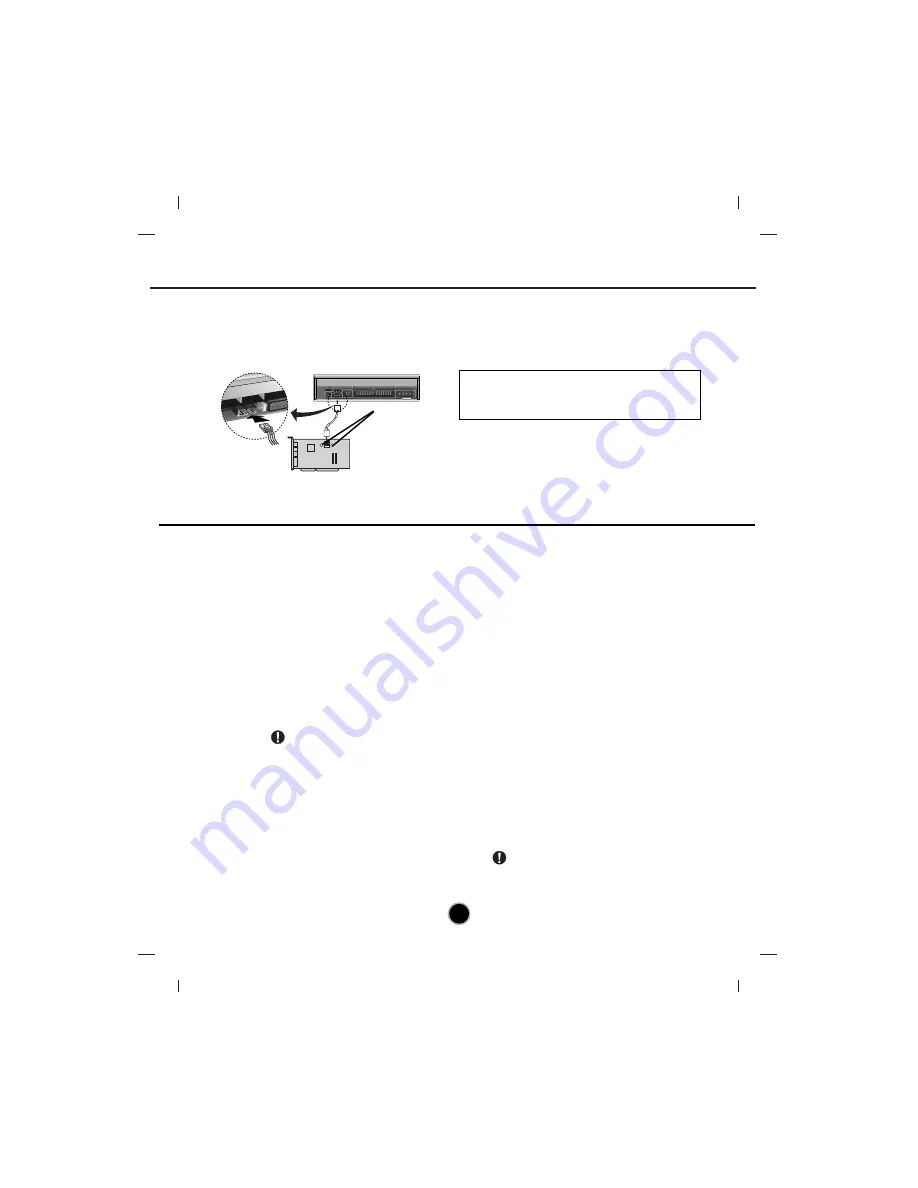
Connecting the Sound Card 

If the computer is using a sound card, the drive is connected to the sound card with an audio
cable. The supplied analog audio cable fits most sound cards or one can be purchased at a local
computer store.

When using Windows 2000 Pro/XP or Window NT Workstation Ver. 4.0, no special device driver is
required. Your system, upon Power On and bootup after installing and connecting the new  drive, will recog-
nize and load native software drivers automatically.
The DOS and Windows 3.1 users can download the DOS Device drivers via  the internet.
Please consult the following internet sites:

http://www.lgservice.com (then choose your country from the list), http://www.lgeservice.com/drivers.html

For Windows 2000 Pro/XP Users

In order to ensure normal drive operation, please check the following:
• The drive is displayed in

Windows 2000 Pro/XP : [Control Panel]-[System]-[Hardware]-[Device Manager]-

[DVD/CD-ROM-Drive]

• 32-bit is displayed in [Control Panel]-[System]-[Performance]

If the drive is not recognized by your computer, please check the  following items.
• If an 

indicator is displayed on the IDE controller in [Control Panel]-[System]-[Device

Manager]-[Hard Disk Controller], you will need to contact your PC’s manufacturer or the
motherboard’s manufacturer and get the appropriate IDE controller driver.

Run 

Add New Hardware

in Control Panel to let PC search again for new device.

For Windows NT Workstation Ver.4.0 Users

In order to ensure normal drive operation, please check to see if the drive is displayed on
the IDE controller in [Control Panel]-[SCSI Adapter]-[Device]

If the drive is not recognized by your computer, an 

indicator is displayed on the IDE 

controller in [Control Panel]-[SCSI Adapter]-[Devices], you will need to contact your PC’s 
manufacturer or the motherboard’s manufacturer and get the appropriate IDE controller driver.

Replacing the Computer Cover

When the installation of the drive unit is 
complete, replace the computer cover

Device Drivers

Refer to the manual for the sound card
for detailed information regarding this
connection.

L

R

INTER

marking L-R

Sound card

Summary of Contents for GWA-4166B

Page 1: ...DVD Writable CD RW Drive English ...

Page 2: ...n against harmful interference in a residential installation This equipment generates uses and can radiate radio frequency energy and if not installed and used in accordance with the instructions may cause harmful interference to radio communications However there is no guarantee that interference will not occur in a particular installation If this equipment does cause harmful interference to radi...

Page 3: ...36 EEC 93 68 EEC and 73 23 EEC CAUTION INVISIBLE LASER RADIATION WHEN OPEN AVOID EXPOSURE TO BEAM VARNING OSYNLIG LASERSTRÄLNING NÄR DENNA DEL ÄR ÖPPNAD STRÄLEN ÄR FARLIG CLASS 1 LASER PRODUCT KLASSE 1 LASER PRODUKT LUOKAN 1 LASER LAITE KLASS 1 LASER APPARAT CLASE 1 PRODUCTO LÁSER CLASSE 1 PRODOTTO LASER ...

Page 4: ...uct names written in this manual are trademarks or registered trademarks of the respective companies WARNING Only drives bearing the logo Compact Disc ReWritable Ultra Speed can write or erase Ultra Speed CD RW media Ultra Speed CD RW Media may be recognized by the same Compact Disc ReWritable Ultra Speed logo on the disc label or packaging material Attempting to write to Ultra Speed CD RW media u...

Page 5: ...e drive In case a foreign object enters the drive please consult the dealer where the drive was purchased Don t interrupt the electric power while the drive is operating When connecting two IDE devices to the Primary or Secondary connectors make sure that the two devices are not configured as both Master or both Slave If they are both set the same Windows may fail to run or recognize the drives Th...

Page 6: ...r This jumper determines whether the drive is configured as a master or slave Changing the master slave configuration takes effect after power on reset 4 IDE Interface Connector Connect to the IDE Integrated Device Electronics Interface using a 40 pin flat IDE cable NOTE Do not connect or disconnect the cable when the power is on as this could cause a short circuit and damage the system Always tur...

Page 7: ... the manual for the computer for details 2 Insert the drive unit into the bay Do not apply excessive pressure to the cables inside the computer 3 Secure the drive with the screws If there is not enough space behind the drive connect the IDE and other cables before securing the drive NOTE This is a general installation guide If your PC hardware appears different please consult your hardware manual ...

Page 8: ... supplied from the factory NOTE A hard disk is normally installed as the Primary Master on the EIDE ATAPI interface Other EIDE peripheral devices such as hard drives and DVD Writable CD RW Drives are then set differently Name Function Drive set as Master Drive set as Slave Drive mode set by CSEL on the host IDE interface MA Master SL Slave CS Cable Select C S S L M A Primary connector Secondary co...

Page 9: ...n 1 on the drive Pin 1 is closest to the Power Connector Slave drive DVD Writable CD RW drive Jumper set to Slave Master drive Booting hard disk OR DIGITAL ANALOG INTERFACE POWER D R C S M S L A G L G 39 1 5 12 GND 40 2 AUDIO AUDIO Primary connector Secondary connector Master drive Other IDE drive Slave drive DVD Writable CD RW drive Jumper set to Slave DIGITAL ANALOG INTERFACE POWER D R C S M S L...

Page 10: ...ed in Control Panel System Performance If the drive is not recognized by your computer please check the following items If an indicator is displayed on the IDE controller in Control Panel System Device Manager Hard Disk Controller you will need to contact your PC s manufacturer or the motherboard s manufacturer and get the appropriate IDE controller driver Run Add New Hardware in Control Panel to ...

Page 11: ...o OFF 2 Poke a fine tipped object such as a straightened heavy duty paper clip into the small hole above the eject button The front door will pop open and the disk tray will come partway out 3 Pull the front door to open it all the way then grip the disc tray between thumb and forefinger and gently pull it straight out If you cannot get a good grip on the disc tray with your fingers use a steel bi...

Page 12: ...gh free space on the CD DVD disc Does writing fail even using the simulation test Is the disc loaded in the drive with the read write surface facing the right direction label up Is the drive installed in the correct orientation Was the drive or disc moved from a low temperature environment to a high temperature environment There is a possibility of condensation on the lens in the drive or on the s...

Page 13: ...irect sunlight and away from heat sources Excessive vibration or a sudden jolt to the drive during operation may cause a malfunction Avoid exposing the drive to sudden changes in temperature as it may cause condensation to collect inside the drive Copyright 2005 LG Electronics U S A Inc 1000 Sylvan Ave Englewood Cliffs NJ 07632 U S A or http www lgeus com LG Electronics Canada Inc 550 MATHESON Blv...

Reviews: