background image

32

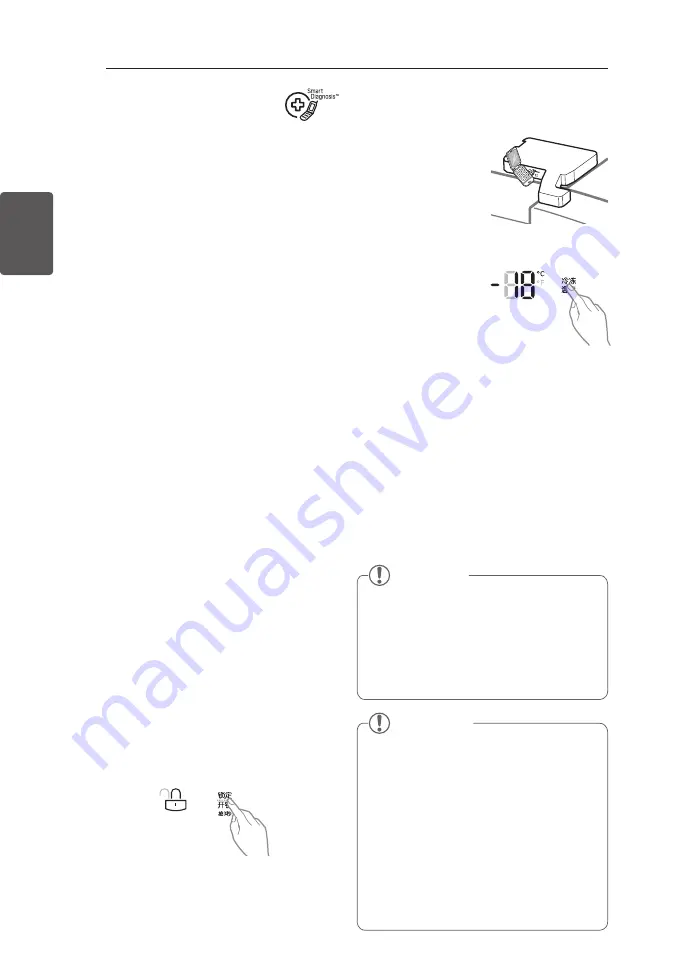
SMART DIAGNOSIS

ENGLISH

3

  Hold the mouthpiece of your phone 

in front of the speaker that is located 
on the right hinge 
of the refrigerator 
door, when 
instructed to do so 
by the call center.

4

  Press and hold the Freezer 

Temperature 
button for three 
seconds while 
continuing to hold your 
phone to the speaker.

5

  After you hear three beeps, release 

the Freezer Temperature button.

6

  Keep the phone in place until the tone 

transmission has finished. This takes 
about 3 seconds, and the display 
will count down the time. Once the 
countdown is over and the tones have 
stopped, resume your conversation 
with the specialist, who will then 
be able to assist you in using the 
information transmitted for analysis. 

Should you experience any problems 
with your refrigerator, it has the capability 
of transmitting data via your telephone 
to the LG service center. This gives you 
the capability of speaking directly to our 
trained specialists. The specialist records 
the data transmitted from your machine 
and uses it to analyze the issue, providing 
a fast and effective diagnosis.

If you experience problems with your 
refrigerator, call to the LG service center. 
Only use the Smart Diagnosis feature 
when instructed to do so by the LG call 
center agent. The transmission sounds 
that you will hear are normal and sound 
similar to a fax machine.

Smart Diagnosis cannot be activated 
unless your refrigerator is connected to 
power. If your refrigerator is unable to 
turn on, then troubleshooting must be 
done without using Smart Diagnosis. 

Using Smart Diagnosis 

First, call to the LG service center. Only 
use the Smart Diagnosis feature when 
instructed to do so by the LG call center 
agent.

1

  Lock the display. To lock the display, 

press and hold the Lock button for 
three seconds. (If the display has been 
locked for over five minutes, you must 
deactivate the lock and then reactivate 
it.)

2

  Open the right refrigerator door.

SMART DIAGNOSIS 

 NOTE

For best results, do not move the 


y

phone while the tones are being 
transmitted.
If the call center agent is not able to 


y

get an accurate recording of the data, 
you may be asked to try again.

 NOTE

Call quality differences by region may 


y

affect the function.
Use the home telephone for better 


y

communication performance, 
resulting in better service.
Bad call quality either from a mobile 


y

or home phone may result in poor 
data transmission from your phone 
to the diagnostics call centre, which 
could cause Smart Diagnosis to not 
work properly. 

Summary of Contents for GR-B24FWAHL

Page 1: ...OUSEHOLD REFRIGERATOR FREEZER Please read this owner s manual thoroughly before operating and keep it handy for reference at all times www lg com P No MFL67567714 ENGLISH GR B24FWAHL GR B24FWSHL GR B24FWVFC GR M24FBGHC ...

Page 2: ...g Food 17 Food Storage Location 19 Food Storage Tips 19 Storing Frozen Food 20 Adjusting the Refrigerator Shelves 20 Detaching the Shelf 20 Refitting the Shelf 21 Using the Folding Shelf 21 When Closing the Door 22 Big Fresh Zone 22 Removal of the Big Fresh Zone drawer 22 Refitting the Big Fresh Zone drawer 23 How to disassemble and assemble the vegetable box 24 Extra Space 24 Fridge Basket 24 In ...

Page 3: ...n for more than 60 seconds a warning alarm sounds in 30 second intervals until it is closed Express FREEZING The freezer section is maintained at the coldest temperature for a 24 hour period before automatically resuming normal operation The freezer display temperature will not change when Express Freezing is engaged It will also enhance ice production whilst it is on Auto Closing Hinge The refrig...

Page 4: ...g its length or at either the plug or connector end Do not use an uncertified power outlet y y Unplug the power plug immediately in the event of a blackout or thunderstorm y y Plug in the power plug with the power cord facing downward y y Installation Contact an authorized service center when you install or relocate the refrigerator y y When moving your refrigerator away from the wall be careful n...

Page 5: ...aning or repairing the refrigerator y y If the refrigerator is fitted with light bulbs and require replacing unplug the refrigerator or turn off y y the power before doing so Do not modify or extend the power cord y y Do not use a hair dryer to dry the interior Do not light a candle to remove any interior odor y y For your safety this appliance must be properly grounded Have the wall outlet and th...

Page 6: ...r do not use crystal ceramics y y Do not touch the cold surfaces in the freezer compartment with wet or damp hands when y y your refrigerator is in operation Do not put glass containers glass bottles or beverage cans in the freezer y y Do not store explosive substances such as aerosol cans with a flammable propellant in this y y appliance This appliance is not intended for use by persons including...

Page 7: ...uit occurs the size of the room in which the appliance may be sited depends on the amount of refrigerant used The room must be 1m2 in size for every 8g of R600a refrigerant inside the appliance The amount of refrigerant in your particular appliance is shown on the identification plate inside the appliance Never start up an appliance showing any signs of damage If in doubt consult your dealer WARNI...

Page 8: ...cluded for your convenience The appearance and specifications of the actual product may differ depending on the model Refrigerator Exterior Applicable to some models only LED Display Displays the refrigerator and freezer s target temperature the water filter condition and the dispenser status Door in Door release Button Refrigerator Freezer ...

Page 9: ...d to preserve dairy products Shelf Freezer Basket Ice Maker Hygiene Fresh filter Door In Door Folding Shelf Big Fresh Zone Fresh Zone Freezer Basket Extra Space Drawer Drawer LED interior lamps The interior lamps light up the inside of the refrigerator Fridge Basket Big Fresh Zone Tilting Fresh Basket ...

Page 10: ...Installation Overview Please read the following installation instructions first after purchasing this product or transporting it to another location 1 Unpacking your refrigerator 2 Choosing the proper location 3 Leveling and Door Alignment ...

Page 11: ... Sheet that is located under the front of the refrigerator To remove any remaining tape or glue rub the area briskly with your thumb Tape or glue residue can also be easily removed by rubbing a small amount of liquid dish soap over the adhesive with your fingers Wipe with warm water and dry Do not use sharp instruments rubbing alcohol flammable fluids or abrasive cleaners to remove tape or glue Th...

Page 12: ...e sides as well as top and maintain at least 2 inches 5 08 cm from the rear wall 4 To avoid vibrations the appliance must be leveled 5 Don t install the appliance below 41 F 5 C It may affect the performance 2 5 08 cm 24 61 cm How to Remove the Refrigerator Door TURN OFF THE MAIN POWER Same procedure for left and right doors 1 Remove the refrigerator door hinge cover left side 2 Disassemble connec...

Page 13: ...zer door Refrigerator door Refrigerator door Freezer door Freezer door GR M24F GR 24 GR B24F Height Adjustment Leveling the doors may not be possible when the floor is not leveled or is of weak or poor construction The refrigerator is heavy and should be installed on a rigid and solid surface Some Timber flooring may cause levelling difficulties if it flexes excesively Fridge Door Height Adjustmen...

Page 14: ... clockwise to unlock it before adjusting the Adjust Hinge pin 2 Rotate the Adjust hinge pin either clockwise or counter clockwise using the narrow side of the spanner spanner to adjust the level difference between the refrigerator door and freezer door this method provides limited adjustment 3 After adjusting door height firmly tighten the Locking nut counter clockwise until secured Height differe...

Page 15: ...fore use Read the Turning On The Power section Your plug type might be different from the picture Caution Putting food in the refrigerator before it has cooled could cause the food to spoil or a bad odor could remain inside the refrigerator Wait for the refrigerator to cool Allow your refrigerator to run for at least three to four hours before putting food in it Check the flow of cold air in the f...

Page 16: ...ill illuminate in the display and will continue for 3 hours The function will automatically disable itself after 3 hours You can stop this function manually by y y touching the button one more time Control Lock The Control Lock function disables the button functions only on the display When power is initially connected to y y the refrigerator the Lock function is off If you want to activate the y ...

Page 17: ...e freshest taste Freezer Basket Preserve small packaged frozen food or frequently taken out foods Ice Maker If necessary preserve ices made in icemaker Big Fresh Zone Preserve vegetables and fruits Drawer 1 Preserve small packaged frozen food or frequently taken out foods Drawer 2 Preserve frozen food to keep it long Tilting Fresh Basket Preserve short term ready to eat vegetables Fridge Basket St...

Page 18: ...also increase the refrigerator s electricity usage Note If you are leaving home for a short period of time like a short vacation the y y refrigerator should be left on Refrigerated foods that are able to be frozen will stay preserved longer if stored in the freezer If you are leaving the refrigerator turned off for an extended period of time remove y y all food and unplug the power cord Clean the ...

Page 19: ...lastic bags or plastic container and store in crisper Fish Store fresh fish and shellfish in the freezer section if they are not being consumed the same day of purchase It is recommended to consume fresh fish and shellfish the same day purchased Leftovers Cover leftovers with plastic wrap aluminum foil or plastic containers with tight lids Storing Frozen Food Freezing Your freezer will not quick f...

Page 20: ...iners y y Containers without tight lids y y Wax paper or wax coated freezer y y wrap Thin semi permeable wrap y y Adjusting the Refrigerator Shelves The shelves in your refrigerator are adjustable to meet your individual storage needs Your model may have either glass or wire shelves Adjusting the shelves to fit different heights of items will make finding the exact item you want easier Doing so wi...

Page 21: ...lean glass shelves with y y warm water while they are cold Shelves may break if exposed to sudden temperature changes or impact Glass shelves are heavy Use y y special care when removing them Caution To reduce the risk of door y y scratches and breaking the door centre mullion please make sure that the refrigerator door mullion is always folded in The door Alarm will sound if the y y door remains ...

Page 22: ...s Big Fresh Zone Removal of the Big Fresh Zone drawer 1 Pull the drawer back to the end of its travel 2 Lift the front of the draw up and remove it from its guide Refitting the Big Fresh Zone drawer 1 Insert the left and right roller of the drawer into the guides whilst the draw is slightly lifted at the front and push it in gently while lowering it at the same time 2 Push it in gently while lower...

Page 23: ...on chamber 2 Lift the vegetable box with both hands and make space in the back by pulling it toward you 3 Grab the back side with one hand to lift the vegetable box and at this time take it out as tilted How to assemble vegetable box 1 Lift the vegetable box askew and push into the refrigeration chamber 2 Lift the vegetable box horizontally with the height as high as the vegetable box in the refri...

Page 24: ... shelves Extra Space Store small foods like eggs ham cheese etc Open and close pushing or pulling y y grips Fridge Basket Preserve drinks like small packs milk beer juice etc In Out Carrier Ideally used to store and carry multiple items to and from the refrigerator When necessary In Out Carrier may y y be taken out seperately It can be used to move required condiments drinks snacks etc for cooking...

Page 25: ...rigerator door may not close properly It could also result in damage to the lid OPEN CLOSE Door In Door Applicable to some models only The Door In Door compartment allows for easy access of commonly used food items The inner Door In Door includes two door bins Cheese Butter and Condiment bins that are specially designed for food that can be stored at a warmer temperature This makes spreading butte...

Page 26: ... basket and raise it up to take it out 3 Move floating basket to the top compartment from magic space cover from which daily corner is removed Door In Door Shelf Disassembly Applicable to some models only 1 Raise magicspace cover up and take it out Hold both ends of the basket and lift up the front part of the basket Assemble in the same method as y y disassembly ...

Page 27: ...the Moving Door Basket y y allows taller food items to be stored more conveniently Caution Remove all food items from basket y y before moving it up or down Not doing so could cause damage to the basket or food items Ice Maker To make ice cubes fill the ice tray with y y water and insert in its position To remove ice cubes hold the lever of y y the tray and pull turn gently Then ice cubes drop in ...

Page 28: ...doors y y all the way before removing or refitting the drawers Freezer Drawer Use the compartment for packed frozen foods and frequently taken out foods You can have a wide space available by taking out the ice maker or fresh zone from the top compartment according to the purpose of use Use the bottom compartment for frozen foods Dried fish condiments The sliding freezer drawers allow easy y y acc...

Page 29: ...e correct level Freezer Fridge basket You can store small packaged frozen food Freezer basket small packaged refrigerated food or beverages Fridge basket such as milk water juice beer etc Do Not store ice cream or foods intended for long term storage in the Freezer Basket To remove the basket hold the basket with both hands and slightly lift up the front part to pull it out To refit the basket ali...

Page 30: ...steel exterior use a clean sponge or soft cloth and a mild detergent in warm water Do not use abrasive or harsh cleaners Dry thoroughly with a soft cloth Caution Do not use a rough cloth or y y sponge when cleaning the interior and exterior of the refrigerator Do not place your hand on the y y bottom surface of the refrigerator when opening and closing Warning Use non flammable cleaner Failure to ...

Page 31: ...t cloth and a mild detergent in warm water Do not use cleaning waxes concentrated detergents bleaches or cleaners containing petroleum on plastic refrigerator parts Plastic Parts covers and panels Use a clean sponge or soft cloth and a mild detergent in warm water Do not use window sprays abrasive cleansers or flammable fluids These can scratch or damage the material Condenser Coil Cover Use a vac...

Page 32: ...vice center Only use the Smart Diagnosis feature when instructed to do so by the LG call center agent The transmission sounds that you will hear are normal and sound similar to a fax machine Smart Diagnosis cannot be activated unless your refrigerator is connected to power If your refrigerator is unable to turn on then troubleshooting must be done without using Smart Diagnosis Using Smart Diagnosi...

Page 33: ...he refrigerator was stored for a long period of time or moved on its side it is necessary for the refrigerator to stand upright for 24 hours before connecting it to power Cooling System runs too much Refrigerator is replacing an older model Modern refrigerators require more operating time but use less energy due to more efficient technology Refrigerator was recently plugged in or power restored Th...

Page 34: ...are opened often or for long periods of time warm humid air enters the compartment This raises the temperature and moisture level within the compartment To lessen the effect reduce the frequency and duration of door openings Unit is installed in a hot location The refrigerator should not be operated in temperatures above 110 F 43 C A large amount of food or hot food was added to either compartment...

Page 35: ...rtment may be raised slightly and condensation may form on the back wall Wait 40 minutes and confirm that the proper temperature has been restored once the defrost cycle has completed Food is not packaged correctly Food stored uncovered or unwrapped and damp containers can lead to moisture accumulation within each compartment Wipe all containers dry and store food in sealed packaging to prevent co...

Page 36: ...he Setting the Controls section for more information Frost or ice crystals on frozen food inside of sealed package Condensation from food with a high water content has frozen inside of the food package This is normal for food items with a high water content Food has been left in the freezer for a long period of time Do not store food items with high water content in the freezer for a long period o...

Page 37: ...Vibrating If the side or back of the refrigerator is touching a cabinet or wall some of the normal vibrations may make an audible sound To eliminate the noise make sure that the sides and back cannot vibrate against any wall or cabinet Dripping Water running into the drain pan during the defrost cycle Normal Operation Pulsating or High Pitched Sound Your refrigerator is designed to run more effici...

Page 38: ...r warmer air enters the refrigerator As the warm air cools it can create a vacuum If the door is hard to open wait one minute to allow the air pressure to equalize then see if it opens more easily Refrigerator wobbles or seems unstable Leveling legs are not adjusted properly Refer to the Leveling and Door Alignment section Floor is not level It may be necessary to add shims under the leveling legs...

Page 39: ...y kg 24h 10 Refrigerant volume g R600a 60 Net weight kg 129 133 144 Noise Sound power dB A 38 Operation standard GB4706 1 2005 Safety of Household and Similar Electrical Appliances Part 1 General Requirements GB4706 13 2014 Safety of Household and Similar Electrical Appliances Particular Requirements for Coolers Ice Cream Makers and Ice makers GB4343 1 2009 Electromagnetic Compatibility Requiremen...

Page 40: ...idity Running rate in percentage R at the ambient temperature i Input power at the ambient temperature 16 C 22 C 32 C 16 C 22 C 32 C 0 10 0 00 0 00 0 03 0 000 0 000 0 000 10 20 0 06 0 06 0 33 0 000 0 000 0 000 20 30 0 60 1 62 2 35 0 000 0 000 0 000 30 40 2 76 9 24 2 56 0 000 0 000 1 513 40 50 6 93 12 72 3 57 0 000 0 000 2 017 50 60 8 01 11 70 1 11 0 756 1 513 3 025 60 70 5 55 11 40 0 05 1 513 2 01...

Page 41: ...escription The defrost heater is controlled by ambient temperature humidity and door opening and closing In case of 32 C ambient temperature the maximum defrost period will be 75 hours and the minimum possible defrost period will be 7 hours Door In Door Heater Relative Humidity Running rate in percentage R at the ambient temperature i Input power at the ambient temperature 16 C 22 C 32 C 16 C 22 C...

Page 42: ......

Page 43: ......

Page 44: ......

Page 45: ......

Page 46: ......

Page 47: ......

Page 48: ...Printed in Korea 韩国庆南昌原市城山区城山贝丘路170 加音丁洞 LG Electronics Inc ...

Reviews: