


19
Installation and Setup
Initial Settings
By using the Setup menu, you can make various
adjustments to items such as picture and sound. You
can also set a language for the subtitles and the
Setup menu, among other things. For details on each
Setup menu item, see pages 19 to 22.
To display and exit the Menu:
Press SETUP to display the menu. A second press of
SETUP will take you back to initial screen.
To go to the next level:
Press
B
on the remote control.
To go back to the previous level:
Press
b
on the remote control.
GENERAL OPERATION
1. Press SETUP. The Setup menu appears.
2. Use
v
/
V
to select the desired option then press
B
to move to the second level. The screen shows
the current setting for the selected item, as well as
alternate setting(s).
3. Use
v
/
V
to select the second desired option then
press
B
to move to the third level.
4. Use
v
/
V
to select the desired setting then press
ENTER to confirm your selection. Some items
require additional steps.
5. Press SETUP or PLAY to exit the Setup menu.
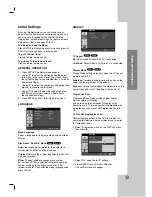
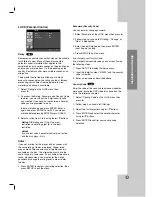
LANGUAGE
Menu Language
Select a language for the Setup menu and on-screen
display.
Disc Audio / Subtitle / Menu
Select the language you prefer for the audio track
(disc audio), subtitles, and the disc menu.
Original
: Refers to the original language in which the
disc was recorded.
Other
: To select another language, press number
buttons then ENTER to enter the corresponding 4-digit
number according to the language code list in the
reference chapter. If you enter the wrong language code,
press CLEAR.
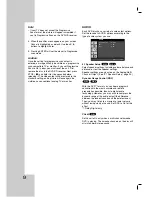
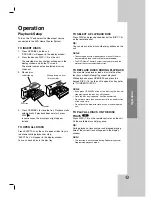
DISPLAY
TV Aspect
4:3:
Select when a standard 4:3 TV is connected.
16:9 Wide:
Select when a 16:9 wide TV is connected.
Display Mode
Display Mode setting works only when the TV Aspect
mode is set to “4:3”.
Letterbox:
Displays a wide picture with bands on the
upper and lower portions of the screen.
Panscan:
Automatically displays the wide picture on the
entire screen and cuts off the portions that do not fit.
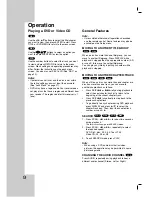
Progressive Scan
Progressive Scan Video provides highe
r
quality
pictures with less flickering.
If you are using the Component Video jacks for
connection to a TV or monitor that is compatible with
a progressive scan signal, set Progressive Scan to
On.
To Turn ON progressive scan:
Connect component out of the DVD to the input of
your monitor/television, set your television or monitor
to Component Input.
1. Select “Progressive Scan” on the DISPLAY menu
then press
B
.
2. Select “On” using the
v
/
V
buttons.
3. Press ENTER to confirm your selection.
The confirm menu will appear.
DVD-A
DVD-V
DVD-A
DVD-V
DVD-A
DVD-V
Menu Language
Original
English
Off
Original
Disc Audio
Disc Subtitle
Disc Menu
Move
Select
LANGUAGE
DISPLAY
TV Aspect
Widescreen
16 : 9
Display Mode
Off
Progressive Scan
Move
Select
DISPLAY
TV Aspect
Display Mode
Move
Enter
Prev.
On
Progressive Scan
Off