background image

Operating

16

Oper

ating

4

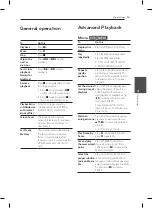
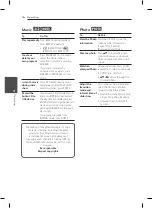
Music 

tu

To

Do this

Play repeatedly

Press REPEAT during playback. 
Press REPEAT repeatedly.


y

F

 (REPEAT ONE) /

(REPEAT ALL) / REPEAT Off

Create or 

delete your 

own program

Press PROGRAM on stop mode. 
Select the desired one or 
more files or tracks by pressing 
MARKER. 
If you want to delete the 
undesired lists or all lists, press 
MARKER or PROGRAM on stop 
mode.

Listen to music 

during slide 

show

Press DVD MENU during music 
playback and select the PHOTO 
mode. And then, press ENTER.

Record the 

Audio CD to 

USB device

Insert Audi o CD and USB Device, 
and press RIPPING. Deactivated 
check boxes are displayed. Press 
ENTER after selecting the desired 
track, one or more to record by 
pressing MARKER. Recording will 
be started. 
If you want to escape from 
RIPPING mode, press ENTER.

The making of unauthorized copies of copy-

protected material, including computer 

programs, files, broadcasts and sound 

recordings, may be an infringement of 

copyrights and constitute a criminal offense. 
This equipment should not be used for such 

purposes. 

Be responsible 

Respect copyrights

Photo 

i

To

Do this

View the Photo 

information

Press the DISPLAY to see the 
contained file information, 
[Type], [File], [Camera], 
[Resolution], and [Date]..

Rotate a photo

Press 

ws

 to rotate the photo 

counterclockwise or clockwise 
while displaying a photo in full 
screen.

Watch an 

enlarged Photo

During slide show, press ZOOM 
repeatedly to select zoom mode. 


y

ZOOM rate: x2/x3/x4


y

wsad

: Move through the 

zoomed photo

Adjust the 

transition 

mode and 

interval time of 

slide show

Go to Slide mode in Setup and 
select the desired transition 
mode and the Interval time.


y

[Transition mode]: None, Slide, 
Stripes, Fade, Wipe, Random


y

[Interval time]: 5/10/30/60 
seconds

Summary of Contents for DV6H Series

Page 1: ...OWNER S MANUAL Full HD Media Player Please read this manual carefully before operating your set and retain it for future reference DV6H P NO MFL66859862 ENGLISH ...

Page 2: ......

Page 3: ... instruction has been adhered to CAUTION This product employs a Laser System To ensure proper use of this product please read this owner s manual carefully and retain it for future reference Shall the unit require maintenance contact an authorized service center Use of controls adjustments or the performance of procedures other than those specified herein may result in hazardous radiation exposure...

Page 4: ...tection y y Cleaning the unit Clean the unit using a soft and dry cloth with a mild detergent solution not strong solvents occurred the damage of surface y y Maintaining performance of the unit Maintain the cleaing status of optical pick up lens and disc drive parts If they are dirty or worn the displayed quality could be diminished For details please contact your nearest authorized service center...

Page 5: ...I cable 11 Connecting to an Amplifier 11 Connecting Audio cable 11 Connecting COAXIAL digital audio cable 11 Connecting HDMI cable 3 System Setting 12 Setup 12 Adjust the settings 12 Language Menu 12 Audio Menu 12 Video Menu 13 Slide Menu 13 Parental control Menu 13 Other Menu 4 Operating 14 On Screen display 14 Displaying content information on screen 14 General Playback 14 Playing Disc 14 Playin...

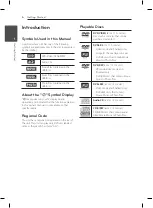
Page 6: ...ia Regional Code This unit has a regional code printed on the rear of the unit This unit can play only DVD disc labeled same as the rear of the unit or ALL Playable Discs DVD VIDEO 8 cm 12 cm disc Discs such as movies that can be purchased or rented DVD R 8 cm 12 cm disc Video mode and finalized only Supports the dual layer disc also DVD R discs that contain Movie Music or Photo files DVD RW 8 cm ...

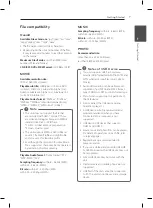
Page 7: ... Dolby Digital DTS MP3 WMA AC3 Sampling frequency within 8 48 kHz MP3 within 32 48 kHz WMA Bit rate within 32 320 kbps MP3 within 20 320 kbps WMA MUSIC Sampling frequency within 8 48 kHz MP3 within 32 48 kHz WMA Bit rate within 8 320 kbps MP3 within 32 192 kbps WMA PHOTO Recommended size more than 32 x 32 x 32 bit pixel less than 4800 x 3500 bit pixel y y This unit supports USB flash memory extern...

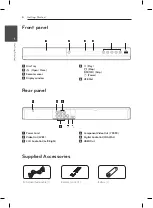
Page 8: ...es RCA Video Audio cable 1 Remote control 1 Battery 1 a Disc Tray b R Open Close c Remote sensor d Display window e D Play I Stop Y U Skip 1 Power f USB Port a Power Cord b Video Out CVBS c 2CH Audio Out Left Right d Component Video Out Y PB PR e Digital Audio Out COAXIAL f HDMI Out ...

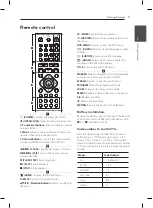
Page 9: ... channel SUBTITLE Selects a subtitle language ANGLE Selects a DVD camera angle if it is available on the disc being played TITLE Accesses the disc s title menu d MARKER Marks any desired point during playback and select or remove any specific track file SEARCH Displays or exit the search menu PROGRAM Enters the program edit mode ZOOM Enlarge video image in disc mode REPEAT Repeats a desired select...

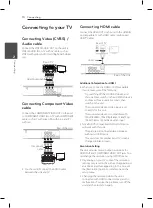
Page 10: ... The connected device s video input is set correctly for this unit The connected device is compatible with 720x576i 480i 720x576p 480p 1280x720p 1920x1080i or 1920x1080p video input y y Not all HDCP compatible HDMI or DVI devices will work with this unit The picture will not be displayed properly with non HDCP device This unit does not playback and TV screen is changed to black screen Resolution S...

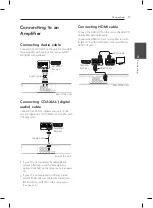
Page 11: ...ampling frequency set the Sample Freq option to 48 KHz on the setup menu See page 12 y y If your TV is not equipped with Dolby Digital and MPEG decoder set the Dolby Digital and MPEG options to PCM on the setup menu See page 12 Connecting HDMI cable Connect the HDMI OUT on the unit to the HDMI IN on amplifier with HDMI cable Connect the HDMI OUT jack on amplifier to HDMI IN jack on TV with HDMI ca...

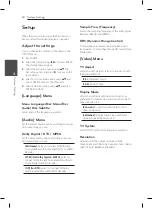
Page 12: ...nnect COAXIAL jack to an amplifier with Dolby Digital DTS or MPEG decoder PCM for Dolby Digital MPEG Select to connect COAXIAL jack to an amplifier without Dolby Digital or MPEG decoder Off for DTS Select to connect COAXIAL jack to an amplifier without DTS decoder Sample Freq Frequency Selects the sampling frequency of the audio signal between 48KHz and 96KHz DRC Dynamic Range Control To adjust th...

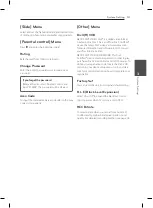
Page 13: ... Inc This is an official DivX Certified device that plays DivX video Visit www divx com for more information and software tools to convert your files into DivX video ABOUT DIVX VIDEO ON DEMAND This DivX Certified device must be registered in order to play purchased DivX Video on Demand VOD movies To obtain your registration code locate the DivX VOD section in your device setup menu Go to vod divx ...

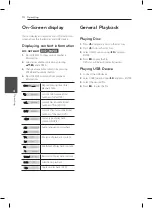
Page 14: ...r total number of title DVD Current track number total number of files MOVIE Current chapter number total number of chapter DVD Codec type of playback content MOVIE Audio language on playback File type of playback content File format of playback content Resolution of playback content Subtitle on playback Angle on playback DVD General Playback Playing Disc 1 Press B and place a disc on the disc tra...

Page 15: ... MENU DVD Only Play repeatedly Press REPEAT during playback Press REPEAT repeatedly y y DVD CHAPTER TITLE OFF y y MOVIE TRACK ALL OFF Repeat a specific portion Press A B to beginning and end points desired repeatedly To return to normal playback Press A B again to return to normal playback Set the desired staring time of playback Press DISPLAY during playback Select the elapsed Time Press ENTER an...

Page 16: ...from RIPPING mode press ENTER The making of unauthorized copies of copy protected material including computer programs files broadcasts and sound recordings may be an infringement of copyrights and constitute a criminal offense This equipment should not be used for such purposes Be responsible Respect copyrights Photo i To Do this View the Photo information Press the DISPLAY to see the contained f...

Page 17: ...it Poor picture quality and sound distortion Fingerprints and dust is stained on the disc Wipe the disc from the center to out with a clean cloth Do not use strong solvents alcohol benzine thinner commercially available cleaners No picture The TV is not set to receive the signal from the unit Select the appropriate video input mode on the TV The video cable is not connected securely Connect the vi...

Page 18: ...nland GL Hong Kong HK Hungary HU India IN Indonesia ID Israel IL Italy IT Jamaica JM Japan JP Kenya KE Kuwait KW Libya LY Luxembourg LU Malaysia MY Maldives MV Mexico MX Monaco MC Mongolia MN Morocco MA Nepal NP Netherlands NL Antilles AN New Zealand NZ Nigeria NG Norway NO Oman OM Pakistan PK Panama PA Paraguay PY Philippines PH Poland PL Portugal PT Romania RO Russian Federation RU Saudi Arabia ...

Page 19: ...an 7285 Icelandic 7383 Indonesian 7378 Interlingua 7365 Irish 7165 Italian 7384 Japanese 7465 Kannada 7578 Kashmiri 7583 Kazakh 7575 Kirghiz 7589 Korean 7579 Kurdish 7585 Laothian 7679 Latin 7665 Latvian Lettish 7686 Lingala 7678 Lithuanian 7684 Macedonian 7775 Malagasy 7771 Malay 7783 Malayalam 7776 Maori 7773 Marathi 7782 Moldavian 7779 Mongolian 7778 Nauru 7865 Nepali 7869 Norwegian 7879 Oriya ...

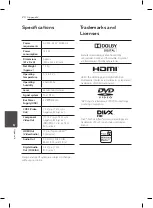
Page 20: ...RCA jack x 2 HDMI Out Video Audio 19 pin Type A HDMI Connector Audio Out 2 0 Vrms 1 kHz 0 dB 600 Ω RCA jack L R x 1 Digital Audio Out COAXIAL 0 5 V p p 75 Ω RCA jack x 1 Design and specifications are subject to change without prior notice Trademarks and Licenses Manufactured under license from Dolby Laboratories Dolby and the double D symbol are trademarks of Dolby Laboratories HDMI the HDMI logo ...

Page 21: ......

Page 22: ......

Reviews: