background image

6


a


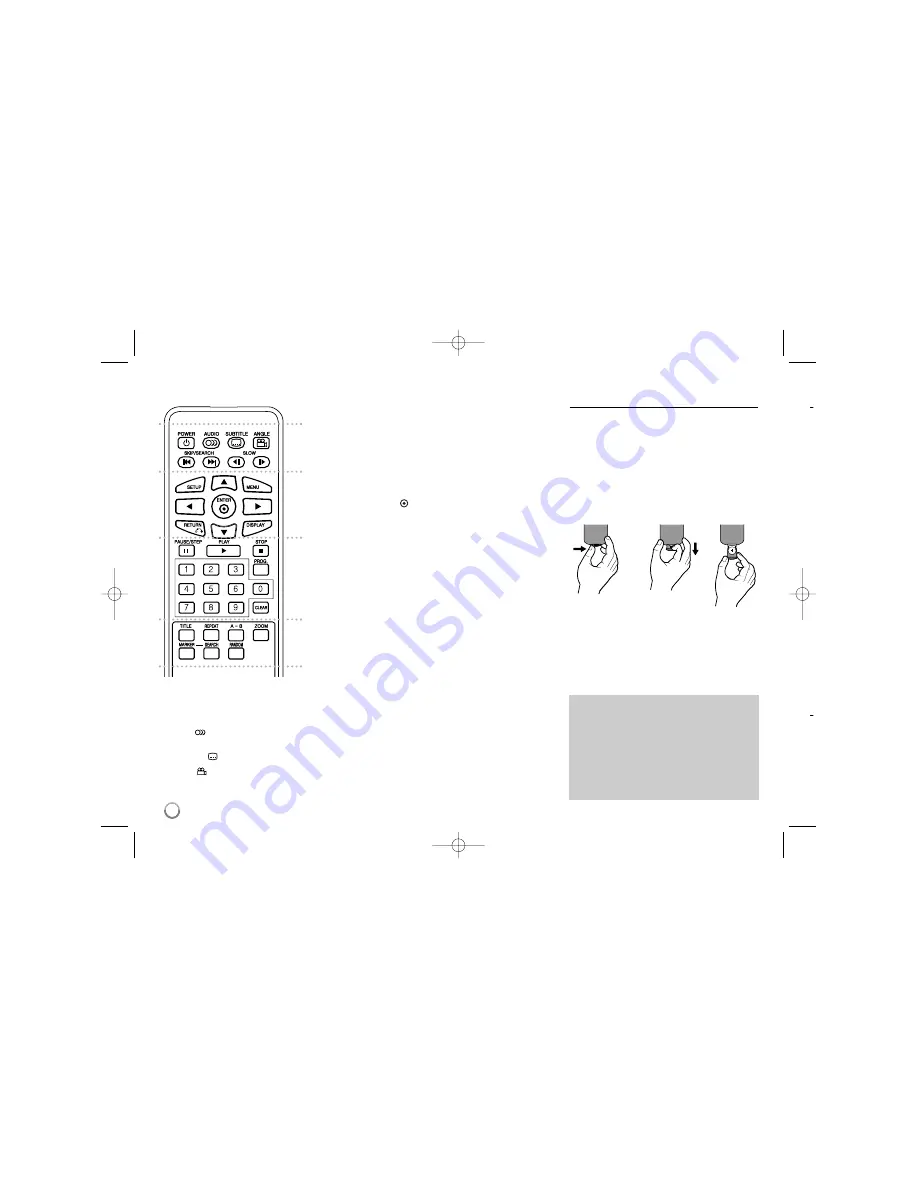
POWER (

1

)

: Switches the unit ON or OFF.

AUDIO (

):

Selects an audio language or audio

channel.

SUBTITLE (

):

Selects a subtitle language.

ANGLE (

):

Selects a DVD camera angle, if

available.

SKIP/SEARCH (

.

>

):

Search* backward /

forward. Go to next or previous chapter/track.
* Press and hold button for about two seconds.

SLOW (

t

T

):

Reverse/ Forward slow playback.


b


SETUP:

Accesses or exits the setup menu.

MENU:

Accesses the DVD menu.

vV b B

Navigates the menus.

ENTER (

): 

Confirms menu selection.

RETURN (

O

): 

Press to move backwards in the

menu or exit the menu.

DISPLAY:

Accesses On-Screen Display.


c


PAUSE/STEP (

X

):

Pauses playback temporarily/

press repeatedly for frame-by-frame playback.

PLAY (

N

):

Starts playback.

STOP (

x

):

Stops playback.

Numerical buttons: 

Selects numbered options in a

menu.

PROG.: 

Enters the program edit mode.

CLEAR: 

Removes a track number on the Program

List.


d


TITLE: 

Access the disc’s title menu.

REPEAT: 

Repeats a chapter, track, title or all.

A-B: 

Repeats a section.

ZOOM: 

Enlarges video image.

MARKER : 

Marks any point during playback.

SEARCH : 

Displays [Marker Search] menu.

RANDOM: 

Plays tracks in random order.

Put the battery into the Remote Control

Pinch the battery holder clip together then pull the
tab to remove the battery holder. Insert the battery
with the + facing in the same direction as the + on
the battery holder. Replace the battery holder with
battery into the Remote Control unit making sure
that it is fully inserted.
• Replace Remote Control unit battery with 3V

micro lithium cells such as CR. 2025 or its equiv-
alent.

• Dispose of battery safety in accordance with

local laws. Do not dispose of in fire.

Warning for replaceable lithium battery

• danger of explosion if battery incorrectly replaced.
• replace only with the same type battery.
• additional warning marking close to the battery if

intended to be replaced by users.

a

b

c

d

Remote Control

Warning : 

The battery used in this device may

present a fire or chemical burn hazard if mis-
treated. Do not recharge, disassemble, inciner-
ate, or heat above 100 °C (212 °F).
Replace the battery with Matsushita Elec. Ind.
Co., Ltd. (Panasonic), part no. CR. 2025 only.
Use of another battery may present a risk of fire
or explosion. Dispose of used batteries. Keep
batteries away from children. Do not disassem-
ble or dispose of in fire.

P

C

C

A


C

T
8
c
te

DP382-N_AUSALLR_MFL48000402  3/28/08  4:35 PM  Page 6

Summary of Contents for DP885 - Portable DVD Player

Page 1: ...ENGLISH P NO MFL48000402 DP885 Copyright 2008 LG Electronics U S A Inc For service support Call Toll Free Number 1 800 243 0000 http us lgservice com DP382 N_AUSALLR_MFL48000402 3 28 08 4 35 PM Page 1 ...

Page 2: ...try to open the enclosure Visible laser radiation when open DO NOT STARE INTO BEAM CAUTION The apparatus should not be exposed to water dripping or splashing and no objects filled with liquids such as vases should be placed on the apparatus CAUTION The ventilation should not be impeded by covering the ventilation openings with items such as newspapers table cloth curtains etc No naked flame source...

Page 3: ...lewood Cliffs NJ Phone 1 201 816 2000 Important Safety Instructions 1 Read these instructions 2 Keep these instructions 3 Heed all warnings 4 Follow all instructions 5 Do not use this apparatus near water 6 Clean only with dry cloth 7 Do not block any ventilation openings Install in accordance with the manu facturer s instructions 8 Do not install near any heat sources such as radiators heat regis...

Page 4: ... The internal rechargeable battery will start charging only when the unit is turned off and the AC adapter is connected to a power outlet The charging stops if you turn on the unit The charging will take approximately 3 hour 30 minutes Operating time on battery approximately 3 hour 30 minutes The operating time on battery may vary depending on the battery status operational status and environment ...

Page 5: ...htness of the LCD display press COLOR BRIGHT repeatedly on the main unit to display the Brightness or Color menu then use b B to adjust the value Press ENTER to confirm the adjustment e Joystick Use the joystick to select an item in the menu Press the joystick to con firm the menu selection f Battery charge and power indicator The indicator turns red in charging and changes to green color when the...

Page 6: ...cks in random order Put the battery into the Remote Control Pinch the battery holder clip together then pull the tab to remove the battery holder Insert the battery with the facing in the same direction as the on the battery holder Replace the battery holder with battery into the Remote Control unit making sure that it is fully inserted Replace Remote Control unit battery with 3V micro lithium cel...

Page 7: ...vent electrical shock and possible damage to your unit or vehicle always unplug the automotive adapter from the cigarette lighter socket before you remove the plug from your unit A 1 5 amp 250V fuse for protection is installed in the automotive adapter While the engine is being started disconnect the automotive adapter from the car s cigarette lighter socket Do not operate your unit when the car b...

Page 8: ...osition open the LCD panel to a verti cal position Revolve the LCD panel counterclockwise slowly 180 degrees When finished using the unit return the LCD panel to its original position Do not leave the LCD panel in the face up position or sudden shocks may damage it Selecting the operation mode You need to select a operation mode before using this unit Press MODE on the unit and the operation mode ...

Page 9: ...e Adjust the display settings TV Aspect Select which screen aspect to use based on the shape of your TV screen 4 3 Select when a standard 4 3 TV is connected 16 9 Select when a 16 9 wide TV is connected Display Mode If you selected 4 3 you ll need to define how you would like widescreen programs and films to be displayed on your TV screen LetterBox This displays a widescreen picture with black ban...

Page 10: ...the parental lock See page 15 Adjust the others settings B L E Black Level Expansion To select the black level of playback pic tures Set your preference and monitor s ability Displaying Disc Information more you can do You can select an item by pressing vV and change or select the setting by pressing b B Current title number total number of titles Current chapter number total number of chapters El...

Page 11: ...rame by Frame playback Playing repeatedly Press REPEAT repeatedly to select an item to be repeated The current title chapter or track will be played back repeatedly To return to normal playback press REPEAT repeatedly to select Off Fast forward or fast reverse Press and hold SKIP or to play fast forward or fast reverse during playback You can change the various playback speed by pressing and hold ...

Page 12: ...MARKER at the desired position The marker icon will appear on screen briefly Repeat to place up to nine markers Also you can recall or clear the positions Press SEARCH and Marker Search menu Use b or B to select a desired marker on the menu then press ENTER to recall it or CLEAR to clear it Last Scene Memory This unit memorizes last scene from the last disc that is viewed The last scene remains in...

Page 13: ...hlight icon then press ENTER to start slide show You can change slide show speed using b B when icon is highlighted Skip to the next previous photo Press SKIP or to view the previous next photo Rotate a photo Use vV to rotate the photo in full screen counterclockwise or clockwise while viewing a photo in full screen Pause a slide show Press PAUSE STEP X to pause a slide show Press PLAY N to contin...

Page 14: ... devices Digital camera and mobile phone are not supported Using a USB Flash Drive 1 Connect a USB Flash Drive to the USB port on the unit 2 Display the menu to select MODE the USB operation mode 3 Select USB b b B B ENTER 3 Select a file v v V V MENU 4 Play the file N N PLAY 5 Remove the USB Flash Drive You can play MP3 WMA JPEG files in the USB Flash Drive with version 1 1 BUTTON Watching a AV i...

Page 15: ... 8377 Sanskrit 8365 Scots Gaelic 7168 Serbian 8382 Serbo Croatian 8372 Shona 8378 Sindhi 8368 Singhalese 8373 Slovak 8375 Slovenian 8376 Spanish 6983 Sudanese 8385 Swahili 8387 Swedish 8386 Tagalog 8476 Language Code Tajik 8471 Tamil 8465 Telugu 8469 Thai 8472 Tonga 8479 Turkish 8482 Turkmen 8475 Twi 8487 Ukrainian 8575 Urdu 8582 Uzbek 8590 Vietnamese 8673 Volapük 8679 Welsh 6789 Wolof 8779 Xhosa ...

Page 16: ...O settings to the cor rect position Insert a playable disc Check the disc type and regional code Change the rating level Point the remote control at the remote sensor of the unit Operate the remote control closer to the unit No power The power is on but the unit does not work No picture No sound The unit does not start playback The remote control does not work properly Designs and specifications a...

Page 17: ...re to maintain or separate system components and Damages or operating problems that result from normal wear and tear misuse abuse operation outside environmental specifications or contrary to the requirements or precautions in the Operating Guide accident lightning strikes or other natural causes unauthorized modification or alteration incorrect elec trical current or voltage reception problem cau...

Reviews: