background image

EN
G

LISH

86

SPECIFICATIONS

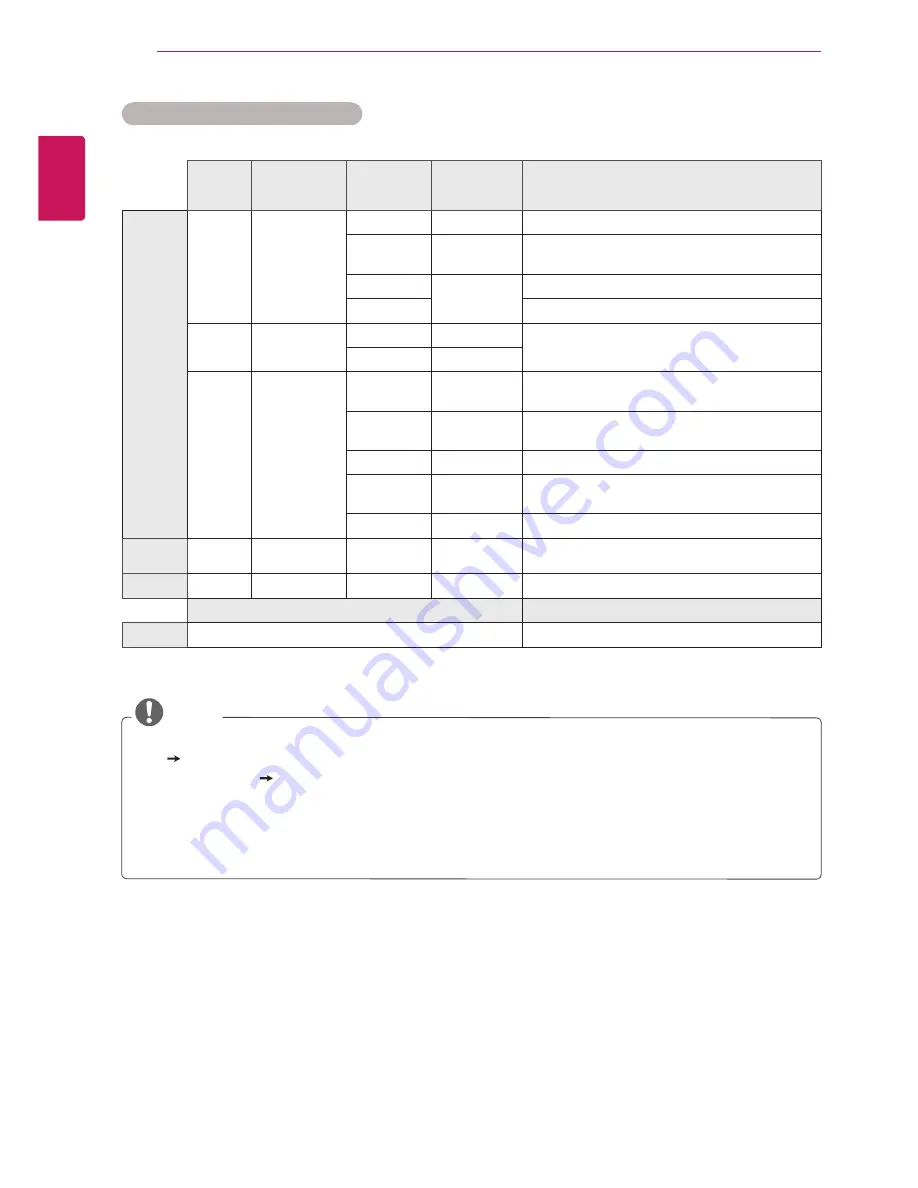
3D video input format supported.

Signal

Resolution

Horizontal

Frequency

(kHz)

Vertical

Frequency

(Hz)

Playable 3D video format

HDMI

720p

1280 x 720

45

60

Top & Bottom, Side by Side

89.9

90

59.94

60

HDMI Frame Packing

37.5

50

Top & Bottom, Side by Side

75

HDMI Frame Packing

1080i

1920 x 1080

33.75

60

Top & Bottom, Side by Side

28.125

50

1080p

1920 x 1080

67.50

60

Top & Bottom, Side by Side,

Checker Board, Single Frame Sequential

56.250

50

Top & Bottom, Side by Side,

Checker Board, Single Frame Sequential

27

24

Top & Bottom, Side by Side, Checker Board

53.95

54

23.98

24

HDMI Frame Packing

33.75

30

Top & Bottom, Side by Side, Checker Board

USB 

1080p

1920 x 1080

33.75

30

Top & Bottom, Side by Side, Checker Board

RGB

1080p

1920 x 1080

66.587

59.93

Top & Bottom, Side by Side

Signal

Playable 3D video format

DTV

720p, 1080i

Top & Bottom, Side by Side

 NOTE

y

y

If HDMI input is received in HDMI 3D format, images are automatically converted into 3D.  

y

y

2D   3D

  mode is available to watch for all signals.

y

y

If you change 

2D   3D

 mode, the left and right edges of the screen are clipped.

y

y

If you select HDMI 3D, 3D mode is automatically enabled, which may cause the delay of screen 
turning on.

y

y

For some 3D content files, if a 3D file is converted into 2D, the left and right edges of the screen may 
appear truncated.

Summary of Contents for DM2780A

Page 1: ...л чит т нич ю н льт цию гл т чн Б з вы дны www sotmarket ru д бн я инф м ция т в тзывы бз ы и ы Инструкция LG DM2780D Перейти в карточку товара 8 800 775 98 98 ...

Page 2: ...www lg com OWNER S MANUAL CINEMA 3D TV DM2780D DM2780A Please read this manual carefully before operating the your TV and retain it for future reference CINEMA 3D TV MODELS ENGLISH ...

Page 3: ...nostics Only DTV 26 CI Common interface Information Only DTV 27 Selecting the programme list 27 Favourite programme setup 28 Using additional options 28 Adjusting aspect ratio 30 Using the input list 31 On screen menu language Country selection Only DTV 32 Language selection In digital mode only Only DTV 33 Using the Lock options 33 Locking the buttons on the TV 34 Parental control In digital mode...

Page 4: ...ettings 67 OPTION settings 68 LOCK settings 69 INPUT settings 69 USB settings 70 MAKING CONNECTIONS 70 Connection overview 72 Connecting to a Camcorder Camera HD receiver DVD VCR player or Gaming device 72 HDMI connection 72 DVI to HDMI connection 72 Component connection 73 Composite connection 73 Euro Scart connection 73 Connecting to an audio system 73 Digital optical audio connection 74 Headpho...

Page 5: ...82 TROUBLESHOOTING WHEN USING 3D MODE 83 SPECIFICATIONS 87 IR CODES 88 EXTERNAL CONTROL DEVICE SETUP 88 RS 232C Setup 88 Type of connector D Sub 9 Pin Male 89 RS 232C configurations 90 Communication Parameters 90 Command reference list 91 Transmission Receiving protocol ...

Page 6: ...ABOUT DIVX VIDEO ON DEMAND This DivX Certified device must be registered in order to play purchased DivX Video on Demand VOD movies To obtain your registration code locate the DivX VOD section in your device setup menu Go to vod divx com for more information on how to complete your registration DivX Certified to play DivX video up to HD 1080p including premium content DivX DivX Certified and assoc...

Page 7: ...ries contact the local dealer where you purchased your product The illustrations in this manual may differ from the actual product and accessories Remote control and Batteries Stand Base Power Cord Cable Tie CD Owner s Manual Card TriDef 3D Game Software CD Quick Installation Guide 3D Glasses Normal type 3D Glasses Clip type AC DC Adapter RGB Cable ...

Page 8: ... span y y Any damages or injuries by using pirated items are not covered by the warranty y y The accessories supplied with your product may vary depending on the model y y Product specifications or contents in this manual may be changed without prior notice due to upgrade of product functions CAUTION NOTE ...

Page 9: ...nd exits the menus OK Selects the highlighted menu option or confirms an input VOL Adjusts the volume level PR Scrolls through the saved programmes I Turns the power on or off All of the buttons are touch sensitive and can be operated through simple touch with your finger MONO 1 2 AUDI0 AV IN2 Remote Control Sensor PCMCIA Card Slot ONLY DTV Power Indicator y y Lighting On Turned on y y Lighting Of...

Page 10: ...protect the screen from damage CAUTION CAUTION y y It is recommended to move the TV in the box or packing material that the TV originally came in y y Before moving or lifting the TV disconnect the power cord and all cables y y Hold the top and bottom of the TV frame firmly Make sure not to hold the transparent part speaker or speaker grill area y y When holding the TV the screen should face away f...

Page 11: ...crew to the left and then pull out the Stand Base from the Stand Body Mounting on a table 1 Lift and tilt the TV into its upright position on a table Leave a 10 cm minimum space from the wall for proper ventilation 2 Connect the AC DC Adapter and Power Cord to a wall outlet 10 cm 10 cm 10 cm 10 cm 3 Remove 2 screws and pull out the Stand Body from the TV ...

Page 12: ...down to adjust the angle of the TV to suit your view NOTE Front Rear 18 5 Using the Kensington security system The Kensington security system connector is located at the back of the TV For more information of installation and using refer to the manual supplied with the Kensington security system or visit http www kensington com Connect the Kensington security system cable between the TV and a tabl...

Page 13: ... to mount the TV to a wall attach Wall mounting interface optional parts to the back of the set When you install the TV using the wall mounting interface optional parts attach it carefully so it will not drop 1 Please Use the screw and wall mount interface in accordance with VESA Standards 2 If you use screw longer than standard the TV might be damaged internally 3 If you use improper screw the pr...

Page 14: ...injury y y Use an authorized LG wall mount and contact the local dealer or qualified personnel y y Do not over tighten the screws as this may cause damage to the TV and void your warranty y y Use the screws and wall mounts that meet the VESA standard Any damages or injuries by misuse or using an improper accessory are not covered by the warranty CAUTION y y Use the screws that are listed on the VE...

Page 15: ...ING FAV 3D MUTE OK MENU GUIDE Q MENU POWER Turns the TV on or off ENERGY SAVING See p 60 Adjusts the brightness of the screen to reduce energy consumption TV PC Selects TV or PC mode LIST See p 27 Displays the programme table INPUT See p 30 Selects the input mode TV RAD See p 24 Selects Radio TV and DTV programme Number buttons Enters numbers Q VIEW Returns to the previously viewed programme MARK ...

Page 16: ...e p 58 Accesses the main menus or saves your input and exit menus Navigation buttons Scrolls through menus or options OK Selects menus or options and confirms your input BACK Allows the user to move return one step in an interactive application EPG or other user interaction function Teletext buttons See p 75 These buttons are used for teletext For further details see the Teletext section USB Menu ...

Page 17: ...socket with 2 RF cables 75 ohm y y Use a signal splitter to use more than 2 TVs y y If the image quality is poor install a signal amplifier properly to improve the image quality y y If the image quality is poor with an antenna connected aim the antenna to the proper direction y y Visit http AntennaWeb org for more information about the antenna and cable connection NOTE y y Make sure not to bend th...

Page 18: ...r home environment select Home Use mode y y Store Demo mode is suitable for the retail environment y y If you select Store Demo mode the previously customized settings will switch to the default settings of Store Demo mode in 2 minutes If you do not complete the initial setting it will appear whenever you access the TV 3 The initial setting screen appears if you access the TV for the first time 4 ...

Page 19: ...ilable programmes 1 Press MENU to access the main menus 2 Press the Navigation buttons to scroll to SETUP and press OK 3 Press the Navigation buttons to scroll to Auto Tuning and press OK 4 Select Start to start automatic tuning The TV scans and saves available programmes automatically 5 When you are finished press EXIT When you return to the previous menu press BACK NOTE y y Use Number buttons to...

Page 20: ...NOTE y y Use Number buttons to input a 4 digit password in Lock System On y y Automatic Numbering Decide whether to use the programme numbers as sent by broadcasting stations for tuning y y If you want to select the Cable 1 Press MENU to access the main menus 2 Press the Navigation buttons to scroll to SETUP and press OK 3 Press the Navigation buttons to scroll to Auto Tuning and press OK 4 Press ...

Page 21: ...DTV Setting Service Operator y y Acquired certification SO Sweden Comhem Canal Digital Denmark YouSee Canal Digital Stofa Norway Canal Digital If there are not any Service Operator that you want select Other Operators If you select Other Operators or the selected country supports Other Operators only it may take some time to search all the channels or it may not search some of the channels If some...

Page 22: ...st For countries other than Finland Sweden Denmark and Norway When selecting Antenna if Finland Sweden Denmark Norway or country is chosen 1 Press MENU to access the Main menus 2 Press the Navigation buttons to scroll to SETUP and press OK 3 Press the Navigation buttons to scroll to Manual Tuning and press OK 4 Press the Navigation buttons to scroll to DTV 5 Press the Navigation buttons or Number ...

Page 23: ...annel number 8 Press the Navigation buttons to scroll to Commence searching 9 Press the Navigation buttons to scroll to Store and press OK 10 When you are finished press EXIT When you return to the previous menu press BACK Assigning a station name You can assign a station name with five characters to each programme number 1 Press MENU to access the main menus 2 Press the Navigation buttons to scro...

Page 24: ...t be updated Cable DTV Setting In Cable mode only Only DTV The range that a user can select from the Service Operator menu differs depending on number of Service Operator supported by each country and if number of supported Service Operator for each country is 1 corresponding function becomes non activation After changing Service Operator a warning window saying that channel map will be deleted wh...

Page 25: ... scroll to the programme number you wish to skip 2 Press the Blue button to skip the selected programme number 3 Press the Blue button again to release Skipping a programme number NOTE y y You will be unable to select a skipped programme using P buttons during watching TV y y If you wish to watch a skipped programme directly enter the programme number using number buttons or release it in the Prog...

Page 26: ... to On appears y y When the power is turned off downloading starts When the power is turned on while updating the progress status is displayed y y Select the Yes using the button and you will see the following picture y y After the Software Update is complete the System restarts Yes Close Software update is available Would you like to download now approximately 30 Min 2 hours Your TV software is u...

Page 27: ... access the module menu To purchase a module and smart card contact your dealer Do not repeatedly insert or remove a CI module from the TV This may cause a malfunction When the TV is turned on after inserting a CI Module you may not have any sound output This may be incompatible with the CI module and smart card CI Common Interface functions may not be possible depending upon the country broadcast...

Page 28: ...igital TV The mode will be switched between TV DTV and Radio from the program you are currently watching Paging through a programme list 1 Press the Navigation buttons to turn the pages 2 Return to normal TV viewing and Press LIST Favourite programme setup Selecting favourite programme Favourite programme is a convenient feature that lets you quikly scan up to programmes of your choice without hav...

Page 29: ...sing Q MENU or accessing Aspect Ratio in the PICTURE menu NOTE 16 9 The following selection will allow you to adjust the picture horizontally in linear proportion to fill the entire screen useful for viewing 4 3 formatted DVDs Just Scan Just Scan Following Selection will lead to you view the picture of best quality without loss of original picture in high resolution image Note If there is noise in...

Page 30: ...owever the top and bottom of the picture will be cropped y y You can only select 4 3 16 9 Wide 14 9 Zoom Cinema Zoom in Component mode y y You can only select 4 3 Original 16 9 Wide 14 9 Zoom Cinema Zoom in HDMI mode y y You can only select 4 3 16 9 Wide in RGB PC HDMI PC mode only y y In DTV HDMI Component over 720p mode Just Scan is available y y In Analogue AV mode Full Wide is available NOTE C...

Page 31: ...each input source Adding an Input label 1 Press MENU to access the main menus 2 Press the Navigation buttons to scroll to OPTION and press OK 3 Press the Navigation buttons to scroll to Input Label and press OK 4 Press the Navigation buttons to scroll to one of the input sources 5 Press the Navigation buttons to scroll to one of the input label and press OK 6 When you are finished press EXIT When ...

Page 32: ... for Country password is not 0 0 0 0 but 1 2 3 4 y y If you do not finish the set up Installation Guide by pressing BACK or if you time out on the OSD On Screen Display the installation menu will continuously appear until the set up is completed whenever the TV is switched on y y If you select the wrong local country teletext may not appear correctly on the screen and some problems may occur durin...

Page 33: ...tion buttons to scroll to OPTION and press OK 3 Press the Navigation buttons to scroll to Audio Language or Subtitle Language and press OK 4 Press the Navigation buttons to scroll to Desired Language option you want and press OK 5 When you are finished press EXIT When you return to the previous menu press BACK Audio Language Selection When two or more audio languages are broadcast you can select t...

Page 34: ...or Country password is not 0 0 0 0 but 1 2 3 4 Lock the buttons on the TV to prevent any unwanted operations or accidents by children 1 Press MENU to access the main menus 2 Press the Navigation buttons to scroll to LOCK and press OK 3 Press the Navigation buttons to scroll to Key Lock and press OK 4 Press the Navigation buttons to scroll to On and press OK to activate the Key lock feature To deac...

Page 35: ... Sound Mode Selects one of the sound modes Standard Music Cinema Sport Game Audio Selects the sound output Sleep Timer Sets the length of time until the TV to turns off Favourite Selects the favourite programme USB Device Selects Eject in order to eject USB device Aspect Ratio 16 9 The available menus and options may differ from the input source that you are using NOTE 3 Press the Navigation butto...

Page 36: ...displays the programme details for next 8 days 1 Press INFO to shows the present screen information Icon Description Displayed with a DTV Programme Displayed with a Radio Programme Displayed with a MHEG Programme Displayed with a AAC Programme Aspect ratio of broadcasting programme Displayed with a Teletext Programme Displayed with a Subtitle Programme Displayed with a Scramble Programme Displayed...

Page 37: ...ays the 8 Day Guide mode for the programme in the Favourite List Programme Guide ALL NOW NEXT 1 YLE TV1 Keno World Business 2 YLE TV2 4 TV Your World Today Fantomen Legenen om Den Kritiskt Naturtimmen ABC Lyssna Tänään otsikoissa Glamour 5 YLE FST 6 CNN 8 YLE24 RADIO Pr Change Favourite Mode Schedule Schedule List Information That 70s show 1 YLE TV1 6 Apr 2007 15 09 Button Function in NOW NEXT Gui...

Page 38: ...using a SCART cable Button Description BACK Change to Guide or Schedule mode or Select Record or Remind Function setting or Select Date Start End time or Programme OK Save Timer Record Remind Button Function in Schedule List Mode If you ve created a schedule list a scheduled program is displayed at the scheduled time even when you are watching a different program at the time Only the Up Down OK BA...

Page 39: ...optional external speaker instead of the built in speaker set the TV speaker feature to off See p 63 y y Use a High Speed HDMI Cable y y Please check the PC environment if you cannot hear the sound in HDMI mode y y If you want to use HDMI PC mode you must set the input label to PC mode NOTE NOTE HDMI connection Transmits the digital video and audio signals from your PC to the TV Connect the PC and...

Page 40: ...om your PC to the TV Connect the PC and the TV with the DVI to HDMI cable as shown the following illustrations To transmit an audio signal connect an optional audio cable RGB connection Transmits the analog video signal from your PC to the TV Connect the PC and the TV with the D sub 15 pin cable as shown the following illustrations To transmit an audio signal connect an optional audio cable PC RGB...

Page 41: ...mance 1 Press MENU to access the main menus 2 Press the Navigation buttons to scroll to PICTURE and press OK 3 Press the Navigation buttons to scroll to Picture Mode and press OK 4 Press the Navigation buttons to scroll to an image mode you want and press OK 5 Select and adjust following options and then press OK Option Description Backlight Adjusts the brightness of the screen by controlling the ...

Page 42: ...mage may be unstable for a few seconds while the configuration is in progress Position Size Phase Adjusts the options when the image is not clear especially when characters are shaky after the auto configuration Reset Restores the options to the default setting 5 When you are finished press EXIT When you return to the previous menu press BACK Adjusting the sound Selecting an sound mode Play the so...

Page 43: ...s OK 5 Select and adjust following options and then press OK Option Description Surround X This option enhances sound depth and clarity by maximizing the Surround effect Treble Controls the dominant sounds in the output When you turn up the treble it will increase the output to the higher frequency range Bass Controls the softer sounds in the output When you turn up the bass it will increase the o...

Page 44: ...age device make sure to end the connection properly to prevent damages to the TV or files or 1 Press Q MENU to access the quick menus 2 Press the Navigation buttons to scroll to USB Device and press OK 3 Disconnect the USB storage device only when the message says that it is safe to remove y y Do not turn the TV off or remove a USB storage device while the USB storage device is connected to the TV...

Page 45: ...ment method of USB storage device is similar to Window XP and filename can recognize up to 100 English characters y y Be sure to back up important files since data stored in a USB memory device may be damaged We will not be responsible for any data loss y y If the USB HDD does not have an external power source the USB device may not be detected So be sure to connect the external power source Pleas...

Page 46: ...File size information 6 Return to the previous level 7 Available buttons on the remote control Supported file format Type Supported file format Photo y JPG y Available size Baseline 64 pixel W x 64 pixel H 15360 pixel W x 8640 pixel H Progressive 64 pixel W x 64 pixel H 1920 pixel W x 1440 pixel H Music y MP3 y Bit rate range 32 Kbps 320 Kbps y Sampling rate Sampling Frequency MPEG1 layer 3 32 kHz...

Page 47: ...0 01 2010 SG 003 10 01 2010 SG 001 10 01 2010 SG 004 10 01 2010 SG 005 10 01 2010 SG 006 10 01 2010 SG 007 10 01 2010 Page 2 3 No Marked Navigation Popup Menu Page Change Mark Exit 1 folder s 7 file s 1366x768 125KB View Mark All Delete Close 1 17 Slideshow BGM Delete Q MENU Option Hide Using photo options Use the following options while viewing photos Number of selected photos Options Option Desc...

Page 48: ...ess OK Listening to Music 1 Press the Navigation buttons to scroll to USB and press OK 2 Press the Navigation buttons to scroll to Music List and press OK 3 Select Drive1 to access the connected USB storage device 4 Press the Navigation buttons to scroll to a folder you want and press OK 5 Press the Navigation buttons to scroll to a file you want and press OK A pop up window will appears 6 Play mu...

Page 49: ...ions for Music List 1 Press Q MENU to access the Pop Up menus 2 Press the Navigation buttons to scroll to Set Audio Play or Set Audio and Press OK When you select the Set Audio Play 1 Press the Navigation buttons to show the Set Audio Play 2 Press the Navigation buttons to make appropriate adjustments When you select the Set Audio 1 Press the Navigation buttons to to show the Sound Mode Auto Volum...

Page 50: ...work properly depending on the frame y y Movie files other than the specified types and formats may not work properly y y Max bit rate of playable movie file is 20 Mbps y y We do not guarantee smooth playback of profiles encoded level 4 1 or higher in H 264 AVC y y DTS Audio codec is not supported y y A movie file more than 30GB in file size is not supported for playback y y A DivX movie file and ...

Page 51: ...in a USB storage device Close Closes the pop up menu The image under the preview window will appear if you select a non supported file NOTE Movie List Moive SG 001 avi Page 2 3 Title Duration No Marked Navigation Popup Menu Page Change Mark Exit 640x480 720KB Up Folder Up Folder SG 001 avi 03 50 SG 002 avi 03 55 SG 003 avi 03 35 640x480 720KB Play Repeat Mark All Delete Close 7 Control playback by...

Page 52: ...ion or When using the or button during playback a cursor indicating the position can be viewed on the screen Play Press the Play button to return to normal playback ENERGY SAVING Press the ENERGY SAVING button repeatedly to increase the brightness of your screen See p 60 When you select the Set Video Play Menu Description Picture Size Selects your desired picture format during movie play Audio Lan...

Page 53: ...DivX codec may be corrupted or not be played y y The DivX VOD code allows you to activate up to 6 devices under one account Once the deregistration is executed you must register your device again to see DivX VOD contents NOTE NOTE DivX VOD Deregistration You should deregister your device with 8 digit DivX deregistration code from your device at www divx com vod 1 Press MENU to access the USB menus...

Page 54: ... confusion y y Put fragile or breakable objects away when viewing 3D images y y Such objects may break or cause personal injuries when you are startled by the realistic 3D images y y Parents should prevent children who are 5 years or younger from watching 3D images because viewing 3D images can be harmful to vision development y y Warning about photosensitivity seizures Some users may have a seizu...

Page 55: ... any dust before using the cloth y y Do not scratch the surface of the lens Polarized film of 3D glasses with a sharp tool or wipe the lens with chemicals y y The lens of the 3D glasses is different from those of general glasses and is very thin Therefore be careful with the glasses as the lens can be popped out easily y y Be careful of the edges of the glass frame when putting on the 3D glasses C...

Page 56: ...L 70 cm Up Down Optimal viewing angle D 14 No Description 1 Adjust your distance from the TV to allow you to view images from the optimal distance L 2 Adjust the TV and your posture to allow you to view images at the optimal viewing angle D 3 Place your hands gently on the keyboard keeping your arms bent at the elbows and horizontally outright 4 Adjust the location of the TV to avoid it reflecting...

Page 57: ...lasses 4 Press the Navigation buttons to scroll the OK and press OK 5 Press the Navigation buttons to scroll the shape and press OK Mode Description 2D 3D Changed from 2D imaging to 3D imaging 2D 3D Side by Side Top Bottom Checker Board Frame Sequential 6 Press 3D button to to 2D Off or 3D Off Mode Description 3D 2D Displays images in 2D without any 3D effects 2D 3D Displays images in 3D 3D Off Di...

Page 58: ... converted into 3D y y You cannot enter the Main menu while watching 3D files NOTE 3D Mode Setting Left Right Vivid Close 3D Picture Correction 3D Depth 15 3D Viewpoint 0 Picture Mode The available Programme settings are described in the following Option Description 3D Picture Correction Select Left Right or Right Left Select the screen with 3D video with better visibility 3D Depth Adjusts the ste...

Page 59: ...sts the sound quality effect or volume level PICTURE See p 60 Adjusts the image size quality or effect TIME See p 66 Sets the time date or Timer feature SETUP See p 59 Sets up and edit programmes USB See p 69 Using integrated media features LOCK See p 68 Locks or unlocks channels and programs INPUT See p 69 Views the input sources with their labels OPTION See p 67 Customizes the general settings y...

Page 60: ...able inputs See p 18 Manual Tuning Tunes and stores the programmes you want manually See p 21 to 22 Programme Edit Adds or deletes pregrammes on the programme See p 23 Software Update This automatically updates your TV s software See p 25 Diagnostics This shows you the manufacturer model or type number serial number and software information See p 26 CI information Enables you to watch some encrypt...

Page 61: ...ill be saved as Expert1 in the picture modes Set 3D Video Only 3D model Sets the 3D imaging option See p 53 Energy Saving Sets to automatically adjust the screen brightness corresponding to the surroundings Option Off The backlight is off Minimum Medium Maximum Selects the brightness level of the backlight Screen off The screen turns off in 3 seconds Colour Tint Picture Wizard Dynamic Contrast Col...

Page 62: ...onfiguration is in progress Position Size Phase Adjusts the options when the picture is not clear especially when characters are shaky after the auto configuration Reset Restores the options to the default setting Basic image options Setting Description Backlight Adjusts the brightness of the screen by controlling the LCD backlight If you decrease the brightness level the screen becomes darker and...

Page 63: ...D HD Converts the colour of a different video to HD colour This function is set for SD video BT 601 and HD video BT 709 colour format Expert Pattern Off Expert 1 Expert 2 This is the pattern necessary for expert adjustment This function is enabled in Picture Mode Expert when you watch DTV Colour Filter Off Red Green Blue This is the function to filter the specific colours of the video You can use ...

Page 64: ...de Mode Standard Select when you want standard quality sound Music Select when you listen to music Cinema Select when you watch movies Sport Select when you watch sports events Game Select when you play games NOTE If sound quality or volume is not at the level you want it is recommended to use a separate home theater system or amplifier to cope with different user environments Option Surround X Pr...

Page 65: ...peaker On MPEG Dolby Digital Dolby Digital Plus HE AAC PCM Dolby Digital Dolby Digital PCM Auto Speaker Off MPEG Dolby Digital Dolby Digital Plus HE AAC PCM Dolby Digital Dolby Digital Dolby Digital PCM PCM PCM TV Speaker Turns on the internal speaker of the TV when using an external Hi Fi or SRS system You can use the TV speaker as an audio output device even if there is no video input DTV Audio ...

Page 66: ...rs DUAL I I I Sends a separate language to each loudspeaker Stereo Dual Reception In Analogue Mode Only If the TV is equipped with a receiver for NICAM reception high quality NICAM Near Instantaneous Companding Audio Multiplex digital sound can be received Sound output can be selected according to the type of broadcast received 1 When NICAM mono is received you can select NICAM MONO or MONO 2 When...

Page 67: ...nction you should set the current time and date in the Clock menu NOTE y y If you do not press any button within 2 hours after the TV turns on by the On Time feature the TV enters the Standby mode automatically y y If you set the On Time feature and turn the TV off by pressing Main power switch the On Time feature will not work To activate the On Time feature the TV set must be in Standby mode y y...

Page 68: ...input label to PC mode Set ID Adds an ID to the connected devices See p 89 Power Indicator Sets to turn on or off the Power indicator on the TV Demo Mode Display the slide show to explain the various logo of this TV Mode Setting Customizes the TV settings to suit your preference The initial setup screen will appear when you turn on the TV for the first time Setting Mode Setting Selects Home Use mo...

Page 69: ...do not want to watch or that you do not want your children to watch y This function is available in Lock System On y Enter a password to watch a blocked programme Parental Guidance This function operates according to information from the broadcasting station Therefore if the signal has incorrect information this function does not operate See p 34 Input Block Blocks the input sources Key Lock The T...

Page 70: ...U to access the main menus 2 Press the Navigation buttons to scroll to USB and press OK 3 Press the Navigation buttons to scroll to the setting or option you want and press OK To return to the previous level press BACK 4 When you are finished press EXIT When you return to the previous menu press BACK The available usb settings are described in the following Setting Description Photo List You can v...

Page 71: ... external devices NOTE y y If you record a TV program on a DVD recorder or VCR make sure to connect the TV signal input cable to the TV through a DVD recorder or VCR For more information about recording refer to the manual supplied with the connected device y y The external device connection may differ from the model Connect external devices to the TV by referring to the following table Connection...

Page 72: ...ied with the gaming device HDMI See p 72 DVI See p 72 Component See p 72 Composite See p 73 Euro Scart See p 73 Digital optical audio See p 73 Headphone See p 74 HDMI See p 38 DVI See p 39 RGB See p 39 HDMI See p 72 DVI See p 72 Component See p 72 Composite See p 73 Euro Scart See p 73 HDMI See p 72 DVI See p 72 Component See p 72 Composite See p 73 Component See p 72 Composite See p 73 Euro Scart...

Page 73: ...OUT DVI to HDMI connection Transmits the digital video signal from an external device to the TV Connect the external device and the TV with the DVI HDMI cable as shown in the following illustration To transmit an audio signal connect an optional audio cable y y Use a High Speed HDMI Cable y y High Speed HDMI Cables are tested to carry an HD signal up to 1080p and higher 1 2 AV IN2 VIDEO AUDIO Y PB...

Page 74: ...ice and the TV with the Euro Scart cable as shown on the following illustration To display images by using progressive scan make sure to use the Euro Scart cable Connecting to an audio system Use an optional external audio system instead of the built in speaker NOTE y y If you use an external audio device instead of the built in speaker set the TV speaker feature to off See p 63 Digital optical au...

Page 75: ...and the TV with the headphone as shown on the following illustration Connecting to a USB Connect a USB storage device such as s USB flash memory external hard drive MP3 player or a USB memory card reader to the TV and access the USB menu to use various multimedia files Connecting USB storage devices on See p 43 and Browsing files on See p 45 1 2 AV IN2 MONO AUDI0 or ...

Page 76: ...can be used to select the previous or next page Top Text The user guide displays four fields red green yellow and blue at the bottom of the screen The yellow field denotes the next group and the blue field indicates the next block Block Group Page Selection 1 With the Blue button you can progress from block to block 2 Use the Yellow button to proceed to the next group with automatic overflow to th...

Page 77: ...ext mode press this button to select a sub page number The sub page number is displayed at the bottom of the screen To hold or change the sub page press the Red buttons Green buttons or Number buttons Hold Stops the automatic page change which will occur if a teletext page consists of 2 or more sub pages The number of sub pages and the sub page displayed is usually shown on the screen below the ti...

Page 78: ...teletext 2 Follow the indications on digital teletext and move onto the next step by pressing TEXT OK Navigation button Red button Green button Yellow button Blue button or Number buttons and etc 3 To change digital teletext service select a different service by the numeric or P or button 1 Press the numeric or P or button to select a certain service which broadcasts digital teletext 2 Press the T...

Page 79: ...d dry cloth CAUTION y y Do not push rub or hit the surface with your fingernail or a sharp object as this may result in scratches on the screen and image distortions y y Do not use any chemicals such as waxes benzene alcohol thinners insecticides air fresheners lubricants as these may damage the screen s finish and cause discolorations Cabinet and stand To remove dust wipe the cabinet with a dry a...

Page 80: ...nnel The problem may be with the broadcast y Is the power cord inserted into wall power outlet y Check your antenna direction and or location y Test the wall power outlet plug another product s power cord into the outlet where the product s power cord was plugged in Picture appears slowly after switching on y This is normal the image is muted during the product startup process Please contact your ...

Page 81: ... back to the initial settings after a certain period of time y It means that the TV is currently set to Store Demo mode To switch to Home use mode you should do the followings From the TV Menu choose OPTION Choose Mode Setting Choose Home use Now you have completed switching to the Home use mode PC mode No image is displayed Problem Resolution Power is on power indictor is blue but the screen appe...

Page 82: ...indows Screen Colour is unstable or mono Colour y Check the connection status of the signal cable Do back spots appear on the screen y Several pixels red green white or black Colour may appear on the screen which can be attributable to the unique characteristics of the LCD panel It is not a malfunction of the LCD The screen image looks abnormal Problem Resolution Is the screen position wrong y Adj...

Page 83: ...gle of this TV is between 14 degrees the optimal viewing distance is between 50 cm to 90 cm from the TV When you view 3D images outside the optimal viewing angle or viewing distance the images may look overlapped or not be displayed properly in 3D Notes for Viewing 3D Image with 3D Digital Brodcating In Analogue Brodcating 3D Imaging does not work Problem Resolution When switching the 2D image dis...

Page 84: ...ync Digital Input Connector TV D Sub Analog SCART PC Audio In Component HDMI 2 CVBS Power Rated Voltage 19 V 3 0 A Power Consumption On Mode 47 W typ Off Mode 0 5 W AC DC Adapter Manufacturer LITE ON Model PA 1650 68 Tilt Tilt Range 5 to 18 Dimensions Width x Height x Depth Weight 644 mm x 480 6 mm x 222 8 mm 6 0 kg Environmental conditions Operating Temperature Operating Humidity 10 C to 35 C 20 ...

Page 85: ...5 750 60 000 720 x 576 15 625 50 000 720 x 480 31 470 59 940 720 x 480 31 500 60 000 720 x 576 31 250 50 000 1280 x 720 44 960 59 940 1280 x 720 45 000 60 000 1280 x 720 37 500 50 000 1920 x 1080 33 720 59 940 1920 x 1080 33 750 60 000 1920 x 1080 28 125 50 000 1920 x 1080 56 250 50 000 1920 x 1080 67 432 59 940 1920 x 1080 67 500 60 000 Component port connecting informatio Component ports on the ...

Page 86: ...ble from the TV output port of the PC to the RGB PC port of the TV or the signal cable from the HDMI output port of the PC to the HDMI DVI IN port on the TV y y Connect the audio cable from the PC to the Audio input on the TV Audio cables are not included with the TV y y If using a sound card adjust PC sound as required y y If the graphic card on the PC does not output analogue and digital RGB sim...

Page 87: ...r Board 53 95 54 23 98 24 HDMI Frame Packing 33 75 30 Top Bottom Side by Side Checker Board USB 1080p 1920 x 1080 33 75 30 Top Bottom Side by Side Checker Board RGB 1080p 1920 x 1080 66 587 59 93 Top Bottom Side by Side Signal Playable 3D video format DTV 720p 1080i Top Bottom Side by Side NOTE y y If HDMI input is received in HDMI 3D format images are automatically converted into 3D y y 2D 3D mod...

Page 88: ... Left R C BUTTON 06 Right R C BUTTON 44 OK R C BUTTON 28 BACK R C BUTTON 5B EXIT R C BUTTON AA INFO R C BUTTON 02 R C BUTTON 03 R C BUTTON 1E FAV MARK R C BUTTON 09 MUTE R C BUTTON 00 P R C BUTTON 01 P R C BUTTON 10 to 19 Number Key 0 to 9 R C BUTTON 53 LIST R C BUTTON 1A Q VIEW R C BUTTON 72 Red Key R C BUTTON 71 Green Key R C BUTTON 63 Yellow Key R C BUTTON 61 Blue Key R C BUTTON 20 TEXT R C BUT...

Page 89: ...CE SETUP RS 232C Setup Connect the RS 232C serial port input jack to an external control device such as a computer or an A V control system to control the product s functions externally Connect the serial port of the control device to the RS 232C jack on the product back panel Type of connector D Sub 9 Pin Male 1 5 6 9 RS 232C IN CONTROL SERVICE No Pin name 1 No connection 2 RXD Receive data 3 TXD...

Page 90: ...vious menu press BACK RS 232C configurations 7 Wire Configuration Serial female female NULL modem cable 3 Wire Configurations Not standard PC TV RXD 2 3 TXD TXD 3 2 RXD GND 5 5 GND DTR 4 6 DSR DSR 6 4 DTR RTS 7 8 CTS CTS 8 7 RTS D Sub 9 D Sub 9 PC TV RXD 2 3 TXD TXD 3 2 RXD GND 5 5 GND DTR 4 6 DSR DSR 6 4 DTR RTS 7 8 CTS CTS 8 7 RTS D Sub 9 D Sub 9 OPTION MOVE OK Menu Language English Audio Langua...

Page 91: ... Brightness k h 00 to 64 08 Colour k i 00 to 64 09 Tint k j 00 to 64 10 Sharpness k k 00 to 64 11 OSD Select k l 00 to 01 12 Remote control lock mode k m 00 to 01 13 Treble k r 00 to 64 14 Bass k s 00 to 64 15 Balance k t 00 to 64 16 Colour Temperature x u 00 to 64 17 Energy Saving j q 00 to 05 18 Auto Configuration j u 01 19 Tune Command m a See p 94 20 Programme Add Skip m b 00 to 01 21 Key m c ...

Page 92: ...x63 on transmission receiving protocol DATA To transmit command data Transmit FF data to read status of command Cr Carriage Return ASCII code 0 x 0D ASCII code space 0 x 20 OK Acknowledgement Command2 Set ID OK Data x The set transmits ACK acknowledgement based on this format when receiving normal data At this time if the data is data read mode it indicates present status data If the data is data ...

Page 93: ...080p 24 Hz 30 Hz 50 Hz 60 Hz Component 720p 1080i 1080p 50 Hz 60 Hz mode Just Scan is available Full Wide is supported only for Analogue AV 03 Screen Mute Command k d To select screen mute on off Transmission k d Set ID Data Cr Data 00 Screen mute off Picture on Video mute off 01 Screen mute on Picture off 10 Video mute on Acknowledgement d Set ID OK NG Data x In case of video mute on only TV will...

Page 94: ...k k Set ID Data Cr Data Min 00 to Max 64 Refer to Real data mapping See p 95 Acknowledgement k Set ID OK NG Data x 11 OSD Select Command k l To select OSD On Screen Display on off when controlling remotely Transmission k l Set ID Data Cr Data 00 OSD off 01 OSD on Acknowledgement l Set ID OK NG Data x 12 Remote control lock mode Command k m To lock the front panel controls on the TV and remote cont...

Page 95: ...ff 0 0 0 0 Low Power 0 0 0 1 Minimum 0 0 0 0 Low Power 0 0 1 0 Medium 0 0 0 0 Low Power 0 0 1 1 Maximum 0 0 0 0 Low Power 0 1 0 1 Screen Off Acknowledgement q Set ID OK NG Data x 18 Auto Configure Command j u To adjust picture position and minimize image shaking automatically It works only in RGB PC mode Transmission j u Set ID Data Cr Data 01 To set Acknowledgement u Set ID OK NG Data x 19 Tune C...

Page 96: ...Step 51 R1 FE Step 254 FF Step 255 Step 100 R50 Colour Temperature Step 0 W50 Step 49 W1 Step 50 0 Step 51 C1 Step 100 C50 21 Key Command m c To send IR remote key code Transmission m c Set ID Data Cr Data Min 00 to Max 64 Data Key cod See p 87 Acknowledgement c Set ID OK NG Data x 22 Back Light Command m g To Control the back light Transmission m g Set ID Data Cr Data data Min 00 to Max 64 Acknow...

Page 97: ...eaning If data1 is 03 2D to 3D data2 and data3 have no meaning Data1 Data2 Data3 Data4 00 O O X 01 X X X 02 X X X 03 X X O X don t care Acknowledgement t OK Data01 Data02 Data03 Data04 x t NG Data01 x 25 Extended 3D Command x v only 3D model To change 3D mode for TV Transmission x v Set ID Data01 Data02 Cr Data01 3D option 00 3D Picture Correction 01 3D Depth 2D to 3D Only 02 3D Viewpoint Data02 I...

Page 98: ...UK Only ...

Page 99: ......

Page 100: ......

Page 101: ...ns before using the product Keep the Owner s Manual CD in an accessible place for future reference The model and serial number of the TV is located on the back and one side of the TV Record it below should you ever need service MODEL SERIAL ...

Page 102: ...л т з з любым д бным б м гл т чн я л жб дд ж и Д т в з з в в ии ф мл ни дит нл н з 2 мин ты м нии Д т в и л т вин и тзывы ции и ид и LG DM2780D Описание Характеристики Отзывы ...

Reviews: