background image

REFERENCE

27

Troubleshooting / Specifications

General

Power requirements  . . . . . . AC 110-240 V , 50/60 Hz
Power consumption  . . . . . . . . . . . . . . . . . . . . . 14 W 
Dimensions (approx.)  .430 X 43 X 253 mm (w x h x d)
Mass (approx.)  . . . . . . . . . . . . . . . . . . . . . . . 2.54 kg
Operating temperature  . . . 5˚C to 35˚C (41˚F to 95˚F)
Operating humidity . . . . . . . . . . . . . . . . . 5 % to 90 %

System

Laser   . . . . .Semiconductor laser, wavelength 650 nm
Signal system  . . . . . . . . . . . . . . . . PAL/NTSC/AUTO
Frequency 
response  . . . . . . DVD (PCM 96 kHz): 8 Hz to 44 kHz 

DVD (PCM 48 kHz): 8 Hz to 22 kHz
CD: 8 Hz to 20 kHz

Signal-to-noise ratio  . . . . . . . . . . . More than 100 dB 

(ANALOG OUT connector only)

Harmonic distortion  . . . . . . . . . . . Less than 0.008 %
Dynamic range  . . . . . . . . . . More than 100 dB (DVD)

More than 95 dB (CD)

Outputs

VIDEO OUT  . . . . . . . . . . . . . . . . . . . . . . .1 Vp-p 75 

sync negative, RCA jack x 1

S-VIDEO OUT . . . . . . . . . . . . . . .(Y) 1.0 V (p-p), 75 

negative sync, Mini DIN 4-pin x 1

(C) 0.3 V (p-p) 75 

COMPONENT
VIDEO OUT  . . . . . . . . . . . . . . . .(Y) 1.0 V (p-p), 75 

negative sync, RCA jack x 1

(Pb)/(Pr) 0.7 V (p-p), 

75 

, RCA jack x 2

Audio output (digital audio)  . . . . . . . .0.5 V (p-p), 75 

RCA jack x 1

Audio output (optical audio)  . . . . . . . . .3 V (p-p), 75 

Optical connector x 1

Audio output (analog audio) . . .2.0 Vrms (1 KHz, 0 dB), 

600 

, RCA jack (L, R) x 1

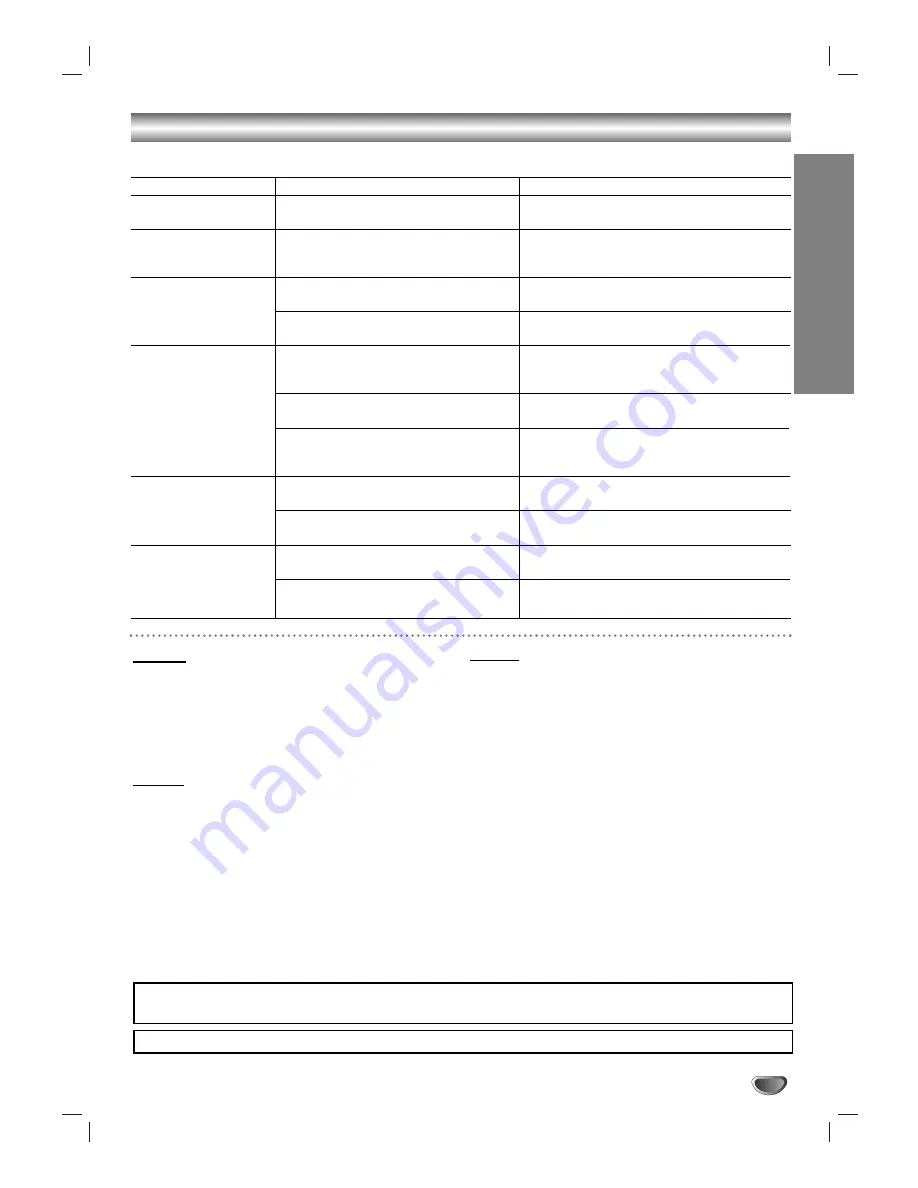
Check the following guide for the possible cause of a problem before contacting service.

Symptom

No power.

The power is on, but
the DVD player does
not work.

No picture.

No sound.

The DVD player does
not start playback.

The remote control
does not work properly.

Possible Cause

• The power cord is disconnected.

• No disc is inserted.

• The TV is not set to receive DVD sig-

nal output.

• The video cable is not connected

securely.

• The equipment connected with the

audio cable is not set to receive DVD
signal output.

• The power of the equipment connected

with the audio cable is turned off.

• The AUDIO options are set to the

wrong position.

• An unplayable disc is inserted.

• The rating level is set.

• The remote control is not pointed at

the remote sensor on the DVD player.

• The remote control is too far from the

DVD player.

Correction

• Plug the power cord into the wall outlet

securely.

• Insert a disc. (Check that the DVD or audio

CD indicator in the display 
window is lit.) 

• Select the appropriate video input mode on

the TV.

• Connect the video cable securely.

• Select the correct input mode of the audio

receiver so you can listen to the sound from
the DVD player.

• Turn on the equipment connected with the

audio cable.

• Set the Digital Audio Output to the 

correct position, then turn on the DVD play-
er again by pressing POWER.

• Insert a playable disc. (Check the disc type,

color system, and regional code.)

• Cancel the rating function or change the

rating level.

• Point the remote control at the remote sen-

sor of the DVD player.

• Operate the remote control closer to the

DVD player.

Manufactured under license from Dolby Laboratories. Dolby, MLP Lossless and the double-D symbol are trademarks of Dolby
Laboratories. Confidential unpublished works. Copyright 1992-1997 Dolby Laboratories. All rights reserved.

DTS and DTS Digital Surround are registered trademarks of Digital Theater Systems, Inc. 

Design and specifications are subject to change without notice.

Summary of Contents for DKS-6100

Page 1: ...NUAL MODEL DKS 6100 Please read this manual carefully before operating your set Retain it for future reference Designs and specifications are subject to change without notice for improvement LGECM_DKS 6100_ENG 131K R CD R R CD R RW ...

Page 2: ...filled with liquids such as vases shall be placed on the apparatus CAUTION concerning the Power Cord Most appliances recommend they be placed upon a dedi cated circuit That is a single outlet circuit which powers only that appliance and has no additional outlets or branch circuits Check the specification page of this owner s manual to be certain Do not overload wall outlets Overloaded wall outlets...

Page 3: ...Special DVD Features 17 Title Menu 17 Disc Menu 17 Camera Angle 17 Changing the Audio Language 17 Changing the Audio Channel 17 Subtitle 17 Operation with Audio CD and MP3 WMA Disc 18 Playing an Audio CD and MP3 WMA Disc 18 Pause 18 Moving to another Track 18 Repeat Track All Off 18 Search 18 Operation with JPEG Disc 19 Viewing a JPEG disc 19 Slide Show 19 Moving to another File 19 Still Picture 1...

Page 4: ...ndTM playback an external 5 1 chan nel DTS Digital SurroundTM decoder system must be connected to the digital output of the unit Disc related terms Title DVD only The main film content or accompanying feature content or additional feature content or music album Each title is assigned a title reference number enabling you to locate it easily Chapter DVD only Sections of a picture or a musical piece...

Page 5: ...solution Do not use strong solvents such as alcohol benzine or thinner as these might damage the surface of the unit To obtain a clear picture The DVD player is a high tech precision device If the optical pick up lens and disc drive parts are dirty or worn the picture quality will be poor Regular inspection and maintenance are recommended after every 1 000 hours of use This depends on the operatin...

Page 6: ...speaker connection subwoofer connection front speakers connections rear surround speakers connections Forward Skip Scan M Go to the next chapter track Press and hold for two seconds for fast forward search Reverse Scan Skip m Go to previous chapter track or to the beginning Press and hold for two seconds for fast reverse search STOP x Stops playback PAUSE STEP XP STEP Pauses playback Press repeate...

Page 7: ...STEP TITLE SET UP TEMPO TEMPO SUBTITLE REPEAT RETURN REPEAT A B DISPLAY FEMALE VOCAL POWER ENTER SELECT ECHO VOL MIC VOL 1 POWER button 2 NUMERIC buttons 0 9 3 PROGRAM button CLEAR button 4 AUDIO button MALE button SOUND button FEMALE button 5 ARROW buttons For use in highlighting a selection on a GUI menu screen TITLE and MENU screen 6 SELECT ENTER button 7 KEY CONTROL b buttons 8 STOP x button P...

Page 8: ... the S Video in jack on the TV using the S Video cable S 2 2 Connect the Left and Right AUDIO OUT jacks of the DVD Player to the audio left right in jacks on the TV A using the audio cables Component Video Color Stream connection 1 1 Connect the COMPONENT VIDEO OUT PROGRESSIVE SCAN jacks on the DVD Player to the corresponding in jacks on the TV using an Y Pb Pr cable C 2 2 Connect the Left and Rig...

Page 9: ... stream is selected Notes If the audio format of the digital output does not match the capabilities of your receiver the receiver will produce a strong distorted sound or no sound at all Six Channel Digital Surround Sound via digital con nection can only be obtained if your receiver is equipped with a Digital Multi channel decoder To see the audio format of the current DVD in the on screen display...

Page 10: ... of the pre programmed sound fields according to the program you want to listen to When DVD is inserted You can change the Digital Audio Output mode by pressing the AUDIO button on the remote control during playback Although the DVD contents differ from disc to disc the following explains the basic operation when this feature is used a After you select 2 channel For example or by pressing AUDIO bu...

Page 11: ... Shows the current title number and total number of titles skips to the desired title number Shows the current chapter number and total number of chapters skips to the desired chapter number Shows the elapsed playing time searches by elapsed time Shows the current audio soundtrack language encoding method and channel number changes the setting Shows the current subtitle language changes the set ti...

Page 12: ...ide TV is connected Display Mode Display Mode setting works only when the TV Aspect mode is set to 4 3 Letterbox Displays a wide picture with bands on the upper and lower portions of the screen Panscan Automatically displays the wide picture on the entire screen and cuts off the portions that do not fit Progressive Scan Progressive Scan Video provides the highest quality pictures with less flicker...

Page 13: ...the previous menu Speaker selection Select a speaker that you want to adjust Front speaker Front L Front speaker Front R Center Speaker Center Subwoofer Woofer Rear speaker Rear L or Rear speaker Rear R Size Since the speaker settings are fixed you cannot change the setting Volume Press to adjust the output level of the selected speaker 5dB 5dB Distance If you have connected speakers to your DVD P...

Page 14: ...rated scenes are not played unless an alternate scene is available on the disc The alternative must have the same rating or a lower one If no suitable alternative is found playback stops You must enter the 4 digit pass word or change the rating level in order to play the disc 4 4 Press SELECT ENTER to confirm your rating selection then press SETUP to exit the menu Password Security Code You can en...

Page 15: ...en may be displayed first after loading a DVD or Video CD which contains a menu Use the buttons to select the title chap ter you want to view then press SELECT ENTER to start Press TITLE or MENU to return to the menu screen Use the number buttons to select the track you want to view and press RETURN to return to the menu screen Menu settings and operating procedures may differ Follow the instructi...

Page 16: ...required speed t 1 2 t 1 4 t 1 8 or t 1 16 backward DVD only or T 1 2 T 1 4 T 1 8 or T 1 16 forward 3 To return to normal PLAY press PLAY Repeat You can play a title chapter all track on a disc Press REPEAT during playback to select a desired repeat mode DVD Video Discs Repeat Chapter Title Off Chapter repeats the current chapter Title repeats the current title Off does not play repeatedly DivX Vi...

Page 17: ...Otherwise the disc menu may appear 2 The menu can list camera angles spoken language and subtitle options and chapters for the title 3 To remove the title menu press TITLE again Disc Menu Press MENU The disc menu is displayed Changing the Audio Language Press AUDIO repeatedly during playback to hear a different audio language or audio track Changing the Audio Channel Press AUDIO repeatedly during ...

Page 18: ...isplay does not play repeatedly Search 1 Press FF or GG during playback The player will now go into SEARCH mode 2 To exit SEARCH mode press PLAY WMA MP3 CD WMA MP3 CD WMA MP3 CD WMA MP3 CD WMA MP3 CD Program List Track1 Track2 Track3 Track4 Track5 Track6 Track7 Track8 0 00 00 1 12 Audio CD Program List 0 00 00 1 104 MP3 WMA 2 Music2 1 Music1 3 Music3 4 Music4 5 Music5 6 Music6 7 Music7 MP3 WMA dis...

Page 19: ...CT ENTER Moving to another File Press or once during viewing a picture to advance to the next file or to the previous file Still Picture 1 Press PAUSE STEP during slide show The player will now go into PAUSE mode 2 To return to the slide show press PLAY or press PAUSE STEP again JPEG Preview List JPEG JPEG Folder 1 JPEG Folder 2 JPEG Folder 3 JPEG Folder 4 JPEG Folder 5 JPEG Folder 6 JPEG Folder 7...

Page 20: ...k repeats the current track All repeats all the tracks on a disc Off No display does not play repeatedly Erasing a Track from Program List 1 Use to select the track that you wish to erase from the Program list 2 Press CLEAR Or select Delete icon then Press SELECT ENTER to place the selected track on the Program list Repeat to erase additional tracks on the list Erasing the Complete Program List Se...

Page 21: ...e name of the DivX subtitle is available by 20 40 characters differs from language If there is impossible code to express in the DivX file it may be displayed as _ mark on the dis play If the number of the screen frame is over 30 per 1 second this unit may not operate normally If the video and audio structure of recorded file is not interleaved either video or audio is out putted If the file is re...

Page 22: ...just MIC Volume Press the Microphone volume control MIC VOL button on the remote control clockwise to increase the volume or counterclockwise to decrease it 0 15 steps To Adjust ECHO Volume You can give an echo effect to the sound from the microphones Press the ECHO volume control ECHO VOL button on the remote control clockwise to increase the echo or counterclockwise to decrease it 0 15 steps Key...

Page 23: ...ow Press TEMPO repeatedly during singing to play faster Press TEMPO repeatedly during singing slower Shadow Function If Video CD caption and the song s subtitle are mixed up the song s subtitle may be invisible In this case to highlight the song s subtitle press SHADOW It will be highlighted by background shadow image Karaoke MENU Playback Preparation Press MENU on the karaoke mode The main MENU a...

Page 24: ... want by pressing the then press SELECT ENTER 2 Select the song title you want by pressing the and press SELECT ENTER SINGER LIST 1 Select 2 SINGER LIST and select the initial of the singer you want by pressing the in the SONG LIST and SINGER LIST menu and press SELECT ENTER 2 Select the singer you want by pressing the and press SELECT ENTER 3 Select the song title of the singer you want by pressi...

Page 25: ...press SELECT ENTER 3 3 Select CHALLENGE SCORE by pressing and select one of 60 70 80 or 90 by pressing to select success score then press SELECT ENTER 4 4 Select START by pressing then press SELECT ENTER It appears as below 5 5 Select number you want by pressing and press SELECT ENTER Sing along with the accompaniment 6 Repeat step 4 5 Change the team of red team or blue team alternately 7 7 When ...

Page 26: ...orussian 6669 Cambodian 7577 Catalan 6765 Chinese 9072 Corsican 6779 Croatian 7282 Czech 6783 Danish 6865 Dutch 7876 English 6978 Esperanto 6979 Estonian 6984 Faroese 7079 Fiji 7074 Language Code Finnish 7073 French 7082 Galician 7176 Georgian 7565 German 6869 Greek 6976 Greenlandic 7576 Guarani 7178 Gujarati 7185 Hausa 7265 Hebrew 7387 Hindi 7273 Hungarian 7285 Icelandic 7383 Indonesian 7378 Inte...

Page 27: ...eive DVD sig nal output The video cable is not connected securely The equipment connected with the audio cable is not set to receive DVD signal output The power of the equipment connected with the audio cable is turned off The AUDIO options are set to the wrong position An unplayable disc is inserted The rating level is set The remote control is not pointed at the remote sensor on the DVD player T...

Page 28: ...P NO 3834RH0131K ...

Reviews: