background image

14

INSTALLATION

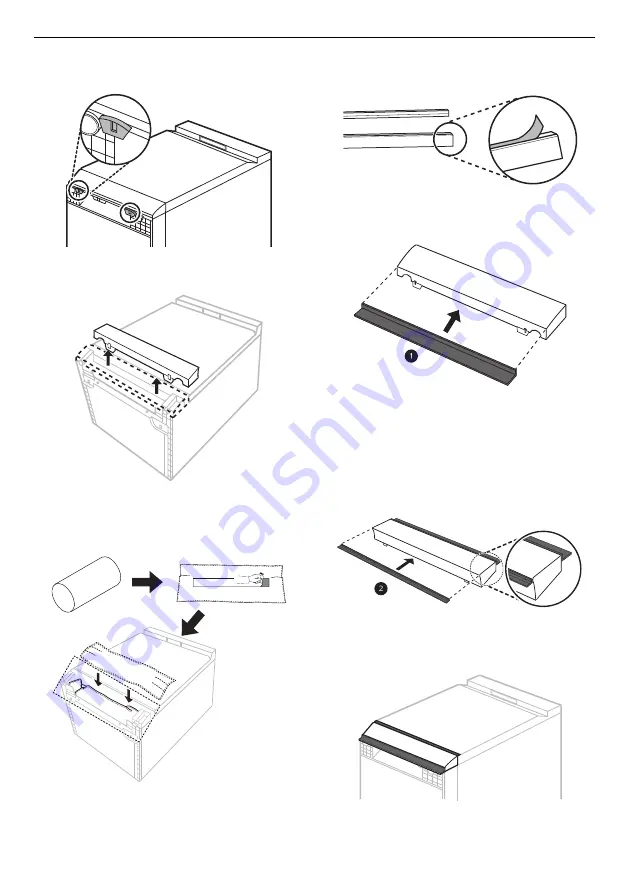
1

Lay down the appliance and pull on both the 

hooks at the bottom of the lower cover.

2

Pull on the lower cover to remove it.

3

Remove the double-sided tape on the back of 

the felt and attach it to the front side of the 

appliance’s bottom.

4

Remove the double-sided tape from the lower 

and front strips.

5

Attach the black coloured lower strip 

a

 to the 

bottom of the lower cover.

6

Attach the black coloured front strip 

b

 to the 

top of the lower cover.
•  The length of the front strip is longer than 

the lower cover. Attach the front strip so that 

the overhang is equal on both sides of the 

lower cover.

7

Attach the lower cover with the strip onto the 

appliance.

Summary of Contents for DFB325 Series

Page 1: ...ully This will simplify installation and ensure that the product is installed correctly and safely Leave these instructions near the product after installation for future reference ENGLISH DFB325 MFL70282460 Rev 01_120920 www lg com Copyright 2020 LG Electronics Inc All Rights Reserved ...

Page 2: ...ations 11 Preparing Cabinet Opening 13 Levelling the Appliance 16 Installing the Drain Hose 17 Preparing Water and Electrical Connections 18 Final Installation Check 19 OPERATION Operation Overview 21 Before Using 22 Control Panel 26 Wash Cycles 27 Options and Extra Functions 28 Programme Table 31 Information for Test 33 Loading the Dishwasher 34 Adding Cleaning Agents 39 Refilling 40 Useful Tips ...

Page 3: ...TROUBLESHOOTING Before Calling for Service 49 ...

Page 4: ... basic precautions including the following Technical Safety This appliance is not intended for use by persons including children with reduced physical sensory or mental capabilities or lack of experience and knowledge unless they have been given supervision This symbol is displayed to indicate matters and operations that can cause risk Read the part with this symbol carefully and follow the instru...

Page 5: ... Please contact the LG Customer information centre to advise of its incompatibility This appliance should only be transported by two or more people holding the appliance securely Do not install the appliance in a damp and dusty place Do not install or store the appliance in any outdoor area or any area that is subject to weathering conditions such as direct sunlight wind or rain or temperatures be...

Page 6: ...e power plug must be plugged into an appropriate socket outlet that is installed and grounded in accordance with all local codes and ordinances After installing check the hose connection for leaks before moving the appliance into the cabinet opening Do not damage or place heavy items on the power cord of the appliance This appliance is intended to be used in household and domestic applications onl...

Page 7: ...eakage isobutane propane natural gas etc do not touch the appliance or power plug and ventilate the area immediately In case of flood disconnect the power plug and contact the LG Electronics Customer Information Centre Under certain conditions hydrogen gas may be produced in a hot water system that has not been used for two weeks or more HYDROGEN GAS IS EXPLOSIVE If the hot water system has not be...

Page 8: ...ere it is exposed during or immediately after use Do not abuse sit on or stand on the door or dish rack of the dishwasher After cleaning the dishes turn off the tap Turn on the tap again and check the connection status of water supply hose before cleaning Do not open the door while the appliance is in operation Water will splash out and could cause a slipping hazard Be careful not to catch your ha...

Page 9: ...on does not disconnect this appliance from the power supply Disposal Before discarding an old appliance unplug it Cut off the cable directly behind the appliance to prevent misuse Dispose of all packaging materials such as plastic bags and styrofoam away from children The packaging materials can cause suffocation Remove the door before disposing of or discarding this appliance to avoid the danger ...

Page 10: ...ouch water draining from the machine as it may be hot If the drain hose and the water supply hose are frozen in winter defrost before using Do not put hands feet or metal objects below or behind the appliance Do not wash dishes stained with chemical products such as oil cream or lotions used in a massage parlor skin care shop beauty shop or barber shop Maintenance If cooking oil is spilled on the ...

Page 11: ...l Panel Door Handle b Front Cover c Lower Cover d Levelling Feet e Power Cord f Water Supply Hose g Drain Hose Interior View a Top Wash Impeller b Upper Spray Arm c Lower Spray Arm d Salt Container Cap e Filtration System f Cutlery Basket 1 g Detergent and Rinse Aid Dispenser h Steam Nozzle 1 i Lower Rack j Upper Rack k Cutlery Rack 1 1 This feature is only available on some models ...

Page 12: ... Noise strips are provided Lower 1 EA Front 1 EA Side 2 EA Specifications Model DFB325 Power Supply 220 240 V 50Hz Dimension Width X Depth X Height 600 mm X 600 mm X 850 mm Product Weight Approx 52kg Max Capacity 14 Place Settings Permissible Inlet Water Pressure 0 05 0 6 MPa Power Consumption 1600 1800 W ...

Page 13: ...wood surrounding the appliance should be sealed with a waterproof paint or sealant to prevent it from swelling Slide the dishwasher into the cabinet opening carefully Make sure that the drain hose behind the machine and inside the cabinet is not kinked or stretched Install the appliance on a flat and stable area Do not place any objects in between the floor and base or leg off the appliance NOTE T...

Page 14: ... appliance s bottom 4 Remove the double sided tape from the lower and front strips 5 Attach the black coloured lower strip a to the bottom of the lower cover 6 Attach the black coloured front strip b to the top of the lower cover The length of the front strip is longer than the lower cover Attach the front strip so that the overhang is equal on both sides of the lower cover 7 Attach the lower cove...

Page 15: ...e opening is below 850 mm follow these instructions 1 Remove the 2 screws on the back 2 Pull the top cover backwards after removing the two screws and then lift it up to remove it 3 Remove the locating pins on the top by using a Phillips screw driver NOTE When the appliance is correctly leveled there should be no slant stickiness or rubbing sound when the door is opened Installing Moisture Barrier...

Page 16: ...and poor washing Check whether the appliance is perfectly level after installation If the appliance rocks when pushing the top plate of the appliance diagonally adjust the feet again NOTE The appliance is not level if there is a rubbing sound or stickiness when the door is opened Adjusting and Leveling the Appliance When the appliance is not perfectly level turn the adjustable feet until the appli...

Page 17: ...or can occur when the waste spigot below the sink is not drilled out properly To connect the drain hose drill out at least a 15 mm diameter hole in the waste spigot before connecting and securing CAUTION Make sure that plastic debris is not remaining inside of spigot after it has been drilled out Do not attempt to open the waste hole with a screwdriver and hammer This will induce debris to become ...

Page 18: ...r damage the water supply hose as it contains electrical wires and components It can not be detached or removed from the appliance for installation purposes It is important that the water supply hose not be tampered with cut disassembled pulled or kinked It contains electrical wiring inside and if damaged can cause an electrical hazard CAUTION Only use the threaded nut of the water supply hose to ...

Page 19: ...appropriate outlet that is properly installed and grounded in accordance with all local codes and ordinances Repairs to the appliance must only be carried out by qualified service personnel Repairs carried out by inexperienced persons may cause injury or serious malfunctioning Contact our local service centre Connect to a properly rated protected and sized power circuit to avoid electrical overloa...

Page 20: ... sink Then gradually slide the dishwasher into the cabinet while pulling on the hoses under the sink to take up any slack This helps avoid kinking the hoses or trapping them beneath the dishwasher House water supply not turned on Turn water on Water pressure may be too high or too low Error Code Possible Cause and Solution ...

Page 21: ...t no dishes or utensils are in the path of the spray arms Do not place one dish on top of another 6 Add the proper amount of detergent powder to the dispenser If using Tablets they can simply be placed directly on the base of the tub or on the lower part of the inner door 7 Set and start the programme The programme will start automatically in 4 seconds after any setting is selected WARNING Do not ...

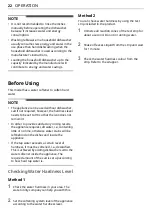
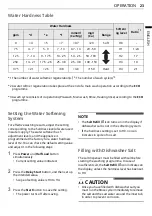
Page 22: ...insing results the appliance requires soft water i e containing little or no lime otherwise water stains will be left behind on the dishes and inside the appliance If the tap water exceeds a certain level of hardness it must be softened i e decalcified This is achieved by adding dishwasher salt to the water softener inside the appliance The required amount of the salt is set up according to how ha...

Page 23: ...on and then set up the intended value Scope of setting value is H0 to H4 3 Press the Start button to save the setting The power turns off after saving NOTE The Salt Refill n icon turns on in the display if dishwasher salt is not in the softening system If the hardness setting is set to H0 no icon indicates in spite of no salt Filling with Dishwasher Salt The salt dispenser must be filled with salt...

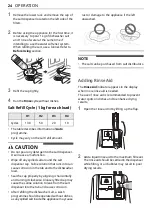
Page 24: ... corrosion in the tub and to the dishwasher load Seal the cap properly by aligning it horizontally and turning it clockwise A loosely fitted cap may cause the saline solution to leak from the salt dispenser into the tub and cause corrosion After refilling the dishwasher salt a wash programme should be operated without dishes as any spilled salt inside the appliance may cause rust or damage to the ...

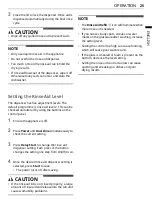
Page 25: ...simultaneously to check the current setting 3 Press Delay Start to change the rinse aid dispenser setting Each press of the button changes the setting one step from L0 off to L4 4 Once the desired rinse aid dispenser setting is selected press Start to save The power turns off after saving CAUTION If the rinse aid lid is not closed properly a large amount of rinse aid will release into the tub and ...

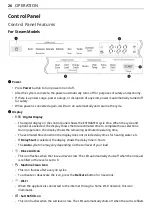
Page 26: ...During operation the display shows the remaining estimated operating time The estimated time shown on the display does not include delay times for heating water etc If Delay Start is selected the display shows the delay time in hours The Auto cycle time may vary depending on the soil level of your load e Rinse Aid Icon This icon flashes when the rinse aid level is low The LED automatically shuts o...

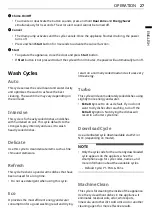
Page 27: ...icate items such as fine china and stemware Refresh This cycle freshens up and warms dishes that have been unused for a long time Do not use detergent when using this cycle Eco It provides the most efficient energy and water consumption for a good washing result and drying result on a normally soiled load and as it uses very little energy Turbo This cycle will clean moderately soiled dishes using ...

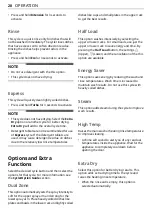
Page 28: ...matically sets the spray intensity to soft for the upper spray arm and strong for the lower spray arm Place heavily soiled dishes like plates and bowls in the lower rack and lightly soiled dishes like cups and small plates in the upper rack to get the best results Half Load This option washes intensively by selecting the upper or lower racks For small loads use just the upper or lower rack to save...

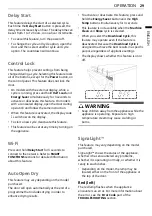
Page 29: ...UNCTIONS sections for detailed information about this feature Auto Open Dry This feature may vary depending on the model purchased The door will open automatically at the end of a programme that includes drying in order to enhance drying results To activate or deactivate this feature press and hold the Energy Saver button and the High Temp button simultaneously for 3 seconds This feature is not av...

Page 30: ...when a cycle has been paused The white lamp lights up when a cycle is running Green right The green lamp lights up when a cycle is finished When the door is opened the lamp turns off If the appliance does not detect that the door has been opened the lamp will turn off after 90 seconds ...

Page 31: ...ent temperature water pressure and voltage When the Auto Open Dry feature is activated the heating rinse temperature will be changed as 62 Program me Soil Level Wash Rinse Dry Pre wash Main wash Rinse Heating rinse Auto All levels 50 55 70 Intensive Heavy 75 70 Delicate Light 55 70 Refresh 75 Eco Moderate 49 1 42 2 54 1 65 2 Turbo Moderate 65 65 Express Light 45 60 Rinse Light Machine Clean 50 70 ...

Page 32: ...he High Temp or Extra Dry option The Delay Start option can be selected for every washing programme in this table For Steam Models Programm e Dual Zone Half Load Energy Saver Steam High Temp Extra Dry Auto Intensive Delicate Refresh Eco Turbo Express Rinse Machine Clean Download Cycle ...

Page 33: ...side surface of the door Height adjustable Rack U position Middle Auto Open Dry setting On For Models without Auto Open Dry Function Capacity 14 place settings Comparability programme Eco Rinse aid setting L4 Reference cleaner 35 g of detergent onto the inside surface of the door Height adjustable Rack U position Middle Loading the Dishes Cutlery Basket Upper Rack a Glasses b Cups c Saucers d Larg...

Page 34: ...ombination of high water temperature and dishwasher detergents may damage certain items Do not wash the following items Copper or anodised aluminium Hand painted silver or gold leaf crockery Wood or bone handled utensils Iron or non rust proof utensils Plastic items which are not appliance safe Expensive ware such as silver and dishes with golden rings Fragile item such as crystal glasses CAUTION ...

Page 35: ...n to fit larger dishes pull tines back up to fit smaller dishes Loading the Upper Rack Daily Use Load The upper rack is suitable for delicate items such as small plates long cutlery cups glasses and appliance safe plastic items Cups glasses and bowls must be positioned upside down Plates should be positioned upwards with the plate The cup racks provide support for long steam glasses The left side ...

Page 36: ... be removed 1 Slide cup rack down into its closed position 2 Locate assembly slot a on cup rack and firmly pop rack off support bar on that side The rack on the left pops free at the back The rack on the right pops free at the front 3 Slide cup rack off support bar on opposite side 4 Reverse instructions to replace cup rack Height Adjustable Upper Rack The height of the upper rack can be adjusted ...

Page 37: ... place in the upper position It is not necessary to lift the lock levers to raise the rack Possible plate size according to the upper rack position WARNING Before adjusting ensure the rack is empty of all dishes Otherwise dishes may get damaged or you may get injured NOTE Raise the upper rack without pushing the buttons on each side Pushing the buttons when raising the rack will prevent the rack f...

Page 38: ...tion push in the upper rack first and the lower rack later Pull out the lower rack first and the upper rack later When the upper rack is in the lower position the possible height of dishes differs with models where the cutlery rack is fitted Loading the Cutlery Rack The cutlery rack is best suited for flatware and most cooking or serving utensils It can also fit small prep bowls and lids The separ...

Page 39: ...to reduce the risk of injury Adding Cleaning Agents Adding Detergent to the Dispenser Remove the label on the dispenser prior to running the appliance for the first time The amount of detergent needed depends on the cycle load size and soil level of dishes Put detergent into the detergent compartment before starting any cycle except the Rinse cycle 1 Push the button on the dispenser lid to open th...

Page 40: ...resulting in poor wash results After washing check whether the detergent was completely washed out Some appliance detergent tablets may become stuck in the dispenser due to their excessive size Tablets can be placed onto the base of the wash tub next to the filter before starting the cycle Never use liquid dishwashing detergent in the appliance Detergent tablets are not recommended for use of Expr...

Page 41: ...e opened for a short period of time after the cycle NOTE Make sure that all items do not touch each other If dry results are not good or water stains remain add the Extra Dry option or set the rinse level When using tablet type 2 in 1 3 in 1 detergent an additional rinse may be required depending on the volume of dishes in this case use the Extra Dry option or set the rinse level Unloading the Dis...

Page 42: ...lean cycle Smart Diagnosis This function provides useful information for diagnosing and solving issues with the appliance based on the pattern of use Settings Allows you to set various options on the appliance and in the application Push Alert When the cycle is complete or the appliance has problems you have the option of receiving push notifications on a smartphone The notifications are triggered...

Page 43: ...system OS and the manufacturer If the security protocol of the router is set to WEP you may fail to set up the network Please change it to other security protocols WPA2 is recommended and register the product again Installing the LG ThinQ Application Search for the LG ThinQ application from the Google Play Store or Apple App Store on a smartphone Follow instructions to download and install the app...

Page 44: ... Using Audible Diagnosis to Diagnose Issues Follow the instructions below to use the audible diagnosis method Launch the LG ThinQ application and select the Smart Diagnosis feature in the menu Follow the instructions for audible diagnosis provided in the LG ThinQ application 1 Press the POWER button to turn on the appliance Do not press any other buttons 2 Place the mouthpiece of your smartphone c...

Page 45: ...y discolour or damage the appliance Cleaning the Interior It is recommended to clean the interior spray arms or filters once every two weeks Clean the interior of the appliance periodically with a soft damp cloth or sponge to remove food and dirt particles Food residue may be stuck in the narrow gaps inside the appliance after completion of washing Wipe off all food residue NOTE If you have not us...

Page 46: ...filter and stainless steel filter 3 Clean the filters with a soft brush under running water Reassemble the filters before reinstalling them 4 To replace the assembled filters position the spray arm so the wider vee is toward the front Fit the filters back into the filter holder and secure them by turning the inner filter clockwise until it clicks into place WARNING Be cautious of sharp edges when ...

Page 47: ...ot pull or manually rotate them Cleaning the Upper Spray Arm 1 Pull the upper rack forward Make sure that the water jet holes are not blocked by food particles 2 When cleaning is necessary remove the upper spray arm by turning the nut on the bottom of the spray arm 1 8 turn counterclockwise and pulling down 3 Remove food particles by rinsing or shaking the spray arm 4 If any food residue blocks th...

Page 48: ...he appliance check that the filter is not blocked If there is a leak the water supply hose will need to be checked for proper connection Never over tighten the water supply valve or use mechanical devices to tighten When reassembling the seal and the filter ensure that they free from dirt or grit that may have come from the water supply Seasonal Maintenance and Storage If you will be absent for an...

Page 49: ... for a clogged kinked or frozen water supply hose Check water supply OE Drainage Problem Check for a clogged kinked or frozen drain hose Waste spigot is clogged Remove knockout on waste spigot Filters are clogged Clean Filters bE Oversudsing caused by improper detergent such as liquid dish soap Do not use hand dishwashing liquids Only use detergents which are designed for use in automatic dishwash...

Page 50: ...he appliance again Power supply or power cord is not connected Connect the power supply or cord properly When the Control Lock feature is activated the display code CL will show on the display Deactivate the Control Lock button Press and hold Half Load and Energy Saver simultaneously for 3 seconds to activate or deactivate this feature Fuse is blown or circuit breaker tripped Replace the fuse or r...

Page 51: ...etergent is left in the detergent dispenser Unbalanced upper rack Adjust the left right height of the upper rack Detergent may not be dispensed because poor stacking of the dishes prevent automatic opening of the detergent dispenser Correctly arrange the dishes and always dry out the dispenser before adding new detergent so that it does not clump together Water leaks outside the appliance The door...

Page 52: ...ount of detergent See the OPERATION section Rinse aid dispenser is empty Refill rinse aid dispenser The water softener has no salt or insufficient the salt Check whether there is the salt in the water softener Water hardness level may be set too low Increase the hardness level setting value The rinse aid may be insufficient Refill the rinse aid or increase the dispensing level Hard water buildup i...

Page 53: ...r is an acid and with constant use it could damage your appliance Food soil remains on dishes Improper cycle selection Select correct cycle based on soil level and type of dishware being washed Water temperature is too low Check water supply connection or water heater setting Dishwashing detergent was not used Use recommended detergent Low inlet water pressure Water pressure should be between 0 05...

Page 54: ... to connect to is incorrect Find the Wi Fi network connected to your smartphone and remove it then register your appliance on LG ThinQ Mobile data for your smartphone is turned on Turn off the Mobile data of your smartphone and register the appliance using the Wi Fi network The wireless network name SSID is set incorrectly The wireless network name SSID should be a combination of English letters a...

Page 55: ...Memo ...

Page 56: ......

Reviews: