background image

7

NSTALLATION INSTRUCTIONS

I

Step 5 : 

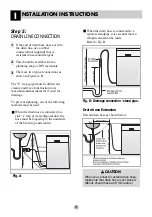
DRAIN LINE CONNECTION

1

2

3

If the end of drain hose does not fit to
the drain line, use a rubber
connector(not supplied) that is
resistant to heat and detergent.

This should be available from a
plumbing shop or DIY merchants.

There are two typical connections as
shown in Figure A, B.

The “S” trap spigot must be drilled out
cleanly and free of obstruction to its
maximum internal diameter, if used for
drainage.

To prevent siphoning, one of the following
methods must be used:

When the drain hose is connected to a
sink “s” trap or waste disposal unit, the
hose must be looped up to the underside
of the bench top and secured.

When the drain hose is connected to a
separate standpipe, it is essential that an
airtight connection be made.
Refer to Fig.B

Drain hose Extension

Extend drain hose as shown below.

Fig. A

Fig. B : Drainage connection - stand pipe.

CAUTION

When you connect or extend drain hose,
make sure that drain hose is not kinked.
(Bends should have a 40 mm radius.) 

Summary of Contents for D1420AF

Page 1: ...ISHWASHER Please read this manual carefully before operating your dishwasher Retain it for future reference OWNER S MANUAL MODEL D1420W L M T B C D A F B U D1421W L M T B C D A F B U WZ 6805WF WZ 6805MF ...

Page 2: ...STALLATION INSTRUCTIONS 5 PARTS NAME 9 FUNCTION OF CONTROL BUTTON 10 BEFORE USING FOR THE FIRST TIME 13 HOW TO USE AND OPERATE 15 OPERATING SEQUENCE 21 PROGRAM 22 USER MAINTENANCE INSTRUCTIONS 23 TROUBLE SHOOTING GUIDE 24 SPECIFICATION ...

Page 3: ... is accessible The appliance is to be connected to the water mains using new hose sets and that old hose sets should not be reused During use Only suitable household utensils should be placed in the dishwasher Please avoid utensils that are non heatresistant metal decorated etc Do not use any kinds of solvent in your dishwasher They may cause an explosion or fire Do not spray water on the applianc...

Page 4: ... Periodically examine the cord of your appliance and if its appearance indicates damage or deterioration unplug it discontinue use of the appliance and have the cord replaced with an exact replacement part by an authorized servicer Protect the power cord from physical or mechanical abuse such as being twisted kinked pinched closed in a door or walked upon Pay particular attention to plugs wall out...

Page 5: ...o not use an extension cord or adapter plug with this appliance Electrical and earthing connections must comply with the national electrical code provincial and municipal code and or other local codes Any bare wood surrounding the dishwasher should be sealed with a waterproof paint or sealant to prevent swelling Dangerous voltage To indicate hazards arising from dangerous voltages Note In case of ...

Page 6: ... CUPBOARD 1 2 Before sliding the dishwasher into the cupboard opening all necessary height and balancing adjustments should be made using a spanner Slide the dishwasher into the cabinet opening carefully Make sure that the drain hose inside the cabinet is not kinked or stretched CAUTION If the height of the cupboard is below 850mm you should remove the top table by unscrewing the 2 screws Two of r...

Page 7: ...maximum internal diameter if used for drainage To prevent siphoning one of the following methods must be used When the drain hose is connected to a sink s trap or waste disposal unit the hose must be looped up to the underside of the bench top and secured When the drain hose is connected to a separate standpipe it is essential that an airtight connection be made Refer to Fig B Drain hose Extension...

Page 8: ...ems or water leaks When the dishwasher is used for the first there may be a loud noise if this happens turn off the power and restart the dishwasher Step 8 HOW TO LEVEL THE DISHWASHER After installing the dishwasher you may notice a slight sticking of the door to the dishwasher when you open or close the door If this does happen you need to adjust the level of the dishwasher If the door slants to ...

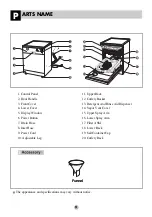
Page 9: ...ain Hose 8 Inlet Hose 9 Power Cord 10 Adjustable Leg 11 Upper Rack 12 Cutlery Basket 13 Detergent And Rinse Aid Dispenser 14 Vapor Vent Cover 15 Upper Spray Arm 16 Lower Spray Arm 17 Filter ASM 18 Lower Rack 19 Salt Container Cap 20 Cutlery Rack The appearance and specifications may vary without notice Funnel ...

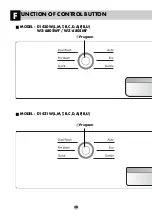
Page 10: ...UNCTION OF CONTROL BUTTON F 10 Program Program MODEL D1420W L M T B C D A F B U WZ 6805WF WZ 6805MF MODEL D1421W L M T B C D A F B U ...

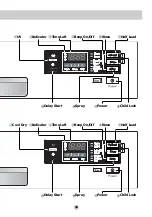
Page 11: ...11 UV Indicator Time Left Rinse Beep On Off Half Load Spray Delay Start Power Child Lock Cool Dry Indicator Time Left Rinse Beep On Off Half Load Spray Delay Start Power Child Lock ...

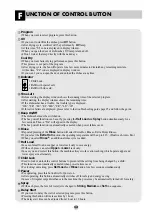
Page 12: ...neously for a few seconds Then a On will appear in the display The beep on off function is automatically canceled when power failure occur Rinse Repeated pressing of the Rinse button will select Extra Hot Rinse Extra Hot Rinse If you select the Extra Hot function the operating temperature will be up to 80 Dual wash Auto Eco When you select Rinse an additional rinse cycle is added Half Load In case...

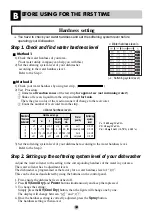
Page 13: ...h this 2 Set the softening system level of your dishwasher according to the water hardness level Refer to the Step 2 Method 2 1 Check your water hardness by using test strip 2 Test Procedure Immerse all reaction zones of the test strip for approx 1sec not in running water Shake off excess liquid from the strip and wait for 1min Then the green color of the reaction zone will change to the red viole...

Page 14: ...w the cap of salt container Before using your dishwasher for the first time fill with salt The container has a capacity of 1 9kg salt Use a funnel for ease and clean filling ensuring that coarse salt or regenerating salt intended for dishwashers is used After filling wipe off any spilled salt to seal the cap properly Screw the cap tightly to prevent any suds from penetrating into the container In ...

Page 15: ...mmodate different sizes of utensils or cutlery Each tray is adjusted by lifting it out and rotating it front to back The entire cutlery rack can be removed if more space is needed on the upper rack for larger items NOTE Always remove cutlery from the rack before removing the rack Knife fork and spoon handles should be positioned between the tines If the handles of your flatware are too thick then ...

Page 16: ...with the handles down The cover can be hinged and clipped away from the basket if you choose not to use them Place knives in the separate rack for located in the top of the dishwasher Take care when loading and unloading sharp items Slide two baskets in opposite directions then pull them apart 4 Loading the Lower Rack The lower basket is best loaded with dinner plates soup bowls dishes pots pans l...

Page 17: ...ishwasher Safe Items The combination of high water temperatures and dishwasher detergent may damage particular items therefore we do not recommend using the dishwasher to wash the following Copper or anodized aluminum Hand painted silver or gold leaf crockery Wood or bone handled utensils Iron or non rust proof utensils Plastic items that which are not dishwasher safe OW TO USE AND OPERATE H Take ...

Page 18: ...hwashers Ordinary hand washing detergent should not be used because the foam can interfere with proper operation PROGRAM AMOUNT OF DETERGENT Dual Wash 25g Auto 20g Eco 15g Gentle 15g Quick 10g Pre Wash No detergent Your upper rack can be raised or lowered to cater for different sized crockery Before adjusting ensure that the rack is empty You can change the position of the upper rack by lifting th...

Page 19: ... products ex 3 in 1 Some products integrated rinse aid work best specific programs only Yow will obtain optimum rinsing and drying results by using conventional and separate salt and rinse aid Products that replace regeneration salt can only be used within a specific water hardness range Please contact the detergent manufacturer if the drying performance is very poor or you find the white film whe...

Page 20: ...arting the next operation This will immediately thin and drain away any excess salt solution For refilling Salt 10 Energy Test EN50242 Appliance loaded in accordance with standard specifications Example of loaded dishwasher p 15 17 Capacity 14 place settings Comparability course Eco Rinse Aid setting 4 Reference cleaner 8g of detergent onto the inside surface of the door and fill 27g into the dete...

Page 21: ...l Dry mode And then the dishwasher automatically switches off later Ensure the spray arms can freely rotate Measure out detergent Add the required amount of detergent into the dispenser and close the lid Setting and starting the program Press the program button to select the desired program After 5 seconds the machine will start If necessary select the option function corresponding to the desired ...

Page 22: ...After finishing Cool Dry function is automatically performed for the better drying result Quick Can use this program for only removing soil before washing dishes by hand Pre Wash During the Auto program the degree of soiling in the dishes is determined by the amount of clouding of the water According the degree of soiling the program automatically adjust the washing time temperature As a result th...

Page 23: ...ter Upper Spray Arm Pull the upper rack forwards Check that the water jet holes are not blocked If cleaning is required remove the arm by unscrewing the nut Clean the spray arm and replace it in the reverse order Lower Spray Arm Check that the water jet holes are not blocked If cleaning is required remove the arm by pulling up Clean the spray arm and replace it pulling down After each cycle clean ...

Page 24: ...e aid Adjust the level of rinse aid container Too little Rinse Aid dispensed Dry results are not satisfactory Too little Rinse Aid dispensed The spray arms do not rotate smoothly Clean the holes of the spray arm The mounting of the spray arms is blocked by food particles Washing results are not satisfactory Incorrect amount of detergent Utensils incorrectly arranged or overloaded Filters are clogg...

Page 25: ...rouble The display shows EI code Automatically Drain pump operated Close the water tap and unplug the power plug Call for service Water is leaking from the hose connections Damage to the unit has been caused by a water leak The display shows FE code Automatically Drain pump operated Excessive water is supplied than the normal water level There is a problem with the inlet valve The display shows HE...

Page 26: ...EMO M 26 ...

Page 27: ...EMO M 27 ...

Page 28: ...ion Water Feed Pressure 14 Place settings See rating label See rating label See rating label 50 800 kPa D1420W L M T B C D A F D1421W L M T B C D A F WZ 6805WF WZ 6805MF D1420W L M T B C D A U D1421W L M T B C D A U D1420W L M T B C D A B D1421W L M T B C D A B ...

Reviews: