background image

Operating

21

Oper

ating

3

Sound adjustment

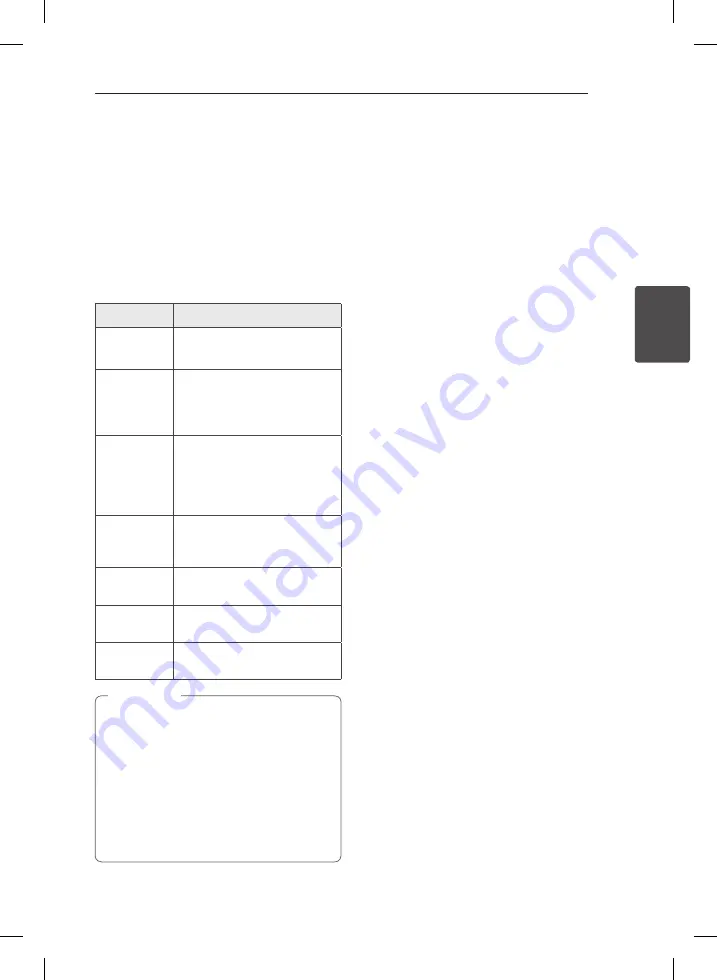
Setting the surround mode

This system has a number of pre-set surround 
sound fields. You can select a desired sound mode 
by using 

SOUND EFFECT 

on the remote control or 

LG EQ

 on the unit.

The displayed items for the Equalizer may be 
different depending on sound sources and effects.

On Display

Description

NATURAL

You can enjoy comfortable and 
natural sound.

AUTO EQ

Realizes the sound equalizer that 
is the most similar to the genre 
of which is included in the MP3 
ID3 tag of song files.

POP 

CLASSIC 

JAZZ 

ROCK

This program lends an 
enthusiastic atmosphere to the 
sound, giving you the feeling 
you are at an actual rock pop, 
jazz or classic concert.

MP3 -- OPT

This function is optimized 
for compressible MP3 file. It 
improves the treble sound.

BASS

Reinforces the treble, bass and 
surround sound effect.

LOUDNESS

Improves the bass and treble 
sound.

BYPASS

You can enjoy the sound 
without equalizer effect.


y

 On some speakers, sound may not be heard 
or heard in low sound depending on the 
sound mode.


y

 Maybe you need to reset the surround 
mode, after switching the input, sometimes 
even after the sound track changed.


y

 By  pressing 

BASS BLAST

 on the unit you 

can directly select the BYPASS or  
BASS BLAST sound.


,

Note

Setting the Clock

1.  Turn the unit on.
2. Press 

CLOCK

.

3.  Choose time mode by pressing 

Y/U

.

-  AM 12:00 (for an AM and PM display) 

 or 0:00 (for a 24 hour display)

4. Press 

SET/RDS 

to confirm your selection.

5.  Select the hours by pressing 

Y/U

.

6. Press 

SET/RDS

.

7.  Select the minutes by pressing 

Y/U

.

8. Press 

SET/RDS

.

9.  If you want to reset the clock, press and hlod 

CLOCK

. Then repeat steps 2-8.

Setting the alarm

You can use the unit as an alarm clock. 
You have to set the clock before setting the alarm.
1.  Turn the unit on.
2. Press 

TIMER

3.  Each of functions will blink. Press 

SET/RDS

 to 

select a sound source you want.

4.  “ON TIME” will be displayed. This is your desired 

time to the unit turns on. Press 

Y/U

 to 

change the hours and minutes and press  

SET/RDS

 to save.

5.  The “OFF TIME” will be displayed. This is your 

desired time to the unit turns off. Press 

Y/

U

 to change the hours and minutes and 

press 

SET/RDS

 to save.

6. Press 

Y/U

 to change the volume and 

press 

SET/RDS

 to save. The clock icon "

(

“ 

shows that the alarm is set.

7. Press 

TIMER

. You can check the setting status.

8.  If you want to reset the alarm, press and hlod 

TIMER

. Then repeat steps 3-6.

CM4330-DE_DDEULLK_ENG_7599.indd   21

2013-02-28     11:09:27

Summary of Contents for CMS4330F

Page 1: ...re reference CM4631 CM4631 CMS4630F CM4531 CM4531 CMS4530F CMS4530W CM4431 CM4431 CMS4530F CM4331 CM4331 CMS4330F OWNER S MANUAL Mini Hi Fi System ENGLISH DEUTSCH FRANÇAIS NEDERLANDS SLOVENŠČINA ITALIANO ESPAÑOL ΕΛΛΗΝΙΚΑ PORTUGUÊS CM4330 DE_DDEULLK_ENG_7599 indd 1 2013 02 28 11 09 23 ...

Page 2: ... s instruction has been adhered to CAUTION This product employs a Laser System To ensure proper use of this product please read this owner s manual carefully and retain it for future reference Shall the unit require maintenance contact an authorized service center Use of controls adjustments or the performance of procedures other than those specified herein may result in hazardous radiation exposu...

Page 3: ...n about disposal of your old appliance please contact your city office waste disposal service or the shop where you purchased the product Disposal of waste batteries accumulators 1 When this crossed out wheeled bin symbol is attached to batteries accumulators of Your product it means they are covered by European Directive 2006 66 EC 2 This symbol may be combined with chemical symbols for mercury H...

Page 4: ...perations 17 Programmed Playback 17 Displaying file information 17 Searching for a folder 18 Turn off the sound temporarily 18 Deleting an MP3 WMA file 18 DEMO 18 AUTO DJ playback 19 Listening to the sound from your external device 19 Auto Power Down 19 Radio Operations 19 Listening to the radio 20 Presetting the Radio Stations 20 Deleting all the saved stations 20 Improving poor FM reception 20 S...

Page 5: ... 5 4 Troubleshooting 26 Troubleshooting 5 Appendix 27 Specifications 28 Speaker specifications 29 Maintenance 29 Handling the Unit 29 Notes on Discs 29 Trademarks and Licenses CM4330 DE_DDEULLK_ENG_7599 indd 5 2013 02 28 11 09 23 ...

Page 6: ...A file compatibility with this unit is limited as follows y y Sampling frequency within 32 to 48 kHz MP3 within 32 to 48 kHz WMA y y Bit rate within 32 to 320 kbps MP3 40 to 192 kbps WMA y y Maximum files Under 999 y y File extensions mp3 wma y y CD ROM file format ISO 9660 JOLIET y y We recommend that you use Easy CD Creator which creates an ISO 9660 file system y y You have to set the disc forma...

Page 7: ...ation y y For a large capacity USB it may take longer than a few minute to be searched y y To prevent data loss back up all data y y If you use a USB extension cable or USB hub the USB device is not recognized y y Using NTFS file system is not supported Only FAT 16 32 file system is supported y y This unit is not supported when the total number of files is 1 000 or more y y External HDD Card reade...

Page 8: ...available for any function REPEAT MENU Listens to your tracks files repeatedly or randomly Move to the previous menu when you select USB function to play iPod iPhone C V Skip Search Skips Fast backward or Forward Searches for a section within a track file TUNING Selects the radio station Z ENTER Stops playback or recording Cancels DELETE function d M Play Pause Starts or pauses playback Selects ST...

Page 9: ...Getting Started 9 Getting Started 1 Front Panel CM4330 DE_DDEULLK_ENG_7599 indd 9 2013 02 28 11 09 25 ...

Page 10: ...r Switches the unit ON or OFF i Display window j USB Plays the audio files by connecting the USB device Connects iPod iPhone by using iPod iPhone cable USB REC Records music to USB k FUNC Selects the function or input source l DEMO Demonstrates each of functions m TST MO Starts or pauses playback Selects Stereo Mono n Volume knob Adjusts volume of speaker o LG EQ You can choose sound impressions p...

Page 11: ...Getting Started 11 Getting Started 1 a AUX IN L R connectors b ANTENNA FM c POWER IN d Cooling fan e SPEAKERS terminal cord Rear Panel CM4530 CM4330 DE_DDEULLK_ENG_7599 indd 11 2013 02 28 11 09 25 ...

Page 12: ...Getting Started 12 Getting Started 1 a AUX IN L R connectors b ANTENNA FM c POWER IN d Cooling fan e SPEAKERS terminal Rear Panel CM4630 CM4330 DE_DDEULLK_ENG_7599 indd 12 2013 02 28 11 09 25 ...

Page 13: ...Getting Started 13 Getting Started 1 a AUX IN L R connectors b ANTENNA FM c POWER IN d SPEAKERS terminal Rear Panel CM4430 CM4330 CM4330 DE_DDEULLK_ENG_7599 indd 13 2013 02 28 11 09 26 ...

Page 14: ...ctor until it clicks Be careful to make sure children do not put their hands or any objects into the speaker duct Speaker duct A hall for plentiful bass sound on speaker cabinet enclosure The speakers contain magnet parts so color irregularity may occur on the TV screen or PC monitor screen Please use the speakers far away from either TV screen or PC monitor Do not connect any other speaker except...

Page 15: ...connecting the FM wire antenna keep it horizontal Note Optional Equipment Connection AUX IN Connection Connect an output of auxiliary device Camcoder TV Player etc to the AUX IN L R connector If your device has only one output for audio mono connect it to the left white audio jack on the unit To the audio output jacks of your component TV VCR etc Red White CM4330 DE_DDEULLK_ENG_7599 indd 15 2013 0...

Page 16: ...B Memory or MP3 player etc to the USB port on the front of the unit Removing the USB Device from the unit 1 Choose a different function mode or press I Stop twice in a row 2 Remove the USB device from the unit Note CM4330 DE_DDEULLK_ENG_7599 indd 16 2013 02 28 11 09 27 ...

Page 17: ...epeatedly or randomly Press REPEAT MENU repeatedly The display will be changed in the following order RPT1 RPT DIR only MP3 WMA RPT ALL RANDOM OFF DIR Directory Other Operations Programmed Playback The program function enables you to store your favorite files from any disc or USB device A program can contain 20 tracks files 1 Insert a CD or connect your USB and wait for it to be ordered 2 Press PR...

Page 18: ...nce more You can enjoy other functions during the DEMO Then the DEMO will pause to temporary Without input key in 10 sec the DEMO will play back automatically Note AUTO DJ playback Auto DJ blends the end of one song into the beginning of another for seamless playback It equalizes volume across tracks for uninterrupted playback Press AUTO DJ on the remote control or unit repeatedly the display chan...

Page 19: ... unit after 6 hours since Main unit has been connected to other device using analog input Radio Operations Be sure that FM aerial is connected Refer to the page 15 Listening to the radio 1 Press FUNCTION on the remote control or FUNC on the unit until FM appears in the display window The last received station is tuned in 2 Auto tuning Press TUNING on the remote control or Y U on the unit for about...

Page 20: ...l or T ST MO on the unit This will change the tuner from stereo to mono Then the reception will be better than before Seeing information about a Radio station The FM tuner is supplied with the RDS Radio Data System facility This shows information about the radio station being listened to Press RDS repeatedly to cycle through the various data types PS Programme Service Name The name of the channel ...

Page 21: ...times even after the sound track changed y y By pressing BASS BLAST on the unit you can directly select the BYPASS or BASS BLAST sound Note Setting the Clock 1 Turn the unit on 2 Press CLOCK 3 Choose time mode by pressing Y U AM 12 00 for an AM and PM display or 0 00 for a 24 hour display 4 Press SET RDS to confirm your selection 5 Select the hours by pressing Y U 6 Press SET RDS 7 Select the minu...

Page 22: ...After setting a clock function you can set alarm function If you set the clock and alarm you can check the time and alarm icon by pressing CLOCK although the unit is turned off During playback press TIMER two times when the alarm icon is displayed You can check the setting state If you activate the alarm the alarm icon will appear in the display window If you deactivate the alarm the alarm icon wi...

Page 23: ...heck procedure below Your iPod iPhone is not connected firmly This unit recognizes your iPod iPhone as an unknown device Your iPod iPhone is exceptionally low in power The battery needs to be charged If you charge the battery while iPod iPhone is extremely low in power it may take longer to be charged y y Depending on your iPod iPhone s software version it may not be possible to control your iPod ...

Page 24: ...he unit Pausing recording During recording press USB REC on the remote control or USB REC on the unit to pause recording Press it again to restart recording Only Radio AUX To select recording bit rate and speed 1 Press USB REC on the remote control or USB REC on the unit for longer than 3 seconds 2 Use C V on the remote control or Y U on the unit to select the bit rate 3 Press USB REC on the remot...

Page 25: ...ssage like NO USB ERROR FULL or NO REC is displayed on the display window y y Multi card reader device or External HDD can not be used for USB recording y y A file is recorded by about 512 Mbyte when you record for a long term y y You may not store more than 999 files y y It ll be stored as follows AUDIO CD MP3 WMA The other source TUNER AUX and the like Note The making of unauthorized copies of c...

Page 26: ...ted upside down Place the disc with the label or printed side facing upwards Radio stations cannot be tuned in properly y y The antenna is positioned or connected poorly Connect the antenna securely y y The signal strength of the radio station is too weak Tune to the station manually y y No stations have been preset or preset stations have been cleared when being tuned by scanning preset channels ...

Page 27: ... jack L R x 1 Tuner FM Tuning Range 87 5 to 108 0 MHz or 87 50 to 108 00 MHz Amplifier Model CM4631 CM4531 CM4431 CM4331 Stereo mode 250 W 250 W 3 Ω at 1 KHz THD 10 160 W 160 W 4 Ω at 1 KHz THD 10 150 W 150 W 4 Ω at 1 KHz THD 10 90 W 90 W 4 Ω at 1 KHz THD 10 Surround mode Front 250 W 250 W 3 Ω at 1 KHz THD 10 160 W 160 W 4 Ω at 1 KHz THD 10 150 W 150 W 4 Ω at 1 KHz THD 10 90 W 90 W 4 Ω at 1 KHz TH...

Page 28: ...t Dimensions W x H x D 245 x 452 x 275 mm 232 x 352 x 262 mm 232 x 352 x 262 mm 204 x 301 x 235 mm Net Weight 5 55 kg 3 32 Kg 3 32 Kg 2 48 Kg Subwoofer speaker Model CMS4530W Type 1 Way 1 Speaker Impedance 3 Ω Rated Input Power 180 W Max Input power 360 W Net Dimensions W x H x D 250 x 352 x 327 mm Net Weight 5 58 kg y y Design and specifications are subject to change without notice CM4330 DE_DDEU...

Page 29: ...ns and disc drive parts are dirty or worn the picture quality could be diminished For details please contact your nearest authorized service center Notes on Discs Handling Discs Never stick paper or tape on the disc Storing Discs After playing store the disc in its case Do not expose the disc to direct sunlight or sources of heat and never leave it in a parked car exposed to direct sunlight Cleani...

Page 30: ...CM4330 DE_DDEULLK_ENG_7599 indd 30 2013 02 28 11 09 29 ...

Reviews: