background image

21

ENGLISH

Installing on a Wall

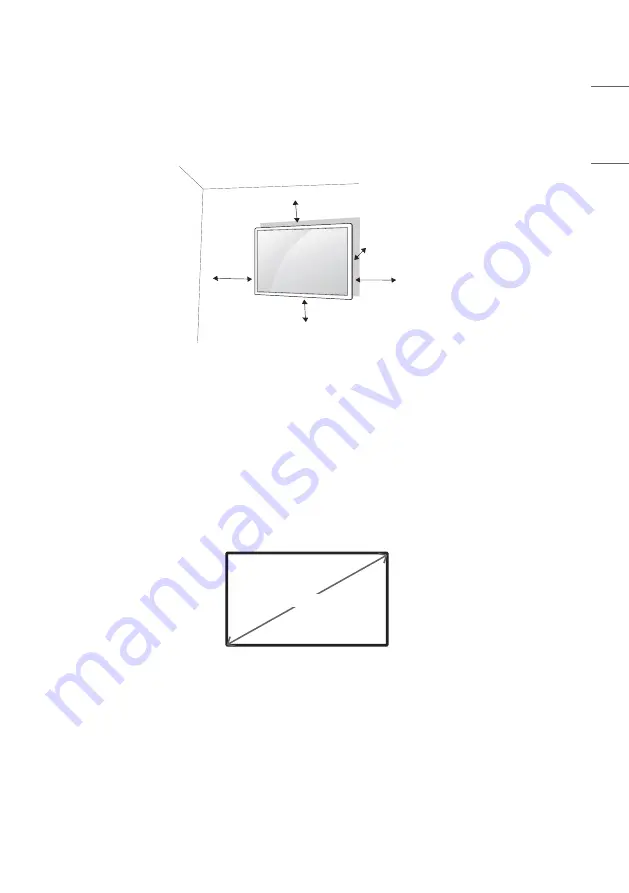
For proper ventilation, allow a clearance of 100 mm on each side and from the wall. Detailed installation instructions 

are available from your dealer, see the optional Tilt Wall Mounting Bracket Installation and Setup Guide.

100 mm

100 mm

100 mm

100 mm

100 mm

To install your monitor on a wall, attach a wall mounting bracket (optional part) to the back of the monitor.
Make sure that the wall mounting bracket is securely fixed to the monitor and to the wall.

Use only screws and wall mounting brackets that conform to VESA standards.

Screws which are longer than standard length may damage the inside of the monitor.

A non-VESA standard screw may damage the product and cause the monitor to fall. LG Electronics is not liable for 

any accidents related to the use of non-standard screws.

Please use VESA standard as below.


785 mm and above
* Fixing screws:  Diameter 6.0 mm x Pitch 1.0 mm x Length 12 mm

785 mm

Summary of Contents for 55CT5WJ

Page 1: ...MANUAL LG Digital Signage MONITOR SIGNAGE Please read this manual carefully before operating your set and retain it for future reference www lg com Copyright 2021 LG Electronics Inc All Rights Reserved 55CT5WJ ...

Page 2: ...ontrol 12 Precautions for Experiencing Image Retention 13 Product Disposal 13 ASSEMBLY AND PREPARATION 14 Optional Accessories 15 Precaution When Using the Touch Pen 16 Parts and Buttons 17 Camera 18 IR Receiver and Status Indicator 19 Installing on a Wall 21 REMOTE CONTROL 23 Using One Quick Air Mouse 23 MAKING CONNECTIONS 25 Connecting to a PC 25 External Device Connection 25 Using the Input Lis...

Page 3: ...ping the user to use the product safely and for its intended purpose WARNING If you ignore the warning message you may be seriously injured or there is a possibility of accident or death CAUTION If you ignore the caution message you may be slightly injured or the product may be damaged WARNING Indoor Use Only ...

Page 4: ... firmly so it cannot come loose Poor connection may cause a fire or electric shock In the presence of thunder and lightning never touch the power cord and signal cable because it can be very dangerous It can cause electric shock Be careful not to step or place heavy objects electronic appliances clothing etc on the power cord or AC adapter Additionally do not bend or pull out the power cord or AC ...

Page 5: ...cted from the AC power source even if the unit is turned off Power consumption will be 0 only when the power plug is unplugged Use an appliance coupler as a disconnect device CAUTION If the outlet pins of the power plug or AC adapter is covered with dust be sure wipe and keep clean Overheating due to layers of dust may cause a fire or electric shock If the outlet pins of the power plug or AC adapt...

Page 6: ... front panel of the product You may be electrocuted or the product can be damaged Comply with the number of people according to weight of product Under 25 kg per person use the equipment when exceed 100 kg If use the damaged product again contact the service center because it can cause electric shock or fire Do not hold it upside down while holding only the stand It is for stand supported models o...

Page 7: ...unction may occur Do not install this product by yourself as you may injure yourself or cause damage to product Please contact service engineer authorised by service center Do not install this product on a wall if it could be exposed to oil or oil mist This may damage the product and cause it to fall Do not leave the power or signal cable etc on the pathway This could cause a trip or fall which ca...

Page 8: ...e to internal heat buildup Do not cover the product with tablecloth or curtain or other material eg plastic while plugged in to block the ventilation hole of the product The product can be deformed or fire can break out due to overheating inside the product Do not install the product in an area with poor ventilation e g on a bookshelf in a closet or outside and avoid placing on cushions or carpets...

Page 9: ...tric shock may occur or damage to the screen as get a scratch When you want to clean the front frame spray water onto a soft cloth 2 to 4 times and wipe in one direction only Too much moisture may cause staining CAUTION When cleaning the product or the screen unplug the power cord and wipe it gently with a soft cloth Do not spray water or other liquids directly on the product Especially do not cle...

Page 10: ... or impact on the product or screen It can cause injury to human problem to product and damage the screen If you can smell smoke or other odors or hear a strange sound unplug the power cord and contact the service center If you continue to use the product without taking proper measures it may cause electrical shock or fire Do not attempt to disassemble repair or modify the product yourself Please ...

Page 11: ...ct Also do not throw toys or objects at the product or screen It can cause injury to human problem to product and damage the screen All the power sources must be disconnected by removing the power cables to remove all power from the unit CAUTION This panel is an advanced product that contains millions of pixels You may occasionally see pixel spots when viewing the screen Since these deactivated pi...

Page 12: ... Used batteries which include rechargeable batteries should be recycled separately from waste Please dispose used batteries and rechargeable batteries at a local recycling center or a retail store that handles batteries CAUTION Do not short circuit and disassemble of batteries It may cause electrical shock or fire The remote control may not function properly in sunlight or under a strong lamp Move...

Page 13: ...tention Most third party products have the same issue The resulting damage is not covered by the product warranty Use a screen saver when using the monitor for a prolonged period of time Product Disposal Do not dispose of this product with general household waste Disposal of this product must be carried out in accordance to the regulations of your local authority ...

Page 14: ...eit components NOTE The accessories provided with your product may vary depending on the model or region Product specifications or contents in this manual may be changed without prior notice due to upgrade of product functions The warranty will not cover any damage caused by using the product in an excessively dusty environment Remove all front tape before connecting the product to its power cord ...

Page 15: ...ccessories are subject to change to improve the performance of the product and new accessories may be added The illustrations in this manual may differ from the actual product and accessories Stand kit ST 653TW Screws Diameter 4 0 mm x Pitch 0 7 mm x Length 10 0 mm ...

Page 16: ...H Precaution When Using the Touch Pen When the tip of the touch pen is damaged as shown in the figure replace it with a tip provided as an accessory The touch pen can be mounted on the back cover of the product ...

Page 17: ...Selection Press 2 Power Off 3 Press and Hold Volume Control Menu Control 2 Menu Control 2 1 When the monitor is turned on press the button one time 2 You can use the function when you control menu 3 Power off the monitor Quick Menu Turns the power off Accesses the main menu Changes the input source Close the quick menu ...

Page 18: ...18 ENGLISH Camera Camera On Camera Off ...

Page 19: ...roduct 1 2 3 1 IR receiver 2 Camera On Off Status Indicator When the camera turns on the indicator lights up and when the camera turns off the indicator lights turns off 3 PC On Off Status Indicator When the PC turns on the indicator lights up and when the PC turns off the indicator lights turns off When the PC goes into sleep mode the blinks ...

Page 20: ...stem refer to the manual provided with the Kensington security system or visit http www kensington com Connect the Kensington security system cable between the monitor and a table NOTE The Kensington security system is optional You can obtain additional accessories from most electronics retail stores The illustration shows a general example of installation and may look different from the actual pr...

Page 21: ... to the back of the monitor Make sure that the wall mounting bracket is securely fixed to the monitor and to the wall 1 Use only screws and wall mounting brackets that conform to VESA standards 2 Screws which are longer than standard length may damage the inside of the monitor 3 A non VESA standard screw may damage the product and cause the monitor to fall LG Electronics is not liable for any acci...

Page 22: ...and wall mounting brackets that meet the VESA standard Any damage or injuries caused by misuse or use of improper accessories are not covered by the warranty NOTE The wall mount kit includes the installation guide and all necessary parts The wall mounting bracket is optional You can obtain additional accessories from your local dealer The length of screws required may differ depending on the wall ...

Page 23: ...the labels inside the compartment and close the battery cover To remove the batteries perform the installation actions in reverse The illustrations may differ from the actual accessories CAUTION Do not mix old and new batteries as this may damage the remote control Be sure to point the remote control toward the remote control sensor on the monitor Some features of the remote control may not be sup...

Page 24: ...ode Backward Browser backward click One Quick Mode Forward Browser forward click One Quick Mode This function is not supported Back Returns to the previous level Q Settings Accesses the Quick settings Miracast Allows to share the screen with other devices Input Changes the input source Control Play Pause for media contents One Quick Mode Guide Accesses the OWNER S MANUAL One Quick Air Mouse Pairin...

Page 25: ...C Some of the cables are not provided This monitor supports the feature a feature that enables a PC to recognize devices attached by the user without device configuration or user intervention when powering up External Device Connection Some of the cables are not provided Connect a HD receiver DVD or VCR player to the monitor and select an appropriate input mode For the best picture and sound quali...

Page 26: ...any sound in HDMI mode please check your PC settings Some PCs require you to manually change the default audio output to HDMI You may experience compatibility issues if you use HDMI PC mode Make sure the power cable is disconnected If you connect a gaming device to the monitor use the cable provided with the gaming device CAUTION Connect the signal input cable and tighten it by turning the screws ...

Page 27: ...e PC and the product or the cable connection status is unstable Check the signal cable Access the input menu to check the input signal The signal from the PC Graphics card is out of the vertical or horizontal frequency range of the product Adjust the frequency range by referring to the specifications in this manual The position of the screen is incorrect Check if the graphics card resolution and f...

Page 28: ...ust brightness and contrast again Backlight may need repair Issues Related to Sound There is no sound output See if the audio cable is connected properly Adjust the volume of the product or external device See if the sound is set properly Sound is too dull Select the appropriate equalizer sound Sound is too low Adjust the volume of the product or external device For some models you will need to pu...

Page 29: ...e screen only with nail or fingertip If holding the tip of the touch pen or near the tip of the touch pen If using the touch pen while pressing it with strong force on the screen The location of a touch does not correspond to the touch coordinates This may occur when the touch screen is not calibrated properly Change your tablet PC settings A touch is applied to a monitor other than the one I inte...

Page 30: ...is referred to as image sticking Image sticking does not occur when using constantly changing images but may occur when using a fixed image for an extended period of time Therefore it is recommended that you use the instructions below to decrease the likelihood of image sticking occurring when using a fixed image It is recommended that you change the screen at least once every 12 hours at the very...

Page 31: ...I1 2 One Quick Works USB C PC 30 Hz to 60 317 Hz Synchronization Separate Sync Digital Input Output ports DisplayPort Only Some smartphones may not be compatible depending on their features Embedded battery Applied Environmental Conditions Operating Temperature 0 C to 40 C Operating Humidity 10 to 80 Storage Temperature 20 C to 60 C Storage Humidity 5 to 85 Audio Input Sensitivity 0 7 Vrms Power R...

Page 32: ...luetooth Bluetooth 5 0 Connecting a Bluetooth device and wireless LAN at the same time may slow the system s performance Bluetooth 5 0 is available only if the device you are connecting to the product also supports Bluetooth 5 0 Bluetooth specifications may vary depending on the OS Wireless LAN Intel 9260 NGW Camera Resolution 4K 30 fps 1080p 720p 960 x 540 848 x 480 800 x 448 640 x 480 640 x 360 ...

Page 33: ...of 20 cm between the device and the body Only Nigeria Connection and use of this communication equipment is permitted by the Nigerian Communications Commission Only Vietnam Wireless module Intel 9260NGW Specifications Wireless LAN IEEE 802 11a b g n ac Frequency range MHz Output power Max dBm 2400 to 2483 5 5150 to 5350 5725 to 5850 16 17 17 Bluetooth Frequency range MHz Output power Max dBm 2400 ...

Page 34: ...0 1080 50p 56 25 50 1080 60p 67 432 59 94 1080 60p 67 5 60 2160 30p 67 5 30 2160 50p 112 5 50 2160 60p 135 60 NOTE Horizontal frequency The horizontal interval is the time taken to display one horizontal line When 1 is divided by the horizontal interval the number of horizontal lines displayed every second can be tabulated as the horizontal frequency The unit is kHz Vertical frequency The product ...

Page 35: ...nition Multimedia Interface and the HDMI Logo are trademarks or registered trademarks of HDMI Licensing Administrator Inc The Bluetooth word mark and logos are registered trademarks owned by Bluetooth SIG Inc and any use of such marks by LG Electronics Inc is under license Other trademarks and trade names are those of their respective owners ...

Page 36: ...hem below in case you ever need service MODEL SERIAL NO This product qualifies for ENERGY STAR Changing the factory default configuration and settings or enabling certain optional features and functionalities may increase energy consumption beyond the limits required for ENERGY STAR certification Refer to ENERGYSTAR gov for more information on the ENERGY STAR program ...

Reviews: