background image

9

ENGLISH

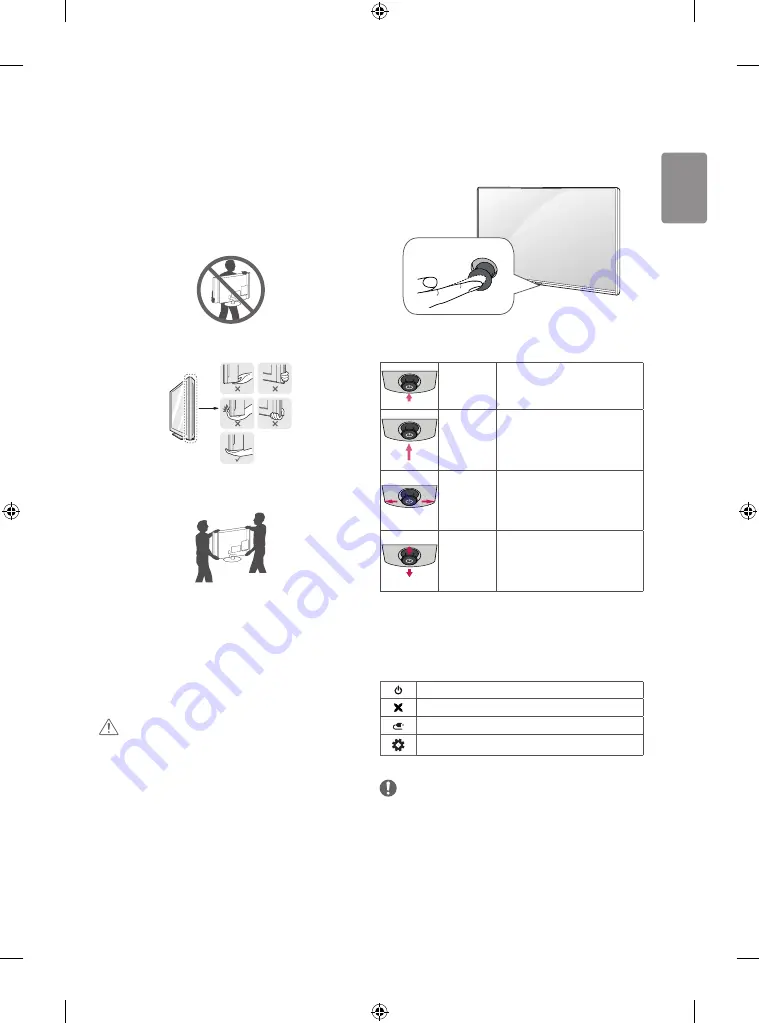
Lifting and moving the TV

Please note the following advice to prevent the TV from being scratched 
or damaged and for safe transportation regardless of its type and size.

•  It is recommended to move the TV in the box or packing material 

that the TV originally came in.

•  Before moving or lifting the TV, disconnect the power cord and 

all cables.

•  When holding the TV, the screen should face away from you to 

avoid damage.

•  Hold the top and bottom of the TV frame firmly. Make sure not to 

hold the transparent part, speaker, or speaker grill area.

•  When transporting a large TV, there should be at least 2 people. 
•  When transporting the TV by hand, hold the TV as shown in the 

following illustration.

•  When transporting the TV, do not expose the TV to jolts or 

excessive vibration.

•  When transporting the TV, keep the TV upright, never turn the TV 

on its side or tilt towards the left or right.

•  Do not apply excessive pressure to cause flexing /bending of frame 

chassis as it may damage screen.

•  When handling the TV, be careful not to damage the protruding 

joystick button. 

 CAUTION

•  Avoid touching the screen at all times, as this may result in damage 

to the screen.

•  Do not move the TV by holding the cable holders, as the cable 

holders may break, and injuries and damage to the TV may occur. 

Using the joystick button 

(Image shown may differ from your TV.)
You can simply operate the TV functions, pressing or moving the joystick 
button up, down, left or right.

Joystick Button

Basic functions

Power On

When the TV is turned off, place your 
finger on the joystick button and 
press it once and release it. 

Power Off

When the TV is turned on, place your 
finger on the joystick button and 
press it once for a few seconds and 
release it. All running apps will close.

Volume 
Control

If you place your finger over the 
joystick button and move it left or 
right, you can adjust the volume level 
you want. 

Programmes 
Control

If you place your finger over the 
joystick button and move it up or 
down, you can scrolls through the 
saved programmes you want. 

Adjusting the menu

When the TV is turned on, press the joystick button one time. You can 
adjust the Menu items moving the joystick button up, down, left or
right. 


Turns the power off. 
Clears on-screen displays and returns to TV viewing.
Changes the input source.
Accesses the Quick Settings.

 NOTE

•  When your finger over the joystick button and push it to the up, 

down, left or right, be careful not to press the joystick button. If you 
press the joystick button first, you may not be able to adjust the 
volume level and saved programmes.

Summary of Contents for 43LX761H-GA

Page 1: ...LED TV LX76 www lg com AAA c d a X 4 M4 X L14 43 49 55LX76 b X 4 M4 X L20 43 49 55LX76 b X 6 M4 X L20 32 40LX76 X 2 X 2 X 2 Depending on model Tergantung pada modelnya ...

Page 2: ...i ...

Page 3: ...c d b c d c d b a 3 B 1 2 32 40LX76 32 40LX76 43 49 55LX76 43 49 55LX76 3 A 4 A 4 B 1 5 ...

Page 4: ...2 A B H P OUT USB IN 1 IN 2 USB IN 2 A 1 32 40LX76 ...

Page 5: ...A 2 H P OUT 2 1 IN 2 H P OUT USB IN 1 IN 2 USB IN 2 43 49 55LX76 ...

Page 6: ...ANTENNA CABLE IN OPTICAL DIGITAL AUDIO OUT IN 1 ARC VIDEO MONO AUDIO L R AUDIO VIDEO L R VOLUMECONTROL LNB Satellite IN 13 18V 700mA Max B ...

Page 7: ...3 5 4 1 3 4 2 ...

Page 8: ...H GA 55LX761H TA 55LX765H TA A x B x C mm 734 x 489 x 282 911 x 576 x 282 973 x 624 x 325 1106 x 701 x 325 1242 x 780 x 325 A x E x F mm 734 x 438 x 55 3 911 x 528 x 55 3 973 x 573 x 55 1 1106 x 647 x 55 1 1242 x 724 x 55 1 D kg 8 2 10 4 13 6 17 8 21 1 D G kg 5 3 7 5 10 2 14 4 17 7 AC 100 240 V 50 60 Hz A F C D B E G Power requirement Persyaratan daya ...

Page 9: ......

Page 10: ......

Page 11: ......

Page 12: ... MFL71699202 2001 REV00 ...

Page 13: ...fore operating your set and retain it for future reference Safety and Reference OWNER S MANUAL www lg com LED TV LG LED TV applies LCD screen with LED backlights Copyright 2020 LG Electronics Inc All Rights Reserved MFL71699101 2001 REV00 ...

Page 14: ...dry the power plug completely or wipe dust off You may be electrocuted due to excess moisture Make sure to connect Mains cable to compliant AC mains socket with Grounded earth pin Except for devices which are not grounded on earth Otherwise possibility you may be electrocuted or injured Insert power cable plug completely into wall socket otherwise if not secured completely into socket fire ignitio...

Page 15: ... You may be electrocuted Depending on model Do not put or store inflammable substances near the product There is a danger of combustion explosion or fire due to careless handling of the inflammable substances Do not drop metallic objects such as coins hair pins chopsticks or wire into the product or inflammable objects such as paper and matches Children must pay particular attention Electrical sho...

Page 16: ...in fire electric shock malfunction or product deformation Never Disassemble the AC adapter or power cord This may result in fire or electric shock CAUTION Install the product where no radio wave occurs There should be enough distance between an outside antenna and power lines to keep the former from touching the latter even when the antenna falls This may cause an electric shock Do not install the...

Page 17: ...lug to the wall outlet Do not use the power plug for switch It may cause mechanical failure or could give an electric shock Please follow the installation instructions below to prevent the product from overheating The distance between the product and the wall should be more than 10 cm Do not install the product in a place with no ventilation e g on a bookshelf or in a cupboard Do not install the p...

Page 18: ...as this could be hazardous When moving the product make sure you turn the power off first Then unplug the power cables antenna cables and all connecting cables TheTV set or power cord may be damaged which may create a fire hazard or cause electric shock When moving or unpacking the product work in pairs because the product is heavy Otherwise this may result in injury Contact the service centre onc...

Page 19: ...alization of theTV may take a few minutes Image shown may differ from yourTV YourTV s OSD On Screen Display may differ slightly from that shown in this manual The available menus and options may differ from the input source or product model that you are using New features may be added to thisTV in the future TheTV can be placed in standby mode in order to reduce the power consumption And theTV sho...

Page 20: ...anufacturer s circumstances or policies Depending on model AN MR600 Magic Remote LG Audio Device Maintenance Cleaning your TV Clean yourTV regularly to keep the best performance and to extend the product lifespan Make sure to turn the power off and disconnect the power cord and all other cables first When theTV is left unattended and unused for a long time disconnect the power cord from the wall o...

Page 21: ...ding the cable holders as the cable holders may break and injuries and damage to theTV may occur Using the joystick button Image shown may differ from yourTV You can simply operate theTV functions pressing or moving the joystick button up down left or right Joystick Button Basic functions Power On When theTV is turned off place your finger on the joystick button and press it once and release it Po...

Page 22: ...ort the television Ensuring the television is not overhanging the edge of the supporting furniture Not placing the television on tall furniture for example cupboards or bookcases without anchoring both the furniture and the television to a suitable support Not standing the televisions on cloth or other materials placed between the television and supporting furniture Educating children about the da...

Page 23: ... a desk so it cannot be pulled in a forward backward direction potentially causing injury or damaging the product A type Desk Stand 4 Screws Not supplied withTV NOTE Screw M5 x L L Table depth 8 10 mm ex Table depth 15 mm Screw M5 x L25 B type 2 Screws for Stand Fixing 2 Washers for Stand Fixing 2 Nuts for Stand Fixing Supplied withTV Desk Stand ...

Page 24: ...large enough to support theTV securely Brackets bolts and ropes are not provided You can obtain additional accessories from your local dealer Mounting on a wall Attach an optional wall mount bracket at the rear of theTV carefully and install the wall mount bracket on a solid wall perpendicular to the floor When you attach theTV to other building materials please contact qualified personnel LG reco...

Page 25: ...NOTE Use the screws that are listed on theVESA standard screw specifications The wall mount kit includes an installation manual and necessary parts The wall mount bracket is not provided You can obtain additional accessories from your local dealer The length of screws may differ depending on the wall mount Make sure to use the proper length For more information refer to the manual supplied with th...

Page 26: ...ture is clear In PC mode some resolution settings may not work properly depending on the graphics card Only a USB storage device is recognizable Antenna connection Connect th eTV to a wall antenna socket with an RF cable 75 Ω Use a signal splitter to use more than 2TVs If the image quality is poor install a signal amplifier properly to improve the image quality If the image quality is poor with an...

Page 27: ...el ThisTV can be connected to a Pro Centric server via the LAN port After making the physical connection theTV needs to be set up for network communication Connect the LAN port of the Modem or Router from Pro Centric server to the LAN port on theTV 2 1 Pro Centric Server Broadband Modem Broadband Modem Pro Centric Server Router Broadband Modem 1 Connect the LAN port of the Modem or Router to the L...

Page 28: ...d and new batteries as this may damage the remote control In AnalogueTV and some countries some remote control buttons may not work The remote control will not be included for all sales market Make sure to point the remote control toward the remote control sensor on theTV Depending on model A B A POWER Turns theTV on or off Adjusts the brightness of the screen to reduce energy consumption Shows th...

Page 29: ...orted licenses may differ by model For more information about licenses visit www lg com Manufactured under license from Dolby Laboratories Dolby and the double D symbol are trademarks of Dolby Laboratories The terms HDMI and HDMI High Definition Multimedia interface and the HDMI logo are trademarks or registered trademarks of HDMI Licensing LLC in the United States and other countries This DivX Ce...

Page 30: ...ftware If needed please consult with LGE and upload revised software version according to the guidance provided by LGE Cannot control theTV with the remote control Check the remote control sensor on the product and try again Check if there is any obstacle between the product and the remote control Check if the batteries are still working and properly installed to to No image display and no sound i...

Page 31: ...nsideration of the user this device should be installed and operated with a minimum distance of 20 cm between the device and the body CI Module W x H x D 100 0 mm x 55 0 mm x 5 0 mm Environment condition OperatingTemperature 0 C to 40 C Operating Humidity Less than 80 StorageTemperature 20 C to 60 C Storage Humidity Less than 85 DigitalTV Depending on Country AnalogueTV Depending on Country Televi...

Page 32: ...0 00 720 x 480 31 47 31 50 59 94 60 00 720 x 576 31 25 50 00 1280 x 720 37 50 44 96 45 00 50 00 59 94 60 00 1920 x 1080 28 12 33 72 33 75 26 97 27 00 33 71 33 75 56 25 67 43 67 50 50 00 59 94 60 00 23 97 24 00 29 97 30 00 50 00 59 94 60 00 HDMI PC Supported Mode Use HDMI IN 1 for PC mode Resolution Horizontal Frequency kHz Vertical Frequency Hz 640 x 350 31 46 70 09 720 x 400 31 46 70 08 640 x 480...

Page 33: ...by Digital Plus AAC PCM mpg mpeg dat Video MPEG 1 MPEG 2 Audio MPEG 1 Layer I II MPEG 1 Layer III MP3 vob Video MPEG 1 MPEG 2 Audio Dolby Digital MPEG 1 Layer I II DVD LPCM rm rmvb Video RV30 RV40 Audio Realaudio6 cook AAC LC HE AAC This feature is available in certain countries only Audio Format File Format Item Info mp3 Bit rate 32 Kbps 320 Kbps Sample freq 16 kHz 48 kHz Support MPEG1 MPEG2 Chan...

Page 34: ...rol Button 40 Remote control Button 07 Remote control Button 41 Remote control Button 06 Remote control Button 44 Remote control Button 43 Remote control Button 28 Remote control Button 5B Remote control Button 72 Red Remote control Button 71 Green Remote control Button 63 Yellow Remote control Button 61 Blue Remote control Button 20 Remote control Button 21 Remote control Button Code Hexa Functio...

Page 35: ... to control the product s functions externally Connect the serial port of the control device to the RS 232C jack on the product back panel NOTE RS 232C connection cables are not supplied with the product RS 232CIN CONTROL SERVICE Not Provided Type of Connector D Sub 9 Pin Male 6 1 5 9 No Pin name 1 3 5V 2 RXD Receive data 3 TXD Transmit data 4 IR OUT fromTV 5 GND 6 No Connection 7 5V 8 No Connecti...

Page 36: ...RT Data length 8 bits Parity None Stop bit 1 bit Communication code ASCII code Use a crossed reverse cable Command Reference List Depending on Model COMMAND1 COMMAND2 DATA Hexadecimal 01 Power k a 00 to 01 02 Aspect Ratio k c See p 25 03 Screen Mute k d See p 26 04 Volume Mute k e 00 to 01 05 Volume Control k f 00 to 64 06 Contrast k g 00 to 64 07 Brightness k h 00 to 64 08 Colour k i 00 to 64 09 ...

Page 37: ... based on this format when receiving abnormal data from non viable functions or communication errors Data 00 Illegal Code 01 Power Command k a To control Power On Off of the set Transmission k a Set ID Data Cr Data 00 Power Off 01 Power On Ack a Set ID OK NG Data x To ShowTV is Power On Off Transmission k a Set ID FF Cr Ack a Set ID OK NG Data x Similarly if other functions transmit 0 x FF data ba...

Page 38: ... Command k g To adjust screen contrast You can also adjust contrast in the PICTURE menu Transmission k g Set ID Data Cr Data Min 00 to Max 64 Refer to Real data mapping Ack g Set ID OK NG Data x 07 Brightness Command k h To adjust screen brightness You can also adjust brightness in the PICTURE menu Transmission k h Set ID Data Cr Data Min 00 to Max 64 Refer to Real data mapping Ack h Set ID OK NG ...

Page 39: ... ID OK NG Data x 14 ColourTemperature Command x u To adjust colour temperature You can also adjust Colour Temperature in the PICTURE menu Transmission x u Set ID Data Cr DataWarm 00 to Cool 64 Refer to Real data mapping Ack u Set ID OK NG Data x 15 Energy Saving Command j q To reduce the power consumption of theTV You can also adjust Energy Saving in PICTURE menu Transmission j q Set ID Data Cr Po...

Page 40: ...o 47 00 2F 2FH No 394 01 8A 18AH DTV No 0 Don t care Data 02 Antenna 0 x 00 Analog Main 0 x 10 DTV Main 0 x 20 Radio Cable 0 x 80 Analog Main 0 x 90 DTV Main 0 x A0 Radio Channel data range Analogue Min 00 to Max 63 0 to 99 Digital Min 00 to Max 3E7 0 to 999 Ack a Set ID OK NG Data x Data Min 00 to Max 7DH 19 Programme Add Skip Command m b To set skip status for the current Programme Transmission ...

Page 41: ...ternal Input Data 0 0 0 0 DTV 0 0 0 1 Analogue 0 0 1 0 AV 0 1 0 0 Component 0 1 1 0 RGB 0 1 1 1 HDMI 1 0 0 0 1 0 0 1 1 0 1 0 Input Number Data 0 0 0 0 Input1 0 0 0 1 Input2 0 0 1 0 Input3 0 0 1 1 Input4 Ack b Set ID OK NG Data x Real data mapping 00 Step 0 A Step 10 Set ID 10 F Step 15 Set ID 15 10 Step 16 Set ID 16 64 Step 100 6E Step 110 73 Step 115 74 Step 116 CF Step 199 FE Step 254 FF Step 25...

Page 42: ...Record the model number and serial number of the TV Refer to the label on the back cover and quote this information to your dealer when requiring any service MODEL SERIAL Only DTV ...

Reviews: