background image

10

ENGLISH

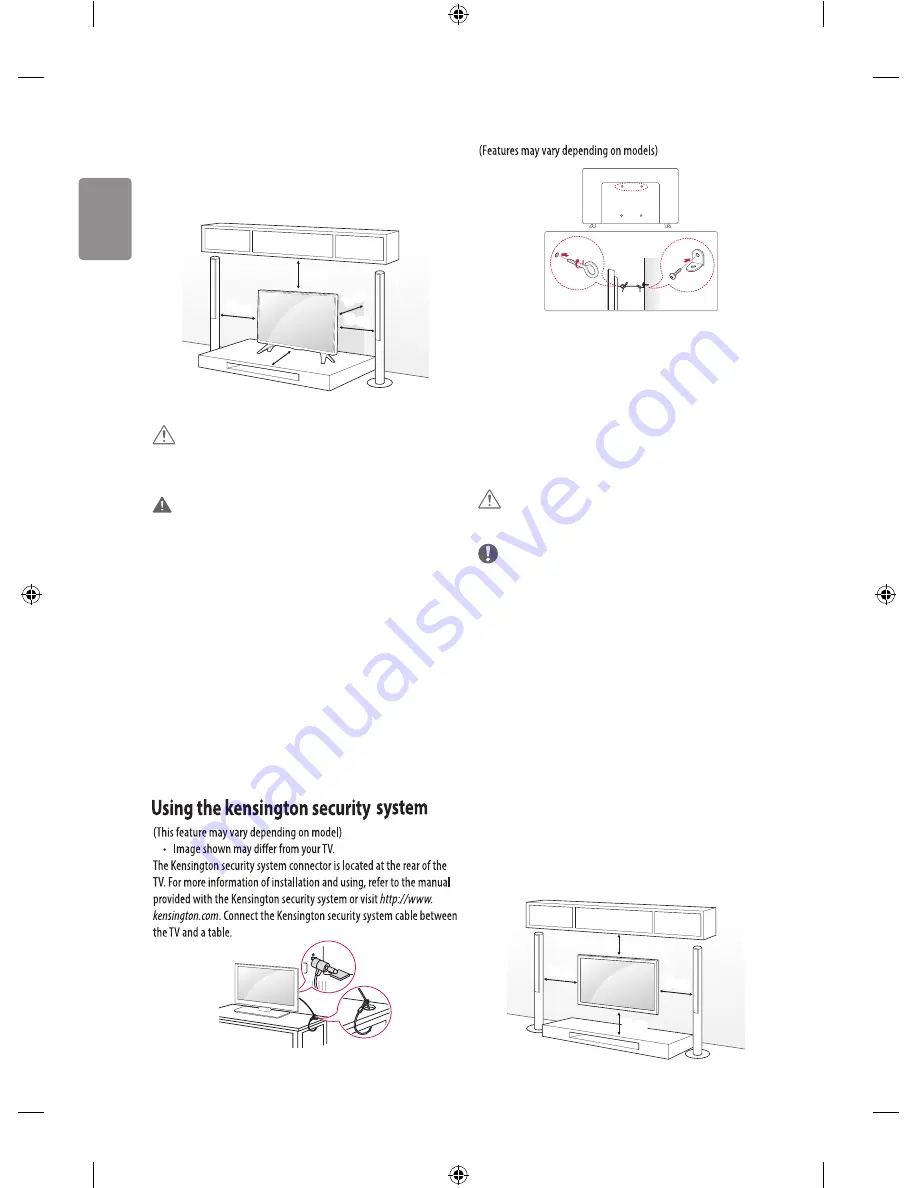
Mounting on a table

1  Lift and tilt the TV into its upright position on a table.  

•  Leave a 10 cm (minimum) space from the wall for proper 

ventilation.

10 cm

10 cm

10 cm

10 cm

10 cm

2  Connect the power cord to a wall outlet.

 CAUTION

•  Do not place the TV near or on sources of heat, as this may result in 

fire or other damage.

 WARNING

If a television is not positioned in a sufficiently stable location, it can 
be potentially hazardous due to falling. Many injuries, particularly to 
children, can be avoided by taking simple precautions such as:

•  Using cabinets or stands recommended by the manufacturer of 

the television.

•  Only using furniture that can safely support the television.
•  Ensuring the television is not overhanging the edge of the 

supporting furniture.

•  Not placing the television on tall furniture (for example, cupboards 

or bookcases) without anchoring both the furniture and the 
television to a suitable support.

•  Not standing the televisions on cloth or other materials placed 

between the television and supporting furniture.

•  Educating children about the dangers of climbing on furniture to 

reach the television or its controls.

Securing the TV to a wall 

1  Insert and tighten the eye-bolts, or TV brackets and bolts on the back 

of the TV. 

•  If there are bolts inserted at the eye-bolts position, remove the 

bolts first.

2  Mount the wall brackets with the bolts to the wall. 

Match the location of the wall bracket and the eye-bolts on the rear 
of the TV.

3  Connect the eye-bolts and wall brackets tightly with a sturdy rope. 

Make sure to keep the rope horizontal with the flat surface.

 CAUTION

•  Make sure that children do not climb on or hang on the TV.

 NOTE

•  Use a platform or cabinet that is strong and large enough to 

support the TV securely.

•  Brackets, bolts and ropes are not provided. You can obtain 

additional accessories from your local dealer.

Mounting on a wall

Attach an optional wall mount bracket at the rear of the TV carefully 
and install the wall mount bracket on a solid wall perpendicular to 
the floor. When you attach the TV to other building materials, please 
contact qualified personnel. LG recommends that wall mounting be 
performed by a qualified professional installer. We recommend the use 
of LG’s wall mount bracket. LG’s wall mount bracket is easy to move with 
cables connected. When you do not use LG’s wall mount bracket, please 
use a wall mount bracket where the device is adequately secured to the 
wall with enough space to allow connectivity to external devices. It is 
advised to connect all the cables before installing fixed wall mounts.

10 cm

10 cm

10 cm

10 cm

(Depending on model)

Summary of Contents for 43lh595t

Page 1: ...is manual carefully before operating your set and retain it for future reference Safety and Reference OWNER S MANUAL LED TV Disclaimer LG LED TV applies LCD screen with LED backlights www lg com P NO 3 7 MFL69446122 ...

Page 2: ...t up it is designed to meet the BEE Star Labeling requirements while maintaining optimum picture quality Changes to certain functionalities of this television TV Guide Picture sound etc may change the power consumption Depending upon such changed setting eg Retail mode the power consumption may vary which possibly could exceed the stated energy consumption To reset the television to Star rating qu...

Page 3: ...dry the power plug completely or wipe dust off You may be electrocuted due to excess moisture Make sure to connect Mains cable to compliant AC mains socket with Grounded earth pin Except for devices which are not grounded on earth Otherwise possibility you may be electrocuted or injured Insert power cable plug completely into wall socket otherwise if not secured completely into socket fire ignitio...

Page 4: ... You may be electrocuted Depending on model Do not put or store inflammable substances near the product There is a danger of combustion explosion or fire due to careless handling of the inflammable substances Do not drop metallic objects such as coins hair pins chopsticks or wire into the product or inflammable objects such as paper and matches Children must pay particular attention Electrical sho...

Page 5: ...k malfunction or product deformation Never Disassemble the AC adapter or power cord This may result in fire or electric shock Be careful in handling the adapter to prevent any external shocks to it An external shock may cause damage to the adapter Make sure the power cord is connected securely to the power plug on theTV Depending on model CAUTION Install the product where no radio wave occurs Ther...

Page 6: ...ke sure the connecting cables are long enough Otherwise the product may fall over which may cause injury or damage the product Do not turn the product On Off by plugging in or unplugging the power plug to the wall outlet Do not use the power plug for switch It may cause mechanical failure or could give an electric shock Please follow the installation instructions below to prevent the product from ...

Page 7: ...ing the cable grab the plug and unplug it by pulling at the plug Don t pull at the cord to unplug the power cord from the power board as this could be hazardous When moving the product make sure you turn the power off first Then unplug the power cables antenna cables and all connecting cables TheTV set or power cord may be damaged which may create a fire hazard or cause electric shock When moving ...

Page 8: ...are using New features may be added to thisTV in the future The items supplied with your product may vary depending on the model Product specifications or contents of this manual may be changed without prior notice due to upgrade of product functions For an optimal connection HDMI cables and USB devices should have bezels less than 10 mm thick and 18 mm width Use an extension cable that supports U...

Page 9: ...g or moving the buttons Turns the power off Clears on screen displays and returns toTV viewing Changes the input source Accesses the settings menu Separate purchase items can be changed or modified for quality improvement without any notification Contact your dealer to buy these items These devices only work with certain models The model name or design may be changed depending on the upgrade of pr...

Page 10: ...rTV brackets and bolts on the back of theTV If there are bolts inserted at the eye bolts position remove the bolts first 2 Mount the wall brackets with the bolts to the wall Match the location of the wall bracket and the eye bolts on the rear of theTV 3 Connect the eye bolts and wall brackets tightly with a sturdy rope Make sure to keep the rope horizontal with the flat surface CAUTION Make sure t...

Page 11: ...gaming device In PC mode there may be noise associated with the resolution vertical pattern contrast or brightness If noise is present change the PC output to another resolution change the refresh rate to another rate or adjust the brightness and contrast on the PICTURE menu until the picture is clear In PC mode some resolution settings may not work properly depending on the graphics card Antenna ...

Page 12: ...battery cover To remove the batteries perform the installation actions in reverse CAUTION In AnalogueTV and some countries some remote control buttons may not work Make sure to point the remote control toward the remote control sensor on theTV A B 1 1 1 2 3 1 2 3 A POWER Turns theTV on or off Selects Radio TV and DTV programme 1 Search Search for content such asTV programmes movies and other video...

Page 13: ...p down left right Scrolls through menus or options Selects menus or options and confirms your input D 5 By pressing the AD button audio descriptions function will be enabled Depending on model 5 Starts to record and displays record menu Only Time MachineReady supported model Depending on model 5 Sets the sleep timer Depending on model 6 Returns to LIVETV Depending on model Control buttons Controls...

Page 14: ...plays the set top box Home menu When you are not watching via a set top box the display changes to the set top box screen C D C Wheel OK Press the center of theWheel button to select a menu You can change programmes by using the wheel button up down left right Press the up down left or right button to scroll the menu If you press buttons while the pointer is in use the pointer will disappear from ...

Page 15: ...rst pair it with yourTV 1 Put batteries into the Magic Remote and turn theTV on 2 Point the Magic Remote at yourTV and press the Wheel OK on the remote control If theTV fails to register the Magic Remote try again after turning theTV off and back on How to deregister the magic remote Press the and HOME buttons at the same time for five seconds to unpair the Magic Remote with yourTV Pressing and ho...

Page 16: ...ity Less than 85 1 Only Satellite models DigitalTV Depending on Country AnalogueTV Depending on Country Television system DVB T T21 DVB T T2 C S S22 DVB T3 PAL B B PAL B G PAL D K PAL I SECAM B G SECAM D K NTSC M Programme coverage VHF UHF C Band2 Ku Band2 VHF UHF CATV Maximum number of storable programmes LH57 DVB T T2 AnalogueTV 2 000 DVB S S2 6 000 LH59 LH60 DVB T T2 AnalogueTV 3 000 DVB S S2 6...

Page 17: ... Not placing the television set on tall furniture for example cupboards or bookcases without anchoring both the furniture and the television set to a suitable support Not placing the television set on cloth or other materials that may be located between the television set and supporting furniture Educating children about the dangers of climbing on furniture to reach the television set or its contr...

Page 18: ...ENGLISH ...

Page 19: ......

Page 20: ...Record the model number and serial number of the TV Refer to the label on the back cover and quote this information to your dealer when requiring any service MODEL SERIAL ...

Reviews: