background image

18

WaTChiNg TV / PrOgrammE CONTrOl

W

AT

C

H

IN

G

 T

V /

 P

R

O

G

R

AM

M

E C

O

N

TR

O

L

OK

Move

Auto Tuning
Manual Tuning
Programme Edit

SETUP

OK

Move

Auto Tuning
Manual Tuning
Programme Edit

SETUP

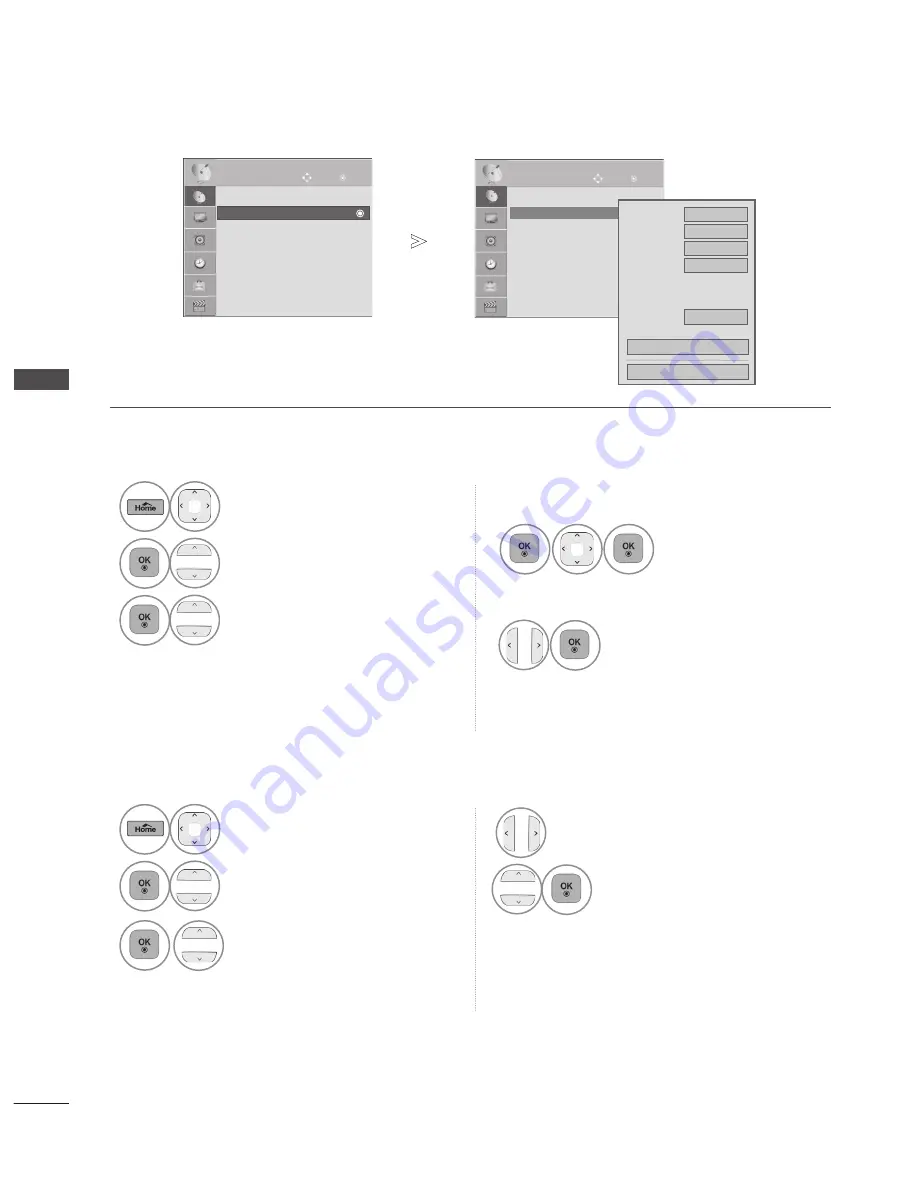
Manual Tuning

Manual Tuning

Storage

1

System

BG

Band

V/UHF

Channel

◄     ►

Search

0

Name

C  02

Close

Store

Fine

◄     ►

You can assign a station name with five characters to each programme number.

Normally fine tuning is only necessary if reception is poor.


assigning a station name


Fine Tuning

1

Select 

SETuP

.

2

Select 

manual Tuning

.

3

Select 

Name

.

1

Select 

SETuP

.

2

Select 

manual Tuning

.

3


Select 

Fine

.

4

Select the position and 

make your choice of the 

second  character,  and 

so on.

You  can  use  an  the 

alphabet 

a

  to 

z

,  the 

number 

0

 to 

9

, +/ -, and 

blank. 

5

4

5


Select 

Close

.

Fine  tune  for  the  best  picture 

and sound.

Select 

Store

.

• 

Press the 

home/ExiT

 button to return to normal TV viewing.

• 

Press the 

BaCK 

button to move to the previous menu screen.

Summary of Contents for 42PT2

Page 1: ...www lg com OWNER S MANUAL PLASMA TV Please read this manual carefully before operating your set and retain it for future reference ...

Page 2: ...he TV 2 Use the ferrite core to reduce the electromagnetic interference in the power cable Wind the power cable on the ferrite core once Place the ferrite core close to the TV 3 Use the ferrite core to reduce the electromagnetic interference in the power cable Wind the power cable on the ferrite core once Place the ferrite core close to the TV and a wall plug If there is one ferrite core follow as...

Page 3: ...up 22 Input List 23 Input Label 24 SIMPLINK 25 AV Mode 28 Initializing Reset to original factory settings 29 Key Lock 30 To use a USB device When connecting a USB device 31 Photo list 33 Music list 39 Movie list 42 DivX Registration Code 48 Deactivation 49 Picture Control Picture Size Aspect Ratio Control 50 Energy Saving 52 Preset Picture Settings 53 Manual Picture Adjustment 54 Picture Improveme...

Page 4: ...to on off time setting 73 Sleep Timer setting 73 Teletext Switch on off 74 SIMPLE Text 74 TOP Text 74 FASTEXT 75 Special Teletext Functions 75 Appendix Troubleshooting 76 Maintenance 78 Product Specifications 79 IR Codes 81 External Control Device Setup 82 ...

Page 5: ...oth Polishing cloth for use on the screen This item is not included for all models Lightly wipe any stains or fingerprints on the surface of the TV with the polishing cloth Do not use excessive force This may cause scratching or discolouration Preparation Cable Holder Power Cord holder Wall Mounting Bracket Separate purchase PSW400BG or PSW400B or DSW400BG Ferrite Core Depending on model Protectio...

Page 6: ...ak causing possible injury from fragments of glass or the TV may fall Do not drag the TV The floor or the product may be damaged Image shown may differ from your TV 42 50PT2 50PV2 42 50PT3 P HOME INPUT OK P HOME INPUT OK P HOME INPUT OK PROGRAMME VOLUME HOME OK INPUT POWER Intelligent Sensor Adjusts picture according to the surrounding conditions Remote Control Sensor Power Standby Indicator Illum...

Page 7: ...NPUT OK PROGRAMME VOLUME HOME OK INPUT POWER Touch Sensor You can use the desired button function by touching P HOME INPUT OK Intelligent Sensor Adjusts picture according to the surrounding conditions Remote Control Sensor Power Standby Indicator Illuminates red in standby mode SPEAKER ...

Page 8: ... on an AC power The voltage is indicated on the Specifications page Never attempt to operate the TV on DC power HDMI Input Connect an HDMI signal to HDMI IN Or DVI VIDEO signal to HDMI DVI port with DVI to HDMI cable RGB DVI Audio Input Connect the audio from a PC RGB Input Connect the output from a PC RS 232C Input CONTROL SERVICE Port Connect to the RS 232C port on a PC This port is used for Ser...

Page 9: ...rage device to this jack 1 2 3 4 5 6 7 8 9 10 IN RS 232C IN CONTROL SERVICE ANTENNA IN COMPONENT IN AV IN 1 AUDIO VIDEO L MONO R AUDIO VIDEO 1 1 2 VARIABLE AUDIO OUT AV IN2 IN 2 1 42 50PT3 IN RS 232C IN CONTROL SERVICE ANTENNA IN COMPONENT IN AV IN 1 AUDIO VIDEO L MONO R AUDIO VIDEO 1 2 2 VARIABLE AUDIO OUT AV IN2 IN 3 AUDIO IN RGB DVI RGB IN PC DVI IN 1 3 8 2 7 4 9 6 5 IN RS 232C IN CONTROL SERVI...

Page 10: ...ck of the TV Image shown may differ from your TV When assembling the desk type stand check whether the bolt is fully tightened If not tightened fully the product can tilt forward after the product installation If you tighten the bolt with excessive force the bolt can deviate from abrasion of the tightening part of the bolt 1 2 3 M4X26 Stand Body Stand Base M5x14 5 Rear Front When assembling the st...

Page 11: ...rd Holder and Power Cord It will help prevent the power cable from being removed by accident 1 Gather and bind the cables with the Cable Holder 2 CAUTION Do not move the TV by holding the Cable Holder Power Cord Holder as the Cable Holders may break and injuries and damage to the TV may occur Cable Holder ...

Page 12: ... the protection cover tape This will protect the opening from accumulating dust and dirt When installing the wall mounting bracket use the Protection cover Swivel stand Image shown may differ from your TV This feature is not available for all models After installing the TV you can adjust the TV set manually to the left or right direction by 20 degrees to suit your viewing position ...

Page 13: ... 3 Use the eye bolts or TV brackets bolts to fix the product to the wall as shown in the picture If your TV has bolts in the eyebolts loosen then bolts Insert the eye bolts or TV brackets bolts and tighten them securely in the upper holes Secure the wall brackets with the bolts on the wall Match the height of the bracket that is mounted on the wall Use a sturdy rope to tie the product for alignmen...

Page 14: ...ck brick and hol low block Installing screw type and length depends on the wall mount used Further informa tion refer to the instructions included with the mount LG is not liable for any accidents or dam age to property or TV due to incorrect installation Where a non compliant VESA wall mount is used I Incorrect fastening of screws to surface which may cause TV to fall and cause personal injury No...

Page 15: ...mme Selects numbered items in a menu Displays the programme table Returns to the previously viewed programme Adjusts the volume Check and un check programmes in the USB menu Displays the selected favourite programme Selects your desired picture format Switches the sound on or off Move from one full set of screen information to the next one Selects a programme TELETEXT BUTTONS These buttons are use...

Page 16: ...ows you to navigate the on screen menus and adjust the system settings to your preference Accepts your selection or displays the current mode Allows the user to move return one step in an inter active application EPG or other user interaction function See a list of AV devices connected to TV When you toggle this button the Simplink menu appears at the screen p 25 Clears all on screen displays and ...

Page 17: ... until all connections are made between the devices Multi family Dwellings Apartments Connect to wall antenna socket Single family Dwellings Houses Connect to wall jack for outdoor antenna Outdoor Antenna VHF UHF Wall Antenna Socket RF Coaxial Wire 75 Ω Antenna UHF Signal Amplifier VHF In poor signal areas to achieve better picture quality it may be necessary to install a signal amplifier to the a...

Page 18: ...p 576p O O 720p 1080i O O 1080p O 50 60Hz only O 24Hz 30Hz 50Hz 60Hz Component Input ports To achieve better picture quality connect a DVD player to the component input ports as shown below Component ports on the TV Y PB PR Video output ports on DVD player Y PB PR Y B Y R Y Y Cb Cr Y Pb Pr 1 Connect the video outputs Y PB PR of the external equipment digital set top box DVD etc to the COMPONENT IN...

Page 19: ...that your HDMI cable is High Speed HDMI Cable If the HDMI cables are not High Speed HDMI Cable flickering or no screen display can result Please use the High Speed HDMI Cable HDMI mode supports PCM audio format only Audio format was reseted to Dolby DTS Bitstrem in DVD Player or STB it should be changed to PCM We recommend using under 10m of the HDMI cable When using over the length connect an amp...

Page 20: ...DIO VIDEO VIDEO 1 1 2 AUDIO IN RGB DVI RGB IN PC DVI PC OUTPUT AUDIO 1 2 Usb setup Connect the USB device to the USB IN jack on the TV After connecting the USB IN jack you use the USB function p 31 2 1 Connecting with a HDMI to DVI cable or 1 Connect the digital set top box or the DVI out put of the PC to HDMI DVI IN 1 jack on the TV 2 Connect the audio output of the digital set top box or the PC ...

Page 21: ...ve a mono VCR connect the audio cable from the VCR to the AUDIO L MONO jack of the TV NOTE Camcorder Video Game Set or 1 Connect the AUDIO VIDEO jacks between TV and VCR or external equipment Match the jack colours Video yellow Audio Left white and Audio Right red 2 Insert a video tape into the VCR and press PLAY on the VCR Refer to the VCR owner s manual Or Operate the corresponding external equi...

Page 22: ...d with the amplifier 2 1 NOTE When connecting with external audio equipments such as amplifiers or speakers please turn the TV speakers off p 67 AV IN2 IN 2 ANTENNA IN COMPONENT IN AUDIO VIDEO 1 2 N CE ANTENNA IN COMPONENT IN AV IN 1 AUDIO VIDEO L MONO R AUDIO VIDEO 1 2 VARIABLE AUDIO OUT IO IN B DVI C L R VIDEO L R S VIDEO VIDEO OUTPUT SWITCH ANT IN ANT OUT DVI IN RS 232C IN CONTROL SERVICE ANTEN...

Page 23: ...PONENT IN AV IN 1 AUDIO VIDEO 1 1 2 AUDIO IN RGB DVI RGB IN PC RGB OUTPUT AUDIO OUTPUT SWITCH ANT IN R S VIDEO VIDEO ANT OUT L 1 2 Connecting with a D sub 15 pin cable This TV provides Plug and Play capability meaning that the PC adjusts automatically to the TV s settings 1 Connect the RGB output of the PC to the RGB IN PC jack on the TV 2 Connect the PC audio output to the AUDIO IN RGB DVI jack o...

Page 24: ...ted on the screen use a screen saver when possible There may be interference relating to resolution vertical pattern contrast or brightness in PC mode Change the PC mode to another resolution or change the refresh rate to another rate or adjust the brightness and contrast on the menu until the picture is clear If the refresh rate of the PC graph ic card can not be changed change the PC graph ic ca...

Page 25: ...e and Phase to the factory default settings This function works in the following mode Component Except 480i 576i RGB Screen Reset To Set Auto Config Move Prev Resolution Position Size Phase Reset Yes No R G Screen Press the Home EXIT button to return to normal TV viewing Press the BACK button to move to the previous menu screen 1 Select PICTURE 2 Select Screen 3 Select Reset 4 Select Yes 5 Run Res...

Page 26: ... Auto Configure RGB PC mode only To Set Auto Config Move Prev Resolution Position Size Phase Reset Yes No If the position of the image is still not correct try Auto adjustment again If picture needs to be adjusted again after Auto adjustment in RGB PC you can adjust the Position Size or Phase OK Move Brightness 50 Sharpness 60 Colour 60 Tint 0 ColourTemperature 0 Advanced Control Picture Reset Scr...

Page 27: ...Move Prev Resolution Position Size Phase Reset OK Move Brightness 50 Sharpness 60 Colour 60 Tint 0 ColourTemperature 0 Advanced Control Picture Reset Screen PICTURE Screen R G W C 1024 x 768 1280 x 768 1360 x 768 Screen Press the Home EXIT button to return to normal TV viewing Press the BACK button to move to the previous menu screen 1 Select PICTURE 2 Select Screen 3 Select Resolution 4 Select th...

Page 28: ... in RGB mode Adjustment for screen Position Size Phase Auto Config Screen Move Prev Resolution Position Size Phase Reset OK Move Brightness 50 Sharpness 60 Colour 60 Tint 0 ColourTemperature 0 Advanced Control Picture Reset Screen PICTURE Screen R G W C Press the Home EXIT button to return to normal TV viewing Press the BACK button to move to the previous menu screen 1 Select PICTURE 2 Select Scre...

Page 29: ... s default mode d Store Demo mode is the optimal setting for store environments If a user modifies image qual ity data Store Demo mode initializes the product to the image quality set by us after a certain period of time e The mode Home Use Store Demo can be changed by executing Mode Setting in the OPTION menu 1 Firstly connect the power cord correctly At this stage the TV switches to standby mode...

Page 30: ...g watched Selects your desired Sound Mode Audio Selects the sound output Sleep Timer Sets the sleep timer Favourite Selects the favourite programme USB Eject Selects Eject in order to eject USB device Quick Menu Your TV s OSD On Screen Display may differ slightly from that shown in this manual Q Menu Quick Menu is a menu of features which users might use frequently Press the Q MENU button to retur...

Page 31: ...ff Clear Voice II Off Level 3 Balance 0 Sound Mode Standard Infinite Surround Off Treble 50 Bass 50 AUDIO L R Image shown may differ from your TV OK Move Clock Off Time Off On Time Off Sleep Timer Off TIME OK Move Photo List Music List Movie List DivX Reg Code Deactivation USB OK Move Menu Language English Input Label SIMPLINK On Key Lock Off Set ID 1 ISM Method Normal Demo Mode Off Mode Setting H...

Page 32: ... all previously stored service information will be deleted Auto Tuning Auto Tuning If you wish to keep on auto tuning select Yes using the button Then press the OK but ton Otherwise select No Yes No Check your antenna connection The previous channel information will be updated during Auto Tuning Still Continue Press the Home EXIT button to return to normal TV viewing Press the BACK button to move ...

Page 33: ...he Home EXIT button to return to normal TV viewing Press the BACK button to move to the previous menu screen BG PAL B G SECAM B G Europe East Europe Asia NewZealand M East Africa Australia I PAL I II U K Ireland Hong Kong South Africa DK PAL D K SECAM D K East Europe China Africa CIS M NTSC M USA Korea Philippines PAL M South America To store another channel repeat steps 3 to 8 5 Select V UHF or C...

Page 34: ...amme number Normally fine tuning is only necessary if reception is poor Assigning a station name Fine Tuning 1 Select SETUP 2 Select Manual Tuning 3 Select Name 1 Select SETUP 2 Select Manual Tuning 3 Select Fine 4 Select the position and make your choice of the second character and so on You can use an the alphabet A to Z the number 0 to 9 and blank 5 4 5 Select Close Fine tune for the best pictu...

Page 35: ...u to skip the stored programmes OK Move Auto Tuning Manual Tuning Programme Edit SETUP Programme Edit S11 9 Pr Change Page Change P 0 4 C 01 8 C 10 12 16 20 24 28 Navigation Previous Skip Move Delete 1 ARD 5 S 46 4 S 11 13 17 21 25 29 2 BBC1 6 C 05 4 C 52 14 18 22 26 30 4 ARD 7 C 06 11 15 19 23 27 31 TV 1 Select SETUP 2 Select Programme Edit 3 Enter the Programme Edit 4 Select a programme to be st...

Page 36: ... you will be unable to select it using the P button during normal TV viewing If you wish to select a skipped pro gramme directly enter the programme number with the NUMBER buttons or select it in the programme edit 1 Select a programme number to be deleted 2 RED Turn the deleted programme number to RED 3 RED Release the deleted programme 1 Select a programme number to be moved 2 GREEN Turn the mov...

Page 37: ... 8 8 8 8 Programme List Exit You may find some blue programmes These have been set up to be skipped by auto pro gramming or in the programme edit mode Some programmes with the channel number shown in the programme list indicate there is no station name assigned 1 Display the Programme List 1 Select a programme 2 Switch to the chosen programme number 1 P A G E P Turn the pages 2 Return to normal TV...

Page 38: ...gramme list Selecting favourite programme This will automatically include the selected programme into your favourite programme list 1 or Select your desired programme 2 Select Favourite 3 Select Favourite 4 Return to TV viewing 1 Display the Favourite Programme List Favourite Q Menu Close 16 9 Vivid Standard Mono Off Favourite Eject Aspect Ratio Picture Mode Sound Mode Audio Sleep Timer Favourite ...

Page 39: ...ing the TV AV Select it when watching the VCR or external equipment Component Select it when using DVD or Digital set top box depends on connector RGB Select it when using PC depends on connector HDMI Select it when using DVD or Digital set top box depend on connector 1 INPUT Select the input source Except for 42 50PT2 50PV2 ...

Page 40: ...IMPLINK On Key Lock Off Set ID 1 ISM Method Normal Demo Mode Off Mode Setting Home Use OPTION Input Label Selects a label for each input source Input Label Input Label AV1 AV2 Component 1 Component 2 RGB HDMI1 HDMI2 HDMI3 Close Except for 42 50PT2 50PV2 1 Select OPTION 2 Select Input Label 3 Select the source 4 Select the label Press the Home EXIT button to return to normal TV viewing Press the BA...

Page 41: ...ices with the SIMPLINK logo Please check the SIMPLINK logo The product might not function properly when using it with other products with HDMI CEC function This allows you to control and play other AV devices connected to the display through HDMI cable with out additional cables and settings If you do not require the SIMPLINK menu select Off SIMPLINK On SIMPLINK On Off On On 1 Select OPTION 2 Sele...

Page 42: ...ontrolled by SIMPLINK When the unit is connected to SIMPLINK Home Theater set to Variable Out and turn off the TV Speaker to operate the Home Theater Speaker At this time the maximum volume of the Home Theater Speaker is set to the TV volume When you select or operate a media device with home theater function the speaker automatically switches to home theater speaker HT speaker 1 Connect the HDMI ...

Page 43: ...er for Audio Out 1 2 3 4 5 Disc playback Control connected AV devices by pressing the OK ll and buttons Direct Play After connecting AV devices to the TV you can directly control the devices and play media without additional settings Select AV device Enables you to select one of the AV devices connected to the TV and operate it Power off all devices When you switch off the TV all connected devices...

Page 44: ...udio for watching movies Sport Optimizes video and audio for watching sports events Game Optimizes video and audio for playing games If you select Cinema in AV mode Cinema will be selected both for Picture Mode and Sound Mode in PICTURE menu and AUDIO menu respectively If you select Off in AV mode the picture and image which you initially set will be selected 1AV MODE Press the AV MODE button repe...

Page 45: ...ginal factory settings Use to quickly reset all the menu options to their original factory preset values This function deletes all TV programmes When the Initial Setting is completed you must restart the Initializing setup Initial Setting Initial Setting Yes No All user settings and channel settings will be reset Still Continue Select OPTION 2 Select Initial Setting 3 Select Yes 4 Start Initial Re...

Page 46: ...t so that the remote control is required to control it This feature can be used to prevent unauthorized viewing In Key Lock On if the TV is turned off to turn on the TV press the INPUT P button on the TV or POWER INPUT P or NUMBER buttons on the remote control then the set will be turned on With the Key Lock On the display Key Lock On appears on the screen if any button on the front panel is press...

Page 47: ...n may differ from your TV When removing the USB device Connect the USB device to the USB IN jack on the TV 3 Select PHOTO LIST MUSIC LIST or MOVIE LIST 1 PHOTO LIST MUSIC LIST MOVIE LIST Select the USB Eject menu before removing the USB device 2 This TV Supports on JPEG and MP3 and SD DivX 1 Select Eject 2 AV IN2 COMPONENT IN AUDIO VIDEO A 1 AUDIO IN RGB DVI USB IN SERVICE ONLY RGB IN PC COMPONENT...

Page 48: ...orage device cannot be deleted in the NTFS file system Please connect power to a USB storage device which requires an external power supply If not the device may not be recognized Please connect a USB storage device with cable is offered by USB maker If connected with cable is not offered by USB maker or an excessively long cable the device may not be recognized Some USB storage devices may not be...

Page 49: ...line scan is supported among JPEG SOF0 SOF1 only Non supported files are displayed in the form of bitmap 2 4 Select USB Select Photo List 2 1 3 Photo List Page 2 3 No Marked KY101 09 10 2008 KY102 09 10 2008 JMJ001 09 10 2008 JMJ002 09 10 2008 JMJ003 09 10 2008 JMJ004 09 10 2008 KY103 09 10 2008 KY104 09 10 2008 KY105 09 10 2008 JMJ005 09 10 2008 JMJ006 09 10 2008 JMJ007 09 10 2008 JMJ008 09 10 20...

Page 50: ...drive 2 Select the desired photos 3 Show the PopUp menu 4 Select the desired PopUp menu KR101 09 10 2008 KR102 09 10 2008 JMJ001 09 10 2008 JMJ002 09 10 2008 JMJ003 09 10 2008 JMJ004 09 10 2008 KR103 09 10 2008 KR104 09 10 2008 KR105 09 10 2008 JMJ005 09 10 2008 JMJ006 09 10 2008 JMJ007 09 10 2008 JMJ008 09 10 2008 Up Folder Up Folder Photo List Navigation Popup Menu Page Change Mark Exit Page 2 3...

Page 51: ... 1 17 KR101 09 10 2008 KR102 09 10 2008 JMJ001 09 10 2008 JMJ002 09 10 2008 JMJ003 09 10 2008 JMJ004 09 10 2008 KR103 09 10 2008 KR104 09 10 2008 KR105 09 10 2008 JMJ005 09 10 2008 JMJ006 09 10 2008 JMJ007 09 10 2008 JMJ008 09 10 2008 Up Folder Up Folder Photo List Navigation Popup Menu Page Change Mark Exit Page 2 3 No Marked Drive 1 JMJ001 1366x768 125KB P MARK KR101 09 10 2008 KR102 09 10 2008 ...

Page 52: ...played in a slide show Set the time interval of the slide show in Option BGM Background Music Listen to music while viewing photos in full size Set the Music Folder for BGM in Options before using this function Rotate Rotate photos Rotates the photo 90 180 270 360 clockwise Delete Delete photos Hide Hide the menu on the full sized screen To see the menu again on the full sized screen press OK butt...

Page 53: ...2 Select Set Photo View Set Video or Set Audio When you select the Set Photo View You cannot change Music Folder while BGM is playing 1 2 Show the Slide Speed or Music Folder Make appropriate adjustments Press to set the time interval between slides Slide Speed Music Folder Fast Prev Prev NOTE If you select Off for TV speaker Set Audio features in Choose Options will not work ...

Page 54: ...Picture Reset Set Audio Sound Mode Auto Volume Clear Voice II Balance 0 Cinema Off Off When you select the Set Video When you select the Set Audio 1 Make appropriate adjustments Refer to p 53 to 55 58 1 2 Show the Sound Mode Auto Volume Clear Voice II and Balance Make appropriate adjustments Refer to p 62 to 66 Prev Prev NOTE mode is not supported in Set Video function ...

Page 55: ...nts MUSIC MP3 supporting file Bit rate 32 k to 320kbps Sampling rate MPEG1 layer 3 32 k to 48 kHz Page 2 3 No Marked Music List 00 00 01 34 Up Folder 001 S001 mp3 003 S002 mp3 004 S003 mp3 006 S004 mp3 007 S005 mp3 Music Title Duration 03 33 04 45 01 30 Up Folder Navigation Popup Menu Page Change Mark Exit P MARK 004 SweetBox Love 02 37 01 58 Moves to upper level folder Current page Total pages To...

Page 56: ...move to the Photo List Mark All Mark all music titles in the folder Unmark All Deselect all marked music titles Delete Delete the selected music titles Close Close the pop up menu Use the P button to navigate up down in the music page Use MARK button to mark or unmark a music When one or more music files are marked the marked music title will be played in sequence For example if you want to listen...

Page 57: ... If you don t press any button for a while during the playing the play information box as shown in the below will float as a screen saver The Screen Saver Screen saver is to prevent screen pixel damage due to an fixed image remaining on the screen for a extended period of time 1 2 Set Audio Sound Mode Auto Volume Clear Voice II Balance 0 Cinema Off Off Using the music list funtion play Show the So...

Page 58: ...0 ass ssa txt DVD Subtitle System Some user created subtitles may not work properly Time information in an external subtitle file should be arranged in ascending order to be played The video file and the subtitle file must be located in the same folder The name of the video file and the subtitle file must be the same to view the subtitles normally If the video and audio structure of recorded file ...

Page 59: ...left right keys may not work properly for some files while playing a movie Screen Components 2 3 Moves to upper level folder Current page Total pages Total number of marked movie title Corresponding buttons on the remote control 1 3 4 2 Select USB Select Movie List 1 2 Movie List 640x480 720KB movie Up Folder Page 2 3 No Marked Up Folder Favorite Music B001 B002 B003 B004 00 03 33 00 04 45 00 01 1...

Page 60: ...ing In the case of files not supported a message regard ing non supported file is displayed 1 Select the target folder or drive 2 Select the desired movie title 3 Show the PopUp menu 4 Select the desired PopUp menu Movie List 640x480 720KB movie Up Folder Page 2 3 No Marked Up Folder FavoriteMusic B001 B002 B003 B004 00 03 33 00 04 45 00 01 13 00 03 13 00 02 51 Navigation Popup Menu Page Change Ma...

Page 61: ...btitle from 10 secs to 10 secs by steps of 0 5 secs during movie play Position Changes the Position of the subtitle either up or down during movie play Using the music list funtion play 1 Select the PopUp menu 2 Select Set Video Play Set Video or Set Audio When you select the Set Video Play 1 2 Show the Picture Size Audio Language or Subtitle Language Make appropriate adjustments Choose Options Se...

Page 62: ...arian Byelorussian Macedonian Russian Serbian and pre 1990 no ghe with upturn Ukrainian Greek English modern Greek Hebrew English modern Hebrew Chinese Chinese Thai Thai Arabic English Arabic NOTE Some special characters are not supported in subtitles HTML tags are not supported in subtitles Subtitles in languages other than the supported languages are not available When you select the Set Video 1...

Page 63: ...reen is displayed When using the or button during playback a cursor indicating the position can be viewed on the screen PLAY Press the PLAY button to return to normal playback STOP During playback press the Stop button Stop the playing movie Using the remote control Set Audio Sound Mode Auto Volume Clear Voice II Balance 0 Cinema Off Off When you select the Set Audio 1 2 Show the Sound Mode Auto V...

Page 64: ...DivX Video on Demand VOD movies To obtain your registra tion code locate the DivX VOD section in your device setup menu Go to vod divx com for more information on how to complete your registration DivX Certified to play DivX video including premium content DivX DivX Certified and associated logos are trademarks of DivX Inc and are used under license Covered by one or more of the following U S pate...

Page 65: ...vX DRM files OK Move Photo List Music List Movie List DivX Reg Code Deactivation USB OK Move Photo List Music List Movie List DivX Reg Code Deactivation USB Deactivation Deactivation DivX R Video On Demand Do you want to deactivate your device Yes No i 1 Select USB 2 Select Deactivation 3 Select Yes 4 Press the Home EXIT button to return to normal TV viewing Press the BACK button to move to the pr...

Page 66: ...creen signal it will auto matically change to the picture format broadcast 4 3 The following selection will allow you to view a picture with an original 4 3 aspect ratio gray bars will appear on both the left and right of the screen Picture Size Aspect Ratio Control You can watch the screen in various picture formats 16 9 Just Scan Original 4 3 14 9 Zoom and Cinema Zoom1 If a fixed image is displa...

Page 67: ...will allow you to view the picture without any alteration while filling the entire screen However the top and bottom of the picture will be cropped Cinema Zoom1 Choose Cinema Zoom1 when you want to enlarge the picture in correct proportion Note When enlarging or reducing the picture the image may become distorted NOTE You can only select 4 3 16 9 Wide in RGB mode only In HDMI Component over 720p m...

Page 68: ... Picture Mode Standard Contrast 70 Brightness 90 Sharpness 50 Colour 70 Tint 0 PICTURE Energy Saving Intelligent Sensor Medium R G When the Intelligent sensor function is on the most suitable picture is automatically adjusted according to the sur rounding conditions Intelligent Sensor Adjusts picture according to the surrounding conditions Screen Off When you select Screen Off the screen will be t...

Page 69: ...tandard The most general screen display status Auto Power Saving Maximize reducting the power consumption without hurting the picture quality Optimizes power consumption Cinema Optimizes video for watching movies Sport Optimizes video for watching sports events Game Optimizes video for playing games Picture Mode adjusts the TV for the best picture appearance Select the preset value in the Picture ...

Page 70: ... and green levels Colour Temperature Adjust the balance between red warm and blue cool level of white balance OK Move Aspect Ratio 16 9 Energy Saving Off Picture Mode Standard Contrast 70 Brightness 90 Sharpness 50 Colour 70 Tint 0 PICTURE Contrast 100 R G Contrast 88 OK NOTE You cannot adjust colour sharpness and tint in the RGB PC mode 1 Select PICTURE 2 Select Picture Mode 3 Select Vivid Standa...

Page 71: ...se Reduction Off Low Medium High Reduces screen noise without compromising video quality This feature is also used to reduce recursive noise and MPEG noise Mosquito Block Gamma Low Medium High You can adjust brightness of dark area and middle gray level area of the picture Low Make dark and middle gray level area of the picture brighten Medium Express original picture gradation High Make dark and ...

Page 72: ...Reduction Medium Gamma Black Level Off Film Mode Close OK Move Brightness 50 Sharpness 70 Colour 60 Tint 0 ColourTemperature 0 Advanced Control Picture Reset Screen PICTURE R G Advanced Control W C Select PICTURE Select Advanced Control Select Black Level Select Low or High Low The reflection of the screen gets darker High The reflection of the screen gets brighter Auto Realizing the black level o...

Page 73: ... OK Move Brightness 50 Sharpness 70 Colour 60 Tint 0 ColourTemperature 0 Advanced Control Picture Reset Screen PICTURE R G Advanced Control Advanced Film Mode Makes video clips recorded in film look more natural This feature operates only in TV AV and Component 480i 576i mode W C 1 3 2 4 Select PICTURE Select Advanced Control Select Film Mode Select On or Off Press the Home EXIT button to return t...

Page 74: ...int 0 ColourTemperature 0 Advanced Control Picture Reset Screen PICTURE R G Picture Reset Picture Reset Settings of the selected picture modes return to the default factory settings Resetting video configuration W C Press the Home EXIT button to return to normal TV viewing Press the BACK button to move to the previous menu screen 1 Select PICTURE 2 Select Picture Reset 3 Select Yes 4 Initialize th...

Page 75: ...yed It is difficult to sense the afterimage occurred while the temporary afterimage is removed and the colour pattern is operating White Wash White wash removes permanent images from the screen Note An excessive permanent image may be impossible to clear entirely with White Wash Select OPTION Select ISM Method Select Normal Orbiter Colour Wash or White Wash Save If you do not need this function se...

Page 76: ...de On Mode Setting Store Demo OPTION Demo Mode Use it to see the difference between XD Demo on and XD Demo off It is not possible to use Demo Mode in Home Use mode In Store Demo Demo Mode is automatically set to On Demo Mode On Demo Mode On Off On LED On On On Off 1 Select OPTION 2 Select Demo Mode 3 Select On or Off To stop the Demo Mode press any button 4 Press the Home EXIT button to return to ...

Page 77: ...nt Store Demo mode is an optimal setting for displaying at stores Mode Setting Store Demo Selecting the environment Choose the setting mode you want Mode setting Store Demo Home Use Select Home Use to use this TV at home To use this TV at store select Store Demo OK 1 Select OPTION 2 Select Mode Setting 3 Select Store Demo or Home Use 4 Save Press the Home EXIT button to return to normal TV viewing...

Page 78: ...me automatically remains on the same level of volume if you change programmes Because each broadcasting station has its own signal conditions volume adjustment may be needed every time the channel is changed This feature allows users to enjoy stable volume levels by making automatic adjustments for each programme Auto Volume Off Auto Volume Off Off On On L R R 1 Select AUDIO 2 Select Auto Volume 3...

Page 79: ...entiating the human sound range from others it helps users listen to human voices better Clear Voice II Off Clear Voice II Off Off On Off L R Adjustment for Clear Voice Level With selecting On If you select On for Clear Voice II Infinite Surround feature will not work Select levels from 6 to 6 1 Select AUDIO 2 Select Clear Voice II 3 Select On or Off Press the Home EXIT button to return to normal ...

Page 80: ...ustment as the TV sets the appro priate sound options based on the programme content Standard Music Cinema Sport and Game are preset for optimum sound quality at the factory Standard Offers standard quality sound Music Optimizes sound for listening to music Cinema Optimizes sound for watching movies Sport Optimizes sound for watching sports events Game Optimizes sound for playing games Sound Mode ...

Page 81: ...Surround Treble Bass 50 Treble 50 Close Off Infinite Surround Select this option to sound realistic 1 Select AUDIO 2 Select Sound Mode 3 Select Standard Music Cinema Sport or Game 4 Select Treble or Bass Set the desired sound level 1 Select AUDIO 2 Select Infinite Surround 3 Select On or Off 5 Press the Home EXIT button to return to normal TV viewing Press the BACK button to move to the previous m...

Page 82: ...ar Voice II Off Level 3 Balance 0 Sound Mode Standard Infinite Surround Off Treble 50 Bass 50 AUDIO R L R Balance 0 L R Balance 0 Balance You can adjust the sound balance of the speakers to preferred levels Close Balance 0 L R L L R 1 Select AUDIO 2 Select Balance 3 Make desired adjustment Press the Home EXIT button to return to normal TV viewing Press the BACK button to move to the previous menu ...

Page 83: ...Bass 50 Reset TV Speaker On AUDIO TV Speaker On OK Move Level 3 Balance 0 Sound Mode Standard Infinite Surround Off Treble 50 Bass 50 Reset TV Speaker On AUDIO TV Speaker On Off On On NOTE When the TV speaker is turned off while the Simplink home theater is operating the sound output automati cally switches to the Home theater speaker but when the TV speaker is turned on the sound output the TV sp...

Page 84: ...Surround Off Treble 50 Bass 50 Reset TV Speaker On AUDIO OK Move Level 3 Balance 0 Sound Mode Standard Infinite Surround Off Treble 50 Bass 50 Reset TV Speaker On AUDIO Reset Reset Resetting sound mode configuration 1 Select AUDIO 2 Select Reset 3 Initialize the adjusted value Press the Home EXIT button to return to normal TV viewing Press the BACK button to move to the previous menu screen ...

Page 85: ...can switch to DUAL I DUAL II or DUAL I II DUAL I Sends the primary broadcast language to the loudspeakers DUAL II Sends the secondary broadcast language to the loudspeakers DUAL I II Sends a separate language to each loudspeaker Stereo Dual ReceptioN When a programme is selected the sound information for the station appears with the programme number and station name Broadcast On Screen Display Mon...

Page 86: ...oudspeakers Select the sound output L R Audio signal from audio L input is sent to the left loudspeaker and audio signal from audio R input is sent to the right loudspeaker L L Audio signal from audio L input is sent to left and right loudspeakers R R Audio signal from audio R input is sent to left and right loudspeakers 1 When NICAM mono is received you can select NICAM MONO or FM MONO 2 When NIC...

Page 87: ...never the TV is switched on On Screen Menu Language Selection The installation guide menu appears on the TV screen when it is switched on for the first time If you want to change Language Country selection 1 Select your desired language 1 Select OPTION 2 Select Menu Language 3 Select your desired language 4 Save Press the Home EXIT button to return to normal TV viewing Press the BACK button to mov...

Page 88: ... Move Clock Off Time Off On Time Off Sleep Timer Off TIME OK Move Clock Off Time Off On Time Off Sleep Timer Off TIME Clock Setup Clock Hour 16 Minute 09 Close Clock 72 time setting 1 Select TIME 2 Select Clock 3 Select Hour or Minute 4 Set the Hour or Minute Press the Home EXIT button to return to normal TV viewing Press the BACK button to move to the previous menu screen ...

Page 89: ...er Off TIME On Time Off On Time On On Hour 00 Minute 00 Programme 1 Volume 30 Close 23 59 1 Select TIME 2 Select Off Time or On Time When the On Time is selected 3 Select Hour Minute Programme or Volume Set the hour Minute Programme Volume 4 Press the Home EXIT button to return to normal TV viewing Press the BACK button to move to the previous menu screen Sleep Timer setting You do not have to rem...

Page 90: ...iewed appears on the screen Two page numbers TV station name date and time are displayed on the screen headline The first page number indicates your selection while the second shows the current page displayed Press the TEXT button to switch off teletext The previous mode reap pears Switch on off Page selection Enter the desired page number as a three digit number with the NUMBER buttons If during ...

Page 91: ... solutions to riddles or puzzles Update Displays the TV picture on the screen while waiting for a new teletext page The display will appear at the top left hand corner of the screen When the updated page is available then display will change to the page number Select this menu again to view the updated teletext page FASTEXT The teletext pages are colour coded along the bottom of the screen and are...

Page 92: ...itching on This is normal the image is muted during the TV startup process Please contact your service centre if the picture has not appeared after five minutes No or poor colour or poor picture Adjust Colour in menu option Allow a sufficient distance between the TV and the VCR Try another channel The problem may be with the broadcast Are the video cables installed properly Activate any function t...

Page 93: ...ere is a problem in PC mode Only PC mode applied The signal is out of range Invalid format Adjust resolution horizontal frequency or vertical frequency Check the input source Vertical bar or stripe on background Horizontal Noise Incorrect position Use Auto configure or adjust size phase or H V position Option Screen colour is unstable or single colour Check the signal cable Reinstall the PC video ...

Page 94: ...water and a little fabric softener or dish washing detergent Wring the cloth until it is almost dry and then use it to wipe the screen Ensure there is no excess water on the screen Allow any water or dampness to evaporate before switching on Cleaning the Cabinet To remove dirt or dust wipe the cabinet with a soft dry lint free cloth Do not to use a wet cloth Extended Absence 2 1 CAUTION If you exp...

Page 95: ... kg 29 5 kg 27 2 kg MODELS 42PT3 50PT3 42PT350R TD 42PT351R TC 42PT352R TB 50PT350R TD 50PT351R TC 50PT352R TB Dimensions Width x Height x Depth with stand 991 8 mm x 667 0 mm x 230 5 mm 1176 1 mm x 774 7 mm x 289 8 mm without stand 991 8 mm x 613 8 mm x 52 5 mm 1176 1 mm x 716 5 mm x 52 5 mm Weight with stand without stand 21 5 kg 20 0 kg 29 6 kg 27 3 kg Television System Programme Coverage Exter...

Page 96: ...thout stand 1171 9 mm x 712 2 mm x 52 5 mm Weight with stand without stand 29 8 kg 27 5 kg Television System Programme Coverage External Antenna Impedance PAL SECAM B G D K PAL I II NTSC M VHF NZ1 to E21 UHF E21 to E69 CATV S1 to S20 HYPER S21 to S47 75 Ω Environment condition Operating Temperature Operating Humidity 0 C to 40 C Less than 80 Storage Temperature Storage Humidity 20 C to 60 C Less t...

Page 97: ...OK R C BUTTON 28 BACK R C BUTTON 30 AV MODE R C BUTTON 02 R C BUTTON 03 R C BUTTON 1E FAV MARK R C BUTTON 79 RATIO R C BUTTON 09 MUTE R C BUTTON 00 P R C BUTTON 01 P R C BUTTON 10 to 19 Number Key 0 to 9 R C BUTTON 53 LIST R C BUTTON 1A Q VIEW R C BUTTON 72 RED Key R C BUTTON 71 GREEN Key R C BUTTON 63 YELLOW Key R C BUTTON 61 BLUE Key R C BUTTON 20 TEXT R C BUTTON 21 T OPT T Option R C BUTTON 7E ...

Page 98: ...RS 232C IN CONTROL SERVICE ANTENNA IN COMPONENT IN AV IN 1 AUDIO VIDEO VIDEO 1 1 2 AUDIO IN RGB DVI RGB IN PC 1 5 6 9 RS 232C Configurations 7 Wire Configurations Standard RS 232C cable PC TV RXD 2 3 TXD TXD 3 2 RXD GND 5 5 GND DTR 4 6 DSR DSR 6 4 DTR RTS 7 8 CTS CTS 8 7 RTS D Sub 9 D Sub 9 3 Wire Configurations Not standard PC TV RXD 2 3 TXD TXD 3 2 RXD GND 5 5 GND DTR 4 6 DTR DSR 6 4 DSR RTS 7 7...

Page 99: ...t Label SIMPLINK On Key Lock Off Set ID 1 ISM Method Normal Demo Mode Off Mode Setting Store Demo OPTION Set ID Use this function to specify a set ID number Refer to Real Data Mapping p 87 Press BACK to move to the previous menu screen Set ID 1 Set ID 1 1 Close 1 Select OPTION 2 3 Adjust Set ID to choose the desired TV ID number The adjustment range of SET ID is 1 to 99 Select Set ID ...

Page 100: ...4 Transmission Command 1 First command to control the set j k m or x Command 2 Second command to control the set Set ID You can adjust the set ID to choose desired TV ID number in Setup menu Adjustment range is 1 to 99 When selecting Set ID 0 every con nected TV is controlled Set ID is indi cated as decimal 1 to 99 on menu and as Hexa decimal 0x0 to 0x63 on trans mission receiving protocol DATA To...

Page 101: ...et ID Data Cr Acknowledgement d Set ID OK NG Data x 05 Volume Control Command k f To adjust volume You can also adjust volume with the volume buttons on remote control Transmission Data Min 00 to Max 64 Refer to Real data mapping 1 See page 87 k f Set ID Data Cr Acknowledgement f Set ID OK NG Data x 06 Contrast Command k g To adjust screen contrast You can also adjust contrast in the PICTURE menu ...

Page 102: ...data mapping 1 See page 87 k k Set ID Data Cr Acknowledgement k Set ID OK NG Data x 15 Treble Command k r To adjust Treble Transmission Data Min 00 to Max 64 Refer to Real data mapping 1 See page 87 k r Set ID Data Cr Acknowledgement r Set ID OK NG Data x 14 Colour Temperature Command x u To adjust colour temperature You can also adjust Colour Temperature in the PICTURE menu Transmission Data W50 ...

Page 103: ...tion and minimize image shaking automatically It works only in RGB PC mode Transmission To reduce the power consumption of the TV Transmission Data 01 To set Data 00 Low Power Off Data 01 Low Power Minimum Data 02 Low Power Medium Data 03 Low Power Maximum Data 05 Screen Off Data 10 Intelligent Sensor j u Set ID Data Cr j q Set ID Data Cr Acknowledgement Acknowledgement Data 02 Orbiter Data 04 Whi...

Page 104: ...io 1 x 1 1 Reserved Data0 Data1 Programme Number Data0 High byte Data1 Low byte Data2 Attribute 21 Tune Command Channel Tuning Command m a Tune Channel to following Physical number Transmission m a Set ID Data0 Data1 Data2 Cr Acknowledgement a Set ID OK Data0 Data1 x a Set ID NG Data0 x Data Key code Refer to page 81 22 Channel Skip Command m b 23 Key Command m c To set skip status for the current...

Page 105: ...ion Data Structure MSB LSB x b Set ID Data Cr External Input Input Number Acknowledgement b Set ID OK NG Data x 0 0 0 0 0 0 0 0 External Input Data 0 0 0 1 Analogue 0 0 1 0 AV 0 1 0 0 Component 0 1 1 0 RGB PC 1 0 0 1 HDMI INPUT Number Data 0 0 0 0 Input1 0 0 0 1 Input2 0 0 1 0 Input3 0 0 1 1 Input4 ...

Page 106: ...Record the model number and serial number of the TV Refer to the label on the back cover and quote this information to your dealer when requiring any service Model Serial No ...

Reviews: