background image

ENGLISH

1 9

MAINTENANCE

The water circulation nozzle

• Clean the water circulation nozzle, if clogged.

Cleaning your washer

1. Exterior

Proper care of your washer can extend its life.
The outside of the machine can be cleaned with warm water and a neutral, non-abrasive 
household detergent.
Immediately wipe off any spills. Wipe with a damp cloth.
Try not to damage the surface with sharp objects.

IMPORTANT: Do not use methylated spirit, solvents or similar products.

2. Interior

Dry around the washer door opening, flexible gasket and door glass. These areas should always be clean to
ensure a water-tight seal.
Run washer through a complete cycle using hot water. 
Repeat process if necessary.

• 

To start the TUB CLEAN cycle:

1. Remove any clothing or items from the washer and close the door.

2. Open the dispenser drawer and add liquid chlorine bleach to the bleach compartment.

NOTE: Do not add any detergent to the detergent compartments. Excessive suds may be produced and leak

from the washer.

3. Close the dispenser drawer slowly.

4. Power On and then press the 

Extra Rinse

button for 3 seconds. (Prewash option will be selected.) 

5. Press the 

Start/Pause 

button to start. 

6. After the cycle is complete, leave the door open to dry around the washer door opening, door seal and

door glass. 

CAUTION: 

If there are small children in the house, care must be taken so that they can not climb into or
play inside the washer while it is open for drying. 

NOTE: Remove hard water deposits using only cleaners labeled as safe for washing machines.

Winterizing instructions

If the washer is stored in an area where freezing can occur or moved in freezing temperatures, follow these
winterizing instructions to prevent damage to the washer:

1. 

Turn off water supply tap.

2.

Disconnect hoses from water supply and drain water from hoses.

3.

Plug electrical cord into a properly grounded electrical outlet.

4. 

Add 1 gallon (3.8

) nontoxic recreational vehicle (RV) antifreeze to empty wash drum. Close door.

5.

Set spin cycle and let washer spin for 1 minute to drain out all the water.
Not all of the RV antifreeze will be expelled.

6.

Unplug electrical power cord, dry drum interior, and close door.

7.

Remove the two-compartment container from the Dispenser. Drain any water in compartments and dry the
compartments. 

8.

Store washer in an upright position.

9.

To remove antifreeze from washer after storage, run empty washer through a complete cycle using detergent.

Do not add laundry

.

!

Summary of Contents for 3828ER3024W

Page 1: ...ial printing and exterior size are refer to work tables 2 Printing text size and line are based on LG design film 3 Exterior size on the drawing is cutting line 4 Before product controlled by criteria sample 5 The part should not contain prohibited substances Pb Cd Hg Cr 6 PBB PBDE and details should comply with LG standard of LG 63 A 5501 34 가 P NO 다 FRONT BACK 나 WORK 가 BRAND LG WD 1127 BD WD 102...

Page 2: ...P No 3828ER3024W ...

Page 3: ...ructions on safe installation use and maintenance Retain it for future reference Record the model and serial numbers of your machine and report this information to your dealer if your machine requires service Washing Machine 1 800 243 0000 24 HOURS A DAY 7 DAYS A WEEK FOR LG CUSTOMER SERVICE ...

Page 4: ...ent more efficiently RollerJets WM2277H Washing ball enhances the wash performance and reduces damage to the clothing The jets spray and help tumble clothes to enhance washing performance while maintaining fabric care Automatic Wash Load Detection Automatically detects the load and optimizes the washing time Built in Heater WM2277H Internal heater helps to maintain water temperature at its optimum...

Page 5: ...ce any part of the washer or attempt any servicing unless specifically recommended in the user maintenance instructions or published user repair instructions that you understand and have the skills to carry out See Installation Instructions for grounding requirements ALWAYS follow the fabric care instructions supplied by the garment manufacturer Do not place items exposed to cooking oil in your wa...

Page 6: ... X 75 6 cm D X 98 3 cm H 129 1 cm D door open 27 W X 293 4 D X 3811 16 H 5013 16 D door open Weight 190 lbs 86 kg Wash capacity 3 22 cu ft IEC 3 72 cu ft 1 Spin speed 1100 rpm max WM2277H 1050 rpm max WM2075CW 1000 rpm max WM2077CW Permissible water pressure 4 5 145 PSI 30 1000 kPa Specifications subject to change by manufacturer 1 Per IEC 60456 washes the equivalent of a 3 72 cu ft agitator washe...

Page 7: ... and all shipping bolts must be removed before using the washer When unpacking the base be sure to remove the additional packing support in the middle of the base packing Two or more people may be need to install and move the appliance Shipping bolts Install or store unit where it will not be exposed to temperatures below freezing or exposed to outside weather conditions Properly ground washer to ...

Page 8: ...lidly constructed floor Carpeting and soft tile surfaces are not recommended Never install the washer on a platform or weakly supported structure NOTE A firm solid floor is even more critical to a front loading washer than to a top loader If your floor is wood and or frame construction you may need to reinforce it Front loaders use substantially faster spin speeds than top loaders causing greater ...

Page 9: ...Electrical connection Do not use an extension cord or double adapter If the supply cord is damaged it must be replaced by a qualified person in order to avoid a hazard If the machine will not be used for an extended time unplug it and shut off the water supply Connect the machine to a grounded outlet in accordance with current wiring regulations The appliance must be positioned so that the plug is...

Page 10: ...flooding and damage Properly securing the drain hose will protect the floor from damage due to water leakage This equipment is not designed for maritime use or for mobile installations such as in RV s aircraft etc Turn off the faucet if the machine is to be left for an extended period of time e g holiday When disposing of the appliance cut off the power cable and destroy the plug Disable the door ...

Page 11: ...e done while the washer is spinning with a load Use the wrench supplied to adjust the feet until there is no vibration Then tighten the lock nuts to prevent further adjustment NOTE If there are vibration and noise during the spin cycle re check the leveling of the washer adjust the feet as required and tighten the lock nuts securely to prevent changes in adjustment Run the washer with a test load ...

Page 12: ...brics Lint Lint Producers Collectors Wash lint producers and lint collectors separately 3 Check before loading Combine large and small items in a load Load large items first Large items should not be more than half the total wash load Do not wash single items This may cause an out of balance load Add one or two similar items Check all the pockets to make sure that they are empty Things such as cli...

Page 13: ...mpartment The detergent will automatically be dispensed during Prewash if the Prewash option is selected Add 1 2 the recommended amount of detergent to the Prewash compartment and the recommended amount of detergent to the main wash compartment NOTE Liquid detergent will drain into the washer drum as it is added 1 Prewash Detergent Compartment Liquid Chlorine Bleach Compartment Liquid Fabric Softe...

Page 14: ...d the maximum fill line Overfilling can cause early dispensing of the bleach which could result in damaged clothes Do not pour undiluted liquid chlorine bleach directly onto the load or into the drum Fabric damage can occur Do not use powdered bleach in this compartment 3 Liquid Bleach Compartment Add recommended amount of fabric softener to this compartment Dilute concentrated softeners with warm...

Page 15: ...l Delicates blouses nylons Tap Cold Cold Heavy O O O O sheer or Warm Warm No spin Light lacy garment Warm Cold Woolens silk Cold Cold Normal Wool identified as Tap Cold Cold Low Low Light O O O Silk machine Warm Warm Medium washable Warm Cold No spin Cold Cold Normal Hand Items labeled Tap Cold Cold Low Light O O O Wash hand washable Warm Warm Medium Warm Cold No spin Hot Cold Extra high Light War...

Page 16: ... top load washers Washing time can be reduced significantly for small loads or lightly soiled loads by selecting Quick Cycle with the Option button and setting the Soil Level button at Light 2 Cycles Use this button to turn the Power On Off 1 Power Use this button to start stop the washer 3 Start Pause Allows the start of any cycle to be delayed for 1 12 9 8 hours Choose the wash cycle for your lo...

Page 17: ...In cold climates a warm rinse makes the load more comfortable to handle Cold rinses save energy The Cold rinse temperatures depend on the cold water at your faucet Warm rinses are regulated at approximately 86 F 30 C For the Tap Cold Cold setting both wash and rinse temperatures depend on the cold water at your faucet 6 Wash Rinse Temperature To change the spin speed press the Spin Speed button re...

Page 18: ... the cycle when operating b the error code when an error has been detected Use this option to prevent unwanted use of the washer Press and hold PRE WASH button for 3 seconds to lock unlock control When Child lock is set CHILD LOCK lights and all buttons are disabled except the Power button You can lock the washer while it is operating Adds time to the wash and rinse for better stain removal Automa...

Page 19: ...en the inlet hose 1 Open the lower cover cap with a tool such as coin Turn the drain plug to pull out the hose 2 Unplug the drain plug allowing the water to flow out At this time use a vessel to prevent water from flowing onto the floor When water does not flow any more turn the pump filter open to the left 3 Remove any foreign objects from the pump filter After cleaning turn the pump filter clock...

Page 20: ...n continuously build up in places where it cannot be seen and it is not easily removed from the drum Over time the build up of scale clogs appliances and if it is not kept in check these will eventually have to be replaced Although the washing drum is made of Stainless steel specks of rust can be caused by small metal articles paper clips safety pins etc which have been left in the drum The washin...

Page 21: ...d 5 Press the Start Pause button to start 6 After the cycle is complete leave the door open to dry around the washer door opening door seal and door glass CAUTION If there are small children in the house care must be taken so that they can not climb into or play inside the washer while it is open for drying NOTE Remove hard water deposits using only cleaners labeled as safe for washing machines Wi...

Page 22: ...rum Are all the feet resting firmly on the ground Fill hose connection is loose at tap or washer House drain pipes are clogged Too much detergent or unsuitable detergent Stop washer and check drum and drain filter If noise continues after washer is restarted call for service If sound continues washer is probably out of balance Stop and redistribute wash load See Installation Instructions for remov...

Page 23: ... Turn on water supply tap Close the door and press the Start Pause button After pressing the Start Pause button it may take a few moments before the clothes washer begins to spin The door must lock before spin can be achieved If the imbalance is detected or if the suds removing program operates the wash time shall be increased Problem Possible Cause Solution Water does not enter washer or it enter...

Page 24: ...d the error code will be displayed Is the door opened or not completely closed The water overfills due to the faulty water valve The water level sensor malfunction Overload in motor Overload in motor The washer experienced a power failure Check another tap in the house Fully open tap Straighten hose Check the filter of the inlet hose Clean and straighten the drain hose Clean the drain filter Add 1...

Page 25: ...ENGLISH 2 3 1 800 243 0000 24 hours a day 365 days per year ...

Page 26: ...NOTES ...

Page 27: ...NOTES ...

Page 28: ...samente Le proveerá instrucciones para una instalación uso y mantenimiento seguros Consérvelo para futuras referencias Cite esta información a su proveedor si requiere de servicio Lavadora 1 800 243 0000 para el Servicio LG Atención al Cliente 24 horas al día 7 días a la semana ...

Page 29: ...ación de agua usa ambos agua y detergente con mayor eficiencia Bola de Lavado WM2277H La bola de lavado mejora el desempeño de lavado y reduce el daño a la ropa Detección de la carga de lavado automático Automáticamente detecta la carga y optimiza el tiempo de lavado Calentador Integrado WM2277H El calentador interno calienta automáticamente el agua a la mejor temperatura según el ciclo elegido Se...

Page 30: ...específicamente en las instrucciones de mantenimiento del usuario ó publicado en las instrucciones de reparación para el usuario que usted entienda y tenga la habilidad de llevar a cabo Vea las instrucciones de instalación para los requerimientos de conexión a tierra SIEMPRE siga las instrucciones de cuidado de la tela provistas por el fabricante de la prenda No coloque artículos manchados de acei...

Page 31: ... el fabricante 1 Por cada 60456 IEC lava el equivalente de una agitador de 3 72 pies cúbicos El lnyector de la Circulación del Agua WM2277H Perno para Transportación Ventilación por Seguridad Entrada de Agua Fría Entrada de Agua Caliente Clavija de Energía Si el cable de suministro está dañado debe ser reemplazado por el fabricante ó sus agentes de servicio ó alguna persona calificada en orden a e...

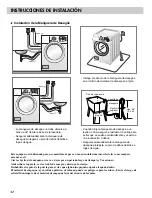
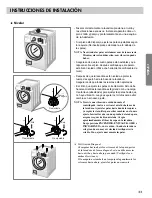
Page 32: ...ue y los tornillos deben ser removidos antes de usarse la lavadora Cuando desempaque la base asegúrese de remover los empaque adicionales que se encuentran a la mitad de la base Pernos de Transportación Instale ó almacene en un lugar donde no esté expuesta a temperaturas inferiores a la congelación ni expuesta a la intemperie Conecte a tierra correctamente y cumpliendo con todos los códigos y orde...

Page 33: ...ir ruido y vibración la lavadora debe ser instalada en un piso construido sólidamente Superficies con alfombras y azulejos no son recomendadas Nunca instale la lavadora en una plataforma o en una estructura débil NOTA Un piso firme y sólido es más necesario para una Carga Frontal que para una Carga Superior Si su piso es de madera o está en construcción puede ser que necesite reforzarlo Las Cargas...

Page 34: ...ñado debe ser repuesto por una persona calificada para evitar peligros Si la lavadora no va a ser usada en un periodo largo de tiempo deconèctela de la energía y de la corriente de agua Conecte la lavadora a una toma de corriente correctamente conectada a tierra de acuerdo con las regulaciones de cableado locales El aparato debe estar posicionado de manera que la conexión a la corriente sea de fác...

Page 35: ...a de desagüe protegerá su piso de daños debidos a fugas de agua Este equipo no está diseñado para uso marítimo ni para su uso en instalaciones móviles tales como campers aeronaves etc Cierre el grifo de la máquina si se va a dejar por un periodo largo de tiempo ej Vacaciones Al desechar el aparato corte el cable de energía y destruya la clavija Deshabilite el seguro de la puerta para evitar que al...

Page 36: ...hacerse mientras la lavadora esté girando con una carga Use la llave abastecida para ajustar las patas hasta que no haya vibración Luego asegure los tornillos para evitar cambios en el nuevo ajuste NOTA Si existe una vibración o ruido durante el centrifugado vuelva a revisar el nivel de balance de la lavadora Ajuste las patas hasta donde lo requiera y asegure los tornillos para evitar cambios en e...

Page 37: ...Pelusa Recolectores Lave por separado las prendas que producen pelusa de las que la recolectan 3 Verifique antes de Cargar Combine artículos pequeños y grandes en una carga Cargue los artículos grandes primero Los artículos grandes no deben ser más de la mitad de la carga total de lavado No lave artículos solos Esto puede causar una carga desbalanceada Añada una ó dos prendas de igual tamaño Verif...

Page 38: ...ibuido automáticamente durante el Prelavado si este fue seleccionado en las opciones Añada la mitad de la cantidad recomendada para el Prelavado y la cantidad completa recomendada para el Lavado Principal NOTA El detergente líquido será drenado al cilindro de la lavadora al ser añadido al distribuidor 1 Compartimiento de Detergente para Prelavado Compartimiento de cloro líquido blanqueador Compart...

Page 39: ...derrames tempranos de blanqueador lo que puede resultar en prendas dañadas No vierta cloro líquido sin diluir directamente en el cilindro ó sobre la ropa Puede ocurrir daño a las telas No use blanqueador en polvo en este compartimiento 3 Compartimiento de Blanqueador Líquido Añada la cantidad recomendada de suavizante de telas a este compartimiento Diluya suavizantes concentrados con agua tibia ha...

Page 40: ...Speed Wash Caliente Fría Extra alto Ligero Ligeramente Fría Fría Fría Fría Tibia Fría Tibia Tibia No Giros Bajo Medio Alto Normal Pesado Tipo de Tela Temperatura de Lavado Enjuague Velocidad de Giro Nivel de Suciedada Prela vado Ciclo Rápido Ciclo de Manchas Enjuague Extra Enjuague Giro Ciclo Ropa interior muy sucia ropa de trabajo pañales etc O O O O O Sanitario Sanitary Extra Caliente Fría Extra...

Page 41: ...vadoras de carga superior El tiempo de lavado se puede reducir significativamente para cargas pequeñas o para prendas ligeramente sucias solo seleccionando el Ciclo Rápido con el botón Opción y programando el botón de Nivel de Suciedad iluminándose la opción 2 Ciclos Permite el comienzo de un ciclo con una demora desde 1 hasta 12 9 8 horas Haga la selección apropiada para su carga después presione...

Page 42: ...amente hasta que el nivel deseado se haya conseguido 8 Nivel de Suciedad Soil Level La programación personalizada le permite almacenar un ciclo de lavado personalizado para uso futuro Para crear el ciclo personalizado 1 Seleccione un ciclo 2 Seleccione Temperatura de Lavado Enjuague Velocidad de Giro Nivel de Suciedad 3 Seleccione otras opciones deseadas 4 Mantenga presionado por 3 segundos el bot...

Page 43: ... cuando este está operando b El código de error cuando este ha sido detectado Use esta opción para prevenir el uso no deseado de la lavadora Presione y sostenga el botón de PRE LAVADO por 3 segundos para bloquear desbloquear el control Cuando se fija de SEGURO PARA NIÑOS las luces CHILD LOCK y todos los botones son lisiados excepto en botón de Encendido Usted puede bloquear la lavadora mientras es...

Page 44: ... entrada 1 Abra la cubierta inferior con alguna herramienta como una moneda Gire la conexión de la manguera de drenaje para sacarla 2 Desconecte la conexión del drenaje permitiendo que el agua salga Al mismo tiempo use un recipiente para evitar que el agua caiga al piso Cuando deje de correr el agua abra el filtro de la bomba hacia la izquierda 3 Retire cualquier material extraño del filtro de la ...

Page 45: ... genera la acumulación de residuos de cal en lugares donde no se ve con facilidad y es difícil remover Con el tiempo esto puede obstruir su aparato y si no se verifica periódicamente podría tener que reemplazarlo Aunque el cilindro de lavado esté hecho de acero inoxidable pueden llegar a aparecer puntos de óxido causados por otros artículos pequeños de metal clips seguros etc que hayan sido dejado...

Page 46: ...ienda y después presione el botón Enjuague Extra Extra Rinse por 3 segundos La opción del prelavado será seleccionar 5 Presione el botón de Iniciar Pausa Start Pause 6 Una vez que el ciclo concluyó deje la puerta abierta y seque alrededor de la puerta su puerta de vidrio PRECAUCIÓN Si hay algún niño pequeño tenga cuidado de no dejar la puerta abierta NOTA Remueva depósitos de agua dura usando únic...

Page 47: ...e la máquina Las mangueras de drenaje de la casa están obstruidas Demasiado detergente ó detergente no compatible Detenga la lavadora y revise el cilindro y el filtro de desagüe Si el ruido persiste después de reiniciar la lavadora llame a Servicio Si el sonido persiste talvez la lavadora esté desbalanceada Deténgala y redistribuya el peso de la carga Véase Instalación para remover los pernos de t...

Page 48: ...la llave del suministro de agua Cierre la puerta y presione el botón de Iniciar Pausa Después de presionar el botón de Iniciar Pausa puede tomar unos momentos antes de que la ropa comience a girar La puerta debe cerrar con seguro antes de iniciar los giros Si el desequilibrio es detectado ó si el programa eliminador de espuma operan el tiempo de lavado puede aumentar Problema Posible Causa Solució...

Page 49: ...s de un rato Está la puerta abierta ó no está bien cerrada El agua sobrellena hasta la válvula de falla de agua Hay una falla en el sensor de nivel de agua Sobrecarga en el Motor Sobrecarga en el Motor La lavadora estuvo sometida a una falla de alimentación eléctríca Verifique con otra llave de agua en la casa Abra bien las llaves del agua Enderece las mangueras Verifique el filtro de las manguera...

Page 50: ...ontrario a los requerimientos o precauciones en la Guia Operacional accidente plagas incendios inundaciones instalación inapropiada actos de Dios alteraciones o modificaciones desautorizadas voltaje incorrecto uso comercial o para el uso de otros fines que no sean los propósitos intencionados El costo de reparaciones o reemplazos que son excluidos de estas circunstancias deben ser asumidos por el ...

Reviews: