background image

74

APPENDIX

APPENDIX

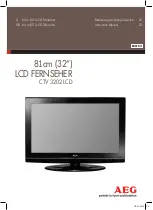
Configuration of frame 

1st frame

Repeat frame

Lead code

Repeat code

B

Biitt   d

deessccrriip

pttiio

on

n

FFrraam

mee   iin

ntteerrvvaall::   T

Tff  

The waveform is transmitted as long as a key is depressed.

Low  
custom code

Lead
code

High 
custom code

Data code

Data code

C0 C1 C2 C3 C4 C5 C6 C7 D0 D1 D2 D3 D4 D5 D6 D7 D0 D1 D2 D3 D4 D5 D6 D7

Repeat  code

Tf

4.5 ms

9 ms 

2.25 ms 

9 ms 

0.55 ms 

0.56 ms

1.12 ms

Tf

Tf

Tf=108ms @455KHz

0.56 ms

2.24 ms

Bit ”0” 

Bit ”1”

1. How to Connect

Connect your wired remote control to the Remote Control port on the TV. 

2. Remote Control IR Codes

Output waveform 

Single pulse, modulated with 37.917KHz signal at 455KHz   

T1

Tc

IR CODES

Carrier frequency

FCAR = 1/TC = fOSC/12
Duty ratio = T1/TC = 1/3

Summary of Contents for 37LB3RS

Page 1: ...efore oper ating your set Retain it for future reference Record model number and serial number of the set See the label attached on the back cover and quote this information to your dealer when you require service LCD TV OWNER S MANUAL 32LB3RS 37LB3RS ...

Page 2: ......

Page 3: ...t be exposed to dripping or splashing and no objects filled with liquids such as vases shall be placed on the apparatus Do not insert any object into the exhaust vent This may cause a fire or could give an electric shock Do not place heavy objects on the product This may cause serious injury to a child or adult Important safety instructions shall be provided with each apparatus This information sh...

Page 4: ...Never touch the power plug with a wet hand This may cause an electric shock Disconnect from the mains and remove all connections before moving Do not place the product in a built in installation such as a bookcase or rack Ventilation required When installing the product on a table be careful not to place the edge of its stand This may cause the product to fall causing serious injury to a child or ...

Page 5: ... and serious damage to the product Unplug this product from the wall outlet before cleaning Do not use liquid cleaners or aerosol cleaners This may cause damaged the product or could give an electric shock Contact the service center once a year to clean the internal part of the product Accumulated dust can cause mechanical failure The distance between eyes and the screen should be about 5 7 times ...

Page 6: ...35 SIMPLINK 36 Input Label 39 Fine tuning Adjustment 40 Booster 41 Favorite Channels Setup 42 PICTURE CONTROL PIP Double Window 43 Watching PIP Double Window 43 TV Program Selection for PIP 43 Selecting an Input Signal Source for the PIP Double Window 44 Sub Picture Size Adjustment PIP mode only 44 Moving the Sub Picture PIP mode only 44 Swapping the PIP Double window 44 Picture Mode Control 45 Ma...

Page 7: ...Sleep 64 OPTION CONTROL On Screen Menus Language Selection 65 Key Lock 66 Closed Captions 67 APPENDIX Troubleshooting Checklist 68 Maintenance 70 Product Specifications 71 Programming the Remote Control 72 Programming Codes 72 IR Codes 74 External Control Device Setup 76 ...

Page 8: ...in a variety of locations where conven tional TVs do not fit If the TV feels cold to the touch there may be a small flicker when it is turned on This is normal there is nothing wrong with TV Some minute dot defects may be visible on the screen appearing as tiny red green or blue spots However they have no adverse effect on the monitor s performance Avoid touching the LCD screen or holding your fin...

Page 9: ...E MO RY ER AS E SL EE P CA PT ION MT S Remote Control Power Cord Cable Management 2 TV Brackets 2 Wall Brackets 2 bolts Twister Holder Arrange the wires with the twister holder Slightly wipe stained spot on the exterior only with the polishing cloth for the product exterior if there is stain or fingerprint on surface of the exterior Do not wipe roughly when removing stain Please be cautions of tha...

Page 10: ... wipe the stand with polishing cloth after removing the protection film attached to the stand CH VOL ENTER MENU INPUT Remote Control Sensor Power Standby Indicator illuminates red in standby mode illuminates white when the set is switched on CH CH VOL VOL ENTER ENTER MENU MENU INPUT INPUT CHANNEL Buttons VOLUME Buttons ENTER Button MENU Button INPUT Button ON OFF Button Intelligent EYE ...

Page 11: ...C jack AV IN 1 Connect audio video output from an external device to these jacks AV OUT Connect a second TV or Monitor Antenna In Connect over the air signals to this jack Power Cord Socket This TV operates on an AC power The voltage is indicated on the Specifications page Never attempt to operate the TV on DC power 1 2 3 4 5 6 7 2 1 4 3 5 6 8 S Video Input Connect S Video out from an S VIDEO devi...

Page 12: ... size and weight of the product G G To use the product safely make sure that the height of the bracket that is mounted on the wall is same as that of the product 3 1 2 Use the eye bolts or TV brackets bolts to fix the product to the wall as shown in the picture If your product has the bolts in the eye bolts position before inserting the eye bolts loosen the bolts Insert the eye bolts or TV bracket...

Page 13: ...e C CA AB BL LE E M MA AN NA AG GE EM ME EN NT T as shown 2 Bundle the cables using the supplied twister holder 3 Hold the C CA AB BL LE E M MA AN NA AG GE EM ME EN NT T with both hands and pull it upward NOTE G G Do not hold the C CA AB BL LE E M MA AN NA AG GE EM ME EN NT T when moving the product If the product is dropped you may be injured or the product may be broken How to remove the cable m...

Page 14: ...ional Tilt Wall Mounting Bracket Installation and Setup Guide G GR RO OU UN ND DI IN NG G Ensure that you connect the earth ground wire to prevent possible electric shock If grounding methods are not possible have a qualified electrician install a separate circuit breaker Do not try to ground the unit by connecting it to telephone wires lightening rods or gas pipes Power Supply Short circuit Break...

Page 15: ...ht direction by 20 degrees to suit your viewing position 20 20 Carefully place the product screen side down on a cushioned surface that will protect product and screen from damage Place the product stand on the product as shown Stand Installation Install the 4 bolts securely in the back of the product in the holes provided ...

Page 16: ...Outdoor Antenna VHF UHF Wall Antenna Socket RF Coaxial Wire 75 ohm Bronze Wire Be careful not to bend the bronze wire when connecting the antenna The TV will let you know when the analog and cable scans are complete NOTE ANTENNA IN ANTENNA ANTENNA IN IN Antenna UHF Signal Amplifier VHF To improve the picture quality in a poor signal area please purchase a signal amplifier and install properly If t...

Page 17: ... 1 1 jacks on the set Match the jack colors Y green PB blue and PR red Connect the audio output of the digital set top box to the C CO OM MP PO ON NE EN NT T I IN N A AU UD DI IO O 1 1 jacks on the set 2 1 2 How to use Turn on the digital set top box Refer to the owner s manual for the digital set top box Select C CO OM MP PO ON NE EN NT T 1 1 input source with using the I IN NP PU UT T button on ...

Page 18: ...et to 1280x720p G G If the digital set top box player does not support Auto HDMI you need to set the output resolution appropriately To get the best picture quality adjust the output resolution of the source device to 1920x1080p NOTE 1 When connecting with a HDMI to DVI cable AUDIO RGB DVI AUDIO RGB DVI RGB PC RGB PC 1 2 VIDEO VIDEO AUDIO AUDIO 1 2 L MONO R AUDIO VIDEO HDMI DVI IN HDMI IN RGB IN C...

Page 19: ... PR R Y Cr Pr Connect the video outputs Y PB PR of the DVD to the C CO OM MP PO ON NE EN NT T I IN N V VI ID DE EO O1 1 jacks on the set Match the jack colors Y green PB blue and PR red Connect the audio outputs of the DVD to the C CO OM MP PO ON NE EN NT T I IN N A AU UD DI IO O1 1 jacks on the set 1 How to connect 2 How to use Turn on the DVD player insert a DVD Select C CO OM MP PO ON NE EN NT ...

Page 20: ... the remote control If connected to A AV V I IN N2 2 select A AV V2 2 input source Refer to the DVD player s manual for operating instructions When connecting HDMI cable Connect the HDMI output of the DVD to the H HD DM MI I I IN N 1 1 D DV VI I or 2 2 jack on the set No separated audio connection is necessary 1 How to connect 2 How to use Select H HD DM MI I1 1 D DV VI I or H HD DM MI I2 2 input ...

Page 21: ...RGB DVI RGB PC AUDIO RGB DVI AUDIO RGB DVI RGB PC RGB PC ANTENNA ANTENNA IN IN L MONO L MONO R AUDIO AUDIO VIDEO VIDEO RGB IN RS 232C IN CONT ROL SERVICE AUD IO OUT VARIABLE AV OUT AV IN 1 L R S VIDEO VIDEO OUTPUT SW ITCH ANT IN ANT OUT Wall Jack Antenna Connect the RF antenna out socket of the VCR to the A An nt te en nn na a socket on the set Connect the antenna cable to the RF antenna in socket...

Page 22: ...Audio Left white and Audio Right red 1 How to connect 2 How to use Insert a video tape into the VCR and press PLAY on the VCR Refer to the VCR owner s manual Select A AV V1 1 input source with using the I IN NP PU UT T button on the remote control If connected to A AV V I IN N2 2 select A AV V2 2 input source When connecting with an S Video cable Connect the S VIDEO output of the VCR to the S S V ...

Page 23: ... Video yellow Audio Left white and Audio Right red 1 How to connect 2 How to use Select A AV V1 1 input source with using the I IN NP PU UT T button on the remote control If connected to A AV V I IN N2 2 input select A AV V2 2 input source Operate the corresponding external equipment 1 AV IN 2 L R AUDIO O VIDEO S VIDEO L R VIDEO Camcorder Video Game Set 1 ...

Page 24: ... refresh rate of the PC graphic card can not be changed change the PC graphic card or consult the manufacturer of the PC graphic card NOTE 1 2 VIDEO AUDIO AUDIO 1 2 L MONO L MONO R AUDIO AUDIO VIDEO VIDEO MI IN RS 232C IN CO NTROL SERVI CE AU DIO OUT VARIABLE AV IN 1 AU DIO RGB DVI RGB PC RGB IN RGB IN RGB OUTP UT AU DI O AUDIO RGB DVI RGB PC 1 2 VIDEO AUDIO 1 2 L MONO R AUDIO VIDEO RGB PC RGB IN ...

Page 25: ...I IN RGB IN CO MPO NENT IN RS 232C IN CO NTROL SERVI CE AU DIO OUT VARIABLE AU DIO RGB DVI RGB PC RGB PC RGB IN RGB IN 1 HDMI DVI IN HDMI DVI IN DVI DTV OUTP UT AU DI O 1 2 Connect the DVI output of the PC to the H HD DM MI I I IN N 1 1 D DV VI I jack on the set Connect the PC audio output to the A AU UD DI IO O R RG GB B D DV VI I jack on the set 1 How to connect 2 How to use Turn on the PC and t...

Page 26: ...t In this case that Video Resolution is not supported G G Avoid keeping a fixed image on the screen for a long period of time The fixed image may become perma nently imprinted on the screen G G The synchronization input form for Horizontal and Vertical frequencies is separate G G When you use too long RGB PC cable there might be a noise on the screen We recommend using under 5m of the cable It pro...

Page 27: ...e D D E E button to select A Au ut to o c co on nf fi ig g Press the G G button to start A Au ut to o c co on nf fi ig g When A Au ut to o c co on nf fi ig g has finished O OK K will be shown on screen If the position of the image is still not correct try Auto adjustment again If picture needs to be adjusted more after Auto adjustment in RGB PC you can adjust the M Ma an nu ua al l c co on nf fi i...

Page 28: ...or Temperature Advanced Aspect Ratio Picture Reset Screen G Demo To set 3 4 Auto Config Manual Config G XGA Mode Reset Phase 50 Clock 10 H Position 0 V Position 0 Press the M ME EN NU U button and then use D D E E button to select the P PI IC CT TU UR RE E menu Press the G G button and then use D D E E button to select S Sc cr re ee en n Press the G G button and then use D D E E button to select M...

Page 29: ...Mo od de e Press the G G button and then use D D E E button to select the desired XGA resolution Press the E EX XI IT T button to return to TV viewing or press the M ME EN NU U button to return to the previous menu 1 2 3 4 5 SIMPLINK FCR 2 1 Picture Mode Color Temperature Advanced Aspect Ratio Picture Reset Screen G Demo To set 3 4 Auto Config Manual Config XGA Mode G Reset 1024x768 1280x768 1360x...

Page 30: ...tton and then use D D E E button to select R Re es se et t Press the G G button 1 2 3 4 Initializing Reset to original factory settings 2 1 Picture Mode Color Temperature Advanced Aspect Ratio Picture Reset Screen G Demo To Set Picture Mode Color Temperature Advanced Aspect Ratio Picture Reset Screen Demo 3 4 Auto Config Manual Config XGA Mode Reset G To Set Screen SIMPLINK FCR Prev MENU OPTIONO T...

Page 31: ...ut G G We recommend to use the AV OUT jacks for VCR recording NOTE 2 1 1 AUDIO RGB DVI RGB PC 1 2 IDEO VIDEO AUDIO AUDIO 1 2 MPO NENT IN RS 232C IN CO NTROL SERVI CE AU DI O OUT AU DI O OUT VARIABLE VARIABLE G G When connecting with external audio equipments such as amplifiers or speakers please turn the TV speakers off G G p p 5 59 9 NOTE EXTERNAL STEREO Use to connected either an external amplif...

Page 32: ...n Selects a menu See a list of AV devices connected to TV When you toggle this button the Simplink menu appears at the screen G G p p 3 36 6 Clears all on screen displays and returns to TV viewing from any menu Allows you to navigate the on screen menus and adjust the system settings to your preference Selects a program for the sub picture Exchanges the main sub images in PIP DW mode Selects the i...

Page 33: ...s the sub picture size Moves the sub picture Switches the sub picture PIP DW mode Memorizes or erases selected channel Sets the sleep timer Selects CAPTION mode Selects the MTS sound Mono Stereo or SAP Illuminates the remote control buttons of selected mode Installing Batteries Open the battery compartment cover on the back side and install the batteries matching cor rect polarity with with Instal...

Page 34: ...r r 0 0 9 9 button on the remote control and then the TV will switch on MODE TV REVIEW INPUT SIMPLINK FCR RATIO SIZE POSITION MEMORY ERASE SLEEP CAPTION MTS Turning on the TV Press the V VO OL L D D E E button to adjust the volume If you want to switch the sound off press the M MU UT TE E button You can cancel this function by pressing the M MU UT TE E V VO OL L D D E E or M MT TS S button Volume ...

Page 35: ...1 SETUP PICTURE OPTION TIME AUDIO Auto Tuning Manual Tuning Favorite Channel Prev MENU Picture Mode Color Temperature Advanced Aspect Ratio Picture Reset Screen Demo Prev MENU Sound Mode Auto Volume Balance 0 TV Speaker Prev MENU Clock Off Time On Time Sleep Time Auto Sleep Prev MENU Language Input Label SIMPLINK Key Lock Set ID Caption Text Prev MENU SETUP PICTUREO AUDIOO TIMEO OPTIONO OPTIONO TI...

Page 36: ...ls with Manual Tuning Redo Auto Tuning if the TV is ever moved to another location Auto Tuning will search for channels only through the Antenna jack Press the M ME EN NU U button and then use D D or E E button to select the S SE ET TU UP P menu Press the G G button and then use D D or E E button to select A Au ut to o T Tu un ni in ng g Press the G G button A Au ut to o T Tu un ni in ng g starts ...

Page 37: ...ss the M ME EM MO OR RY Y E ER RA AS SE E button Press the M ME EM MO OR RY Y E ER RA AS SE E button to select M Me em mo or ry y or E Er ra as se e Press the E EN NT TE ER R button 1 2 3 4 You can also use the S SE ET TU UP P menu to adjust M Ma an nu ua al l T Tu un ni in ng g TV 7 Memory on Fine 0 Booster on Auto Tuning Manual Tuning Favorite Channel Auto Tuning Manual Tuning Favorite Channel P...

Page 38: ...r press the M ME EN NU U button to return to the previous menu 1 2 3 4 NOTE G G Connect the HDMI DVI IN 1 or 2 terminal of the TV to the rear terminal HDMI output of the Simplink device with the HDMI cable G G After connecting the HDMI terminal for the home theater with simplink function in the above method connect the VARIABLE AUDIO OUT terminal on the back of the TV to the VARIABLE AUDIO IN term...

Page 39: ...ast forward chapter skip P Po ow we er r o of ff f a al ll l d de ev vi ic ce es s When you power off TV all connected devices are turned off S Sw wi it tc ch h a au ud di io o o ou ut t Offers an easy way to switch audio out AV device which is connected to TV through HDMI cable but does not support Simplink does not provide this function MODE TV INPUT SIMPLINK SIMPLINK After selecting the T TV V ...

Page 40: ...DD D R Re ec co or rd di in ng gs s p pl la ay yb ba ac ck k Play and control recordings stored in HDD A Au ud di io o O Ou ut t t to o H HT T s sp pe ea ak ke er r A Au ud di io o O Ou ut t t to o T TV V Select HT speaker or TV speaker for Audio Out T TV V v vi ie ew wi in ng g Switch to the previous TV channel regardless of the current mode G G Selected Device G G When no device is con nected di...

Page 41: ...to select the source AV1 AV2 Component1 Component2 RGB HDMI1 DVI or HDMI2 Press the G G button and then use D D or E E button to select the label Press the E EX XI IT T button to return to TV viewing or press the M ME EN NU U button to return to the previous menu SIMPLINK FCR 1 2 3 4 5 1 3 4 AV1 AV2 G Component1 Component2 RGB HDMI1 DVI HDMI2 Language Input Label SIMPLINK Key Lock Set ID Caption T...

Page 42: ... TV viewing or press the M ME EN NU U button to return to the previous menu SIMPLINK FCR 1 2 3 4 5 6 3 4 Normally fine tuning is only necessary if reception is poor To remove fine tuning from a channel reprogram the finely tuned channel with Auto program or Manual Program If a finely tuned channel is memorized the color of the channel number changes to yellow 1 2 Auto Tuning Manual Tuning Favorite...

Page 43: ...utton to store it Press the E EX XI IT T button to return to TV viewing or press the M ME EN NU U button to return to the previous menu SIMPLINK FCR 1 2 3 4 5 6 3 4 If the reception is poor at the fringe area of TV signal select B Bo oo os st te er r to o on n 1 2 Auto Tuning Manual Tuning Favorite Channel TV 7 Memory on Fine 0 Booster on Auto Tuning Manual Tuning Favorite Channel Auto Tuning Manu...

Page 44: ...n and then use D D or E E button to select the S SE ET TU UP P menu Press the G G button and then use D D or E E button to select F Fa av vo or ri it te e C Ch ha an nn ne el l Press the G G button and then use D D or E E button to select the first favorite program position Use the F F or G G button to set the desired channel number for first favorite program Press the E EX XI IT T button to retur...

Page 45: ...sources to be shown on the TV screen at the same time Each source is given half the screen Watching PIP Double Window Press the P PI IP P button to access the sub picture Each press of PIP changes the PIP options as shown below PIP Mode DW2 Mode DW1 Mode TV Program Selection for PIP Use the P PI IP P C CH H button to select a channel for the sub picture The selected channel number is displayed jus...

Page 46: ...he sub picture size With S SI IZ ZE E button in PIP mode sub picture is adjusted Moving the Sub Picture PIP mode only Press the P PO OS SI IT TI IO ON N button Repeatedly press the P PO OS SI IT TI IO ON N button then sub picture moves Swapping the PIP Double window Repeatedly use the S SW WA AP P button to switch the main and sub pictures TV AV1 AV2 Component1 Component2 RGB HDMI1 DVI HDMI2 All A...

Page 47: ...select the P PI IC CT TU UR RE E menu Press the G G button and then use D D or E E button to select P Pi ic ct tu ur re e M Mo od de e Press the G G button and then use D D or E E button to select I In nt te el ll li ig ge en nt t E Ey ye e D Dy yn na am mi ic c S St ta an nd da ar rd d M Mi il ld d U Us se er r1 1 or U Us se er r2 2 Press the E EX XI IT T button to return to TV viewing or press t...

Page 48: ...o make appropriate adjustments Press the E EX XI IT T button to return to TV viewing or press the M ME EN NU U button to return to the previous menu Adjust the picture appearance to suit your preference and view ing situations SIMPLINK FCR NOTE G G In RGB HDMI PC mode you can t adjust color sharpness and tint to the levels you prefer 1 2 3 4 5 6 Picture Mode Color Temperature Advanced Aspect Ratio...

Page 49: ...n use D D or E E button to select C Co ol lo or r T Te em mp pe er ra at tu ur re e Press the G G button and then use D D or E E button to select either C Co oo ol l M Me ed di iu um m W Wa ar rm m or U Us se er r Press the E EX XI IT T button to return to TV viewing or press the M ME EN NU U button to return to the previous menu 2 3 1 Picture Mode Color Temperature G Advanced Aspect Ratio Picture...

Page 50: ... en n or B Bl lu ue e Press the G G button and then use F F or G G button to make appropriate adjustments The adjustment range of R Re ed d G Gr re ee en n or B Bl lu ue e is 40 40 Press the E EX XI IT T button to return to TV viewing or press the M ME EN NU U button to return to the previous menu SIMPLINK FCR 1 2 3 4 5 6 Picture Mode Color Temperature Advanced Aspect Ratio Picture Reset Screen De...

Page 51: ...ious menu 2 3 4 1 S Se el le ec ct ti in ng g t th he e M Ma an nu ua al l 1 Press the G G button and then use D D or E E button to select X XD D C Co on nt tr ra as st t X XD D C Co ol lo or r or X XD D N NR R N No oi is se e M MP PE EG G N NR R X XD D C Co on nt tr ra as st t Optimizing the contrast auto matically according to the brightness of the reflection X XD D C Co ol lo or r Adjusting the...

Page 52: ...B Bl la ac ck k L Le ev ve el l Press the F F or G G button to select L Lo ow w or H Hi ig gh h L Lo ow w The screen gets darker H Hi ig gh h The screen gets brighter Press the E EX XI IT T button to return to TV viewing or press the M ME EN NU U button to return to the previous menu 1 2 3 4 5 Picture Mode Color Temperature Advanced G Aspect Ratio Picture Reset Screen Demo TruM Off Black level Aut...

Page 53: ... E button to select T Tr ru uM M Press the G G button and then use F F or G G button to select O Of ff f or O On n O Of ff f Set amount of film judder to low O On n Set amount of film judder to high If you have some problem in viewing picture set T Tr ru uM M to O Of ff f Press the E EX XI IT T button to return to TV viewing or press the M ME EN NU U button to return to the previous menu 1 2 3 4 5...

Page 54: ...ay trade off between alteration and screen coverage You can move the Zoom2 screen using D D or E E button 4 3 NOTE Press the R RA AT TI IO O button repeatedly to select the desired picture format You can also adjust A As sp pe ec ct t R Ra at ti io o in the P PI IC CT TU UR RE E menu 1 16 9 Horizon Zoom 1 Zoom 2 D D E E This feature lets you choose the way an analog picture with a 4 3 aspect ratio...

Page 55: ...justed value Returns to the default settings Picture Mode Color Temperature XD Advanced at the factory SIMPLINK FCR 1 2 3 Use to quickly reset all the Picture menu options to their original factory preset values Picture Mode Color Temperature Advanced Aspect Ratio Picture Reset G Screen Demo To set 1 2 3 Picture Mode Color Temperature Advanced Aspect Ratio Picture Reset Screen Demo Prev MENU OPTIO...

Page 56: ...tton and then use D D or E E button to select X XD D D De em mo o Press the G G button to begin X XD D D De em mo o To stop X XD D D De em mo o press the M ME EN NU U button 1 2 3 4 XD Demo XD Off XD On Exit MENU SIMPLINK FCR 1 2 3 Picture Mode Color Temperature Advanced Aspect Ratio Picture Reset Screen Demo To Start Picture Mode Color Temperature Advanced Aspect Ratio Picture Reset Screen Demo P...

Page 57: ... U Us se er r Select this option to use the user defined audio settings SIMPLINK FCR Press the M ME EN NU U button and then use D D or E E button to select the A AU UD DI IO O menu Press the G G button and then use D D or E E button to select S So ou un nd d M Mo od de e Press the G G button and then use D D or E E button to select S SR RS S T TS SX XT T S St ta an nd da ar rd d M Mu us si ic c M ...

Page 58: ...s se er r Press the G G button Select a sound band by pressing the D D E E button Make appropriate sound level with the F F G G button Press the E EX XI IT T button to return to TV viewing or press the M ME EN NU U button to return to the previous menu SIMPLINK FCR 1 2 3 4 5 6 Sound Mode Auto Volume Balance 0 TV Speaker SRS TSXT Standard Music Movie Sports User G User 120Hz F F G 200Hz 500Hz 1 2KH...

Page 59: ...utton to select A Au ut to o V Vo ol lu um me e Press the G G button and then use D D or E E button to select O On n or O Of ff f Press the E EX XI IT T button to return to TV viewing or press the M ME EN NU U button to return to the previous menu 1 2 3 4 1 2 3 Sound Mode Auto Volume G Balance 0 TV Speaker Off On SIMPLINK FCR Sound Mode Auto Volume Balance 0 TV Speaker Prev MENU SETUPO PICTUREO AU...

Page 60: ...a an nc ce e Press the G G button and then use F F or G G button to make desired adjustment Press the E EX XI IT T button to return to TV viewing or press the M ME EN NU U button to return to the previous menu 1 2 3 4 1 2 3 Sound Mode Auto Volume Balance 0 G TV Speaker L R Sound Mode Auto Volume Balance 0 TV Speaker F F G L R Sound Mode Auto Volume Balance 0 TV Speaker Prev MENU SETUPO PICTUREO AU...

Page 61: ...se D D or E E button to select T TV V S Sp pe ea ak ke er r Press the G G button and then use D D or E E button to select O On n or O Of ff f Press the E EX XI IT T button to return to TV viewing or press the M ME EN NU U button to return to the previous menu SIMPLINK FCR 1 2 3 4 1 2 3 Sound Mode Auto Volume Balance 0 TV Speaker G Off On Sound Mode Auto Volume Balance 0 TV Speaker Prev MENU SETUPO...

Page 62: ...eakers Signal mode is stereo SAP The secondary language is heard from left and right speakers in mono sound Use the M MT TS S button to select your desired MTS mode in analog signal Each time you press the M MT TS S button M Mo on no o S St te er re eo o or S SA AP P appear in turn Press the E EX XI IT T button to save and return to TV viewing REVIEW FCR RATIO RATIO SIZE POSITION MEMORY ERASE SLEE...

Page 63: ...et the Year Press the G G button and then use D D or E E button to set the Time Press E EX XI IT T button to return to TV viewing or press M ME EN NU U button to return to the previous menu If the current time setting is wrong reset the clock manually 2 3 4 5 1 SIMPLINK FCR 1 2 3 4 Clock G Off Time On Time Sleep Time Auto Sleep AM Clock Off Time On Time Sleep Time Auto Sleep Prev MENU SETUPO PICTU...

Page 64: ...und level at turn on Press the G G button and then use D D or E E to select the channel at turn on Press the E EX XI IT T button to return to TV viewing or press the M ME EN NU U button to return to the previous menu The time function operates only if the current time has been set The Off Time function overrides the On Time function if they are both set to the same time The TV must be in standby m...

Page 65: ...yed on the screen press the E EN NT TE ER R button The timer begins to count down from the number of min utes selected To check the remaining minutes before the TV turns off press the S SL LE EE EP P button once To cancel the Sleep Timer press the S SL LE EE EP P button repeatedly to select The Sleep Time turns the TV off at the preset time Note that this setting is cleared when the TV is turned o...

Page 66: ...then use D D or E E button to select A Au ut to o S Sl le ee ep p Press the G G button and then use D D or E E button to select O On n or O Of ff f Press E EX XI IT T button to return to TV viewing or press M ME EN NU U button to return to the previous menu 2 3 4 1 1 2 3 Clock Off Time On Time Sleep Time Auto Sleep G Off On Clock Off Time On Time Sleep Time Auto Sleep Prev MENU SETUPO PICTUREO AUD...

Page 67: ...G button and then use D D or E E button to select your desired language From this point on the on screen menus will be shown in the selected language Press the E EX XI IT T button to return to TV viewing or press the M ME EN NU U button to return to the previous menu The menus can be shown on the screen in the selected language First select your language 1 2 3 4 Language Input Label SIMPLINK Key L...

Page 68: ... ey y l lo oc ck k O On n the display K Ke ey y L Lo oc ck k appears on the screen if any button on the front panel is pressed while viewing the set Press the M ME EN NU U button and then use D D or E E button to select the O OP PT TI IO ON N menu Press the G G button and then use D D or E E button to select K Ke ey y l lo oc ck k Press the G G button and then use D D or E E button to select O On ...

Page 69: ...asts include closed caption signals Sometimes TV stations broadcast four different cap tion signals on the same channel By selecting Mode1 to Mode2 you can choose which signal you view Mode1 is usually the signal with the captions while another mode might show demonstration or program ming information Your TV might not receive caption signals normally in the following situations I IG GN NI IT TI I...

Page 70: ...irection and or location Test the wall power outlet plug another product s power cord into the outlet where the product s power cord was plugged in This is normal the image is muted during the product startup process Please contact your service center if the picture has not appeared after five minutes Adjust Color in menu option Keep a sufficient distance between the product and the VCR Try anothe...

Page 71: ...s s T Th he er re e i is s a a p pr ro ob bl le em m i in n P PC C m mo od de e O On nl ly y P PC C m mo od de e a ap pp pl li ie ed d Adjust resolution horizontal frequency or vertical frequency Check the input source Work the Auto configure or adjust clock phase or H V position Option Check the signal cable Reinstall the PC video card T Th he e s si ig gn na al l i is s o ou ut t o of f r ra an ...

Page 72: ...ter and a little fabric softener or dish washing detergent Wring the cloth until it s almost dry and then use it to wipe the screen Make sure the excess water is off the screen and then let it air dry before you turn on your TV Cleaning the Cabinet To remove dirt or dust wipe the cabinet with a soft dry lint free cloth Please be sure not to use a wet cloth Extended Absence If you expect to leave y...

Page 73: ...dance Environment condition including stand excluding stand including stand excluding stand Operating Temperature Operating Humidity Storage Temperature Storage Humidity 34 6 x 22 6 x 8 6 inches 880 x 573 3 x 219 6 mm 34 6 x 20 2 x 3 1 inches 880 x 513 4 x 79 mm 33 1 pounds 15 kg 28 2 pounds 12 8 kg 39 6 x 25 7 x 10 5 inches 1005 x 653 x 267 mm 39 6 x 23 4 x 3 5 inches 1005 x 594 4 x 88 mm 49 2 po...

Page 74: ...at case you have to repeat from step 2 Enter the appropriate code from the code table on the following pages When pressing the button the light blinks at a time If the device turned off the programming is successful Press the M ME EN NU U button to store the code After blinking twice this code is stored Test the remote control functions to see if the device responds properly If not steps 2 5 The p...

Page 75: ...059 MINOLTA 013 020 MITSUBISHI 013 020 045 046 049 051 059 061 151 MTC 034 040 MULTITECH 024 034 NEC 012 023 039 043 048 NORDMENDE 043 OPTONICA 053 054 PANASONIC 066 070 074 083 133 140 145 PENTAX 013 020 031 033 063 PHILCO 031 034 067 PHILIPS 031 033 034 054 067 071 101 PILOT 101 PIONEER 013 021 048 PORTLAND 108 PULSAR 072 QUARTZ 01 1 014 QUASAR 033 066 075 145 RCA 013 020 033 034 040 041 062 063...

Page 76: ... custom code Data code Data code C0 C1 C2 C3 C4 C5 C6 C7 D0 D1 D2 D3 D4 D5 D6 D7 D0 D1 D2 D3 D4 D5 D6 D7 Repeat code Tf 4 5 ms 9 ms 2 25 ms 9 ms 0 55 ms 0 56ms 1 12ms Tf Tf Tf 108ms 455KHz 0 56ms 2 24ms Bit 0 Bit 1 1 How to Connect Connect your wired remote control to the Remote Control port on the TV 2 Remote Control IR Codes Output waveform Single pulse modulated with 37 917KHz signal at 455KHz ...

Page 77: ...n 0F TV Remote control Button 0B INPUT Remote control Button 08 POWER Remote control Button Power On Off C4 POWER ON Discrete IR Code Only Power On C5 POWER OFF Discrete IR Code Only Power OFF 60 PIP Remote control Button 0E SLEEP Remote control Button 39 Caption Remote control Button 0A MTS Remote control Button 43 MENU Remote control Button 79 RATIO Remote control Button 5B EXIT Remote control B...

Page 78: ... back panel Note RS 232C connection cables are not supplied with the product AUDIO RGB DVI AUDIO RGB DVI RGB PC RGB PC 1 2 VIDEO AUDIO 1 2 HDMI DVI IN HDMI IN RGB IN COMPONENT IN AUDIO OUT VARIABLE RS 232C IN CONTROL SERVICE PC Type of Connector D Sub 9 Pin Male RGB IN PC DTV HDMI IN RS 232C IN CONTROL SERVICE AUDIO OUT VARIABLE No Pin Name 1 No connection 2 RXD Receive data 3 TXD Transmit data 4 ...

Page 79: ... and then use F F or G G button to adjust S Se et t I ID D to choose the desired TV ID number The adjustment range of Set ID is 1 99 Press the E EX XI IT T button to return to TV viewing or press the M ME EN NU U button to return to the previous menu Use this function to specify a TV ID number Refer to Real Data Mapping 1 G G p p 8 82 2 Set ID Communication Parameters Baud rate 9600 bps UART Data ...

Page 80: ...V transmits ACK acknowledgement based on this for mat when receiving abnormal data from non viable functions or communication errors Data1 Illegal Code Data2 Not supported function Data3 Wait more time C Co om mm ma an nd d1 1 C Co om mm ma an nd d2 2 S Se et t I ID D D Da at ta a C Cr r C Co om mm ma an nd d2 2 S Se et t I ID D O OK K D Da at ta a x x C Co om mm ma an nd d2 2 S Se et t I ID D N N...

Page 81: ...e on off You can also adjust mute using the MUTE button on remote control Data 0 Volume mute on Volume off Data 1 Volume mute off Volume on Transmission k e Set ID Data Cr Acknowledgement e Set ID OK Data x 0 05 5 V Vo ollu um me e C Co on nt tr ro oll C Co om mm ma an nd d2 2 f f To adjust volume You can also adjust volume with the volume buttons on remote control Data Min 0 Max 64 Refer to Real ...

Page 82: ...a x 1 14 4 P PI IP P P Po os siit tiio on n C Co om mm ma an nd d2 2 q q To select sub picture position for PIP You can also adjust the sub picture position using POSITION button on the remote control Data 0 Right down on screen Data 1 Left down on screen Data 2 Left up on screen Data 3 Right up on screen Transmission k q Set ID Data Cr Acknowledgement q Set ID OK Data x 1 10 0 S Sh ha ar rp pn ne...

Page 83: ... Data 9 Turn the TV off by Auto sleep function Data a Turn the TV off by AV board detect option This function is read only Transmission k z Set ID FF Cr Acknowledgement z Set ID OK Data x 1 19 9 B Bllu ue e A Ad djju us st tm me en nt t C Co om mm ma an nd d2 2 To adjust blue in color temperature Data Min 0 Max 50 Refer to Real data mapping 2 See page 82 Transmission k Set ID Data Cr Acknowledgeme...

Page 84: ...1 1 m m C Co om mm ma an nd d2 2 c c To send IR remote key code Data Key code Refer to page 75 Transmission m c Set ID Data Cr Acknowledgement c Set ID OK Data x 2 24 4 I In np pu ut t s se elle ec ct t C Co om mm ma an nd d1 1 x x C Co om mm ma an nd d2 2 b b M Ma aiin n P Piic ct tu ur re e I In np pu ut t To select input source for TV Data Structure Transmission x b Set ID Data Cr MSB LSB 0 0 0...

Reviews: