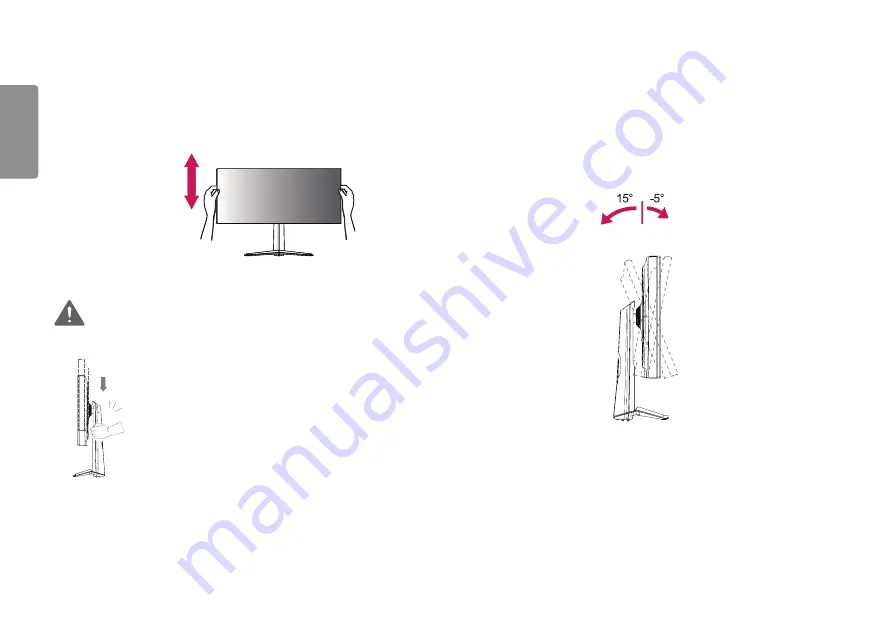
background image

8

ENGLISH

Adjusting the Angle

Place the monitor mounted on the stand base in an upright position.

Adjust the angle of the screen.

The angle of the screen can be adjusted forward or backward from -5° to 15° for 

a comfortable viewing experience.

Front

Rear


Adjusting the Stand Height

Place the monitor mounted on the stand base in an upright position.

Handle the monitor with both hands for safety.

Max. 110.0 mm

 WARNING


When adjusting the screen height, do not place your hand 

on the stand body to avoid injury to your fingers.

Summary of Contents for 34GN850

Page 1: ...nitor applies LCD screen with LED backlights Please read this manual carefully before operating your set and retain it for future reference www lg com 34GN850 34GN85B OWNER S MANUAL LG Gaming Monitor LED MONITOR ...

Page 2: ...ying up Cables Using the Kensington Lock Installing the Wall Mount Plate Installing on the Wall USING THE MONITOR 14 Connecting to a PC 14 HDMI Connection DisplayPort Connection Connecting AV Devices 15 HDMI Connection Connecting Peripherals 16 USB Cable connection Connecting Headphones USER SETTINGS 17 Activating the Main Menu 17 Main Menu Features User Settings 19 Menu Settings TROUBLESHOOTING 3...

Page 3: ...has different licenses Visit www lg com for more information on the license The terms HDMI and HDMI High Definition Multimedia Interface and the HDMI Logo are trademarks or registered trademarks of HDMI Licensing Administrator Inc ...

Page 4: ... the stand and could result in personal injury When lifting or moving the monitor do not touch the monitor screen The force applied to the monitor screen may cause damage to it For wave pattern on appearance unlike the general method of coating it s applied to added glittering material in raw material With no peeled off appearance it has good durability Please use it with confidence because there i...

Page 5: ...inger Basic Functions Power on Press the joystick button once with your finger to turn on the monitor Power off Press and hold the joystick button once with your finger to turn off the monitor Volume control You can control the volume by moving the joystick button left right Controls screen brightness You can control the screen s brightness by moving the joystick button up down NOTE The joystick b...

Page 6: ...nnect the power cord and all other cables Hold the bottom and side of the monitor frame firmly Do not hold the panel itself When holding the monitor the screen should face away from you to prevent it from being scratched When transporting the monitor do not expose the monitor to shock or excessive vibration When moving the monitor keep it upright and never turn the monitor on its side or tilt it s...

Page 7: ...and fall resulting in damage to the monitor or human injury In addition this may cause the joystick button to malfunction Installing on a Table 1 Lift the monitor and place it on the table in an upright position Place the monitor at least 100 mm away from the wall to ensure sufficient ventilation 100 mm 100 mm 100 mm 100 mm ...

Page 8: ...e adjusted forward or backward from 5 to 15 for a comfortable viewing experience Front Rear Adjusting the Stand Height 1 Place the monitor mounted on the stand base in an upright position 2 Handle the monitor with both hands for safety Max 110 0 mm WARNING When adjusting the screen height do not place your hand on the stand body to avoid injury to your fingers ...

Page 9: ...ower part of the monitor s frame as illustrated below Be careful not to touch or press the screen area when adjusting the angle of the monitor NOTE The left or right side of the monitor head can be slightly rotated up or down up to 3 Adjust the horizontal level of the monitor head Monitor head ...

Page 10: ...on security system is located at the bottom of the monitor For more information on installation and usage refer to the Kensington lock owner s manual or visit the website at http www kensington com Connect the monitor to a table using the Kensington security system cable NOTE The Kensington security system is optional You can obtain optional accessories from most electronics stores ...

Page 11: ...a screwdriver to fix the plate to the monitor NOTE The wall mount plate is sold separately For more information on installation refer to the wall mount plate s installation guide Be careful not to apply too much force while mounting the wall mount plate as it may cause damage to the screen Installing on the Wall Install the monitor at least 100 mm away from the wall and leave about 100 mm of space...

Page 12: ...ards The wall mount kit includes the installation guide and all necessary parts The wall mounting bracket is optional You can obtain optional accessories from your local dealer The length of the screw may differ for each wall mounting bracket Be sure to use the proper length For more information please refer to the user manual for the wall mounting bracket CAUTION Unplug the power cord before movi...

Page 13: ...y the use or misuse of inappropriate components will not be covered by the product warranty When measured from the back of the monitor the length of each installed screw must be 8 mm or less Wall Mount Plate Back of the Monitor Screw Dimensions M4 x L10 Wall Mount Plate Back of the Monitor Max 8 mm ...

Page 14: ... where the temperature is low This is normal Sometimes red green or blue spots may appear on the screen This is normal Connecting to a PC This monitor supports the Plug and Play feature Plug and Play A feature that allows you to add a device to your computer without having to reconfigure anything or install any manual drivers HDMI Connection Transmits digital video and audio signals from your PC t...

Page 15: ... cause the device to malfunction Connecting AV Devices HDMI Connection HDMI transmits digital video and audio signals from your AV device to the monitor NOTE Using a DVI to HDMI DP DisplayPort to HDMI cable may cause compatibility issues Use a certified cable with the HDMI logo attached If you do not use a certified HDMI cable the screen may not display or a connection error may occur Recommended ...

Page 16: ...utomatic recognition program installed or that uses its own driver may not be recognized Some USB devices may not be supported or may not work properly It is recommended to use a USB hub or hard disk drive with power supplied If the power supply is not adequate the USB device may not be recognized properly Connecting Headphones Connect peripherals to the monitor via the headphones port NOTE Periph...

Page 17: ...xits the main menu Holding down the button to turn off the monitor You can turn off the monitor this way at any time including when the OSD is on Main menu disabled Adjusts the monitor volume level Main menu enabled Enters the Input features Main menu disabled Adjusts the monitor volume level Main menu enabled Enters the Settings feature Main menu disabled Adjusts the monitor brightness level Main...

Page 18: ...tures Power Off Input Settings Game Mode Exit Main Menu Description Input Sets input mode Power Off Turns off the monitor Settings Configures the screen settings Game Mode Sets the game mode for gaming Exit Exits the main menu ...

Page 19: ...nitor and then enter the Settings 2 Configure the options by moving the joystick up down left right 3 To return to the upper settings or set other settings items move the joystick to or press 4 If you want to exit the settings menu move the joystick to until you exit Game Mode Game Adjust Picture Adjust Input General ...

Page 20: ... display settings including game related setup options Gamer 2 FPS This mode is optimized for FPS games It is suitable for very dark FPS games RTS This mode is optimized for RTS Game Vivid Optimized the screen for vivid colors Reader Optimizes the screen for viewing documents You can brighten the screen in the settings menu HDR Effect Optimizes the screen for high dynamic range sRGB A standard RGB...

Page 21: ... mode is optimized for RTS Game Vivid Optimized the screen for vivid colors NOTE HDR content may not be operated properly depending on the Windows10 OS setting Please check the HDR On Off setting of Windows When the HDR function is turned on the characters or picture quality may be poor according to Graphic card performance While the HDR function is on screen flickering or cracking may occur when ...

Page 22: ...oots change the maximum refresh rate setting in the GPU control panel If the screen display appears abnormal turn off the Overclock setting The function can only be used through DisplayPort The Overclock function s features performance may vary depending on the graphics card or gaming content We do not guarantee the performance of the function and are not responsible for any side effects that may ...

Page 23: ...terface DisplayPort Adaptive Sync HDMI FreeSync Supported Graphic Card A graphic card that supports NVIDIA s G SYNC or AMD s FreeSync is necessary Supported Version Make sure to update the graphic card to the latest driver For more information and requirement refer to NVIDIA website www nvidia com and AMD website www amd com On Adaptive Sync function on Off Adaptive Sync function off Black Stabili...

Page 24: ...to faster Fast Sets the response time to fast Normal Sets the response time to normal Off Does not use the response time improvement feature Cross Hair Cross hair provides a mark on the center of the screen for First Person Shooter FPS games Users can select the cross hair that fits their gaming environment among four different cross hairs When the monitor is off or enters energy saving mode the c...

Page 25: ...ization Warm Sets the screen color to a reddish tone Medium Sets the screen color to between a red and blue tone Cool Sets the screen color to a bluish tone Manual The user can fine tune the color temperature R G B You can customize the picture color using Red Green and Blue colors Six Color Meets the user requirements for colors by adjusting the hue and saturation of the six colors Red Green Blue...

Page 26: ... the monitor can display High Keeps the current contrast ratio of the screen Low Lowers the black levels and raises the white levels from the current contrast ratio of the screen DFC On Adjusts the brightness automatically according to the screen Off Disables the DFC feature Picture Reset No Cancel the select Yes Returns to the default settings ...

Page 27: ...spect ratio is not adjusted from the original NOTE The display may look the same for Full Wide Original and Just Scan options at the recommended resolution 3440 x 1440 There is no Just Scan menu on Adaptive Sync FreeSync Mode Go to Picture Game Adjust Adaptive Sync FreeSync to set Adaptive Sync FreeSync On or Off Auto Input Switch When automatic input switch is set to On display will automatically...

Page 28: ...d of time You can set a timer for the auto off function Off 4H 6H and 8H HDMI Compatibility Mode HDMI Compatibility Mode feature can recognize the legacy equipment that does not support HDMI 2 0 On Enables HDMI Compatibility Mode Off Disables HDMI Compatibility Mode NOTE If the connected device does not support HDMI Compatibility Mode the screen or sound may not work properly When HDMI Compatibili...

Page 29: ...nly be used on HDR content It is recommended to turn off when you are not using the gaming function Buzzer This feature lets you set the sound generated from Buzzer when your monitor powers on On Enables your monitor s Buzzer Off Disables your monitor s Buzzer OSD Lock This feature disables the configuration and adjustment of menus On Enables OSD Lock Off Disables OSD Lock NOTE All features are di...

Page 30: ...s see the troubleshooting guide in the product owner s manual message being displayed This occurs when signals transferred from the PC graphics card are out of the recommended horizontal or vertical frequency range of the monitor Please see the Product Specification section of this manual to set the appropriate frequency Is the No Signal message being displayed This is displayed when the signal ca...

Page 31: ...play one horizontal line is called the horizontal cycle If 1 is divided by the horizontal interval the result is the number of horizontal lines displayed per second This is called horizontal frequency and is represented by kHz Check if the graphics card s resolution or frequency is within the range allowed by the monitor and set it to the recommended optimal resolution Control Panel Display Settin...

Page 32: ...e screen When using the monitor pixilated spots red green blue white or black may appear on the screen This is normal for an LCD screen It is not an error nor is it related to the monitor s performance No sound from the headphone port Are images displayed using DP DisplayPort or HDMI input without sound Make sure that the headphone port connections are made properly Try increasing the volume with ...

Page 33: ...40 85Hz Recommended Resolution DP 3440 x 1440 144Hz HDMI 3440 x 1440 85Hz Power Sources Power Rating 19 V 5 0 A Power Consumption Typical Operating Mode 72 W Typical Sleep Mode 0 5 W Off Mode 0 3 W AC DC Adapter ADS 110CL 19 3 190110G manufactured by SHENZHEN HONOR ELECTRONIC Or ADS 120QL 19A 3 190110E manufactured by SHENZHEN HONOR ELECTRONIC Output 19 V 5 79 A Environmental Conditions Operating ...

Page 34: ...th Stand 7 6 kg Without Stand 5 5 kg Specifications are subject to change without notice The Operating Mode of Power Consumption is measured with LGE test standard Full White pattern Maximum resolution The Power Consumption level can be different by operating condition and monitor setting The monitor goes to the Sleep Mode in a couple of minutes Max 5 minutes ...

Page 35: ...47 60 05 1280 x 720 45 60 1280 x 1024 63 981 60 02 1600 x 900 60 00 60 00 1680 x 1050 65 29 59 954 1920 x 1080 67 50 60 1920 x 1080 83 894 74 973 3440 x 1440 43 82 29 99 HDMI Compatibility Mode On 3440 x 1440 74 60 50 00 HDMI Only 3440 x 1440 89 52 60 00 DisplayPort only 3440 x 1440 128 69 85 00 HDMI Compatibility Mode Off 3440 x 1440 150 97 99 98 DisplayPort only 3440 x 1440 217 32 143 92 Display...

Page 36: ...I Only 2560 x 1440 88 79 60 HDMI Only DisplayPort only Adaptive Sync On Overclock On HDMI Timing Video Factory support mode Preset Mode Vertical Frequency Hz Remarks 1 480p 60 2 720p 60 3 1080p 60 4 2160p 60 HDMI Compatibility Mode Off ...

Page 37: ...t please visit http opensource lge com In addition to the source code all referred license terms warranty disclaimers and copyright notices are available for download LG Electronics will also provide open source code to you on CD ROM for a charge covering the cost of performing such distribution such as the cost of media shipping and handling upon email request to opensource lge com This offer is ...

Reviews: