background image

4

ENGLISH

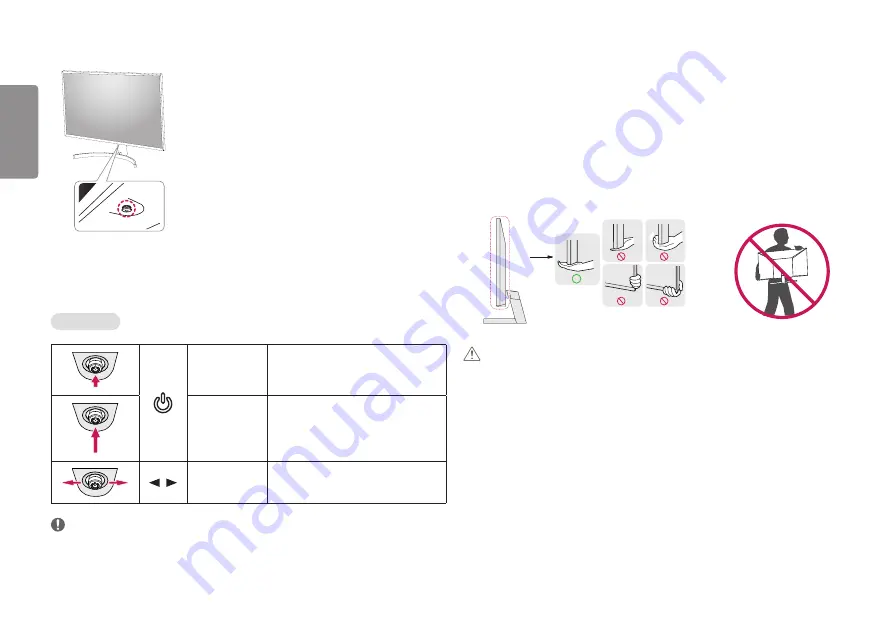
Product and Button Description

Joystick Button 

How to Use the Joystick Button

You can easily control the functions of the monitor by pressing the joystick button or moving it left/right/up/
down with your finger.

Basic Functions

Power on

Press the joystick button once with your finger 
to turn on the monitor.

Power off

Press and hold the joystick button once more 
than 3 seconds with your finger to turn off the 
monitor.

 / 

Volume control

You can control the volume by moving the 
joystick button left/right.

 NOTE


The joystick button is located at the bottom of the monitor.

Moving and Lifting the Monitor

When moving or lifting the monitor, follow these instructions to prevent the monitor from being scratched or 
damaged and to ensure safe transportation, regardless of its shape or size.


Place the monitor in the original box or packing material before attempting to move it.


Before moving or lifting the monitor, disconnect the power cord and all other cables.


Hold the bottom and side of the monitor frame firmly. Do not hold the panel itself.


When holding the monitor, the screen should face away from you to prevent it from being scratched.


When transporting the monitor, do not expose the monitor to shock or excessive vibration.


When moving the monitor, keep it upright and never turn the monitor on its side or tilt it sideways.

 CAUTION


Avoid touching the monitor screen as much as possible.


-

This may result in damage to the screen or some of the pixels used to create images.


If you use the monitor panel without the stand base, its joystick button may cause the monitor to become 
unstable and fall, resulting in damage to the monitor or human injury. In addition, this may cause the joystick 
button to malfunction.

Summary of Contents for 32MN500M

Page 1: ...eenwithLEDbacklights Pleasereadthismanualcarefullybeforeoperatingyoursetand retainitforfuturereference 32MN500M 32MN50W 32MN60T OWNER S MANUAL LEDLCDMONITOR LEDMonitor www lg com Copyright 2018LGElectronicsInc AllRightsReserved ...

Page 2: ...DMIandHDMIHigh DefinitionMultimediaInterface andtheHDMILogoaretrademarksorregisteredtrademarksof HDMILicensingAdministrator Inc TABLE OF CONTENTS LICENSE 2 OPEN SOURCE SOFTWARE NOTICE INFORMATION 3 ASSEMBLING AND PREPARING 3 USINGTHE MONITOR 8 USER SETTINGS 10 TROUBLESHOOTING 18 PRODUCT SPECIFICATION 20 ...

Page 3: ...sinthisdocumentrepresenttypicalprocedures sotheymaylookdifferentfromtheactualproduct Donotapplyforeignsubstances oils lubricants etc tothescrewpartswhenassemblingtheproduct Doing somaydamagetheproduct Applyingexcessiveforcewhentighteningscrewsmaycausedamagetothemonitor Damagecausedinthis waywillnotbecoveredbytheproductwarranty Donotcarrythemonitorupsidedownbyjustholdingthebase Thismaycausethemonit...

Page 4: ...magedandtoensuresafetransportation regardlessofitsshapeorsize Placethemonitorintheoriginalboxorpackingmaterialbeforeattemptingtomoveit Beforemovingorliftingthemonitor disconnectthepowercordandallothercables Holdthebottomandsideofthemonitorframefirmly Donotholdthepanelitself Whenholdingthemonitor thescreenshouldfaceawayfromyoutopreventitfrombeingscratched Whentransportingthemonitor donotexposethemo...

Page 5: ...owercordthatisprovidedintheproductpackageandconnectittoagroundedpower outlet Ifyouneedanotherpowercord pleasecontactyourlocaldealerorthenearestretailstore Adjusting the Angle 1 Placethemonitormountedonthestandbaseinanuprightposition 2 Adjusttheangleofthescreen Theangleofthescreencanbeadjustedforwardorbackwardfrom 5 to15 foracomfortableviewing experience WARNING Toavoidinjurytothefingerswhenadjusti...

Page 6: ...vices NOTE Thewallmountplateissoldseparately Formoreinformationoninstallation refertothewallmountplate sinstallationguide Becarefulnottoapplytoomuchforcewhilemountingthewallmountplateasitmaycausedamagetothe screen Removethestandbeforeinstallingthemonitoronawallmountbyperformingthestandattachmentin reverse Installing on theWall Installthemonitoratleast100mm 3 94inches awayfromthewallandleaveabout10...

Page 7: ...tPlate BackoftheMonitor Standardscrew M4xL10 WallMountPlate BackoftheMonitor Max 8mm 0 3inches Toinstallthemonitortoawall attachawallmountingbracket optional tothebackofthemonitor Makesurethatthewallmountingbracketissecurelyfixedtothemonitorandtothewall Wall Mount mm 100x100 Standard screw M4xL10 Number of screws 4 Wall Mount Plate Optional LSW149 NOTE Anon VESAstandardscrewmaydamagetheproductandc...

Page 8: ...Afeaturethatallowsyoutoaddadevicetoyourcomputerwithouthavingtoreconfigure anythingorinstallanymanualdrivers HDMI Connection TransmitsdigitalvideoandaudiosignalsfromyourPCtothemonitor CAUTION UsingaDVItoHDMI DP DisplayPort toHDMIcablemaycausecompatibilityissues UseacertifiedcablewiththeHDMIlogoattached IfyoudonotuseacertifiedHDMIcable thescreenmaynot displayoraconnectionerrormayoccur RecommendedHDM...

Page 9: ...ctionerrormayoccur RecommendedHDMIcabletypes High SpeedHDMI TM cable High SpeedHDMI TM cablewithEthernet Connecting Peripherals Headphones Connection Connectperipheralstothemonitorviatheheadphonesport NOTE Peripheraldevicesaresoldseparately DependingontheaudiosettingsofthePCandexternaldevice headphonesandspeakerfunctionsmaybe limited Ifyouuseangledearphones itmaycauseaproblemwithconnectinganothere...

Page 10: ...emainmenu Main menu enabled Exitsthemainmenu Holdingdownthebuttonmorethan3secondstoturnoffthemonitor Youcanturnoffthemonitorthiswayatanytime includingwhentheOSDison Main menu disabled Adjuststhemonitorvolumelevel Main menu enabled EnterstheInputfeatures Main menu disabled Adjuststhemonitorvolumelevel Main menu enabled EnterstheSettingsfeature Main menu disabled Displaystheinformationonthecurrentin...

Page 11: ... Menu Description Input Setsinputmode Power Off Turnsoffthemonitor Settings Configuresthescreensettings Picture Mode Setsthepicturemode Exit Exitsthemainmenu Auto Configuration OperatetheAutoConfigurationforoptimaldisplayinD SUB Power Off Input Settings Auto Configuration Exit forD SUBonly ...

Page 12: ...thebottomofthemonitorandthenentertheSettings 2 Movethejoystickup downandleft righttosettheoptions 3 Toreturntotheuppermenuorsetothermenuitems movethejoystickto orpressing it 4 IfyouwanttoexittheOSDmenu movethejoystickto untilyouexit Quick Settings Input Picture General ...

Page 13: ...YoucanadjustMute Unmutebymovingthejoystickbuttonto intheVolumemenu Settings Input Description Input List Selectstheinputmode Aspect Ratio Adjuststheaspectratioofthescreen FullWide Displaysthevideoinwide screen regardlessofthevideosignalinput Original Displaysvideoaccordingtotheaspectratioofthevideosignalinput NOTE Theoptionsmaydisabledattherecommendedresolution 1920x1080 ...

Page 14: ...sturnedoffinthismode High Optimizedpicturequalityisdisplayedwhenauserwantscrystalclearimages Itiseffectiveforhighqualityvideoorgame Middle Theoptimizedpicturequalityisdisplayedwhenauserwantsimagesbetweenlowandhighmodesforcomfortableviewing Itiseffective forUCCorSDvideo Low Theoptimizedpicturequalityisdisplayedwhenauserwantssmoothandnaturalimages Itiseffectiveforslow movingpicturesorstill images Bl...

Page 15: ...D sFreeSyncisnecessary SupportedVersion Makesuretoupdatethegraphiccardtothelatestdriver Formoreinformationandrequirement refertoAMDwebsiteathttp www amd com FreeSync On FreeSyncfunctionon Off FreeSyncfunctionoff Black Stabilizer BlackStabilizer Youcancontroltheblackcontrasttohavebettervisibilityindarkscenes IncreasingtheBlackStabilizervaluebrightensthelowgraylevelareaonthescreen Youcaneasilydistin...

Page 16: ...B only Horizontal Tomoveimageleftandright Vertical Tomoveimageupanddown Clock Tominimizeanyverticalbarsorstripesvisibleonthescreenbackground Thehorizontalscreensizewillalsochange Phase Toadjustthefocusofthedisplay Thisitemallowsyoutoremoveanyhorizontalnoiseandclearorsharpentheimageofcharacters Resolution D SUB only Usercansetthedesiredresolution Thisoptionisenabledonlywhenthescreenresolutiononyour...

Page 17: ...ndbymodeafteracertainperiod OSD Lock Preventsincorrectkeyinput On Keyinputisdisabled NOTE AllfunctionexceptfortheOSDLockmode brightness Contrast Input InformationandVolumearedisabled Off Keyinputisenabled Information ThedisplayinformationwillbeshowntheModel SerialNumber TotalPowerOnTime Resolution Reset Do you want to reset your settings No Canceltheselect Yes Returnstothedefaultsettings NOTE Thev...

Page 18: ...ngetheresolutionto1080portherecommended resolution Notsettingthegraphicscardtotherecommended optimal resolutionmayresultinblurredtext adimmedscreen atruncateddisplayareaor misalignmentofthedisplay Thesettingmethodsmaybedifferentdependingonthecomputeroroperatingsystem andsomeresolutionsmaynotbeavailabledependingonthe performanceofthegraphicscard Ifthisisthecase contactthemanufacturerofthecomputeror...

Page 19: ...rfromourwebsite http www lg com MakesuretocheckifthegraphicscardsupportsPlugandPlayfunction No sound from the headphone port Areimagesdisplayedwithoutsound Makesurethattheheadphoneportconnectionsaremadeproperly Tryincreasingthevolumewiththejoystick SettheaudiooutputofthePCtothemonitoryouareusing Thesettingsmaydifferdependingontheoperatingsystem OS youuse ...

Page 20: ...ZHENHONORELECTRONIC ortypeADS 25SFA 19 319025E manufacturedbySHENZHENHONORELECTRONIC ortypeADS 25FSF 1919025EPCU 1 manufacturedbySHENZHENHONORELECTRONIC ortypeADS 25FSF 1919025EPBR 1 manufacturedbySHENZHENHONORELECTRONIC ortypeADS 25FSF 1919025EPI 1 manufacturedbySHENZHENHONORELECTRONIC ortypeADS 25FSF 1919025EPG 1 manufacturedbySHENZHENHONORELECTRONIC ortypeADS 25FSF 1919025EPB 1 manufacturedbySH...

Page 21: ...x513 3x209 3 mm 28 7x20 2x8 2 inches WithoutStand 729 4x430 3x45 0 mm 28 7x16 9x1 7 inches Weight Without Packaging WithStand 5 6kg 12 3lbs WithoutStand 5 2kg 11 4lbs Thespecificationsaresubjecttochangewithoutnotice Thepowerconsumptionlevelcanbedifferentbyoperatingconditionandmonitorsetting TheOnmodepowerconsumptionismeasuredwithLGEteststandard FullWhitepattern Maximumresolution Themonitorgoestoth...

Page 22: ...z Polarity H V Remarks 640x480 31 469 59 94 640x480 37 5 75 800x600 37 879 60 317 800x600 46 875 75 1024x768 48 363 60 1024x768 60 023 75 029 1280x720 45 60 1280x800 49 702 59 81 1280x1024 63 981 60 02 1280x1024 79 976 75 025 1600x900 60 60 1680x1050 65 29 59 954 1920x1080 67 5 60 1920x1080 83 894 74 973 forHDMIonly ...

Page 23: ...NGLISH HDMITiming Video Factory Support Mode Preset Mode Horizontal Frequency kHz Vertical Frequency Hz Remarks 480p 31 5 60 576p 31 25 50 720p 37 5 50 720p 45 60 1080p 56 25 50 1080p 67 5 60 RecommendMode ...

Page 24: ...donthebackandononesideoftheproduct Recordthem belowincaseyoueverneedservice Model SerialNo Supplier s Declaration of Conformity TradeName LG ResponsibleParty LGElectronicsUSA Inc Address 1000SylvanAveEnglewoodCliffs NJ07632 Telephone 201 266 2215 ...

Reviews: