background image

ENGLISH

17

UseR seTTInGs

UseR seTTInGs

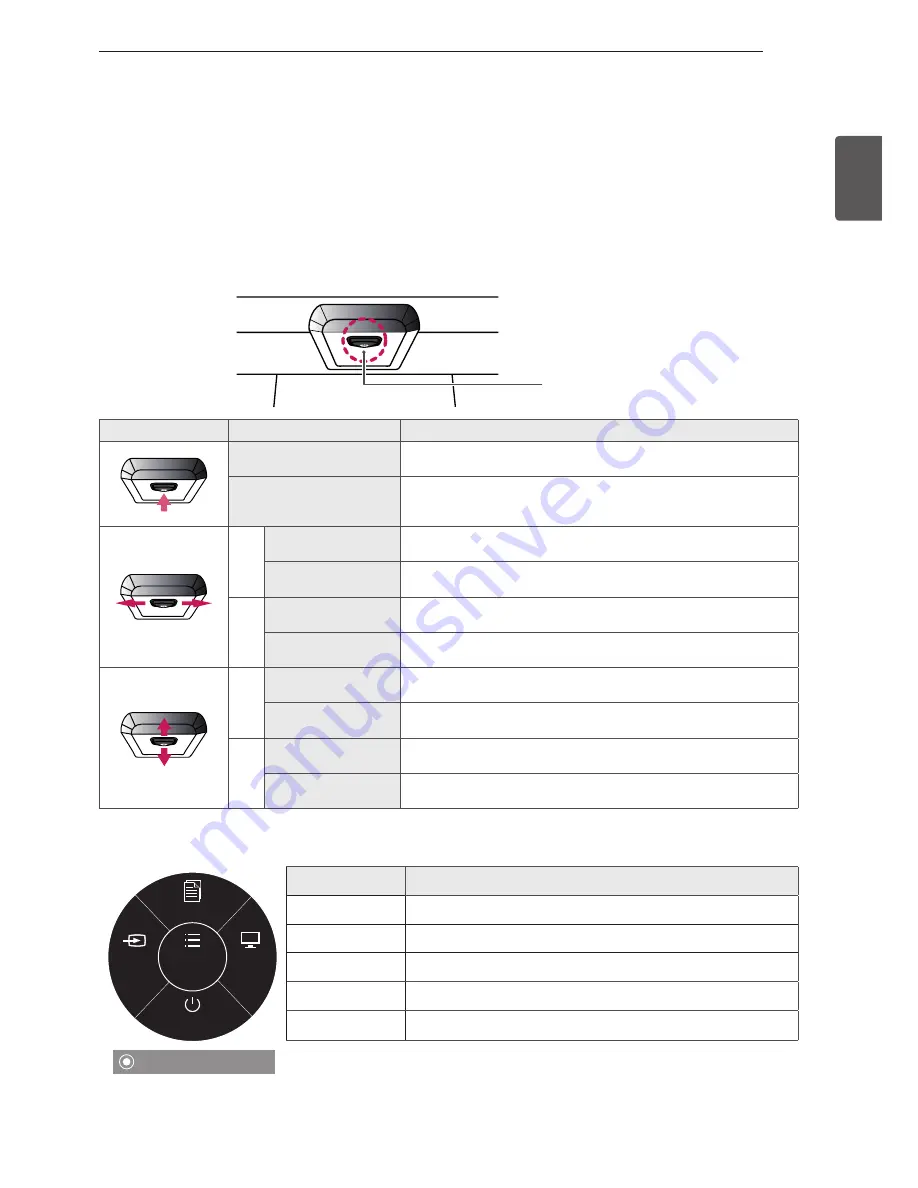
activating the Main Menu

1  

Press the Joystick Button on the bottom of the monitor.

2  

Move the joystick up/down (▲/▼) and left/right(◄/►) to set the options.

3  

Press the Joystick Button once more to exit the main menu.

Joystick button

button

Menu status

Description

Main menu disabled

Enables the main menu. 

Main menu enabled

Exits the main menu.

(Holding down the button to turn off the monitor: You can turn off 

the monitor this way at any time, including when the OSD is on.)

Main menu enabled

Adjusts the menu.

Main menu disabled

Enters the input feature.

Main menu enabled

Adjusts the menu.

Main menu disabled

Enters the auto features.

Main menu enabled

Move the upper menu.

Main menu disabled

Enters the reader feature.

Main menu enabled

Move the menu.

Main menu disabled

Turns off the monitor.


Main Menu features

Reader

aUTo

InPUT

Monitor off

Menu


 long press: Monitor off

Main Menu

Description

Menu

Configures the screen settings.

aUTo

Adjusts display settings. (Only supported in Analog Mode)

Reader

Adjusts color for comfortable text file reading.

InPUT

Change the Input mode.

Monitor off

Turns off the monitor.

Summary of Contents for 32MB25VQ

Page 1: ...www lg com OWNER S MANUAL LED MONITOR 32MB25VQ Please read the safety information carefully before using the product LED MONITOR MODEL P NO MFL68300302 1403 REV00 Printed in Korea MFL68300302 ...

Page 2: ...on a Table 11 Tidying Cables 11 Using the Kensington Lock 12 Installing the Guide Spacer 12 Installing on the Wall mount plate 14 USING THE MONITOR 14 Connecting to a PC 14 D SUB connection 15 DVI Connection 15 HDMI connection 16 Connecting AV Devices 16 HDMI Connection 16 Connecting Peripherals 16 Connecting Headphones 17 USER SETTINGS 17 Activating the Main Menu 17 Main Menu Features 18 Customiz...

Page 3: ...They may result in a shock or fire hazard Call your service technician for replacement As long as this unit is connected to the AC wall outlet it is not disconnected from the AC power source even if the unit is turned off Do not Open the Display y y There are no user serviceable components inside y y There are Dangerous High Voltages inside even when the power is OFF y y Contact your dealer if the...

Page 4: ... cause some afterimages Some dot defects may appear as Red Green or Blue spots on the screen However this will have no impact or effect on the display performance If possible use the recommended resolution to obtain the best image quality for your LCD display If used under any mode except the recommended resolution some scaled or processed images may appear on the screen However this is characteri...

Page 5: ...e regulations of your local authority On Cleaning y y Unplug the display before cleaning the face of the display screen y y Use a slightly damp not wet cloth Do not use an aerosol directly on the display screen because over spraying may cause electrical shock y y When cleaning the product unplug the power cord and scrub gently with a soft cloth to prevent scratching Do not clean with a wet cloth o...

Page 6: ...rent licenses Visit www lg com for more information on the license The terms HDMI and HDMI High Definition Multimedia Interface and the HDMI logo are trademarks or registered trademarks of HDMI Licensing LLC in the United States and other countries ...

Page 7: ... y y Always use genuine components to ensure safety and product performance y y The product warranty will not cover damage or injury caused by the use of counterfeit components CAUTION y y Note that the components may look different from those shown here y y Without prior notice all information and specifications in this manual are subject to change to im prove the performance of the product y y T...

Page 8: ...ck Button is located at the bottom of the monitor NOTE How to Use the Joystick Button You can easily control the functions of the monitor by pressing the Joystick Button or moving it left right with your finger Basic Functions Power on Press the Joystick Button once with your finger to turn on the moni tor Power off Press and hold the Joystick Button once with your finger to turn off the monitor ...

Page 9: ...mly Do not hold the panel itself y y When holding the monitor the screen should face away from you to prevent it being scratched y y When moving the monitor avoid any strong shock or vibrations to the product y y When moving the monitor keep it upright never turn the monitor on its side or tilt it sideways y y As far as possible avoid touching the moni tor screen This may result in damage to the s...

Page 10: ...wn by just holding the base This may cause the monitor to fall off the stand and could result in personal injury y y When lifting or moving the monitor do not touch the monitor screen The force applied to the monitor screen may cause damage to it y y If you use the monitor panel without the stand base its Joystick Button may cause the moni tor to become unstable and fall resulting in damage to the...

Page 11: ...r cord prior to moving or installing the monitor There is risk of electric shock CAUTION Cable Holder Tidying Cables Gather and bind the cables with the supplied cable holder Using the Kensington Lock The connector for the Kensington lock is located at the rear of the monitor For more information on installation and usage refer to the Kensington lock user manual or visit the website at http www ke...

Page 12: ...ch side of the monitor to ensure sufficient ventilation De tailed installation instructions can be obtained from your local retail store Alternatively please refer to the manual for how to install and set up a tilting wall mounting bracket 10 cm 10 cm 10 cm 10 cm To install the monitor to a wall attach a Wall mount plate optional to the back of the monitor Make sure that the Wall mount plate is se...

Page 13: ...s way will not be covered by the product warranty y y Use the Wall mount plate and screws that con form to VESA standards Damage caused by the use or misuse of inappropriate components will not be covered by the product warranty y y When measured from the back of the monitor the length of each installed screw must be 8 mm or less Wall mount plate Back of the monitor Guide spacer fix screw Guide Sp...

Page 14: ...d to change the 15 pin high density 3 row D SUB VGA connector on the supplied cable to a 15 pin 2 row connector y y When connecting the power cord to the out let use a grounded 3 hole multi socket or a grounded power outlet y y The monitor may flicker when turned on in an area of low temperature This is normal y y Sometimes red green or blue spots may ap pear on the screen This is normal y y When ...

Page 15: ... y y Using a DVI to HDMI cable may cause com patibility issues CAUTION DVI Connection Transmits digital video signals to the monitor Con nect the monitor using the DVI cable as illustrated below HDMI IN H P D SUB IN DC IN 19 V DVI D IN HDMI IN DC IN 19 V DVI D IN DVI I D OUT PC AUDIO OUT Sold Separately Sold Separately y y Connect the input signal cable and turn it in the direction of the arrow as...

Page 16: ...rnal device to the monitor Therefore it is recom mended to use Straight earphones Angled Straight y y Depending on the audio settings of the PC and external device headphones and speaker functions may be limited NOTE Connecting AV Devices HDMI Connection HDMI transmits digital video and audio signals from your AV device to the monitor Connect your AV device to the monitor using the HDMI cable as s...

Page 17: ...y time including when the OSD is on Main menu enabled Adjusts the menu Main menu disabled Enters the input feature Main menu enabled Adjusts the menu Main menu disabled Enters the auto features Main menu enabled Move the upper menu Main menu disabled Enters the reader feature Main menu enabled Move the menu Main menu disabled Turns off the monitor Main Menu Features Reader AUTO INPUT Monitor off M...

Page 18: ...at you use Off For a fast moving picture it is recommended that you use High Wide Original Wide Switch to full screen mode according to input image signal Original Change the input image signal ratio to original This function works only if input resolution is lower than Monitor ratio 16 9 Reset Restore all factory default settings Move the joystick or to reset immediately Picture Sharpness To adju...

Page 19: ... to the upper menu or set other menu items move the joystick up Each option is explained below Menu Next Menu Picture Description Sharpness To adjust the clearness of the screen Black Level You can set the offset level If you select High the screen will be bright and if you select Low the screen will be dark Only for HDMI input Offset As the criteria for video signal it is the darkest screen the m...

Page 20: ...n to the upper menu or set other menu items move the joystick up Each option is explained below Menu Next Menu Color Description Gamma Set your own gamma value Gamma 0 Gamma 1 Gamma 2 on the monitor high gamma values display whitish images and low gamma values display blackish images Color Temp Custom Red Set your own red color levels Green Set your own green color levels Blue Set your own blue co...

Page 21: ...the Menu 2 Select the Next Menu button to enter the more option settings 3 Go to Volume by moving the joystick 4 Set the options by moving the Joystick Button left right or down 5 Move the joystick up to leave the OSD menu until you exit To return to the upper menu or set other menu items move the joystick up Each option is explained below Menu Next Menu Display Description Horizontal To move imag...

Page 22: ... right or down 5 Move the joystick up to leave the OSD menu until you exit To return to the upper menu or set other menu items move the joystick up Each option is explained below Menu Next Menu Others Language To choose the language in which the control names are displayed Power Indicator Use this function to set the power indicator on the bottom side of the monitor to On or Off If you set Off it ...

Page 23: ...re the options following the instructions that appear in the bottom right corner Each option is explained below Reader Mode Description Reader 1 Optimizes the screen for browsing newspapers You can brighten the screen in the OSD menu Reader 2 Optimizes the screen for looking at cartoons You can brighten the screen in the OSD menu Reader Off Reader Mode is off ...

Page 24: ...tion of this manual to set the appropriate frequency Is the No Signal message be ing displayed y y This is displayed when the signal cable between the PC and the monitor is missing or disconnected Check the cable and reconnect it The screen retains an image Does image sticking occur even when the monitor is turned off y y Displaying a still image for a prolonged time may cause damage to the screen...

Page 25: ...n y y If the selected resolution is HDMI 1080i 60 50 Hz the screen may be flickering Change the resolution to the recommended resolution 1080P y y Check Control Panel Display Settings and see if the frequency or the resolution were changed If yes readjust the video card to the recommend resolution y y If the recommended resolution optimal resolution is not selected letters may be blurred and the s...

Page 26: ... H P OUT Power Sources Voltage 19 V 2 5 A Power Consumption Typical On Mode 47 W Typ Sleep Mode 0 5 W Off Mode 0 5 W AC DC Adapter LCAP35 type manufactured by Lien Chang Electronic DA 48G19 type manufactured by APD OUTPUT 19 V 2 53 A Environmental conditions Operating Temperature Operating Humidity 10 C to 35 C 10 to 80 Storage Temperature Storage Humidity 20 C to 60 C 5 to 90 non Condensing Dimen...

Page 27: ...0 x 600 37 879 60 317 1024 x 768 48 363 60 1280 x 1024 63 981 60 02 1680 x 1050 65 29 59 954 1920 x 1080 67 50 60 Recommend Mode HDMI TIMING Display Modes Resolution Horizontal Frequency kHz Vertical Frequency Hz Remarks 480P 31 5 60 576P 31 25 50 720P 37 5 50 720P 45 60 1080P 56 25 50 1080P 67 5 60 Recommend Mode Power Indicator Mode LED Color On Mode White Sleep Mode Blinking White Off Mode Off ...

Page 28: ...R POSTURE Adjust the Monitor and your posture to allow you to view images at the optimal viewing angle Place your hands gently on the keyboard keeping your arms bent at the elbows and horizontally outright Adjust the location of the Monitor to avoid it reflecting light ...

Page 29: ......

Page 30: ......

Page 31: ......

Page 32: ...ppliances Class B and is intended for home usage This device can be used in all regions Read the owner s manual carefully and keep it at hand Please note that the label attached to the product provides information for technical support Model Serial No ...

Reviews: