background image

21

ENG

ENGLISH

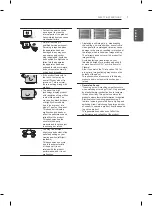
WATCHING TV

TV

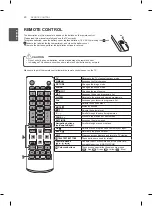
Returns to the TV viewing from any mode.

Q.MENU

Accesses the Quick menus.

PICTURE

Changes the image mode.

SOUND

Changes the sound mode.

 INPUT

Changes the input source.

LIST

Accesses the saved  programme list.

Q.VIEW

Returns to the previously viewed programme.

FAV

Accesses your favourite programme list.

I/II

Selects the sound output.

MUTE 

Mutes all sounds.


Adjusts the volume level.

Scrolls through the saved programmes.

PAGE 

Moves to the previous or next screen.

SETTINGS

Accesses the main menus.

Navigation buttons  

(up/down/left/right)

Scrolls through menus or options.

OK 

Selects menus or options and confirms your input.

BACK   

Returns to the previous level.

EXIT

Clears on-screen displays and return to TV viewing.

 TELETEXT BUTTONS

These buttons are used for teletext.

Control buttons

(

Controls the MY MEDIA menus, or the SIMPLINK 

compatible devices (USB,SIMPLINK).

 Coloured buttons

These access special functions in some menus.

(


: Red,


: Green,


: Yellow,


: Blue)

WATCHING TV 

Turning the TV on for the first 

time

When you turn the TV on for the first time, the Initial set-

ting screen appears. Select a language and customize 

the basic settings.

1  Connect the power cord to a power outlet. The Power 

indicator turns red and the TV switches to Standby 

mode.

2  In Standby mode, press the power button on the 

remote control to turn the TV on. The Initial setting 

screen appears if you turn the TV on for the first time.

 NOTE


y

You can also access 

Initial Setting

 by accessing 

OPTION

 in the main menu.

3  Follow the on-screen instructions to customize your 

TV settings according to your preferences. 

Language

Selects a language to display.

Mode Setting

Selects 

Home Use

 for the 

home environment.

Time Setting

Selects the time zone and 

daylight saving.

Auto Tuning

Scans and saves available 

programmes automatically.

 NOTE


y

To display images in the best quality for your home 

environment, select 

Home Use

.


y

Store Demo

 is suitable for the retail environment.


y

If you select 

Store Demo

, any customized settings 

will switch back to the default settings of 

Store 

Demo

 in 5 minutes.

4  When the basic settings are complete, press the 

OK

.

 NOTE


y

If you do not complete the Initial setting, it will appear 

whenever the TV turns on.


y

Disconnect the power cord from the power outlet when 

you do not use the TV for a long period of time.

5  To turn the TV off, press the power button on the 

remote control.

Watching TV

1  In Standby mode, press 

(POWER)

 to turn the TV 

on.

2  Press 

INPUT 

and select 

TV

.

3  To turn the TV off, press 

(POWER)

.

The TV switches to Standby mode.

Managing programmes

Automatically setting up pro-

gramme

Use this to automatically find and store all available 

programmes.

1  Press 

SETTINGS

 and the Navigation buttons to 

scroll to 

SETUP

.

2  Press the Navigation buttons to scroll to  

Auto Tuning

.

3  Select 

To Set

 and press the Navigation buttons to 

scroll to 

System.

 Select your desired system.

4  Press the Navigation buttons to scroll to  

Storage From

 and select the initial programme 

number.

5  Press the Navigation buttons to scroll to  

Search

 and select To Start to begin auto tuning.

The TV scans and saves available programmes 

automatically.

6  When you return to the previous menu, press  


(BACK)

.

Manually setting up programme

Manual Tuning lets you manually tune and arrange the 

stations in whatever order you desire.

1  Press 

SETTINGS

 and the Navigation buttons to 

scroll to 

SETUP

.

2  Press the Navigation buttons to scroll to  

Manual Tuning

.

3  Press the Navigation buttons to scroll to  

Storage

.

4  Press the Navigation buttons or Number buttons to 

select the desired programme number.

5  Press the Navigation buttons to scroll to  

System

.

6  Press the Navigation buttons to scroll to  

TV System

.

7  Press the Navigation buttons to scroll to  

Band

.

8  Press the Navigation buttons to scroll to  

V/UHF 

or

 Cable

.

9  Press the Navigation buttons to scroll to  

programme

.

Press the Navigation buttons and then select the 

desired programme number with the Navigation 

buttons or Number buttons.

10  Press the Navigation buttons to scroll to  

Search

.

11  Press the Navigation buttons to scroll and start 

Searching

.

12  Press the 

OK 

to store it. 

13  When you return to the previous menu, press  


(BACK)

.

 NOTE


y

 To store another programme, repeat steps 3 to 12.

Summary of Contents for 32LN5100-TA

Page 1: ...R S MANUAL LED TV Please read this manual carefully before operating your set and retain it for future reference LN51 P NO MFL67710801 1212 REV00 LG LED TV applies LCD screen with LED backlights www lg com ...

Page 2: ...ion 19 External Stereo Connection 20 REMOTE CONTROL 21 WATCHING TV 21 Turning the TV on for the first time 21 Watching TV 21 Managing programmes 21 Automatically setting up programme 21 Manually setting up programme 22 Editing your programme list 22 Selecting a programme on the programme list 23 Using additional options 23 Adjusting aspect ratio 24 Using the input list 25 ENTERTAINMENT 25 Connecti...

Page 3: ...ices which are not grounded You may be electrocuted or injured y y Insert the power cable completely into wall socket If the power cable is not inserted completely into wall socket a fire could break out y y Ensure the power cord does not come into contact with hot objects such as a heater This may cause a fire or an electric shock hazard y y Do not place a heavy object or the product itself on po...

Page 4: ...drop metallic objects such as coins hair pins chopsticks or wire into the product or inflammable objects such as paper and matches Children must pay particular attention Electrical shock fire or injury can occur If a foreign object is dropped into the product unplug the power cord and contact the service centre y y Do not spray water on the product or scrub with an inflammable substance thinner or...

Page 5: ...onal parts to the back of the product When you install the set to use the wall mounting bracket optional parts fix it carefully so as not to drop y y Only use the attachments accessories specified by the manufacturer y y When installing the antenna consult with a qualified service technician If not installed by a qualified technician This may create a fire hazard or an electric shock hazard y y We...

Page 6: ...ress strongly upon the panel with a hand or sharp object such as nail pencil or pen or make a scratch on it y y Avoid touching the screen or holding your finger s against it for long periods of time Doing so may produce some temporary distortion effects on the screen y y When cleaning the product and its components unplug the power first and wipe it with a soft cloth Applying excessive force may c...

Page 7: ...ur viewing position left right top down This phenomenon occurs due to the characteristic of the panel It is not related with the product performance and it is not malfunction y y Displaying a still image e g broadcasting channel logo on screen menu scene from a video game for a prolonged time may cause damage to the screen resulting in retention of the image which is known as image sticking The wa...

Page 8: ...3 Connect an external device to the TV set ASSEMBLING AND PREPARING Unpacking Check your product box for the following items If there are any missing accessories contact the local dealer where you purchased your product The illustrations in this manual may differ from the actual product and item CAUTION y y Do not use any unapproved items to ensure the safety and product life span y y Any damages ...

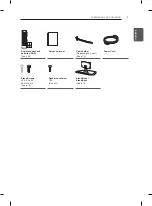
Page 9: ...ND PREPARING Remote control and batteries AAA See p 20 Owner s manual Cable holder Depending on model See p 15 Power Cord Stand Screws 3EA P5 x 25 4EA M4 x 14 See p 12 Desk mount Screw 1EA See p 13 Stand Body Stand Base See p 12 ...

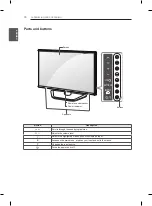
Page 10: ...saved programmes H Adjusts the volume level H Selects the highlighted menu option or confirms an input S Accesses the main menu or saves your input and exits the menus H Changes the input source Turns the power on or off SETTINGS INPUT OK buttons Screen Speakers Remote control sensor Power indicator ...

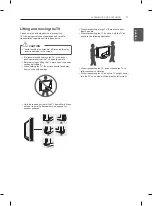
Page 11: ...oving or lifting the TV disconnect the power cord and all cables y y When holding the TV the screen should face away from you to avoid damage y y Hold the top and bottom of the TV frame firmly Make sure not to hold the transparent part speaker or speaker grill area y y When transporting a large TV there should be at least 2 people y y When transporting the TV by hand hold the TV as shown in the fo...

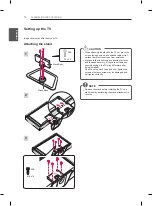
Page 12: ...ushioned table or flat surface to protect the screen from scratches y y Make sure that the screws are inserted correctly and fastened securely If they are not fastened securely enough the TV may tilt forward after being installed Do not use too much force and over tighten the screws otherwise screw may be damaged and not tighten correctly NOTE y y Remove the stand before installing the TV on a wal...

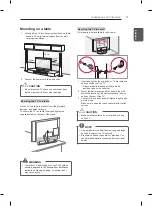
Page 13: ...wall per installation instructions Tipping shaking or rocking the TV may cause injury Securing the TV to a wall This feature is not available for all models 1 Insert and tighten the eye bolts or TV brackets and bolts on the back of the TV If there are bolts inserted at the eye bolts position remove the bolts first 2 Mount the wall brackets with the bolts to the wall Match the location of the wall ...

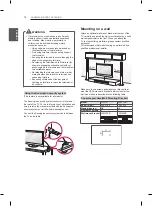
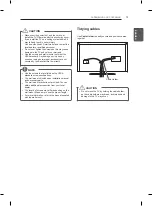
Page 14: ...ling Many injuries particularly to children can be avoided by taking simple precautions such as Using cabinets or stands recommended by the manufacturer of the television Only using furniture that can safely support the television Ensuring the television is not overhanging the edge of the supporting furniture Not placing the television on tall furniture for example cupboards or bookcases without a...

Page 15: ...n improper accessory are not covered by the manufacturer s warranty NOTE y y Use the screws that are listed on the VESA standard screw specifications y y The wall mount kit includes an installation manual and necessary parts y y The wall mount bracket is not provided You can obtain additional accessories from your local dealer y y The length of screws may differ depending on the wall mount Make su...

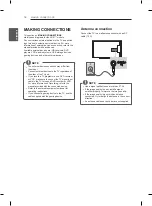
Page 16: ... y y If you record a TV programme on a DVD recorder or VCR make sure to connect the TV signal input cable to the TV through a DVD recorder or VCR For more information of recording refer to the manual provided with the connected device y y Refer to the external equipment s manual for operating instructions y y If you connect a gaming device to the TV use the cable supplied with the gaming device An...

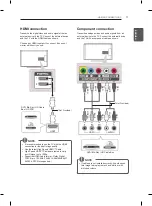
Page 17: ...y Use the latest High Speed HDMI Cable y y High Speed HDMI Cables are tested to carry an HD signal up to 1080p y y Supported HDMI Audio format Dolby Digital PCM Up to 192 KHz 32k 44 1k 48k 88k 96k 17 6k 192k DTS Not supported Component connection Transmits analogue video and audio signals from an external device to the TV Connect the external device and the TV with a component cable as shown AUDIO...

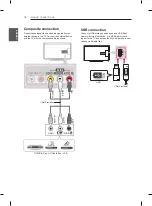
Page 18: ...he TV with the composite cable as shown AVIN2 AUDIO OUT VIDEO MONO AUDIO L R YELLOW WHITE RED RED YELLOW WHITE Not Provided DVD Blu Ray HD Cable Box VCR USB connection Connect a USB storage device such as a USB flash memory external hard drive or a USB memory card reader to the TV and access the My media menu to use various multimedia files USB IN USB Not Provided ...

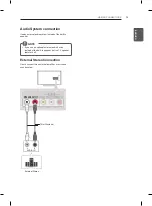
Page 19: ...d of the built in speaker NOTE y y If you use an optional external audio device instead of the built in speaker set the TV speaker feature to off External Stereo Connection Use to connect to an external amplifier or surround sound system AVIN2 AUDIO OUT L R AUDIO IN Not Provided External Stereo ...

Page 20: ...e SOUND Changes the sound mode INPUT Changes the input source LIST Accesses the saved programme list Q VIEW Returns to the previously viewed programme FAV Accesses your favourite programme list I II Selects the sound output MUTE Mutes all sounds Adjusts the volume level P Scrolls through the saved programmes PAGE Moves to the previous or next screen SETTINGS Accesses the main menus Navigation butt...

Page 21: ...t TV 3 To turn the TV off press POWER The TV switches to Standby mode Managing programmes Automatically setting up pro gramme Use this to automatically find and store all available programmes 1 Press SETTINGS and the Navigation buttons to scroll to SETUP 2 Press the Navigation buttons to scroll to Auto Tuning 3 Select To Set and press the Navigation buttons to scroll to System Select your desired ...

Page 22: ...utton during TV viewing If you wish to select the skipped programme directly enter the programme number with the NUMBER buttons or select it in the Programme edit menu This function enables you to skip the stored programmes 1 Press SETTINGS and the Navigation buttons to scroll to SETUP 2 Press the Navigation buttons to scroll to Programme Edit 3 Select To Set and edit programmes using the followin...

Page 23: ... Mode NOTE y y If you select Just Scan you may see image noises at the edge of the original signal Original When your TV receives a wide screen signal it will automatically change to the picture format broadcasted 4 3 Resizes images to the previous standard 4 3 14 9 You can view a picture format of 14 9 or a general TV programme in the 14 9 mode The 14 9 screen is viewed in the same way as in 4 3 ...

Page 24: ...to scroll to one of the input sources and press OK y y Image shown may differ from your TV OK Move INPUT TV AV1 AV2 Component HDMI1 HDMI2 Move OK Input source Description TV Watch TV over the air and cable broadcast AV Watch video from a VCR or other external devices Component Select it when using the DVD or the Digital set top box depends on con nector HDMI Watch video from a HTS or other high de...

Page 25: ...ice y y Please do not turn off the TV or unplug the USB device when the connected USB storage device is working When such device is suddenly separated or unplugged the stored files or the USB storage device may be damaged y y Please do not connect the USB storage device which was artificially manoeuvred on the PC The device may cause the product to malfunction or fail to be played Never forget to ...

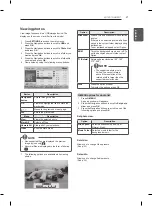
Page 26: ...ontents under the folder focused on 1 6 Available buttons on the remote control Supported file format Type Supported file format Photo JPEG Baseline 64 x 64 to 8192 x 8192 Progressive 64 x 64 to 1024 x 768 y y You can play JPEG files only y y Non supported files are displayed in the form of predefined icon Music MP3 Bit rate 32kbps to 320kbps y y Sampling rate MPEG1 Layer3 32 kHz 44 1 kHz 48 kHz y...

Page 27: ...files Unmark All Clears all of your selections Close Exits the Mark Mode NOTE y y Non supported files are displayed the preview image by icon only y y Abnormal files are displayed in the form of bitmap 7 The following options are available while viewing photos ꔊ 2 13 ꔋ ꔠ Slideshow BGM Hide Option Description Slideshow Starts or stops a slideshow with selected photos If there are no selected photos...

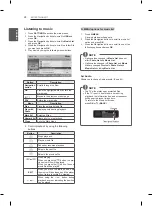
Page 28: ...kips to the next file v Skips to the previous file or When playing When you press the button the pre vious music file will be played When you press the button the next music file will be played EXIT When you press the EXIT button only the music will be stopped and the player will not return to normal TV viewing ꕌ or ꕍ When using the ꕌorꕍ button during playback a cursor indicating the position can ...

Page 29: ... not supported y y Video files with subtitle files of 1 MB or larger may not be played properly y y The screen may suffer temporary interruptions image stoppage faster playback etc when the audio language is changed y y A damaged movie file may not be played correctly or some player functions may not be usable y y Movie files produced with some encoders may not be played correctly y y If the video...

Page 30: ... the subtitle Language Activated for SMI subtitle and can select the language within the subtitle Code Page Can select the font for subtitle When set to default same font as general menu will be used Sync Adjusts the time synchronisation of the subtitle from 10 secs to 10 secs by steps of 0 5 secs during movie play Position Changes the position of the subtitle either up or down during movie play S...

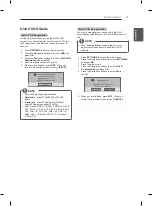
Page 31: ...els y y Frame rate under 30 frames sec 720x480 under 25 frames sec under 720x576 y y Video Codec MPEG 1 MPEG 2 MPEG 4 H 264 AVC DivX 3 11 DivX 4 12 DivX 5 x DivX 6 Xvid 1 00 Xvid 1 01 Xvid 1 02 Xvid 1 03 Xvid 1 10 beta1 Xvid 1 10 beta2 JPEG VC1 Sorenson H 263 H 264 DivX VOD Deregistration You should deregister your device with 8 digit DivX deregistration code from your device at www divx com vod N...

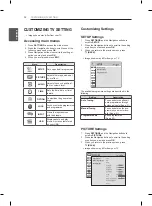
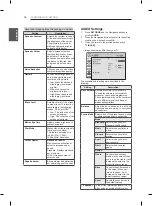
Page 32: ...avigation buttons to scroll to SETUP 2 Press the Navigation buttons to scroll to the setting or option you want and press OK 3 When you return to the previous menu press ꕣ BACK y y Image shown may differ from your TV OK Move SETUP Auto Tuning Manual Tuning Programme Edit Move OK The available programme settings are described in the following Setting Description Auto Tuning Tunes and stores all ava...

Page 33: ...movie theatre Sport Optimizes the video image for high and dynamic actions by emphasizing primary colours such as white grass or sky blue Game Optimizes the video image for a fast gam ing screen such as PCs or games Basic image options Setting Description Backlight Adjusts the brightness of the screen by controlling the LCD backlight If you decrease the brightness level the screen becomes darker a...

Page 34: ...r of colours used Edge Enhancer Shows clearer and distinctive yet natural edges of the video AUDIO Settings 1 Press SETTINGS and the Navigation buttons to scroll to AUDIO 2 Press the Navigation buttons to scroll to the setting or option you want and press OK 3 When you return to the previous menu press ꕣ BACK y y Image shown may differ from your TV OK Move AUDIO Auto Volume On Balance 0 L R Sound ...

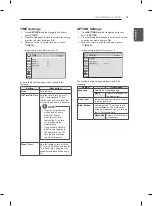
Page 35: ...On time features to the same time the Off time feature overrides the On time feature Sleep Timer Sets the length of time until the TV to turns off When you turn the TV off and turn it on again the Sleep timer feature will be set to off OPTION Settings 1 Press SETTINGS and the Navigation buttons to scroll to OPTION 2 Press the Navigation buttons to scroll to the setting or option you want and press...

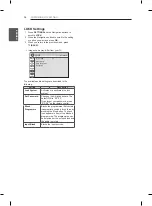
Page 36: ...ock Move OK The available audio settings are described in the following Setting Description Lock System Activates or deactivates the lock system Set Password Changes the 4 digit password The default PIN is 0 0 0 0 If you forget your password press 0 3 2 5 on the remote control Block Programme Blocks the programmes that contain inappropriate contents for children by pressing the Blue button The Loc...

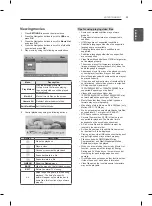
Page 37: ...on The selected page is stored as the selected page number blinking once to confirm this From now on you can select this page with the same coloured button 4 The three other coloured buttons are programmed in this way Fastext The teletext pages are colour coded along the bottom of the screen and are selected by pressing the correspond ing coloured button Page selection 1 Press the INDEX button to ...

Page 38: ...esult in scratches and image distortions y y Do not use any chemicals as this may damage the product y y Do not spray liquid onto the surface If water enters the TV it may result in fire electric shock or malfunction Power cord Remove the accumulated dust or dirt on the power cord regularly TROUBLESHOOTING Problem Solution Cannot control the TV with the remote control y y Check the remote control ...

Page 39: ... TI 39LN5100 TA 39LN5150 TA 39LN5110 TB 39LN5120 TC 39LN5130 TI 39LN510Y TA 39LN515Y TA 39LN511Y TB 39LN512Y TC 39LN513Y TI 42LN5100 TA 42LN5150 TA 42LN5110 TB 42LN5120 TC 42LN5130 TI 42LN510Y TA 42LN515Y TA 42LN511Y TB 42LN512Y TC 42LN513Y TI Dimensions W x H x D With stand mm 738 0 x 497 0 x 207 0 894 0 x 587 0 x 235 0 968 0 x 628 0 x 235 0 Without stand mm 738 0 x 437 0 x 79 0 894 0 x 525 0 x 7...

Page 40: ... 1 to 69 CATV 01 to 47 DK VHF UHF 1 to 69 CATV 01 to 47 M VHF UHF 2 to 78 CATV 01 to 71 Vietnam Malaysia Television System PAL SECAM B G D K PAL I NTSC M Programme Coverage BG VHF UHF 1 to 69 CATV 01 to 47 I VHF UHF 1 to 69 CATV 01 to 47 DK VHF UHF 1 to 69 CATV 01 to 47 M VHF UHF 2 to 78 CATV 01 to 71 Iran Algeria Tunisia Digital model Television System PAL SECAM B G D K PAL I NTSC M Programme Cov...

Page 41: ...0x720 37 5 44 96 45 50 59 94 60 1920x1080 33 72 33 75 28 125 26 97 27 33 716 33 75 56 25 67 43 67 5 59 94 60 50 23 97 24 29 976 30 00 50 59 94 60 Component port connecting information Component ports on the TV Y PB PR Video output ports on DVD player Y PB PR Y B Y R Y Y Cb Cr Y Pb Pr Signal Component 480i 576i O 480p 576p O 720p 1080i O 1080p O 50 Hz 60 Hz only ...

Page 42: ...fied device that plays DivX video Visit divx com for more information and software tools to convert your files into DivX video ABOUT DIVX VIDEO ON DEMAND This DivX Certified device must be registered in order to play purchased DivX Video on Demand VOD movies To obtain your registration code locate the DivX VOD section in your device setup menu Go to vod divx com for more infor mation on how to com...

Page 43: ......
Page 44: ...uote this information to your dealer when requiring any service MODEL SERIAL Only DTV For any Suggestion Opinion Complaints Please Call 800 54 in UAE 0800 54 54 54 in South Africa 080 100 54 54 in Morocco 19960 in Egypt Other countries Please contact our local dealer or log into http www lg com ...

Reviews: