background image

25

EXTERNAL 

EQ
UIPMENT 

SETUP

Automatically adjusts the picture position and minimizes image instability. After adjustment, if the image is
still not correct, your TV is functioning properly but needs further adjustment.

A

Au

utto

o   cco

on

nffiig

gu

urre

e

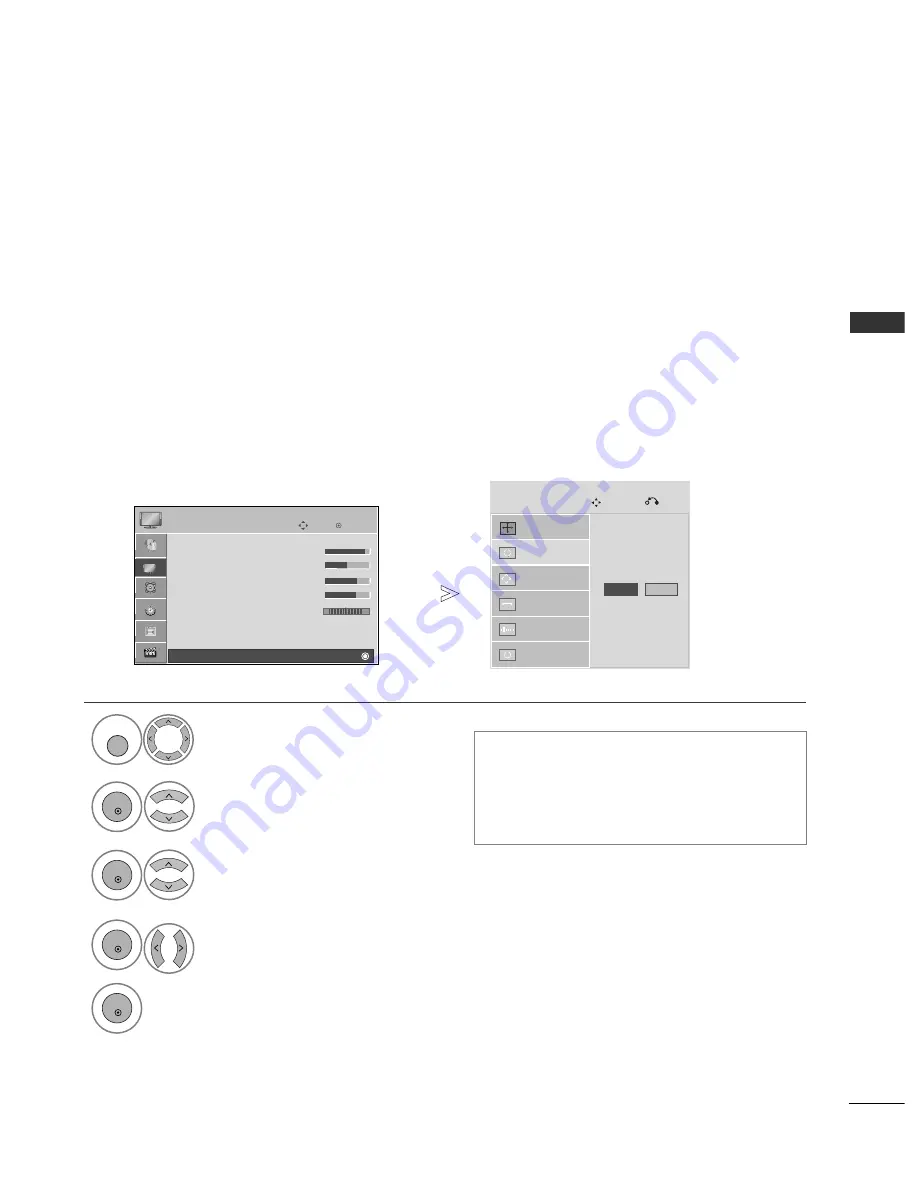
This function is for automatic adjustment of the screen position, size, and phase.

The displayed image will be unstable for a few seconds while the auto configuration is in progress.

Auto Configure (RGB [PC] mode only)

If the position of the image is still not correct,
try Auto adjustment again.

If picture needs to be adjusted again after Auto
adjustment  in  RGB(PC),  you  can  adjust  the
P

Po

ossiittiio

on

n, S

S ii zz ee   or P

P h

h aa ss ee.

Select P

PIIC

CT

TU

UR

RE

E.

Select S

Sccrreeeen

n.

Select A

Au

utto

o   C

Co

on

nffiig

g...

Auto Config.

G

Resolution

Position

Size

Phase

Reset

Screen

Move

Prev.

To Set

1

MENU

3

2

OK 

OK 

• 

Press the M

ME

EN

NU

U button to return to normal TV viewing.

• 

Press the R

RE

ET

TU

UR

RN

N button to move to the previous menu screen.

Select Y

Y ee ss.

Run A

Au

utto

o   C

Co

on

nffiig

g...

4

OK 

5

OK 

Yes

No

OK

Move

• Contrast

90

• Brightness

50

• Sharpness

60

• Colour

60

• Tint

0

• Advanced Control

• Picture Reset

Screen

PICTURE

R

G

E

Screen

Summary of Contents for 32LH30FR-CA

Page 1: ...lease read this manual carefully before operating your TV Retain it for future reference Record the model number and serial number of the TV Refer to the label on the back cover and quote this information To your dealer when requiring any service ENGLISH ...

Page 2: ...HDMI the HDMI logo and High Definition Multimedia Interface are trademarks or registered trademarks of HDMI Licensing LLC ...

Page 3: ...his item is not included for all models Lightly wipe any stains or fingerprints on the surface of the TV with the polishing cloth Do not use excessive force This may cause scratching or discolouration Bolts for stand assembly Refer to p 6 x 4 Protection cover Refer to p 6 1 screw for stand fixing Refer to p 6 Wall Mounting Bracket Separate purchase RW230 32LF3 AVMODE ENERGYSAVING MUTE POWER LIST Q...

Page 4: ...up 17 External Stereo Setup 1 8 AV Output Setup 1 8 Usb in Setup 19 PC Setup 20 Screen Setup for PC Mode 22 WATCHING TV PROGRAMME CONTROL Remote Control Key Functions 26 Turning on the TV 28 Programme Selection 28 Volume Adjustment 28 Quick Menu 29 On Screen Menus Selection and Adjustment 30 Auto Programme Tuning 31 Manual Programme Tuning 32 Programme Edit 34 Selecting the Programme List 36 Favou...

Page 5: ...Sound Mode 73 Sound Setting Adjustment User Mode 74 SRS TruSurround XT 74 Clear Voice ll 75 Balance 76 TV Speakers On Off Setup 77 Selecting Audio Out 78 Audio Reset 79 I II Stereo Dual Reception 80 NICAM Reception 81 Speaker Sound Output Selection 81 On Screen Menu Language Selection 82 TIME SETTING Clock Setup 83 Auto On Off Timer Setting 84 Sleep Timer Setting 84 TELETEXT Switch on off 85 SIMPL...

Page 6: ...e main power button on the TV When the power is turned off with the main power button on the TV it will not be turned on with the remote control CAUTION INPUT MENU OK P PROGRAMME VOLUME OK MENU INPUT POWER Remote Control Sensor Power Standby Indicator Illuminates red in standby mode Illuminates blue when the TV is switched on ON OFF Main Power Switch ...

Page 7: ...port with DVI to HDMI cable RS 232C IN PORT Connect to the RS 232C port on a PC This port is used for Service or Hotel mode RGB IN Input Connect the output from a PC RGB DVI Audio Input Connect the audio from a PC Component Input Connect a component video audio device to these jacks Audio Video Input Connect audio video output from an external device to these jacks AV Output Connect second TV or m...

Page 8: ...TV The TV must be attached to desk so it cannot be pulled in a forward backward direction potentially causing injury or damaging the product Use only an attached screw 1 Screw provided as parts of the product Desk Stand WARNING G To prevent TV from falling over the TV should be securely attached to the floor wall per installa tion instructions Tipping shaking or rocking the machine may cause injur...

Page 9: ...o set up the TV by fixing it to the wall avoiding the possibility of it falling forwards if pulled This will prevent the TV from falling forward and causing injury This will also prevent the TV from damage Ensure that children do not climb or hang from the TV NOTE G When moving the TV undo the cords first G Use a platform or cabinet strong and large enough to support the size and weight of the TV ...

Page 10: ...et which supports VESA standard A LG recommends that wall mounting be performed by a qualified professional installer 4 inches 4 inches 4 inches 4 inches 4 inches NOTE G Should Install wall mount on a solid wall perpendicular to the floor G Should use a special wall mount if you want to install it to ceiling or slanted wall G The surface that wall mount is to be mounted on should be of sufficient ...

Page 11: ...t homepage of the Kensington company Kensington sells security systems for expensive electronic equipment such as notebook PCs and LCD projectors NOTE The Kensington Security System is an optional accessory NOTES a If the TV feels cold to the touch there may be a small flicker when when it is turned on This is normal there is nothing wrong with TV b Some minute dot defects may be visible on the sc...

Page 12: ...ntil all connections are made between the devices Multi family Dwellings Apartments Connect to wall antenna socket Single family Dwellings Houses Connect to wall jack for outdoor antenna Outdoor Antenna VHF UHF Wall Antenna Socket RF Coaxial Wire 75 ohm Antenna UHF Signal Amplifier VHF In poor signal areas to achieve better picture quality it may be necessary to install a signal amplifier to the a...

Page 13: ...p Component O O O O 50 60Hz only HDMI X O O O 24Hz 30Hz 50Hz 60Hz Connect the video outputs Y PB PR of the digital set top box to the C CO OM MP PO ON NE EN NT T I IN N V VI ID DE EO O jacks on the TV Connect the audio output of the digital set top box to the C CO OM MP PO ON NE EN NT T I IN N A AU UD DI IO O jacks on the TV Turn on the digital set top box Refer to the owner s manual for the digit...

Page 14: ...I cables don t support HDMI version 1 3 flicker ing or no screen display can result Please use the latest cables that support at least HDMI version 1 3 NOTE 1 2 DVI IN 1 Connecting with an HDMI to DVI cable Connect the digital set top box to H HD DM MI I D DV VI I I IN N 1 1 jack on the TV Connect the audio output of the digital set top box to the A AU UD DI IO O I IN N R RG GB B D DV VI I jack on...

Page 15: ...ayer Y Y Y Y PB B Y Cb Pb PR R Y Cr Pr 1 2 Connect the video outputs Y PB PR of the DVD to the C CO OM MP PO ON NE EN NT T I IN N V VI ID DE EO O jacks on the TV Connect the audio outputs of the DVD to the C CO OM MP PO ON NE EN NT T I IN N A AU UD DI IO O jacks on the TV Turn on the DVD player insert a DVD Select C Co om mp po on ne en nt t input source using the I IN NP PU UT T button on the rem...

Page 16: ...I I D DV VI I I IN N 1 1 H HD DM MI I I IN N2 2 or H HD DM MI I I IN N3 3 jack on the TV Select H HD DM MI I1 1 H HD DM MI I I IN N2 2 or H HD DM MI I I IN N3 3 input source using the I IN NP PU UT T button on the remote control Refer to the DVD player s manual for operating instructions 2 3 1 1 2 DVI IN 1 Connecting with a S Video cable Connect the S VIDEO output of the DVD to the S S V VI ID DE ...

Page 17: ...socket of the VCR to the A AN NT TE EN NN NA A I IN N socket on the TV Connect the antenna cable to the A AN NT T I IN N socket of the VCR Press the P PL LA AY Y button on the VCR and match the appropriate channel between the TV and VCR for viewing 2 3 1 ANTENNA IN OUTPUT SWITCH ANT IN R S VIDEO VIDEO ANT OUT L VIDEO AUDIO MONO AV VARIABLE AUDIO OUT IN1 OUT Wall Jack Antenna 1 2 ...

Page 18: ... S VIDEO VIDEO OUTPUT SWITCH ANT IN ANT OUT G G If both S VIDEO and VIDEO sockets have been connected to the S VHS VCR simultaneously only the S VIDEO can be received NOTE NT IN L R AUDIO VIDEO AUDIO MONO RGB IN PC AUDIO IN RGB DVI AV VARIABLE AUDIO OUT OUT IN1 L R S VIDEO VIDEO OUTPUT SWITCH ANT IN ANT OUT Connecting with a S Video cable Connect the S VIDEO output of the VCR to the S S V VI ID DE...

Page 19: ...ith using the I IN NP PU UT T button on the remote control If connected to A AV V I IN N 2 2 select A AV V2 2 input source Operate the corresponding external equipment Refer to external equipment operating guide 1 2 3 L MONO R AUDIO VIDEO AV IN2 IN 3 L R VIDEO Camcorder Video Game Set 1 R O C RVICE AUDIO IN RGB DVI AV OUT VARIABLE AUDIO OUT L L MONO MONO R AUDIO AUDIO VIDEO VIDEO AV IN1 L R VIDEO ...

Page 20: ...he stereo amplifier to the V VA AR RI IA AB BL LE E A AU UD DI IO O O OU UT T jacks on the TV Set up your speakers through your analog stereo amplifier according to the instructions provided with the amplifier 2 1 1 1 AV OUTPUT SETUP The TV has a special signal output capability which allows you to hook up the second TV or monitor VIDEO AUDIO MONO AUDIO IN RGB DVI AV VARIABLE AUDIO OUT OUT IN1 L R...

Page 21: ...ENT SETUP USB IN SETUP IN 3 Connect the USB device to the U US SB B I IN N jack on the TV After connecting the U US SB B I IN N jacks you use the U US SB B function G G p p 4 46 6 2 1 1 Here shown may differ from your TV ...

Page 22: ...B output of the PC to the R RG GB B I IN N P PC C jack on the TV Connect the PC audio output to the A AU UD DI IO O I IN N R RG GB B D DV VI I jack on the TV Turn on the TV and the PC Select R RG GB B input source using the I IN NP PU UT T button on the remote control 2 3 1 COMPONENT IN VIDEO L PB PR R AUDIO VIDEO AUDIO MONO RS 232C IN CONTROL AUDIO IN RGB DVI AV VARIABLE AUDIO OUT OU IN RGB IN PC...

Page 23: ...tern contrast or brightness in PC mode Change the PC mode to another resolu tion or change the refresh rate to another rate or adjust the brightness and contrast on the menu until the picture is clear If the refresh rate of the PC graphic card can not be changed change the PC graphic card or consult the man ufacturer of the PC graphic card G G The synchronization input waveform for Horizontal and ...

Page 24: ...ct P PI IC CT TU UR RE E Select S Sc cr re ee en n 3 Select R Re es se et t To Set Auto Config Screen Move Prev Resolution Position Size Phase Reset G 2 OK OK Press the M ME EN NU U button to return to normal TV viewing Press the R RE ET TU UR RN N button to move to the previous menu screen Select Y Ye es s Run R Re es se et t 4 OK 5 OK OK Move Contrast 90 Brightness 50 Sharpness 60 Colour 60 Tint...

Page 25: ...ition Size Phase Select P PI IC CT TU UR RE E Select S Sc cr re ee en n Select P Po os si it ti io on n S Si iz ze e or P Ph ha as se e Make appropriate adjustments Auto Config Resolution Position G Size Phase Reset G F D E Screen Move Prev 1MENU 3 4 2 OK OK Press the M ME EN NU U button to return to normal TV viewing Press the R RE ET TU UR RN N button to move to the previous menu screen OK Move ...

Page 26: ...e ee en n Select R Re es so ol lu ut ti io on n Select the desired resolution Auto Config Resolution G Position Size Phase Reset Screen Move Prev 1MENU 3 4 2 OK OK Press the M ME EN NU U button to return to normal TV viewing Press the R RE ET TU UR RN N button to move to the previous menu screen 1024 x 768 1280 x 768 1360 x 768 OK Move Contrast 90 Brightness 50 Sharpness 60 Colour 60 Tint 0 Advanc...

Page 27: ...still not correct try Auto adjustment again If picture needs to be adjusted again after Auto adjustment in RGB PC you can adjust the P Po os si it ti io on n S Si iz ze e or P Ph ha as se e Select P PI IC CT TU UR RE E Select S Sc cr re ee en n Select A Au ut to o C Co on nf fi ig g Auto Config G Resolution Position Size Phase Reset Screen Move Prev To Set 1MENU 3 2 OK OK Press the M ME EN NU U bu...

Page 28: ...a menu Displays the programme table G G p p 3 36 6 Returns to the previously viewed programme THUMBSTICK Up Down Left Right OK MENU RETURN Allows you to navigate the on screen menus and adjust the system settings to your preference Accepts your selection or displays the current mode Selects a menu Clears all on screen displays and returns to TV viewing from any menu G G p p 3 30 0 Allows the user ...

Page 29: ...s connected to TV When you toggle this button the Simplink menu appears at the screen G G p p 4 40 0 Select the desired quick menu source Aspect Ratio Clear Voice II Picture Mode Sound Mode AUDIO Sleep Timer Favourite USB Device G G p p 2 29 9 Installing Batteries Open the battery compartment cover on the back and install the batteries matching correct polarity with with Install two 1 5V AAA batte...

Page 30: ... is the TV s default mode d Store Demo mode is the optimal setting for store environments If a user modifies image quality data Store Demo mode initializes the product to the image quality set by us after a certain period of time e The mode Home Use Store Demo can be changed by executing Mode Setting in the OPTION menu If the OSD On Screen Display is displayed on the screen after turning on the TV...

Page 31: ...s the best for the images being watched Selects your desired Sound Mode A AU UD DI IO O Selects the sound output S Sl le ee ep p T Ti im me er r Sets the sleep timer F Fa av vo ou ur ri it te e Selects the favourite On or Off U US SB B D De ev vi ic ce e Selects Eject in order to eject USB device QUICK MENU Display each menu Select your desired Source Your TV s OSD On Screen Display may differ sli...

Page 32: ...Colour 70 PICTURE E OK Move Auto Volume Off Clear Voice ll Off Level 3 Balance 0 Sound Mode Standard SRS TruSurround XT Off Treble 50 Bass 50 AUDIO E L R OK Move Menu Language English Input Label SIMPLINK On Key Lock Off Set ID 1 Power Indicator Demo Mode Off Mode Setting Home Use OPTION E Display each menu Select a menu item Move to the pop up menu 1MENU 3 2 OK OK Press the M ME EN NU U button to...

Page 33: ...t Y Ye es s using the button Then press the OK but ton Otherwise select N No o Select S SE ET TU UP P Select A Au ut to o T Tu un ni in ng g Select Y Ye es s Run A Au ut to o T Tu un ni in ng g Check your antenna connection The previous channel information will be updated during Auto Tuning Yes No 1MENU 3 2 OK OK 4 OK Press the M ME EN NU U button to return to normal TV viewing Press the R RE ET T...

Page 34: ...d pro gramme number on Select a TV system Select V V U UH HF F or C Ca ab bl le e Commence searching Select the desired channel number or Select S St to or re e 1 4 5 6 7 8 0 9 2 3 1MENU 3 2 OK OK 4 or 5 6 7 1 4 5 6 7 8 0 9 2 3 8 OK Press the M ME EN NU U button to return to normal TV viewing Press the R RE ET TU UR RN N button to move to the previous menu screen MANUAL PROGRAMME TUNING 9 OK OK Mo...

Page 35: ...o or re e Fine tune for the best picture and sound 1 MENU 2 OK 3 1 MENU 3 2 OK OK 4 5 OK 4 Select the position and make your choice of the second charac ter and so on You can use an the alphabet A A to Z Z the number 0 0 to 9 9 and blank OK OK OK Press the M ME EN NU U button to return to normal TV viewing Press the R RE ET TU UR RN N button to move to the previous menu screen OK OK 6 OK OK Move A...

Page 36: ...nables you to skip the stored programmes Select S SE ET TU UP P Select P Pr ro og gr ra am mm me e E Ed di it t Enter the P Pr ro og gr ra am mm me e E Ed di it t Select a programme to be stored or skipped C 01 1 Pr Change Page Change P TV 0 1 C 01 2 C 05 3 BLN 2 4 5 6 7 8 9 10 11 12 13 14 15 E Navigation Previous Skip 1MENU 3 2 OK OK 4 Press the M ME EN NU U button to return to normal TV viewing ...

Page 37: ...LUE Turn the skipped programme number to BLUE 3 Release the skipped programme 1 The selected programme is deleted all the following programmes are shifted up one position A Moving a programme Select a programme number to be moved Turn the moved programme number to YELLOW 3 YELL YELLO OW W Release the moved programme 1 When a programme number is skipped it means that you will be unable to select it...

Page 38: ...umber 1 LIST A Displaying programme list A Selecting a programme in the programme list You may find some blue programmes These have been set up to be skipped by auto pro gramming or in the programme edit mode Some programmes with the channel number shown in the programme LIST indicate there is no station name assigned Turn the pages 2 Return to normal TV viewing A Paging through a programme list P...

Page 39: ...A Displaying the favourite programme list FAV MARK Select your desired programme Select F Fa av vo ou ur ri it te e A Selecting favourite programme 1 4 5 6 7 8 0 9 2 3 2Q MENU 4Q MENU 3 1 or Select F Fa av vo ou ur ri it te e Return to TV viewing This will automatically include the selected programme into your favourite programme list P P A G E 1 C 01 2 C 05 3 BLN 2 Exit Favorite List Q Menu Close...

Page 40: ...t when watching the VCR or external equipment C Co om mp po on ne en nt t Select it when using DVD or Digital set top box depends on connector R RG GB B Select it when using PC depends on connector H HD DM MI I Select it when using DVD or Digital set top box depend on connector OK TV AV1 AV2 Component HDMI3 HDMI2 HDMI1 RGB Image shown may differ from your TV ...

Page 41: ...o normal TV viewing Press the R RE ET TU UR RN N button to move to the previous menu screen OK Move Menu Language English Input Label SIMPLINK On Key Lock Off Set ID 1 Power Indicator Demo Mode Off Mode Setting Home Use OPTION E Input Label OK Move Menu Language English Input Label SIMPLINK On Key Lock Off Set ID 1 Power Indicator Demo Mode Off Mode Setting Home Use OPTION E Input Label AV1 AV2 Co...

Page 42: ...and play media without additional settings S Se el le ec ct t A AV V d de ev vi ic ce e Enables you to select one of the AV devices connected to the TV and operate it P Po ow we er r o of ff f a al ll l d de ev vi ic ce es s When you switch off the TV all connected devices are turned off S Sw wi it tc ch h a au ud di io o o ou ut t Offers an easy way to switch audio out S Sy yn nc c P Po ow we er ...

Page 43: ...HD DM MI I D DV VI I I IN N 1 1 H HD DM MI I I IN N 2 2 or H HD DM MI I I IN N 3 3 terminal on the back of the TV and the HDMI output terminal of the Home Theater using HDMI cables Connect the Audio output terminal on the back of the TV and the Audio input terminal of the Home Theater using RCA cables Select Home Theater in the Speaker menu by pushing the S SI IM MP PL LI IN NK K button COMPONENT ...

Page 44: ...the current mode D DI IS SC C p pl la ay yb ba ac ck k Select and play connected discs When multiple discs are available the titles of discs are conveniently displayed at the bottom of the screen V VC CR R p pl la ay yb ba ac ck k Play and control the connected VCR H HD DD D R Re ec co or rd di in ng gs s p pl la ay yb ba ac ck k Play and control recordings stored in HDD A Au ud di io o O Ou ut t ...

Page 45: ... on the remote control then the set will be turned on With the K Ke ey y L Lo oc ck k O On n the display K Ke ey y L Lo oc ck k O On n appears on the screen if any button on the front panel is pressed while viewing the TV 1MENU 3 2 OK OK 4 OK Press the M ME EN NU U button to return to normal TV viewing Press the R RE ET TU UR RN N button to move to the previous menu screen OK Move Menu Language En...

Page 46: ... R Re es se et t 1MENU 3 2 OK OK Press the M ME EN NU U button to return to normal TV viewing Press the R RE ET TU UR RN N button to move to the previous menu screen 4 OK Select Y Ye es s Start F Fa ac ct to or ry y R Re es se et t OK Move Input Label SIMPLINK On Key Lock Off Set ID 1 Power Indicator Demo Mode Off Mode Setting Home Use Factory Reset OPTION Factory Reset OK Move Input Label SIMPLIN...

Page 47: ...timizes video and audio for playing games 1AV MODE 2 If you select C Ci in ne em ma a in AV mode C Ci in ne em ma a will be selected both for P Pi ic ct tu ur re e M Mo od de e and S So ou un nd d M Mo od de e in P PI IC CT TU UR RE E menu and A AU UD DI IO O menu respectively If you select O Of ff f in A AV V m mo od de e the picture and image which you initially set will be selected Press the A ...

Page 48: ...onnected with cable is not offered by USB maker or an excessively long cable the device may not be recognized G G Some USB storage devices may not be supported or operated smoothly G G Please back up the important file because a data of USB device may be damaged Data management is con sumer s responsibility and in consequence the manufactures does not cover the product bearing data damage G G Maxi...

Page 49: ...ssive Jpeg You can play JPEG files only Only baseline scan is supported among JPEG SOF0 SOF1 only Non supported files are displayed in the form of bitmap Page 2 3 No Marked PHOTO LIST Up Folder Navigation OPTION Page Change Mark Exit 1366x768 125KB KY101 12 10 2009 KY102 12 10 2009 JMJ001 12 10 2009 JMJ002 12 10 2009 JMJ003 12 10 2009 JMJ004 12 10 2009 KY103 12 10 2009 KY104 12 10 2009 KY105 12 10...

Page 50: ... 12 10 2009 JMJ005 12 10 2009 JMJ006 12 10 2009 JMJ007 12 10 2009 JMJ008 12 10 2009 Up Folder 1366x768 125KB View Mark All Delete Close G G V Vi ie ew w Display the selected item G G M Ma ar rk k A Al ll l Mark all photos on the screen G G U Un nm ma ar rk k A Al ll l Deselect all marked photos G G D De el le et te e Delete the selected photo item G G C Cl lo os se e Close the pop up menu Select t...

Page 51: ...ked PHOTO LIST Up Folder Navigation OPTION Page Change Mark Exit 1366x768 125KB KR101 12 10 2009 KR102 12 10 2009 JMJ001 12 10 2009 JMJ002 12 10 2009 JMJ003 12 10 2009 JMJ004 12 10 2009 KR103 12 10 2009 KR104 12 10 2009 KR105 12 10 2009 JMJ005 12 10 2009 JMJ006 12 10 2009 JMJ007 12 10 2009 JMJ008 12 10 2009 Up Folder Drive1 MARK Page 2 3 No Marked PHOTO LIST Up Folder Navigation OPTION Page Change...

Page 52: ... e Delete photos G G O Op pt ti io on n Set values for S Sl li id de e S Sp pe ee ed d and M Mu us si ic c F Fo ol ld de er r Use button and O OK K button to set values Then go to and press O OK K to save the settings You cannot change M Mu us si ic c F Fo ol ld de er r while BGM is playing G G H Hi id de e Hide the menu on the full sized screen To see the menu again on the full sized screen press...

Page 53: ...ple to assist with the TV operation Screen Components MUSIC MP3 supporting file Bit rate 32k 320kbps Sampling rate MPEG1 layer 3 32k 48kHz Page 2 3 No Marked MUSIC LIST Up Folder Navigation OPTION Page Change Mark Exit 00 00 1 34 Up Folder 2 3 4 1 Moves to upper level folder Current page Total pages Total number of marked music title Corresponding buttons on the remote control 1 3 4 2 Select U US ...

Page 54: ... List G G M Ma ar rk k A Al ll l Mark all music titles in the folder G G U Un nm ma ar rk k A Al ll l Deselect all marked music titles G G D De el le et te e Delete the selected music titles G G C Cl lo os se e Close the pop up menu Use the P P button to navigation in the music page Use M MA AR RK K button to mark or unmark a music When one or more music files are marked the marked music title wil...

Page 55: ...le G G A damaged or corrupted music does not play but displays 00 00 in playtime G G A music downloaded from a paid service with copyright protection does not start but displays inappropri ate information in playtime G G If you press O OK K A A buttons screen saver is stopped G G This TV can not play music files less than 32 Kbytes G G The P PL LA AY Y G G P Pa au us se e I II I A A G GG G F FF F ...

Page 56: ...M Mb bp ps s Maximum FPS Frame Per Second can be reached only at SD level FPS is 25 FPS 720 576 or 30 FPS 720 480 depending on Resolution Time information in an external subtitle file should be arranged in ascending order to be played Files of 25 FPS or 30 FPS of higher may not be played properly If the file is recorded with GMC the unit supports only 1 point of recorded level GMC is the acronym f...

Page 57: ...ted while screen changes G G P Pl la ay y M Ma ar rk ke ed d Play the selected movie titles Once a music finishes playing the next select ed one will be played automatically G G S St to op p P Pl la ay y During playback Stop the play ing movie titles G G M Ma ar rk k A Al ll l Mark all movie titles in the folder G G U Un nm ma ar rk k A Al ll l Deselect all marked movie titles G G D De el le et te...

Page 58: ...FF FF F repeatedly press the F FF F G GG G button to speed up G GG G G GG GG G G GG GG GG G G GG GG GG GG G G GG GG GG GG GG G Pressing these buttons repeatedly increases the fast forward reverse speed During playback press the P Pa au us se e I II I button Still screen is displayed When using the or button during playback a cursor indicating the position can be viewed on the screen Press the P PL...

Page 59: ...igital video format created by DixX Inc This is an official DivX Certified device that plays DivX video Visit www divx com for more infor mation and software tools to convert your files into DivX video ABOUT DIVX VIDEO ON DEMAND This DivX Certified device must be registered in order to play DivX Video on Demand VOD content To generate the registration code locate the DivX VOD section in the device...

Page 60: ...ton to move to the previous menu screen Delete the existing authentication information to receive a new DivX user authentication for TV Once this function is executed a DivX user authentication is required again to see DivX DRM files DivX R Video On Demand Do you want to deactivate your device Yes No Select Y Ye es s DivX R Video On Demand This device is deactivated Your deactivation code XXXXXXXX...

Page 61: ... to view a picture with an original 4 3 aspect ration black bars will appear on both the left and right of the screen PICTURE SIZE ASPECT RATIO CONTROL You can watch the screen in various picture formats 1 16 6 9 9 J Ju us st t S Sc ca an n O Or ri ig gi in na al l 4 4 3 3 1 14 4 9 9 Z Zo oo om m and C Ci in ne em ma a Z Zo oo om m If a fixed image is displayed on the screen for a long time that f...

Page 62: ...p and bot tom of the picture will be cropped C Ci in ne em ma a Z Zo oo om m Choose Cinema Zoom when you wish the pic ture to be altered both horizontally extended and vertically cropped The picture adopting a compromise between alteration and screen coverage The adjustment range is 1 16 NOTE G G You can only select 4 4 3 3 1 16 6 9 9 Wide 1 14 4 9 9 Z Zo oo om m C Ci in ne em ma a Z Zo oo om m in...

Page 63: ... with the Energy Star requirements and is adjusted to the comfortable level to be viewed at home You can increase the brightness of your screen by adjusting the Energy Saving level or by setting the Picture Mode OK Move Aspect Ratio 16 9 Energy Saving Off Picture Mode Vivid Backlight 100 Contrast 100 Brightness 50 Sharpness 70 Colour 70 PICTURE E Energy Saving Off When selecting Screen Off the scr...

Page 64: ...E ET TU UR RN N button to move to the previous menu screen V Vi iv vi id d Strengthen the contrast brightness colour and sharpness for vivid picture S St ta an nd da ar rd d The most general and natural screen display status N Na at tu ur ra al l The most natural screen display status C Ci in ne em ma a Optimizes video for watching movies S Sp po or rt t Optimizes video for watching sports events ...

Page 65: ...djusts the level of crispness in the edges between the light and dark areas of the picture The lower the level the softer the image C Co ol lo ou ur r Adjusts intensity of all colours T Ti in nt t Adjusts the balance between red and green levels It is not available to use this function in I In nt te el ll li ig ge en nt t S Se en ns so or r 1MENU 3 2 OK OK 4 OK 5 OK Press the M ME EN NU U button t...

Page 66: ...TU UR RE E Select A Ad dv va an nc ce ed d C Co on nt tr ro ol l Select C Co ol lo ou ur r T Te em mp pe er ra at tu ur re e D Dy yn na am mi ic c C Co on nt tr ra as st t D Dy yn na am mi ic c C Co ol lo ou ur r N No oi is se e R Re ed du uc ct ti io on n G Ga am mm ma a B Bl la ac ck k L Le ev ve el l E Ey ye e C Ca ar re e F Fi il lm m M Mo od de e C Co ol lo ou ur r G Ga am mu ut t E Ed dg ge ...

Page 67: ...l picture quality for users As the detail item for video quality experts to adjust the video precisely using specific videos this may not be effective for general videos 1MENU 3 2 OK OK 4 OK 5 OK 6 Press the M ME EN NU U button to return to normal TV viewing Press the R RE ET TU UR RN N button to move to the previous menu screen F F Off G G Dynamic Contrast Noise Reduction Low Gamma Colour Gamut L...

Page 68: ...to o Realizing the black level of the screen and set it to High or Low automatically Set black level of the screen to proper level This function enables to select Low or High in the following mode AV NTSC M HDMI or Component Otherwise Black level is set to Auto This feature is not available for all models Adjust the brightness of the screen to prevent the screen from being too bright Dims extremel...

Page 69: ...distinctive even when you make the adjustments for the general video Adjusts Red Green Blue Yellow Cyan Magenta Red Green Blue Yellow Cyan Magenta Colour The adjustment range is 30 30 Red Green Blue Yellow Cyan Magenta Tint The adjustment range is 30 30 This feature is disable in RGB PC mode This feature is enabled in Picture Mode Expert1 2 This is the function to adjust the overall colour of the ...

Page 70: ...e Contrast 100 Brightness 50 Sharpness 70 Colour 70 Tint Advanced Control Picture Reset Screen PICTURE Picture Reset OK Move Contrast 100 Brightness 50 Sharpness 70 Colour 70 Tint Advanced Control Picture Reset Screen PICTURE E E Picture Reset 1MENU 3 2 OK OK R G Press the M ME EN NU U button to return to normal TV viewing Press the R RE ET TU UR RN N button to move to the previous menu screen R G...

Page 71: ...e Factory Reset OPTION E Power Indicator 1MENU 3 2 OK OK Press the M ME EN NU U button to return to normal TV viewing Press the R RE ET TU UR RN N button to move to the previous menu screen Select your desired Source 4 Standby Light On Close Power Light It helps you adjust the brightness of moving LED and sound when power is turned on S St ta an nd db by y L Li ig gh ht t Determines whether to set...

Page 72: ...utes in Demo Mode Select O OP PT TI IO ON N 1MENU 2 OK DEMO MODE Select D De em mo o M Mo od de e Press the M ME EN NU U button to return to normal TV viewing Press the R RE ET TU UR RN N button to move to the previous menu screen 3 OK Select O On n to show the various logo of TV Return to TV viewing If you want to stop the demo press any button except MUTE button 4 OK OK Move Input Label SIMPLINK...

Page 73: ...t home Select Home Use Selecting the environment Choose the setting mode you want Home Use Store Demo Select Home Use to use this TV at Home To use this TV at store select Store Demo Selecting the environment Choose the setting mode you want 4 Save OK We recommend setting the TV to H Ho om me e U Us se e mode for the best picture in your home environment S St to or re e D De em mo o mode is an opt...

Page 74: ...ments for each programme Select A AU UD DI IO O Select A Au ut to o V Vo ol lu um me e Select O On n or O Of ff f 1MENU 3 2 OK OK Press the M ME EN NU U button to return to normal TV viewing Press the R RE ET TU UR RN N button to move to the previous menu screen OK Move Auto Volume Off Clear Voice ll Off Level 0 Balance 0 Sound Mode Standard SRS TruSurround XT Off Treble 50 Bass 50 AUDIO E L R Aut...

Page 75: ...izes sound for watching sports events G Ga am me e Optimizes sound for playing games Select A AU UD DI IO O Select S So ou un nd d M Mo od de e Select S St ta an nd da ar rd d M Mu us si ic c C Ci in ne em ma a S Sp po or rt t or G Ga am me e You can also adjust S So ou un nd d M Mo od de e in the Q Q M Me en nu u 1MENU 3 2 OK OK Press the M ME EN NU U button to return to normal TV viewing Press t...

Page 76: ...atented SRS technology that solves the prob lem of playing 5 1 multicannel content over two speakers Select this option to sound realistic OK Move Auto Volume Off Clear Voice ll Off Level 0 Balance 0 Sound Mode Standard SRS TruSurround XT Off Treble 50 Bass 50 AUDIO E L R Treble 50 6 OK 4 OK Close E E E E Treble 50 Bass 50 SRS TruSurround XT Off Press the M ME EN NU U button to return to normal TV...

Page 77: ...r C Cl le ea ar r V Vo oi ic ce e I II I S SR RS S T Tr ru uS Su ur rr ro ou un nd d X XT T feature will not work Adjustment for Clear Voice Level With selecting On Select L Le ev ve el l Make appropriate adjustments 5 4 OK OK S Se el le ec ct t l le ev ve el ls s f fr ro om m 6 6 t to o 6 6 OK Move Auto Volume Off Clear Voice ll Off Level 0 Balance 0 Sound Mode Standard SRS TruSurround XT Off Tre...

Page 78: ...NU U button to return to normal TV viewing Press the R RE ET TU UR RN N button to move to the previous menu screen OK Move Auto Volume Off Clear Voice ll Off Level 0 Balance 0 Sound Mode Standard SRS TruSurround XT Off Treble 50 Bass 50 AUDIO E L R Balance 0 L R OK Move Auto Volume Off Clear Voice ll Off Level 0 Balance 0 Sound Mode Standard SRS TruSurround XT Off Treble 50 Bass 50 AUDIO E L R Bal...

Page 79: ...E EN NU U button to return to normal TV viewing Press the R RE ET TU UR RN N button to move to the previous menu screen OK Move Balance 0 Sound Mode Standard SRS TruSurround XT Off Treble 50 Bass 50 Reset Audio Out Monitor Out TV Speaker On AUDIO E L R TV Speaker Off NOTE G G When the TV speaker is turned off while the Simplink home theater is operating the sound output auto matically switches to ...

Page 80: ...ment V Va ar ri ia ab bl le e o ou ut t It sounds connected to AV eqiupment input including exterior amp Sound can be adjusted depending on the volume setup of the set Thus the level of the sound from the exterior equipment can be controled either by the exterior equipment or the volume setup of the set 1MENU 3 2 OK OK Press the M ME EN NU U button to return to normal TV viewing Press the R RE ET ...

Page 81: ...U button to return to normal TV viewing Press the R RE ET TU UR RN N button to move to the previous menu screen OK Move Balance 0 Sound Mode Standard SRS TruSurround XT Off Treble 50 Bass 50 Reset Audio Out Monitor Out TV Speaker On AUDIO E L R Reset OK Move Balance 0 Sound Mode Standard SRS TruSurround XT Off Treble 50 Bass 50 Reset Audio Out Monitor Out TV Speaker On AUDIO E L R Reset Resetting ...

Page 82: ...switch to DUAL I DUAL II or DUAL I II D DU UA AL L I I Sends the primary broadcast language to the loudspeakers D DU UA AL L I II I Sends the secondary broadcast language to the loudspeakers D DU UA AL L I I I II I Sends a separate language to each loudspeaker B Br ro oa ad dc ca as st t Mono Stereo Dual O On n S Sc cr re ee en n D Di is sp pl la ay y M MO ON NO O S ST TE ER RE EO O D DU UA AL L I...

Page 83: ...the TV is equipped with a receiver for NICAM reception high quality NICAM Near Instantaneous Companding Audio Multiplex digital sound can be received Sound output can be selected according to the type of broadcast received Speaker Sound Output Selection In AV Component RGB and HDMI mode you can select output sound for the left and right loud speakers Select the sound output L L R R Audio signal fr...

Page 84: ...In ns st ta al ll la at ti io on n S Se et tu up p by pressing R RE ET TU UR RN N or if you time out on the OSD On Screen Display the installation menu will continuously appear until the set up is completed whenever the TV is switched on Select your desired language Select O OP PT TI IO ON N Select M Me en nu u L La an ng gu ua ag ge e 3 Select your desired language 4 Save 1 2 1 OK MENU OK OK OK P...

Page 85: ...power failure or the TV is unplugged reset the clock Select T TI IM ME E Select C Cl lo oc ck k Select either the Hour or Minute option Set the Hour or Minute options 1MENU 3 4 2 OK OK Press the M ME EN NU U button to return to normal TV viewing Press the R RE ET TU UR RN N button to move to the previous menu screen OK Move Clock Off Time Off On Time Off Sleep Timer Off TIME Clock Hour F F 10 G G ...

Page 86: ...Pr ro og gr ra am mm me e or V Vo ol lu um me e 1MENU 3 2 OK OK 4 Press the M ME EN NU U button to return to normal TV viewing Press the R RE ET TU UR RN N button to move to the previous menu screen F F Off G G Hour 00 Minute Programme 1 Volume 30 Close 00 You do not have to remember to switch the TV off before you go to sleep The sleep timer automatically switches the TV to standby after the pres...

Page 87: ...e prices and many other topics The teletext decoder of this TV can support the SIMPLE TOP and FASTEXT systems SIMPLE standard teletext consists of a number of pages which are selected by directly entering the corresponding page number TOP and FAS TEXT are more modern methods allowing quick and easy selection of teletext information TOP TEXT The user guide displays four fields red green yellow and ...

Page 88: ...f the screen To hold or change the sub page press the RED GREEN P P or NUMBER buttons Press again to exit this function A A H Ho ol ld d Stops the automatic page change which will occur if a teletext page consists of 2 or more sub pages The num ber of sub pages and the sub page displayed is usually shown on the screen below the time When this button is pressed the stop symbol is displayed at the t...

Page 89: ...he power cord inserted correctly into the mains A Check your antenna direction and or location A Test the mains outlet by plugging another TV into the same outlet A This is normal the image is muted during the TV startup process Please contact your service centre if the picture has not appeared after five minutes A Adjust Colour in menu option A Allow a sufficient distance between the TV and the V...

Page 90: ...c ce e in menu option A A change in ambient humidity or temperature may result in an unusual noise when the TV is switched on or off and does not indicate a fault with the TV A Check HDMI cable over version 1 3 A Check USB cable over version 2 0 Picture OK No sound Unusual sound from inside the TV No sound when connecting HDMI or USB No output from one of the speakers This feature is not available...

Page 91: ...d a little fabric softener or dish washing detergent Wring the cloth until it is almost dry and then use it to wipe the screen Ensure there is no excess water on the screen Allow any water or dampness to evaporate before switching on Cleaning the Cabinet A To remove dirt or dust wipe the cabinet with a soft dry lint free cloth A Do not to use a wet cloth Extended Absence G If you expect to leave y...

Page 92: ...AM B G D K PAL I II NTSC M VHF NZ1 E21 UHF E21 E69 CATV S1 S20 HYPER S21 S47 75 Ω 0 40 C 32 104 F Less than 80 20 60 C 4 140 F Less than 85 Dimensions Width x Height x Depth Weight Power requirement with stand without stand with stand without stand MODELS PRODUCT SPECIFICATIONS 805 0 x 586 0 x 21 1 0 mm 31 7 x 23 0 x 8 3 inches 805 0x 531 0x 79 9mm 31 7 x 20 9 x 3 2 inches 12 1 kg 26 6 lbs 1 1 0 k...

Page 93: ...4 C5 C6 C7 D0 D1 D2 D3 D4 D5 D6 D7 D0 D1 D2 D3 D4 D5 D6 D7 Lead code Low custom code High custom code Data code Data code Repeat code Tf 4 5 ms 9 ms 2 25 ms 9 ms 0 55 ms 0 56 ms 1 12 ms 0 56 ms 2 24 ms Tf Tf Tf 108ms 455KHz Bit 0 Bit 1 1 How to Connect A Connect your wired remote control to the Remote Control port on the TV 2 Remote Control IR Codes A Output waveform Single pulse modulated with 37...

Page 94: ...UTTON POWER ON OFF R C BUTTON R C BUTTON R C BUTTON R C BUTTON R C BUTTON R C BUTTON R C BUTTON R C BUTTON R C BUTTON R C BUTTON R C BUTTON R C BUTTON R C BUTTON R C BUTTON R C BUTTON R C BUTTON R C BUTTON R C BUTTON R C BUTTON R C BUTTON R C BUTTON R C BUTTON R C BUTTON R C BUTTON R C BUTTON R C BUTTON R C BUTTON R C BUTTON R C BUTTON R C BUTTON R C BUTTON R C BUTTON R C BUTTON 08 0B 45 43 1E 07 ...

Page 95: ...ector D Sub 9 Pin Male No Pin Name 1 No connection 2 RXD Receive data 3 TXD Transmit data 4 DTR DTE side ready 5 GND 6 DSR DCE side ready 7 RTS Ready to send 8 CTS Clear to send 9 No Connection 1 5 6 9 RS 232C Configurations 7 Wire Configurations Standard RS 232C cable PC TV RXD 2 3 TXD TXD 3 2 RXD GND 5 5 GND DTR 4 6 DSR DSR 6 4 DTR RTS 7 8 CTS CTS 8 7 RTS D Sub 9 D Sub 9 3 Wire Configurations No...

Page 96: ...eal Data Mapping G p p 9 98 8 Set ID Press R RE ET TU UR RN N to move to the previous menu screen Select O OP PT TI IO ON N Select S Se et t I ID D Adjust S Se et t I ID D to choose the desired TV ID number The adjustment range of SET ID is 1 99 OK Move Input Label SIMPLINK On Key Lock Off Set ID 1 Power Indicator Demo Mode Off Mode Setting Home Use Factory Reset OPTION E Set ID 1 F F 1 G G Close ...

Page 97: ... command Set ID use the small character if set ID is 1 0 TV will send the 0 a Data use the small character if data is 0xab TV will send the a b NG use the large character C Co om mm ma an nd d1 1 C Co om mm ma an nd d2 2 S Se et t I ID D D Da at ta a C Cr r C Co om mm ma an nd d2 2 S Se et t I ID D O OK K D Da at ta a x x C Co om mm ma an nd d2 2 S Se et t I ID D N NG G D Da at ta a x x C CO OM MM...

Page 98: ...Data x 0 04 4 V Vo ollu um me e M Mu ut te e C Co om mm ma an nd d k k e e To control volume mute on off You can also adjust mute using the MUTE button on remote control Data 00 Volume mute on Volume off Data 01 Volume mute off Volume on Transmission k e Set ID Data Cr Acknowledgement e Set ID OK NG Data x 0 05 5 V Vo ollu um me e C Co on nt tr ro oll C Co om mm ma an nd d k k f f To adjust volume...

Page 99: ...n k u Set ID Data Cr Acknowledgement u Set ID OK NG Data x 1 15 5 A Ab bn no or rm ma all S St ta at te e C Co om mm ma an nd d k k z z To recognize an abnormal state Data FF Read Data 00 Normal Power on and signal exist Data 01 No signal Power on Data 02 Turn the TV off by remote control Data 03 Turn the TV off by sleep time function Data 04 Turn the TV off by RS 232C function Data 05 5V down Dat...

Page 100: ... F Step 15 10 Step 16 64 Step 100 6E Step 1 10 73 Step 1 15 74 Step 1 16 C7 Step 199 FE Step 254 FF Step 255 MSB LSB 0 0 0 0 0 0 0 0 External Input Data 0 0 0 1 Analog 0 0 1 0 AV 0 1 0 0 Component 0 1 1 0 RGB PC 1 0 0 1 HDMI External Input Input Number Acknowledgement b Set ID OK NG Data x 1 19 9 I In np pu ut t s se elle ec ct t C Co om mm ma an nd d x x b b M Ma aiin n P Piic ct tu ur re e I In ...

Page 101: ...a0 Data1 Data2 Cr Acknowledgement a Set ID OK Data0 Data1 x a Set ID NG Data0 x 7 Reserved 0 0 0 0 6 Reserved x x x x 5 Reserved 0 0 1 1 4 Reserved 0 1 0 1 RF Source ATV DTV Radio Reserved 3 Reserved x x 2 Reserved x x 1 Reserved x x 0 Data Main Sub 1 0 Main picture Sub picture C Ca ab bl le e 7 Reserved 1 1 1 1 6 Reserved x x x x 5 Reserved 0 0 1 1 4 Reserved 0 1 0 1 RF Source ATV DTV Radio Reser...

Page 102: ......

Reviews: