background image

ENGLISH

9

asseMblInG anD PRePaRInG

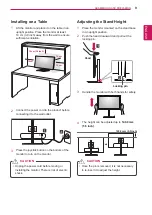
Installing on a Table

1  

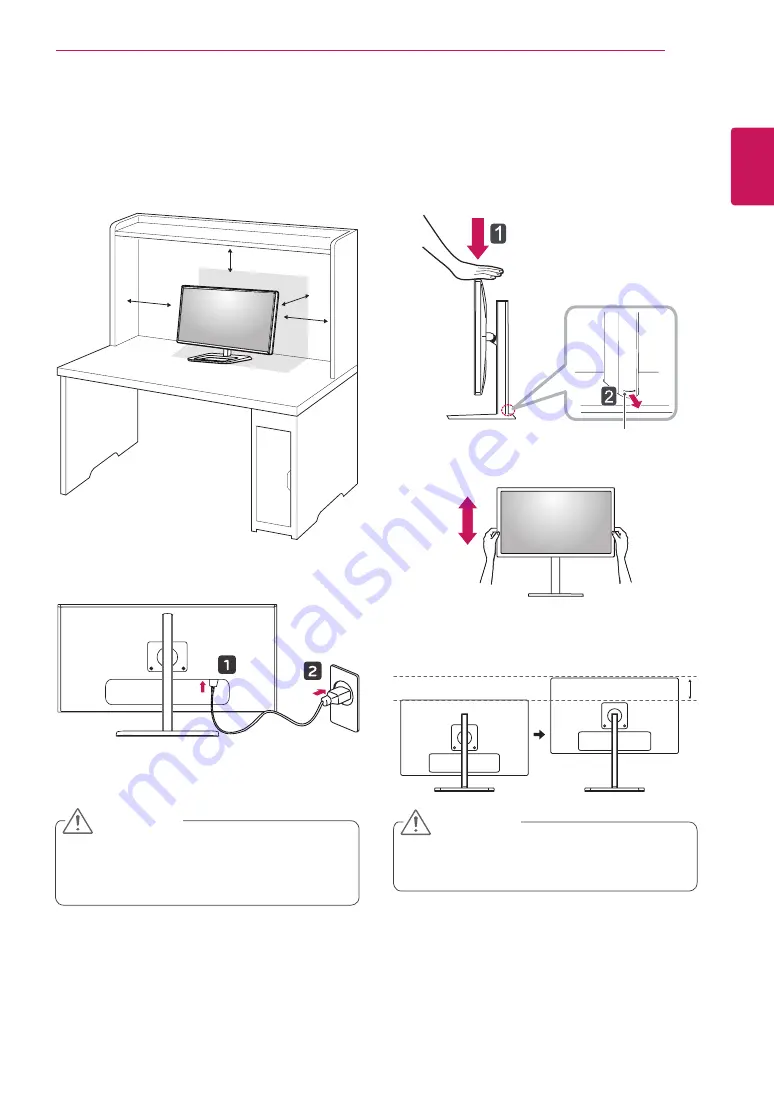
Lift the monitor and place it on the table in an 
upright position. Place the monitor at least  

10 cm (3.9 inch) away from the wall to ensure 

sufficient ventilation.

10 cm

10 cm (3.9 inch)

10 cm

10 cm

2  

Connect the power cord to the product before 
connecting it to the wall outlet.

3  

Press the joystick button on the bottom of the 
monitor to turn on the monitor.


y

Unplug the power cord before moving or 
installing the monitor. There is risk of electric 
shock.

CaUTIon

adjusting the stand Height

1  

Place the monitor mounted on the stand base 
in an upright position. 

2  

Push the head downward and pull out the 
locking pin.

Head

locking pin

3  

Handle the monitor with both hands for safety.

4  

The height can be adjusted up to 

140.0 mm 

(5.5 inch)

.

140.0 mm (5.5inch)


y

Once the pin is removed, it is not necessary 
to re-insert it to adjust the height. 

CaUTIon

Summary of Contents for 31mu97

Page 1: ...www lg com Owner s Manual IPSLEDMONITOR LEDMONITOR 31MU97 31MU97C 31MU97Z Please read the safety information carefully before using the product LG LED Monitors are LCD Monitors with LED Backlighting ...

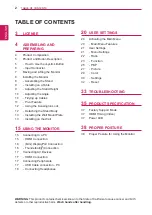
Page 2: ...MONITOR 15 Connecting to a PC 15 HDMI Connection 16 Mini DisplayPort Connection 16 Thunderbolt Connection 17 Connecting AV Devices 17 HDMI Connection 17 Connecting Peripherals 17 USB Cable connection PC 19 Connecting Headphones 20 USER SETTINGS 20 Activating the Main Menu 20 Main Menu Features 21 User Settings 21 Menu Settings 22 Ratio 23 Function 25 PBP 27 Picture 29 Color 30 Settings 32 Reset 33...

Page 3: ...go are trademarks or registered trademarks of HDMI Licensing LLC in the United States and other countries VESA VESA logo DisplayPort compliance logo and DisplayPort compliance logo for dual mode source devices are all registered trademarks of the Video Electronics Standards Association MaxxAudio and additional MAXX trademarks are trademarks and or registered trademarks of Waves Audio Ltd ...

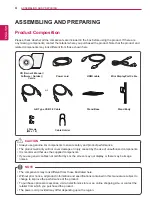
Page 4: ...nsure safety and product performance y y The product warranty will not cover damage or injury caused by the use of unauthorized components y y It is recommend that use the supplied components y y If you use generic cables not certified by LG the screen may not display or there may be image noises CAUTION y y The components may look different from those illustrated here y y Without prior notice all...

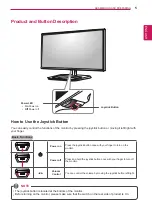
Page 5: ...ight with your finger Basic Functions Power on Press the joystick button once with your finger to turn on the monitor Power off Press and hold the joystick button once with your finger to turn off the monitor Volume Control You can control the volume by moving the joystick button left right y y The joystick button is located at the bottom of the monitor y y Before turning on the monitor please mak...

Page 6: ...PARING Input Connector AC IN USB IN 2 DP IN HDMI IN 1 H P USB UP USB IN 1 HDMI IN 2 mDP IN USB IN 3 5 V 1 1 A USB IN 2 DP IN HDMI IN 1 H P USB UP USB IN 1 HDMI IN 2 mDP IN USB IN 3 5 V 1 1 A AC IN 31MU97 31MU97C 31MU97Z Switch On ...

Page 7: ...the panel itself y y When holding the monitor the screen should face toward you to prevent it from being scratched y y When transporting the monitor do not expose the monitor to shock or excessive vibration y y When moving the monitor keep it upright and never turn the monitor on its side or tilt it side ways y y Avoid touching the monitor screen as much as possible This may result in damage to th...

Page 8: ...ening screws may cause damage to the monitor Damage caused in this way will not be cov ered by the product warranty y y Do not carry the monitor upside down by just holding the base This may cause the moni tor to fall off the stand and could result in personal injury y y When lifting or moving the monitor do not touch the monitor screen The force applied to the monitor screen may cause damage to i...

Page 9: ...stick button on the bottom of the monitor to turn on the monitor y y Unplug the power cord before moving or installing the monitor There is risk of electric shock CAUTION Adjusting the Stand Height 1 Place the monitor mounted on the stand base in an upright position 2 Push the head downward and pull out the locking pin Head Locking pin 3 Handle the monitor with both hands for safety 4 The height c...

Page 10: ...he screen The angle of the screen can be adjusted forward or back ward from 5 to 15 for a comfortable viewing experience 5 15 Front Rear Tidying up Cables Arrange the cables using the cable holder as shown in the illustration y y To avoid injury to the fingers when adjusting the screen do not hold the lower part of the monitor s frame as illustrated below 5 15 y y Be careful not to touch or press ...

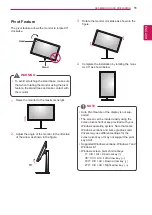
Page 11: ...ockwise as shown in the figure 4 Complete the installation by rotating the moni tor 90 as shown below y y Auto Pivot feature of the display is not sup ported y y The screen can be rotated easily using the screen pivot shortcut key provided with your Windows operating system Note that some Windows versions and some graphics card drivers may use different settings for the screen pivot key or may not...

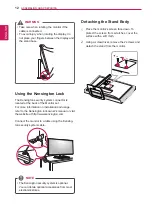
Page 12: ...ecurity system cable y y The Kensington security system is optional You can obtain optional accessories from most electronics stores NOTE Detaching the Stand Body 1 Place the monitor s screen face down To protect the screen from scratches cover the surface with a soft cloth 2 Using a screwdriver remove the 2 screws and detach the stand from the monitor y y Take care when rotating the monitor if th...

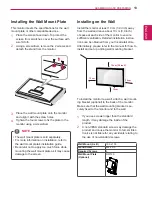
Page 13: ...Installing on the Wall Install the monitor at least 10 cm 3 9 inch away from the wall and leave about 10 cm 3 9 inch of space at each side of the monitor to ensure sufficient ventilation Detailed installation instruc tions can be obtained from your local retail store Alternatively please refer to the manual for how to install and set up a tilting wall mounting bracket 10 cm 3 9 inch 10 cm 10 cm 10...

Page 14: ...talling the monitor on the ceiling or on a slanted wall may result in the monitor falling off which could lead to injury Use an authorized LG wall mount and contact the local dealer or quali fied personnel y y Applying excessive force when tightening screws may cause damage to the monitor Dam age caused in this way will not be covered by the product warranty y y Use the wall mounting bracket and s...

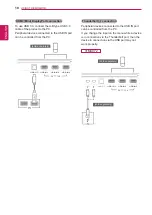
Page 15: ...ing to a PC y y This monitor supports the Plug and Play fea ture Plug and Play A feature that allows you to add a device to your computer without having to recon figure anything or install any manual drivers HDMI Connection Transmits digital video and audio signals from your PC to the monitor Connect your PC to the monitor using the HDMI cable as shown in the illustration below H P HDMI IN 1 HDMI ...

Page 16: ...esolution display or high performance data device to the monitor via a Thunderbolt port Connect your external device to the monitor using the Thunderbolt cable as illustrated below 31MU97Z DP OUT USB IN 2 USB UP USB IN 1 USB UP USB IN 3 USB IN 2 USB IN 1 USB IN 3 5 V 1 1 A 5 V 1 1 A DP OUT sold separately y y The maximum data transmission rate of each port is 20 Gb s y y Make sure to use a Thunder...

Page 17: ...a connec tion error may occur y y Recommended HDMI cable types High Speed HDMI TM Cable High Speed HDMI TM Cable with Ethernet NOTE Connecting Peripherals USB Cable connection PC The USB port on the product functions as a USB hub y y Make sure to install the most recent Windows OS service pack before using the product y y Peripheral devices are sold separately y y A keyboard mouse or USB device ca...

Page 18: ...rt may not work properly 31MU97Z sold separately DP OUT USB IN 2 USB UP USB IN 1 USB UP USB IN 3 DP IN USB IN 2 USB IN 1 USB IN 3 5 V 1 1 A 5 V 1 1 A mDP IN DP OUT sold separately HDMI Mini DisplayPort connection To use USB 3 0 connect the A B type USB 3 0 cable of the product to the PC Peripheral devices connected to the USB IN port can be controlled from the PC USB IN 2 USB UP USB IN 1 USB UP US...

Page 19: ... HDMI IN 2 sold separately y y Peripheral devices are sold separately y y If you use angled earphones it may cause a problem with connecting another external device to the monitor Therefore it is recom mended to use straight earphones Angled Straight y y Depending on the audio settings of the PC and external device headphones and speaker functions may be limited NOTE ...

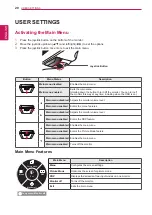
Page 20: ... the OSD is on Main menu disabled Adjusts the monitor volume level Main menu enabled Enters the menu features Main menu disabled Adjusts the monitor volume level Main menu enabled Enters the PBP feature Main menu disabled Enables the main menu Main menu enabled Enters the Picture Mode feature Main menu disabled Enables the main menu Main menu enabled Turns off the monitor Main Menu Features Long p...

Page 21: ...ightness Adjusts the color contrast and brightness of the screen Contrast Volume Adjusts the volume level y y You can adjust Mute Unmute by moving the joystick button to in the Volume menu NOTE Input Selects the input mode Ratio Adjusts the aspect ratio of the screen Function Adjusts MaxxAudio Picture Mode Dual Color Space and SUPER ENERGY SAVING PBP PBP Displays the screens of two input modes on ...

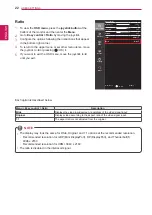
Page 22: ... Menu Easy control Ratio Description Wide Displays the video in widescreen regardless of the video signal input Original Displays video according to the aspect ratio of the video signal input 1 1 The aspect ratio is not adjusted from the original y y The display may look the same for Wide Original and 1 1 options at the recommended resolution Recommended resolution for mDP Mini DisplayPort DP Disp...

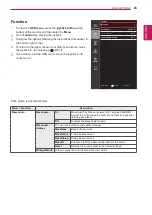
Page 23: ...Description MaxxAudio MaxxAudio On MaxxAudio by Waves recipient of a Technical GRAMMY Award is a suite of studio quality sound tools for a superior listening experience Off Disables the MaxxAudio function MaxxAudio Settings The user can set the sound quality manually MaxxBass Bass Enhancement MaxxTreble Treble Enhancement MaxxDialog Dialog Enhancement Maxx3D Enhances the three dimensional effect o...

Page 24: ...tion 1 Adjusts to the last calibrated screen Calibration 2 Adjusts to the previously calibrated screen Dual Color Space Off Disables the Dual Color Space function sRGB Sets the sRGB Picture Mode on the left of the screen AdobeRGB Sets the Adobe Picture Mode on the left of the screen DCI P3 Sim Sets the DCI P3 Sim Picture Mode on the left of the screen Calibration 1 Sets the Calibration 1 Picture M...

Page 25: ...ion PBP Displays the screens of two input modes on one monitor PBP Connection Sub Screen Right HDMI 1 HDMI 2 Mini DisplayPort Thunderbolt 31MU97Z model only Main Screen Left HDMI 1 O X X HDMI 2 O X X Mini DisplayPort O O X Thunderbolt 31MU97Z model only O O X Input Main Selects the video signal input of the main screen Sub Selects the video signal input of the sub screen Audio Changes the audio ou...

Page 26: ...deo signal input on the PBP screen Sub Wide Displays the video to fit the PBP screen regardless of the video signal input Original Displays the video in the aspect ratio of the video signal input on the PBP screen y y When the PBP mode is Off Input Audio Swap Sub Full and Ratio menus become disabled The Main Sub options for Ratio become disabled if there is no signal y y The optimal resolution for...

Page 27: ...ocus or unsharpened edges the resolution is not compromised even when the images are enlarged which guarantees a clear image NOTE y y Because this is a function to increase the sharpness of low resolution pictures it is not recommended to use the function for normal text or for desktop icons Doing so may result in unnecessarily high sharpness Sharpness Adjusts the sharpness of the screen Black Lev...

Page 28: ...s of the image Response Time Sets a response time for displayed pictures based on the speed of the screen For a normal environment it is recommended that you use Middle For a fast moving picture it is recommended that you use high Setting to High may cause image sticking High Sets the response time to High Middle Sets the response time to Middle Low Sets the response time to Low Off Does not use t...

Page 29: ...emp Manual Adjusts the color temperature in 500K increments Note that 9300K is supported instead of 9500K Custom The user can adjust it to red green or blue by customization Red You can customize the picture color using Red Green and Blue colors Green Blue Six Color Meets the user requirements for colors by adjusting the hue and saturation of the six colors red green blue cyan magenta and yellow a...

Page 30: ...er LED turns off Automatic Standby Feature that automatically turns off the monitor when there is no movement on the screen for a period of time You can set a timer for the auto off function OFF 4 hours 6 hours and 8 hours DisplayPort 1 2 Enables or disables DisplayPort 1 2 y y Be sure to configure this option according to the DisplayPort version supported by your graphics card Set this option to ...

Page 31: ...tings Menu Settings Description OSD Lock Prevents incorrect key input On Disables key input Off Enables key input y y All features are disabled except Brightness Volume Input OSD Lock in Settings and the Exit button NOTE ...

Page 32: ...tom right corner 4 To return to the upper menu or set other menu items move the joystick to or pressing OK it 5 If you want to exit the OSD menu move the joystick to until you exit Each option is described below Menu Reset Description Do you want to reset your settings Reset Restores the default settings Cancel Cancel the reset Reset Easy control Do you want to reset your settings Reset Function C...

Page 33: ... displayed Are some functions not avail able when you press the Menu button y y The OSD is locked Go to Menu Settings and set OSD Lock to Off The screen retains an image Does image sticking occur even when the monitor is turned off y y Displaying a still image for a prolonged time may cause damage to the screen resulting in the retention of the image y y To extend the lifetime of the monitor use a...

Page 34: ...er of your graphics card NOTE The display color is abnormal Does the display appear discol ored 16 colors y y Set the color to 24 bit true color or higher In Windows go to Con trol Panel Display Settings Color Quality Does the display color appear unstable or monochrome y y Check if the signal cable is connected properly Reconnect the cable or reinsert the PC s graphics card Are there spots on the...

Page 35: ... Power Rating AC 100 240 V 50 60 Hz 1 4 A Power Consumption Typical Operating Mode 49 W Typical USB excluded Audio Output 20 Outgoing condition Sleep Mode 1 2 W Off Mode Power Button 0 5 W Switch 0 W Stand Angle Forward Backward 5 to 15 Head Environmental Conditions Operating Conditions Temperature 0 C to 40 C 32 F to 104 F Humidity Less than 80 Storing Conditions Temperature 20 C to 60 C 4 F to 1...

Page 36: ...N Thunderbolt USB UP USB IN 1 2 3 Power Sources Power Rating AC 100 240 V 50 60 Hz 1 7 A Power Consumption Typical Operating Mode 73 W Typical USB excluded Audio Output 20 Outgoing condition Sleep Mode 1 2 W Off Mode Power Button 0 5 W Switch 0 W Stand Angle Forward Backward 5 to 15 Head Environmental Conditions Operating Conditions Temperature 0 C to 40 C 32 F to 104 F Humidity Less than 80 Stori...

Page 37: ... 67 5 60 2048 x 2160 133 32 60 Recommended resolution for PBP 2560 x 1440 88 79 59 95 Mini DIsplayPort Thunder bolt is not supported 3840 x 2160 133 32 60 HDMI is not supported 3840 x 2160 67 5 30 4096 x 2160 133 32 60 HDMI Thunderbolt is not supported Mac OS 4096 x 2160 54 24 Mini DIsplayPort Thunder bolt is not supported 4096 x 2160 111 10 50 HDMI is not supported HDMI Timing Video Preset Mode H...

Page 38: ...r approximately 10 minutes every hour to reduce any fatigue caused by prolonged usage y y Adjust the stand angle from 5 to 15 to obtain the best view of the screen You should be looking slightly down at the screen Place your hands gently on the keyboard keeping your arms bent at the elbows and extended horizontally in front of you Stand Angle 5 to 15 Adjust the position of the screen to mini mize ...

Page 39: ......
Page 40: ...l Serial No Declaration of Conformity Trade Name LG Model 31MU97 31MU97C 31MU97Z Responsible Party LG Electronics Inc Address 1000 Sylvan Ave Englewood Cliffs NJ 07632 U S A TEL 201 266 2534 ENERGY STAR is a set of power saving guidelines issued by the U S Environmental Protection Agency EPA Refer to ENERGY STAR gov for more information on the ENERGY STAR program As an ENERGY STAR Partner LGE U S ...

Reviews: